


0 of 0

About this mod
Asmodeus is a tool designed to simplify and enhance the experience of our dedicated translators, making game content more accessible to a much wider audience of players.
- Permissions and credits
I know most people aren't big fans of reading (myself included — I always hit download without reading anything xD), but I ask you to read this with care. I’ll be working on proper documentation soon, in multiple languages.
I go by the name Kaironn, and I'm a Brazilian developer who spends his free time doing some game translations. I started back in the Skyrim days and always enjoyed bringing games closer to our native language. Right now, I have over 120 translations on Nexus, plus a few more on Mods.io — most of them for Brazilian Portuguese.
Over time, maintaining these translations became a nightmare, especially with Baldur's Gate 3, which had no tools for managing translations. It made the whole process slow, repetitive, and full of inconsistencies.
So I started building tools to help myself — but they were made for coders, working directly with raw code. Eventually, I decided to turn those into something anyone could use, whether you can afford an API key from OpenAI or Google Translator, or not.
Check the source code on my github -> Asmodeus-BG3-Mod-Translator-Desktop
We currently have four translation methods planned, with two already implemented: OpenAI (ChatGPT), manual, DeepL, and Google Translator.
All of them follow the same initial process. First, the system checks if the text has already been translated between the selected source and target languages. If a translation already exists, it automatically replaces the line, saving processing time and avoiding unnecessary manual work during review.
Example: if you once translated “Fire” from English to Portuguese as “Fogo,” the next time the tool encounters “Fire” in English, it will automatically translate it as “Fogo.”
All translations are stored in a file called
located at
inside the Asmodeus folder. This file is created the first time you run the tool.
The data stored includes: source language, source text, target language, translated text, mod name, and a UID (unique identifier for that specific mod text).
Searches follow a priority order. The tool first looks for a translation using the UID. If not found, it checks for the text within the same mod name. If still not found, it checks if the text has ever been translated at all. If no translation is found, it moves to the next step — which depends on the translation method selected. I’ll list those methods below.
In this method, you can simply drag and drop a
If it's a
The model used is
So basically, the flow is: it checks if a translation exists in your database. If not, it sends the text to GPT for translation. At the end, it repacks the files.
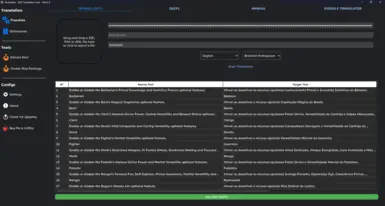
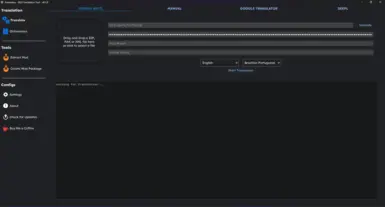
To use this method, just drag the mod file, select the source language and the target language, enter your OpenAI API key, and click “Start Translate.” You’ll see the progress in a box right below.
IMPORTANT!
Even though usage is extremely low, always keep an eye on your usage in the OpenAI dashboard — after all, it's your money.
In this method, you can simply drag and drop a
If it’s a
You can view the unpacked files inside the
The translation is powered by DeepL, which delivers high-quality results with fast response times.
To use it, just create an account at DeepL, copy your API Key from the page, and paste it into the app.
DeepL offers a free monthly limit of 500,000 characters, which is usually enough for many mods.
The translation flow works like this:
You’ll need to unpack the mod file yourself. After that, take the
As you edit the remaining lines, the app will save your translations to the database in real time. When you're done, just click “Export,” and a file picker will open so you can choose where to save the translated file.
All the texts in the dictionaries, generated by your translations, are reused in any file you translate. If you edit any of them, the next translations you make will automatically apply those corrections.
I haven’t added a mechanism to update the dictionary yet. So, if you translate a new mod and want to see everything, you’ll need to close and reopen the app xD. But I promise I’ll add dynamic updating functionality soon.
You can import dictionaries using .csv and .xlsx files. Just use the templates I have provided in the optional files. For the import to work, the file must have 6 columns, namely: source_language, target_language, source_text, target_text, mod_name and uid.
It is not necessary to fill in the uid in all lines. However, if the uid is the same, it will simply replace the previous line.
You can also export dictionaries. Clicking on export opens Windows Explorer so you can choose the export location and extension. The extension can be .csv or .xlsx.
You can also reuse your previous translations. To do this, simply download the original mod and its translation. Unzip both and get the .xml files. In the create dictionary tab, drag and drop, choose the source and target languages and the name of the mod. Then just click create. This way, the program will merge the lines that contain the same uid. Lines that have a null value will not be imported.
Translation with Google Translator: You'll be able to use these APIs for automatic translation. Delete Dictionaries: You can delete any dictionary you no longer need. Visual Settings (Themes, etc.): You’ll have options to change visual settings, including themes. Language Selection for the Tool: Currently, the app is in English, as it’s the most commonly understood language. However, I’ll be translating the tool into all the languages available in our application. Edit
: You will be able to manually edit the Original Game Translations as Dictionaries: I’m working on a way to efficiently add the original game translations as dictionaries, helping us get closer to a native experience. However, with around 220k lines per language, I’ll need to figure out the most efficient approach.
There’s probably more I planned and forgot haha — but I’ll keep updating everything soon!
The application is entirely built in Python.
Because of that, some users might face issues running it directly from the executable. For Windows 11 users, it should work fine without any problems.
However, if you’re using a different OS or run into any trouble, feel free to message me — I’ll guide you on how to run the application directly from the source code. I’ll also prepare a tutorial soon to make this process easier for everyone interested.
The interface is built using PySide6 (Qt).
The application is still in a very early alpha stage, so expect some bugs and unhandled exceptions. Just let me know about any issues, and I’ll work on fixing and improving things.
I have a full-time job, so I don’t have much free time to release constant updates — but I’ll always try to bring in new features and fixes whenever I can.
Your suggestions are very welcome!
And once again, just a reminder: this is still an early alpha version — far from the first stable release — so go easy on me haha.
That’s all for now!
If you have any questions or suggestions, just let me know.

Enjoying my work and want to support it?
Help keep my coffee fuel going through Ko-fi: https://ko-fi.com/kaironn2
Any amount is welcome, as long as it doesn’t hurt your wallet :)
Se você é brasileiro, pode me apoiar diretamente pelo meu pix -> [email protected]
Todo incentivo é bem-vindo, desde que não faça-lhe falta.
You can also export dictionaries. Clicking on export opens Windows Explorer so you can choose the export location and extension. The extension can be .csv or .xlsx.
ABOUT ME
I go by the name Kaironn, and I'm a Brazilian developer who spends his free time doing some game translations. I started back in the Skyrim days and always enjoyed bringing games closer to our native language. Right now, I have over 120 translations on Nexus, plus a few more on Mods.io — most of them for Brazilian Portuguese.
TOOL'S OBJECTIVE
Over time, maintaining these translations became a nightmare, especially with Baldur's Gate 3, which had no tools for managing translations. It made the whole process slow, repetitive, and full of inconsistencies.
So I started building tools to help myself — but they were made for coders, working directly with raw code. Eventually, I decided to turn those into something anyone could use, whether you can afford an API key from OpenAI or Google Translator, or not.
Check the source code on my github -> Asmodeus-BG3-Mod-Translator-Desktop
HOW DOES IT WORKS?
We currently have four translation methods planned, with two already implemented: OpenAI (ChatGPT), manual, DeepL, and Google Translator.
All of them follow the same initial process. First, the system checks if the text has already been translated between the selected source and target languages. If a translation already exists, it automatically replaces the line, saving processing time and avoiding unnecessary manual work during review.
Example: if you once translated “Fire” from English to Portuguese as “Fogo,” the next time the tool encounters “Fire” in English, it will automatically translate it as “Fogo.”
All translations are stored in a file called
dictionary.dblocated at
data/db/ inside the Asmodeus folder. This file is created the first time you run the tool.
The data stored includes: source language, source text, target language, translated text, mod name, and a UID (unique identifier for that specific mod text).
Searches follow a priority order. The tool first looks for a translation using the UID. If not found, it checks for the text within the same mod name. If still not found, it checks if the text has ever been translated at all. If no translation is found, it moves to the next step — which depends on the translation method selected. I’ll list those methods below.
TRANSLATION METHODS
OpenAI (ChatGPT) Translation
In this method, you can simply drag and drop a
.pak, .zip, or .xml file to start the translation.If it's a
.zip, the tool will automatically extract it and then unpack the .pak inside. If it's a .pak, it will just unpack that. You can view the unpacked files inside the Asmodeus folder, under the mods directory. Inside it, the program will create three more folders:/Unpacked/: contains the unpacked files needed for translation./Translated/: contains the files after translation./Packed/: contains the final, repacked mod file.
The model used is
gpt-4o-mini, which offered the best cost-benefit ratio in my tests.So basically, the flow is: it checks if a translation exists in your database. If not, it sends the text to GPT for translation. At the end, it repacks the files.
To use this method, just drag the mod file, select the source language and the target language, enter your OpenAI API key, and click “Start Translate.” You’ll see the progress in a box right below.
IMPORTANT!
Even though usage is extremely low, always keep an eye on your usage in the OpenAI dashboard — after all, it's your money.
DeepL API
In this method, you can simply drag and drop a
.pak, .zip, or .xml file to start the translation.If it’s a
.zip, the tool will automatically extract it and then unpack the .pak inside. If it’s a .pak, it will just unpack that.You can view the unpacked files inside the
Asmodeus folder, under the mods directory. Inside it, the program will create three more folders:/Unpacked/: contains the unpacked files needed for translation./Translated/: contains the files after translation./Packed/: contains the final, repacked mod file.
The translation is powered by DeepL, which delivers high-quality results with fast response times.
To use it, just create an account at DeepL, copy your API Key from the page, and paste it into the app.
DeepL offers a free monthly limit of 500,000 characters, which is usually enough for many mods.
The translation flow works like this:
- It checks if a translation already exists in your local database.
- If not, it sends the content to DeepL for translation.
- At the end, it repacks the files.
- Drag and drop the mod file.
- Select the source language and the target language.
- Enter your DeepL API Key.
- Click “Start Translate.”
MANUAL TRANSLATION
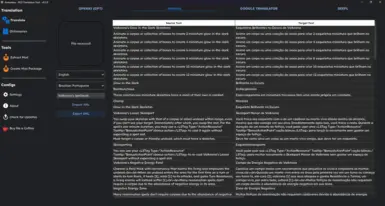
In this method, you can manually translate and edit the translations.You’ll need to unpack the mod file yourself. After that, take the
.xml file containing the text you want to translate and drag it into the application. Select the source and target languages, and fill in the mod name. When you click “Import XML,” the app will load the file, check which lines have already been translated by you, and auto-fill those lines.As you edit the remaining lines, the app will save your translations to the database in real time. When you're done, just click “Export,” and a file picker will open so you can choose where to save the translated file.
DICTIONARIES
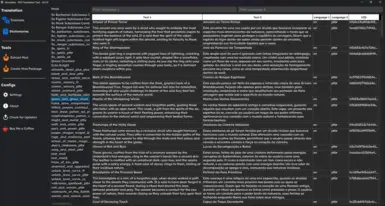
In the Dictionaries tab, you can view all the mods you’ve already translated. It will list them by mod name. Clicking on the mod name will load it in a table format so you can edit the translations. There are also two filters to help you search for specific texts.All the texts in the dictionaries, generated by your translations, are reused in any file you translate. If you edit any of them, the next translations you make will automatically apply those corrections.
I haven’t added a mechanism to update the dictionary yet. So, if you translate a new mod and want to see everything, you’ll need to close and reopen the app xD. But I promise I’ll add dynamic updating functionality soon.
You can import dictionaries using .csv and .xlsx files. Just use the templates I have provided in the optional files. For the import to work, the file must have 6 columns, namely: source_language, target_language, source_text, target_text, mod_name and uid.
It is not necessary to fill in the uid in all lines. However, if the uid is the same, it will simply replace the previous line.
You can also export dictionaries. Clicking on export opens Windows Explorer so you can choose the export location and extension. The extension can be .csv or .xlsx.
You can also reuse your previous translations. To do this, simply download the original mod and its translation. Unzip both and get the .xml files. In the create dictionary tab, drag and drop, choose the source and target languages and the name of the mod. Then just click create. This way, the program will merge the lines that contain the same uid. Lines that have a null value will not be imported.
FEATURES PLANNED
meta.lsx: You will be able to manually edit the
meta.lsx file within the tool.There’s probably more I planned and forgot haha — but I’ll keep updating everything soon!
CREDITS
Once again, my thanks go to the amazing norbyte for his incredible work!
Please check out his other projects on his GitHub.
Once again, my thanks go to the amazing norbyte for his incredible work!
Please check out his other projects on his GitHub.
PROJECT DETAILS
The application is entirely built in Python.
Because of that, some users might face issues running it directly from the executable. For Windows 11 users, it should work fine without any problems.
However, if you’re using a different OS or run into any trouble, feel free to message me — I’ll guide you on how to run the application directly from the source code. I’ll also prepare a tutorial soon to make this process easier for everyone interested.
The interface is built using PySide6 (Qt).
The application is still in a very early alpha stage, so expect some bugs and unhandled exceptions. Just let me know about any issues, and I’ll work on fixing and improving things.
I have a full-time job, so I don’t have much free time to release constant updates — but I’ll always try to bring in new features and fixes whenever I can.
Your suggestions are very welcome!
And once again, just a reminder: this is still an early alpha version — far from the first stable release — so go easy on me haha.
That’s all for now!
If you have any questions or suggestions, just let me know.
Enjoying my work and want to support it?
Help keep my coffee fuel going through Ko-fi: https://ko-fi.com/kaironn2
Any amount is welcome, as long as it doesn’t hurt your wallet :)
Se você é brasileiro, pode me apoiar diretamente pelo meu pix -> [email protected]
Todo incentivo é bem-vindo, desde que não faça-lhe falta.
You can also export dictionaries. Clicking on export opens Windows Explorer so you can choose the export location and extension. The extension can be .csv or .xlsx.