As I’m sure you’ll all remember, we hosted our first Screen Archery Competition back in October for Halloween. Among the first-place prizes was an interview with the winners of each category, giving them the opportunity to discuss their creative process and share any wisdom, tips, or tricks.
We know this has been a bit of a wait, but with the end of the year being such a busy time for everyone, we’re thrilled to finally share these interviews with you.
Everyone received the same set of questions, allowing each winner to offer their unique perspective. They were free to answer as many or as few as they liked and include any images they thought would be relevant to their answers, or just ones they’re proud of and wanted to showcase. So, without further ado, here they are!
PinkyDude
Could you talk us through your inspiration for your winning shot? I know we gave the prompts, but was there anything that sparked the idea for you outside of this?
Hey! Thanks for having me! I'm still surprised and super grateful that my shots were picked for this first competition.
Taking thematic shots in Cyberpunk 2077 is something I've been doing since its release, especially during the Halloween period!
Each year, I come up with a specific idea; I then challenge myself with personal modding and photography goals.
The first shot, which I've titled "Pumpking Carving duty", was directly inspired by my friend Lokiina's "Seasonal Halloween Props" mod. It features the Aldecaldos, notably Mitch and Panam, enjoying the Halloween preparation with some of the clan's kids. There's also my friend, and fellow modder, Halkuonn's character- and my V, of course!
The second shot, titled "Sledgehammer", is part of my yearly Halloween personal challenge I mentioned earlier :)
This year's inspiration was "Slasher Movie" - While thinking of a weapon for my serial killer, Halkuonn mentioned our previous collab that includes a ported Sledgehammer prop. This got my mind racing, instantly thinking of Peter Gabriel's Sledgehammer song, now having my final "setting" for my Halloween set; a Serial Killer who falls in love with one of his to-be-victim, bludgeoning his friend group to death to keep him all for himself!
And like each year, I always try to create a fake movie poster, it's a fun exercise!
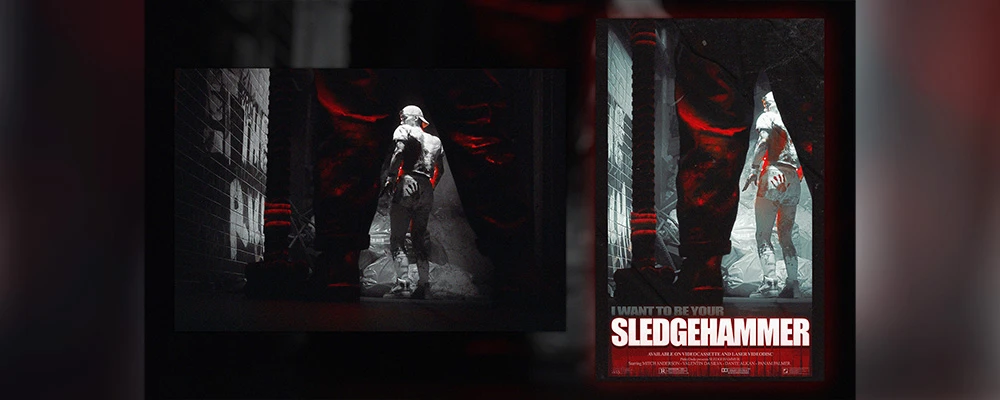
Submitted image and stylised film poster version
Can you walk us through the process of setting up your scene? What steps did you take to get the perfect shot? How did you decide on the composition, lighting, and angles for your entry?
As someone with aphantasia (unable to visualize anything in my mind) I usually do not "plan" anything before actually being in game and SEEING the environment and characters. A lot of pictures kind of happen "by accident" - getting lost and discovering a cool spot, which gives me an idea for a shot, then accidentally moving the mouse before locking the camera in place, which in turn creates a cool angle/composition, etc..
For my "Pumpking" picture, I knew I wanted to showcase my friend's mod through a casual, slice-of-life setting (I love capturing moments of everyday life!). I looked around the Aldecaldos camp for a cool spot; near one of the campfires would be ideal as it provides an already existing source of warm light.
After changing the time of day to mid-evening, I started to spawn my characters. Halloween has always been a "children's holiday" to me, it's not a holiday I celebrate anymore as an adult; kids automatically come to mind when setting a joyful Halloween pic! Placing the group in a circle was easier to capture, on top of creating a cozy vibe, so the "composition" came pretty naturally.
The campfire's light ended up not being satisfying on its own, I decided to spawn more area lights to highlight the characters, make them pop from the background; Orange and Purple are good Halloween colors without looking too out of place in this setting. Orange from the different campfires around camp, Purple from the setting night and reflective moon!
After trying multiple angles, I decided to keep the camera hovering, diving into the scene, as if the viewer was looking at the group while walking by.
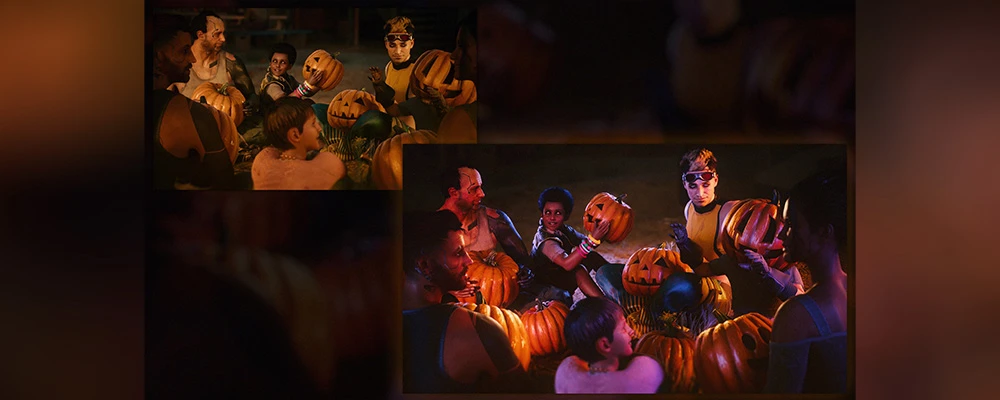
Origianl vs. edited through post-processing images
Which mods (if any) were essential to achieving your visions, and how did they enhance the final result?
Ever since I've started to take shots in Cyberpunk 2077, one mod has been essential; the Appearance Menu Mod / "AMM" mod!
I actually never use the in-game photo mode (I know, I know) and all of my shots are taken in the game itself; AMM allows me to spawn as many characters as I want, change their facial expressions and where they look, change their poses and how they interact with one another. It also allows me to spawn props, to control the weather and time of day. It's an amazing, universal tool that inspired me in both my modding and VP journey!
Did you use any post-processing tools, like Photoshop, to enhance your final image? If so, what adjustments or effects did you apply?
ReShade is my primary "editing" tool, I got a couple of shaders that affect the colors and tone directly in game.
I recently started using an open-source software called RawTherapee for my post-processing. It's similar to Lightroom but totally free! :)
My go-to edit is tweaking the "Contrast by level" - I lower the contrast on everything that isn't detailed while upping the contrast on the finer details. I think that's what really sells this "3D render" look!
I also tweak the overall color and tone, applying either a warm or cold filter depending on the shot's setting to harmonize everything.
As a finishing touch, I drop my pictures in Photoshop to add some noise and my watermark :D
Cephalopodae
Could you talk us through your inspiration for your winning shot? I know we gave the prompts, but was there anything that sparked the idea for you outside of this?
No matter what, I am always trying to do something different. 'Film' is a fairly narrow prompt. I knew there was a good chance of treading the same water as others, so I wrote a list of the most iconic horror/thriller film imagery I could think of and set those aside as backup ideas. If it's my first idea, chances are another person is also coming up with those concepts, too. I always want to dig deeper and get past (what feels to me like) the obvious ideas and bring a different perspective to the table.
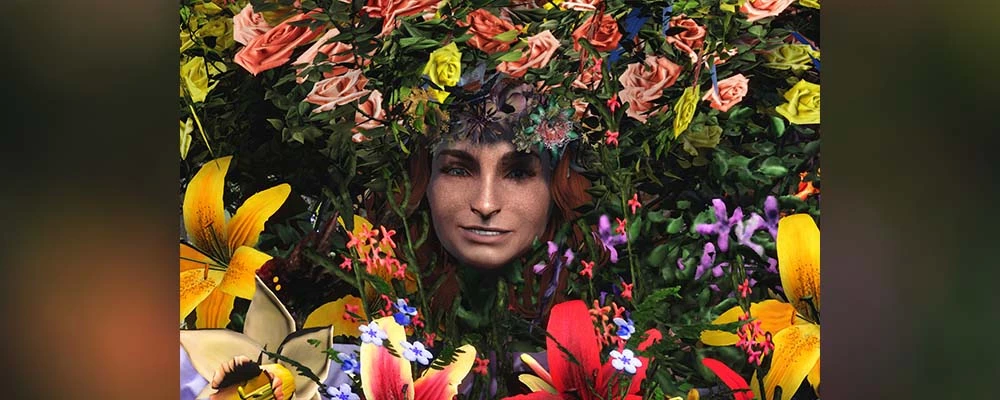
The Midsommar idea spoke to me for a few reasons. When we think of horror, we tend to think of stark lighting and cool colour palettes, not warmth. Midsommar dared to introduce the inciting incident with dreary visual language we might anticipate of a horror film, then it subverted what the audience expects to see with broad daylight and blue skies. I love the idea of something horrible going on in an open clearing.
There's also this rage and loss in Florence Pugh's character that I think a lot of people can relate to. On one hand she's the worst travel buddy, on the other, there's a raw honesty in having The Literal Worst Time of Your Life while on vacation. At all times, the film is challenging you to dislike her and sympathize with her. If you disliked her to start, did you say "Good for her, actually" by the end? If you sympathized with her plight in the beginning, did you leave the movie haunted by the outcome? Everything about that film was so refreshing.
Can you walk us through the process of setting up your scene? What steps did you take to get the perfect shot?
Ansel Adams used to say that in creating an image, one needs to pre-visualize and see the image with their mind's eye. In 2024, this sounds intuitive to the point of, "Yes, and?" I mean, imagine being told you need to think about planning a shot in an internet where kids have grown up on Instagram and TikTok.
Back in the day, no one philosophized the photographic process from camera and optics to washing the film in the darkroom quite like Ansel did. Plan the image; sounds simple. But it means more than that; it's less about how to create the perfect image and more about getting really good at troubleshooting.
Ansel looked at the Tetons and Snake River and thought of what his tools were able to accomplish versus where he would have to compensate to finish the image in post-processing. He metered his photos not to capture the perfect moment in time, but to finish the job later on in order to get closer to the grand vision. He planned to avoid blown-out whites and black shadows on the film negative and would emphasize those details by hand in the darkroom. Through time and experience, he knew where the camera and negative's abilities ended and where the darkroom work could begin.
In my case, I looked at Fallout 4 and my tools, aware I wanted to make a May Queen costume. I figured out issues that might pop up ahead of time (Which mod am I getting flowers from? How am I going to make sure the costume fits my character?) and solved them in the early planning stages, which made bringing the costume and image together much easier. It's basically just good project management!
Since I had to construct a set, I placed a vanilla mannequin on the ground, then laid out all of the flowers and their matswaps in little groups nearby so I could see everything I had at my disposal. This keeps me out of the Workshop later on, since I can always duplicate something with console quicker than I can find it in the Workshop menu. After that, I turned off object collision, opened my reference image on my second monitor, then started layering flowers around the mannequin. I was very concerned with achieving density and a wide palette of colours. I can't get the image 100% accurate to the film still, but I can retain the spirit of the thing through approximation.
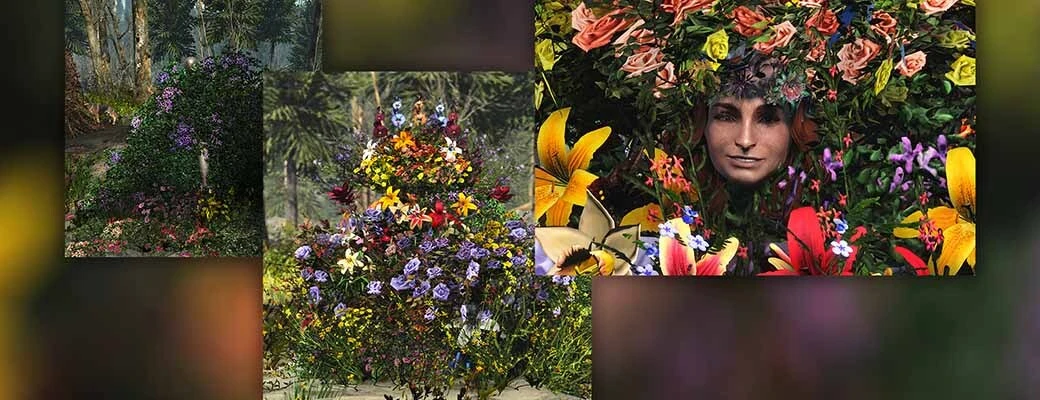
Mannequin + beginning of adding flowers, Mannequin + beginning of adding flowers, Finished May Queen costume and character positioning
Which mods (if any) were essential to achieving your visions, and how did they enhance the final result?
Screen Archer Menu, Photo Mode, Creative Gardens. The same work would have been possible without SAM and PM, but SAM has a lot of functionality that makes what I do faster and easier. For example, console commands for moving objects and changing their scale is in an easy-to-use GUI, which saves me the headache of manually typing commands. It also has objects near the player in a list, which made it way easier to select things if I had to go back and fix placement. It can also force weather and time, but I still type out fw 15e and set game hour to 9 out of force of habit.
I really owe what I do to Maxie, whose continued development of SAM for Fallout 4 is one of the reasons I am still playing.
What people don't see are untold hours spent learning how to run the game well, or the time I spent replacing textures and generating LOD. The work accomplished by the team behind The Midnight Ride taught me a lot about a well-running engine. 4estGimp's SavrenX BA2s as well as their High Def Texture Packer aren't pictured here, but I couldn't play the game without them.
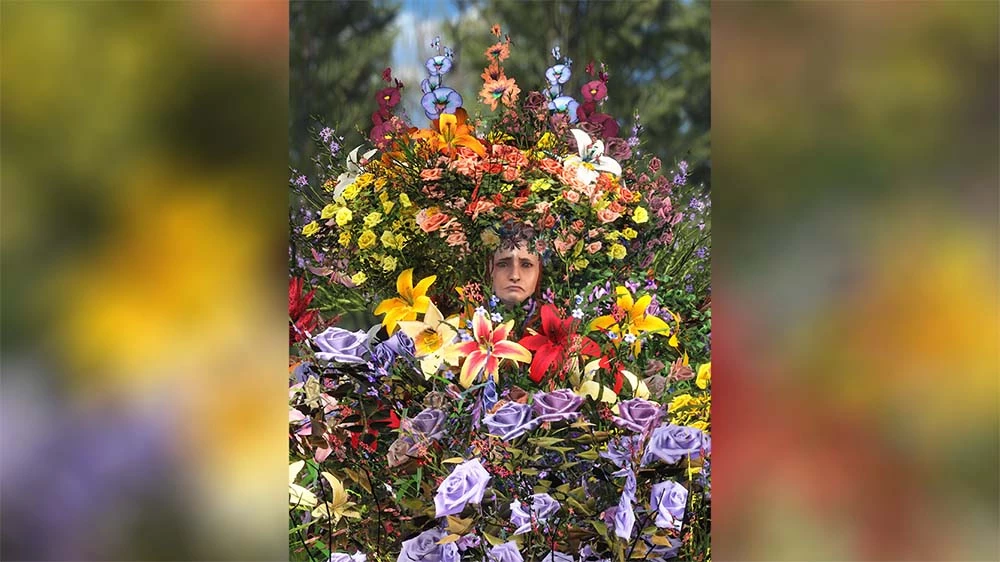
Midsommar
Were there any specific challenges or unexpected surprises while working on your entry? If so, how did you tackle them?
Layering the flowers and trying to achieve a similar density as the flower costume in Midsommar was the big challenge, but if there's anything I wish I could go back and change, it's the lighting. I'm kicking myself over it because it's part of why I loved the original image!
Normally, I set up key and fill lighting, but my subject's face was difficult to light well among the flower structures - whites on flower petals would get overblown if lights are too close, and the small plant meshes in Fallout 4 cast hard shadows. You're not getting fine god rays through a rose bush in this game. I didn't really nail the early morning sun feeling the movie has during this scene; it's much more cool than I would have wanted it to be. I should have fixed that in post by mimicking that lighting with a yellow fill layer set on lower opacity, but it's a lesson for next time.
Do you have a particular workflow or routine when creating your screen archery?
The demands of each image are different. I treat screen archery like I would any camera; if screen archery in a game like Cyberpunk is like a sleek Leica rangefinder, then screen archery in Fallout 4 is like a medium-format Mamiya. It's a little janky, it's a little bit weird, you have all these limitations while the thing seems intent to fall apart at any moment. But behind the limitations are a world of possibility.
I'm often inspired by a real world image, movie poster or song lyrics. Sometimes I see a prompt for events like Yeehawgust or Falloutober and the idea is instant. Sometimes I get the shot in one image, sometimes I take 40 images in-game just to get one.
Some of my images are very simple candid portraits that are nothing more than me pausing the game and bringing up Photo Mode because I notice the way light and shadow interact with an object or character. Most of my images with posed characters are based off of existing poses, then hand-tweaked. I'm very concerned with capturing good lighting and composition.
Some photos have elaborate set designs, or I have to mess with the worldspace in Creation Kit. I don't know how many modders got their start by using the game editor to achieve a screenshot, but that's how I got mine.
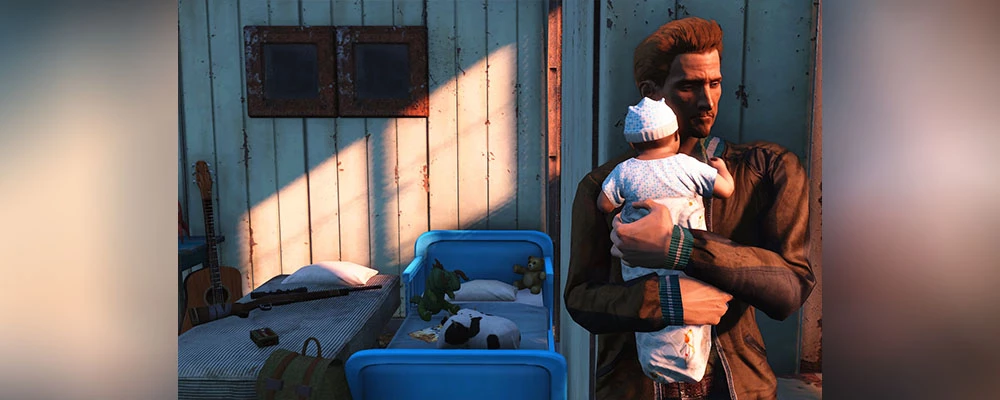
Fiddler's Green
Some of my fave images that encompass both set design and posing are 'Lore Accurate Beatles Fallout Four' where I created a set out of a street near Boston Common to emulate the Abbey Road album cover. 'Christina's World' emulated the Andrew Wyeth painting of the same name. 'Fiddler's Green' told the story of a protective, scared single dad via the set and posing MacCready to hold a spawned-in baby Shaun. 'Me and my Dog' had one of my characters looking out over Boston from the Bunker Hill windowsill during dawn. 'My Hometown' is a posed shot that plays like a candid. 'Poolside' and 'You Can't Sit With Us' were inspired by the movie poster for the film Somewhere. 'Akira x Fallout 4' was inspired by one of the posters for Akira. 'Rocky Mountain High' involved editing worldspace in CK, and was a five-image composite that's 1920×4000 pixels. I had to screenshot the file in order to upload to Nexus, because the file was too big!
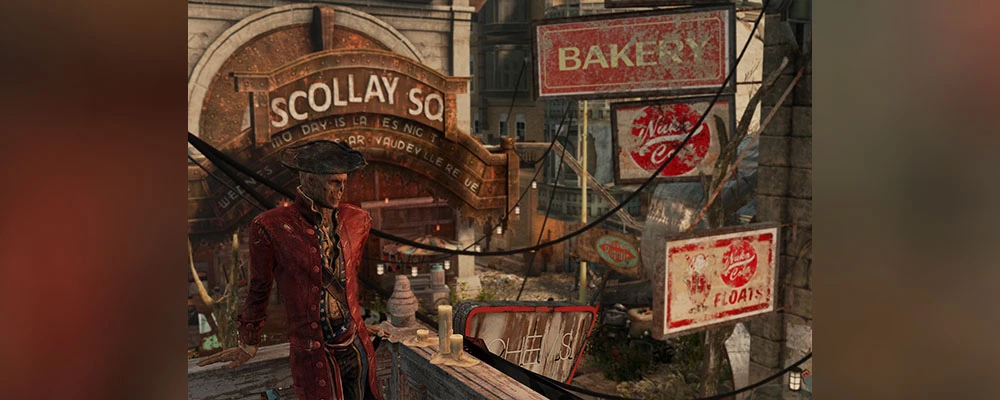
My Hometown
I'm always trying to push myself to try something different, to go bigger and better; to learn something new; to tell better stories. I am normally critiquing finished pieces quickly after completion. If I can't find something to learn from a finished project, then I've done something wrong.
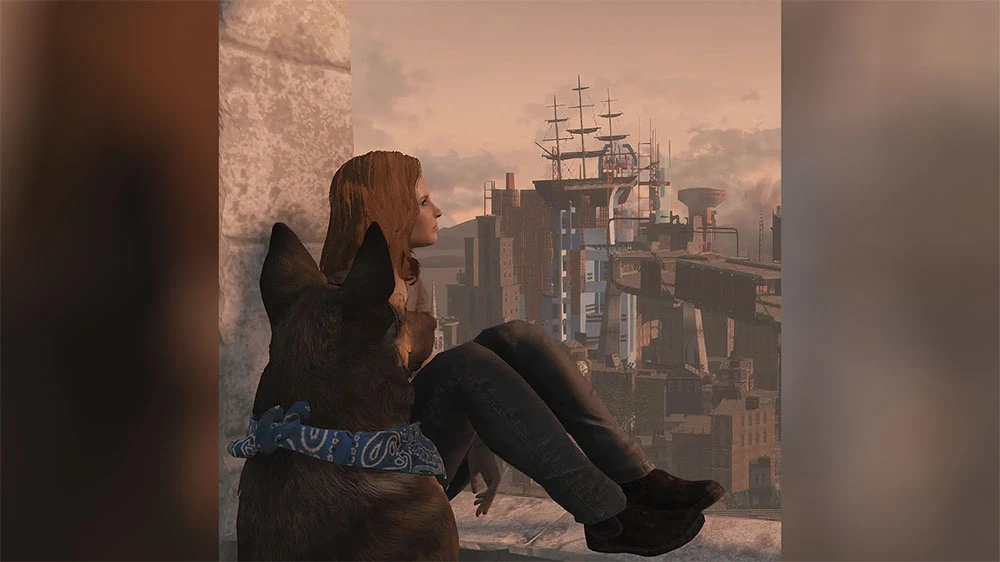
Me and my Dog
Is there a detail in your winning shot that you’re particularly proud of or that you think people might miss?
There is a very small mod cameo. Furbling is an acquaintance; we've been part of the same Fallout 4 circles for a few years. My model is wearing their Big Dumb Flower Crown as the "base" of the flower helmet.
Did you use any post-processing tools, like Photoshop, to enhance your final image? If so, what adjustments or effects did you apply?
My routine is normally the same no matter what post-processing program I am using, whether it's Photoshop, Gimp, Snapseed or Clip Studio.
I duplicate the base image once or twice, then use adjustment layers. Almost every image has a few correction/adjustment layers. I start with correcting white balance and levels, brightness and contrast and hue/saturation/luminosity. When I'm happy with those values, I add a sharpening adjustment to one of the duplicated base images, then erase away at what I don't want sharpened. If I need a Gaussian blur, I manipulate that on the second duplicated image. Before I export the image, I normally turn down the opacity on some of the adjustment layers. This leaves me with a very naturalistic image that never comes across as overdone.
RawTherapee deserves a shoutout as a free/open source alternative to Lightroom. It's not necessary for most photos, but it's useful because it's built to handle images in a non-destructive manner and allows you to mess with lighting in ways you just can't in other jack-of-all-trades editing programs. It's also great for delicate situations where I have less editing latitude, such as images with lights and shadows that could get blown out easily with regular editing.
How do you balance in-game visuals and post-processing to maintain the essence of your shot while adding that extra polish?
Back in the day, photographers threw up their hands at digital post-processing and insisted it would be the end of 'legitimate' photography. Of course, it wasn't. Post-processing is a tool like anything else in a photographer's kit.
I grew up in the middle of that technology transition from film to digital, so my approach is to get as much right as possible in the initial image, then post-processing is relegated to a crop and adjustment layers. I never add in elements that I wasn't able to capture in-game. If I forgot something, I go back and repo camera and do it over again.
One exception is fixing clipping I can't otherwise fix in-game, such as hair or fabric. I often fix that with a clone stamp tool, or I add another layer and patch in a second image with a non-clipping version of the element I need to fix. My base image for 'Christina's World' involved a complex fix where the dress clipped through her thigh, but you couldn't tell I had that issue in the image I uploaded to Nexus.
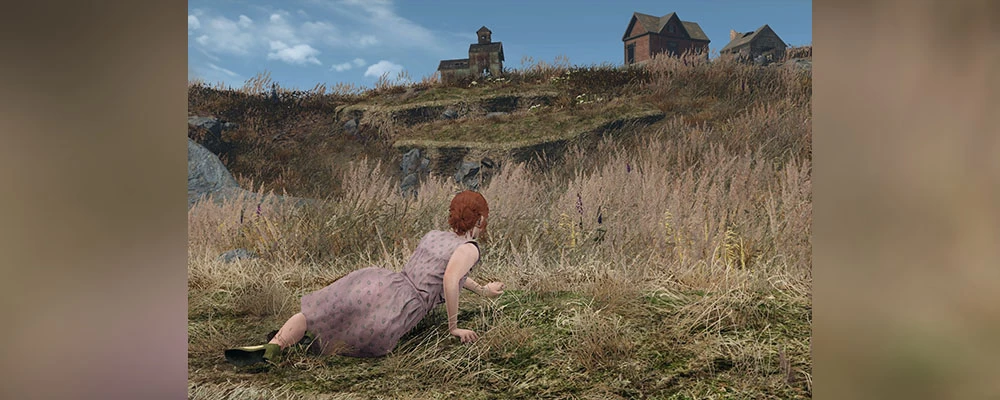
Christina's World
Is there a particular post-processing technique you’re especially proud of or that you feel made a big difference in your entry?
The success of this image isn't in any post-processing - this image is all silhouette, composition and set design.
I think post-processing can help create great images (going back to Ansel Adams: Compare any shot of Yosemite National Park to his prints - the deep planning and involvement of post-processing smokes any amateur shot from any era, contemporaneous or otherwise). But it all needs to start in the camera.
One thing I am exploring that will probably be different in future images from me is using ReShade. I avoided ENB and ReShade for some time because I didn't want to rely on those tools to make a good image. I thought ENB was like bad Instagram filters for video games and wrote them off. I'm very stubborn about treating screen archery as I would any camera. You never want to limit yourself because you don't have a ton of accessories or because you don't have access to Photoshop; you want to work with what you have. The image must be good on its own without post-processing.
Many ENB are too idiosyncratic or colour grade the game in a way I don't like. The problem was I am so stubborn in my 'You have to get the image correct in the camera' philosophy that I didn't realize ENB/ReShade bring a lot of benefits to Fallout 4. Since I have a pretty defined style with my screen archery now and am happily marching to the beat of my own drum, I'm a lot more willing to try those processing tools than I was prior.
-
Congrats to my fellow winners, and to everyone who entered! Thanks to everyone who's left me a comment and endorsed my work, and extra thanks to the Content Team for the prompt challenge! I'm really looking forward to participating again.
And remember to turn that frown… Upside down!
cephalopodae, signing off! ( ̄^ ̄ )ゞ
XenolithicYardZone
Could you talk us through your inspiration for your winning shot? I know we gave the prompts, but was there anything that sparked the idea for you outside of this?
Greetings! Thank you for picking me as one of the contest winners. Much appreciated. And congrats to the other winners as well. The prompts you provided were pretty helpful actually. They gave me an idea about what you were looking for and made me go take some new shots that better fit the description. Inspiration behind the shot were horror movies, especially the scary, suspenseful moments in them. Like a character being terrorized by an unseen or only partially-revealed evil, being too afraid to face it, wishing it wasn't there. Or more psychological fears like imagining things that aren't there, not knowing whether they're real or not. I think I've seen one too many horror movies!
Can you walk us through the process of setting up your scene? What steps did you take to get the perfect shot?
I simply had to find a good location where I could line up both characters and get an unobstructed view. I still had to get rid of a few in-game objects that were getting in the way but that's a straightforward task in Skyrim thanks to console commands.
How did you decide on the composition, lighting, and angles for your entry?
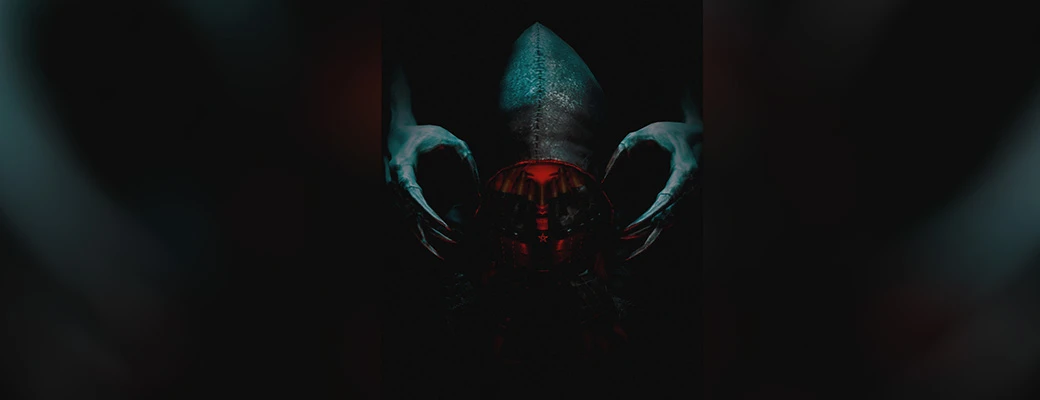
Once I got the idea for the shot, the composition was simple - my player character crouched on her knees covering her face, with the hands of the creature coming out of the dark on either side. I went with some red lighting in the foreground to highlight my character, maybe represent her dread, contrasted it with a cyan tint of sorts to light up the arms of the monster that's frightening her, then covered the rest of the shot with a dark background to add to the fear factor. And I thought a front angle worked best for this shot.
XenolithicYardZone winning image
Which mods (if any) were essential to achieving your visions, and how did they enhance the final result?
Supreme Vampire Lords, Twilight Princess Armor, Poser Hotkey Plus, Screen Archer Menu, Halo's Poser and Karlov Manor are some of the mods that were most influential in achieving the final result. And of course, ENB and ReShade which are so vital in screen archery for so many of us. There are plenty of other mods that might have affected this shot one way or another but there are just too many to mention them all here. I'd like to thank all these mod authors for their mods and tools.
Were there any specific challenges or unexpected surprises while working on your entry? If so, how did you tackle them?
I think the biggest challenge was the approaching deadline. At the start of the event, I was thinking of entering one of my older shots or maybe skipping this category entirely. So I didn't work on any new shots for most of the competition's duration. By the time I decided to do this after reading your comment encouraging new shots, I think I had about a day left in which to find some time to do it. I thought I might have left it too late and almost didn't go ahead with it. But once I booted up the game and got started, thankfully I got it done in about half an hour.
Do you have a particular workflow or routine when creating your screen archery?
Depends on the game and shot. Sometimes it's just a spur-of-the-moment thing when I come across an interesting location or scene. Other times, I might already have an idea in mind before I've started and work towards achieving it. The final result usually winds up looking nothing like what I originally intended to do but at least it's a start! The workflow is basically pausing the game at the right moment, using camera tools to line up a good shot, playing around with ENB/ReShade to get the right visuals before taking the shot.
Shadow of the Tomb Raider
Is there a detail in your winning shot that you’re particularly proud of or that you think people might miss?
like that I could get the creature's fingertips to catch some of that red light.
Did you use any post-processing tools, like Photoshop, to enhance your final image? If so, what adjustments or effects did you apply?
Nearly all of the work was already done in-game through ENB and ReShade. I just applied a bit of noise via GIMP because I forgot to do it in-game and thought the shot could use it.
How do you balance in-game visuals and post-processing to maintain the essence of your shot while adding that extra polish?
I normally set in-game visual settings that make a noticeable difference as high as I'm able to. Post-processing done through ReShade depends entirely on the shot. If the scene already looks good, I keep the tinkering to a minimum. But other times I do make a lot of changes to get a desired look. Photo editing is usually limited to stuff like cropping or fixing any blemishes I can't do anything about in-game.
Stray
Is there a particular post-processing technique you’re especially proud of or that you feel made a big difference in your entry?
I'd say adding a dark background to the shot using ReShade enhanced the atmosphere of dread in the shot. There was just too much light in the shot prior to that.
A big thank you to all our winners for participating in this interview, and congratulations once again to them and our runners-up!
Our festive competition winners' interview will be coming out soon, so look forward to that.



6 comments
Comments locked
A moderator has closed this comment topic for the time beingVery nice.