


0 of 0


About this mod
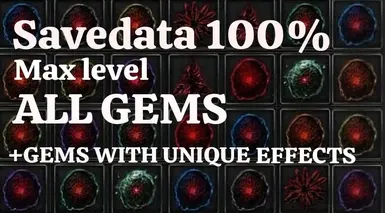
100% Save File
This save file is designed to give you complete freedom, explore map, fight any boss,
experiment with different builds. perfect to try any mod. It includes the best gems of every type, each with unique
effects crafted by me. The goal is to replicate something as close as possible to a creative mode in Bloodborne.
- Permissions and credits
(All of this has been translated with the help of AI and partially corrected manually)
This save was perfected according to my goal, and I achieved most of its features thanks to these mods:
"https://www.nexusmods.com/bloodborne/mods/108"
"https://www.nexusmods.com/bloodborne/mods/19"
"https://www.nexusmods.com/bloodborne/mods/121"
100% Save data
This save file is designed to give you complete freedom — explore the map, fight any boss, or experiment with different builds. It includes the best gems of every type, each with unique effects crafted by me. The goal is to replicate something as close as possible to a creative mode experience in Bloodborne. Perfect and ready to try any mod.
instalation :
Copy the "SPRJ0005" folder into your save game directory:
"ShadPS4\user\savedata\1\CUSA00900"
(Everything written in blue is the most recent addition)
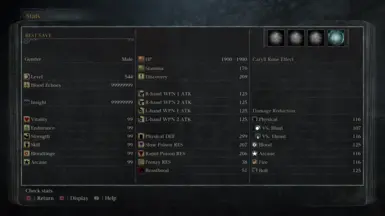
-Max level
-NG+7
-All weapons at max level
-The best gems of every type
-Gems with rune-like effects, offering various utilities and more
(I’ll explain this in more detail below)
-All armor sets
-Deleted armors, weapons, and consumables
-All runes duplicated 3 times each
-All consumables
-All upgrade stones
-All key items
-All chalices
-All ritual materials
-All map shortcuts opened
-All bosses are ALIVE
-All lamps unlocked
-There are also chalices placed that I considered more interesting for experimenting, beyond the usual or farming chalices.
CAUTION:
All bosses are still alive, and all lamps are unlocked — including the lamps within the boss areas themselves.This means you might access certain zones at times when you normally shouldn't (with different moon cycles, closed doors, or non-functioning elevators).Also, entering a boss area without having defeated the boss beforehand can sometimes cause bugs — for example, getting stuck in the boss arena, which would force you to re-download the save files.
I recommend keeping a backup of the original files, just in case, and as a point of reference for restarting.
One of the coolest things about being able to access any area of the map during any moon cycles is that it lets you explore places at times in the story when you normally shouldn't be able to. If you've never tried it, I really recommend it—some of the results are surprisingly interesting. Yahargul, in particular, stands out as the most intriguing.
INVENTARY:
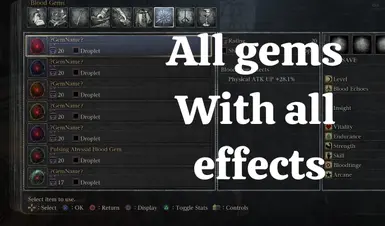
GEMS :
As for the gems, in the weapons of the inventory, there are gems for everything, of all types:Physical damage, Arcane, Blood, Fire, bolt, both in points or percentage,Blunt damage, thrust damage, Poor Man's, Fool man, Poison (both rapid and slow), HP recovery, all in droplet form,in their best versions, and some of my own creations, which I will explain further below.
-All radial and triangular gems are physical damage in %, as they are the most common, to make them easier to differentiate quickly.
-All weapons that deal elemental damage have one of their three versions with corresponding gems that enhance that damage or their characteristics.
Some weapons simply have gems of a specific damage or effect placed on them so they aren't scattered in the inventory, as that would be too chaotic. For example:
-The first 3 saw cleavers have elemental damage gems in %
-The first Saw Spear has 3 physical damage gems, but in the form of droplets.
-The third Hunter's Axe has 3 physical damage gems in points.
-The Third Church pick has 3 Nourishing Gems with +24.4% damage
-The third kirkHammer has 3 blunt damage gems.
-The third Ludwig's blade has 3 piercing damage gems.
-The third Reiterpallasch was used to store 3 HP recovery gems, each with 6 points.
-The third Rifle Spear has 3 slow poison gems.
-The second and third Stake Drivers have Poor Man's and Fool's gems.
-The third Logarius Wheel has 3 fast poison gems.
-The third bloodletter has 3 blood damage gems in points.
–As for the firearms, all of them are equipped with regular blood gems for increased damage, except for the first one, which has a gem that restores 6 HP per hit, and the last Evelyn, which has a gem that reduces stamina costs.
There are also some others with unique effects I created myself, and I’ll explain a few of those below.
The Nourishing Gems found at the Church Pick were among the last ones I added to the save. Based on my testing, these gems are only useful on weapons that deal Arcane, Fire, or Bolt damage — there's no real point in using them on weapons that only deal Physical or Blood damage (they're also useless on the Kos Parasite).Basically, what these gems do is boost both the Physical and Elemental damage of a weapon with one of those three elements, by the same amount.
The downside is that these ones are 24.4%, while standard elemental % gems usually go up to 28.1%.
So you're getting a dual damage boost, but slightly less than what you’d get from a pure elemental gem. If you want to try them out, here they are.
GEMS WITH UNIQUE AND OP EFFECTS:
All the gems previously mentioned in the weapons of the inventory were legal. In this case, regarding the gems stored, we’re talking about gems with the previously mentioned effects, but in large quantities, gems that have rune-like effects, or sets of 2 or 3 gems that complement each other.While some gems are very OP, to the point of literally one-shotting bosses, my intention was never to create OP gems just for the sake of it. Each gem or set has a purpose that brings something new or unique, whether it’s practicality in gameplay, or allowing for the enhancement of things that normally don't stand out in the game (like rapid poison), or even the ability to try and experiment with different gems that add or amplify effects in quantities that don’t limit anything or any weapon characteristic, which would normally be impossible in a legal playthrough.
Some gems don't have an icon, so at first it might look like there's no gem equipped, even though there actually is one
–Back to the character’s inventory, you’ll notice there are 3 Beast Claws. The first one has 2 gems — even though it looks like there’s only one.
The first gem has an invisible icon, but it’s there, and you can see its effects. The visible one is a Physical Damage gem, but it's strong enough to be equivalent to three regular 28.1% Physical gems (I'll talk more about these kinds of gems later).
The second gem has the same effect as the Beast Rune: just equipping the weapon will instantly turn you into a beast, so you won’t need to swap runes in the Hunter’s Dream. This way, you can access the full moveset of the weapon and get the max possible damage during combat — all legally.
– There are also 3 Kos Parasites in the inventory. One of them has 2 gems — again, one is invisible. The visible one is a Triple Arcane Damage gem, just like the one mentioned before. The second gem transforms you into a Lumenwood creature when you equip it.
– Another Parasite also has 2 gems, with one being invisible. It includes another Triple Arcane gem, but this time, the second gem lets you equip the Parasite without going through the transformation process.
In the firearms, I also created and placed gems with the effects mentioned earlier, but in this case, it allows you to do so with a more aesthetic intention or to use any other weapon that isn't one of the previous ones.
-In the inventory, there are 4 Hunter Pistols. The second one, just by equipping it, transforms the character into a beast and also allows you to use the Kos Parasite with that same transformation.
-The third pistol will transform you into a Lumen, and as an extra, to keep the pistol functioning as if it were using a regular gem, besides the transformation, it has the effect of HP recovery with 6 points.
-And the fourth one allows you to equip the Kos Parasite again without the need for the transformation, and also includes HP recovery once more.
– Lastly, regarding the firearms, you’ll notice there are quite a few Evelyns. All of the level 1 ones each have a gem that mimics the effect of a rune — for example, one increases max stamina, another boosts max HP, higher critical damage, and so on. These effects are slightly exaggerated, more specifically, they’re boosted to 6x the normal rune effect per gem.Now, I know I said I didn’t want to make anything overpowered just for the sake of it, but in this case, I think it’s still fun — since it gives you the ability to "switch runes" wherever you are, simply by swapping your pistol. If you check the gem info, you can see which effect it applies (even though the gem icon might be a bit bugged, the actual effect is still readable).And since I was already enabling rune-swapping one at a time, I figured I might as well go all in and max out each rune effect in a single gem. You can think of it kind of like activating a cheat — like in GTA, for example.One of the Evelyns has a regular HP recovery gem that heals 6 HP per hit — but again, 6x, so it’s great for healing if you’re out of vials, or just want to use it like a much better version of a standard regen gem. Another Evelyn has a stamina cost reduction gem, also boosted to 6x.
(The very last Evelyn at the bottom has a regular stamina cost reduction gem with the normal 1x effect)
This is what the bugged icon and its effect look like :
And this is what the effect of the 20% stamina gem X6 would look like on one of the Evelyns:
(Not all rune effects are included, as some were not deemed necessary (like the Eye, Heir, or Moon runes, since they are for farming), or unfortunately, they didn't work when applied to gems (like the Hunter rune and Radiance).)
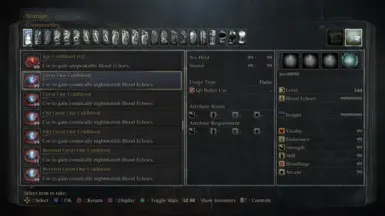
STORAGE:
(The weapons in the storage are simply being used as folders)
WORKSHOP WEAPONS :
Saw Cleaver:
There are 3 Saw Cleavers.-The first one has a set of 3 gems, designed to be placed in weapons that ONLY DEAL PHYSICAL DAMAGE. Together, these gems make the weapon cause all elemental damage (except Blood damage), and in a somewhat exaggerated way (a little OP). While you can see three effects in the gem info, in this case, these gems have more than what you can see, so I don’t recommend mixing these gems, as they can get confusing, and on their own, they cause effects that don’t lead to anything specific.
-The second Saw Cleaver is a set that does exactly the same as the previous one, but in this case, this set is for ALL WEAPONS THAT DEAL ELEMENTAL DAMAGE (except Blood). For example: Burial Blade (Arcane), Tonitrus (bolt), Moonlight Sword (Arcane), boom Hammer (Fire).
-And the third Saw Cleaver is another set that does the same, but now, FOR WEAPONS THAT DEAL BLOOD DAMAGE (Chikage, Simon's Bow, Bloodletter).
This is what the elements in the Blood Damage set would look like:
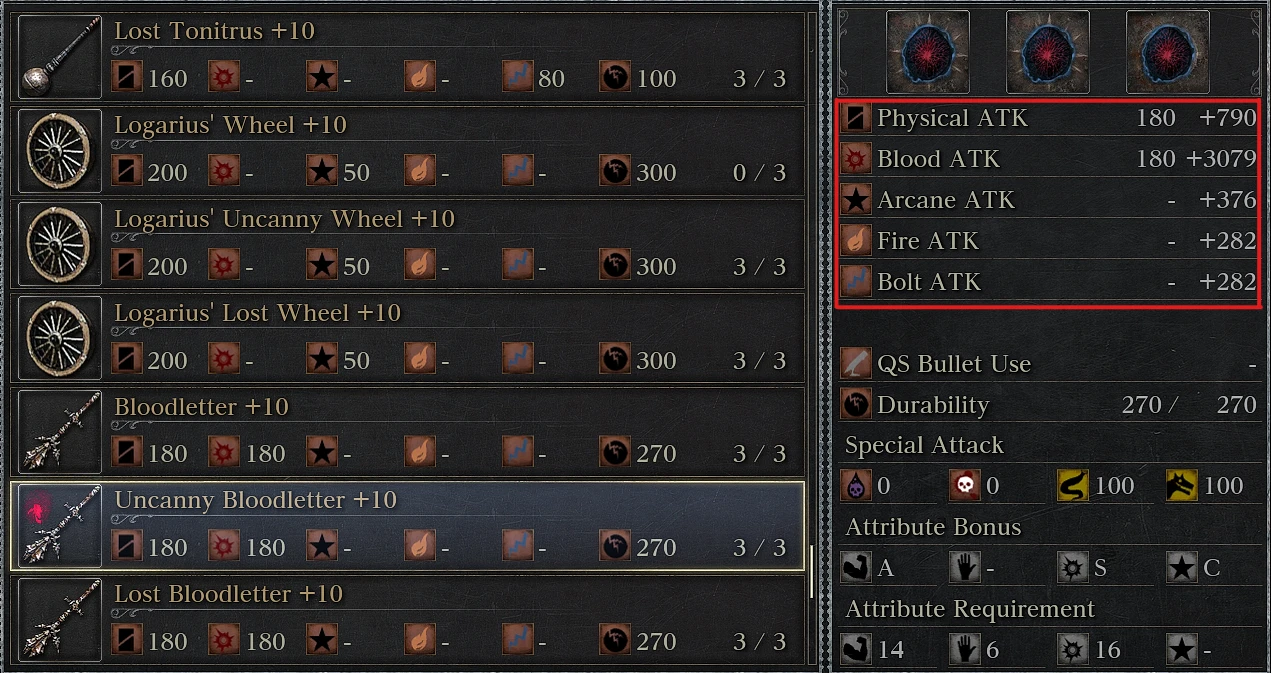
This is what that same blood setup would look like in battle in terms of damage:
(Keep in mind these videos are always in NG7)
Saw Spear:
There are 3 Saw Spears, again, 3 sets, each with 2 gems. They do exactly the same as the Saw Cleaver sets, but in this case, in a more balanced way. The previous ones could boost the same damage between 4 and 5 times each, but in this case, it’s up to 3. For the Blood set, physical damage isn’t boosted (due to space limitations), but since they only take up 2 gem slots, the missing boost can be added with gems that I’ll mention later.
-The first Saw Spear contains the set designed for physical damage weapons.
-The second one is for weapons that apply any elemental damage except Blood.
-And the last one is for those that apply Blood damage.
It’s important that each set is placed on a weapon of the element it was made for. If not, the effects won’t apply properly. Unfortunately, this was necessary due to how the effects interact with each weapon depending on its characteristics.
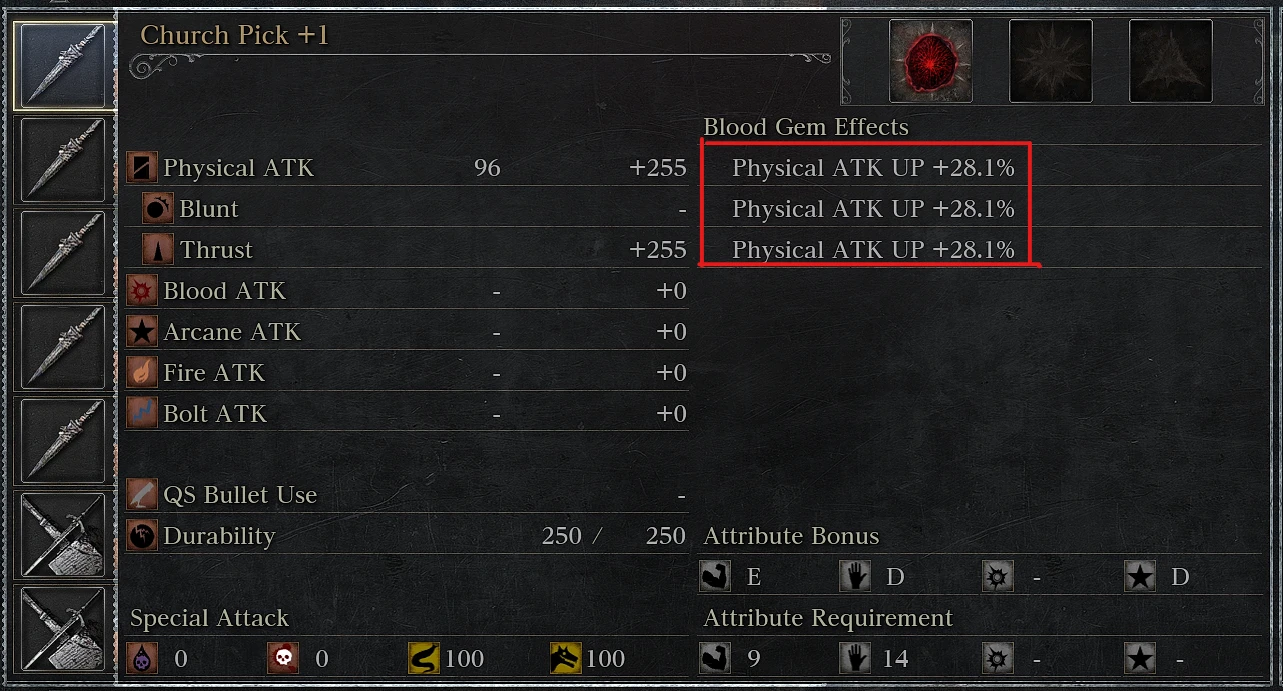
CHURCH WEAPONS:
In this category of weapons, the effects of the gems are as shown (except gems of the poor and fool man), so they are easy to recognize.All gems in the Church weapons category are damage gems we've seen before, but now there's one gem per weapon, with each having the same effect repeated up to 3 times. This means each gem is equivalent to 3 of that same type, allowing for combinations of up to 3 elements in a single weapon, boosting everything evenly without having to choose just one effect, thus using all the gem slot spaces, and each effect with the same limit it would normally have.
Church Pick:
First pick: Physical damage in %
Second pick: Blood damage in %
Third pick: Arcane damage in %
Fourth pick: Fire damage in %
Fifth pick: bolt damage in %
Church Hammer:
First hammer: Physical damage in points
Second hammer: Blood damage in points
Third hammer: Arcane damage in points
Fourth hammer: Fire damage in points
Fifth hammer: bolt damage in points
Bloodletter :
Only bloodletter : Nourishing Gem
Amigdalan arm :
First amigdalan arm : Blunt damage
Second amigdalan arm : Thrust damage
Beast claws :
First claws: Gem of the Poor Man
Second claws: Gem of the Fool Man
Kos parasite :
And finally, in the Church weapons section, you’ll find over ten Kos Parasites. I used them to add the last few missing gem types — some of which you probably won’t find very useful.Each Parasite has three gems with the same effect: the first one is a regular version, the second is 2x, and the third is 3x. That should give you plenty of options in terms of how and how much you want to use them.Out of all the different gem types on these Parasites, the ones I find most interesting are the ones that boost charged attack damage, reduce stamina costs, and increase weapon durability.As for the others — feel free to check them out and see if anything catches your eye.
This is what the effects of the Physical Damage x3 gem would look like:
Vileblood Weapons:
Reiterpallasch:
In this case, we have the poison gems. There are 3 Reiterpallasch
-The first one has a single gem that applies both rapid and slow poison, X3 times each. This means that just having this gem is equivalent to having 6 normal gems—3 for rapid poison and 3 for slow poison.
-The second Reiterpallasch applies slow poison X6 times, just like the previous one, but this one is purely slow poison.
-And the third one applies rapid poison, again X6 times, and it’s purely rapid poison.
Chikage:
There are only two Chikages, and this is where I placed two poison gems again, but in this case, they’re a bit more balanced as they apply poison only X3 times each.
-The first one applies slow poison X3 times.
-And the second one applies rapid poison X3 times.
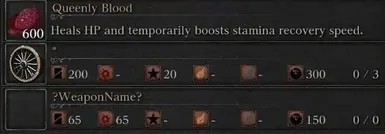
And finally, there are 3 Rakuyos.The first one has 3 gems, each one applying 6x the effect of a single 33% Blood ATK Up gem. I made these gems mainly to avoid mixing them into the regular inventory — the idea was to have the ability to supercharge a firearm with just one of them, and make something like the Railgun way more destructive. And yeah, I know this kind of goes against what I said at the beginning, but obviously, if you want to slap all 3 of them onto Simon’s Bowblade, the Chikage, or the Butcher Knife and one-shot a boss… well, even if that wasn’t my original intention — no one’s stopping you ;)
The second Rakuyo has 3 HP regeneration gems, again boosted to 6x each. They heal super fast, great if you don’t want to use Blood Vials or just want a more convenient healing method.
And the last Rakuyo comes with 3 durability gems, each one also at 6x, to massively increase weapon durability.
These are two examples of how blood gems can be used:
All these gems are intended, as I mentioned earlier, to boost multiple damages or effects at once, without the need to choose one and sacrifice another. You simply enhance everything, or create combinations of damages and/or boost and highlight things that wouldn’t normally stand out (like poison). Thanks to these gems, for example, rapid poison can be applied with the same brutality that bleeding is applied in Elden Ring :
If you take the gem from the first pick (Physical ATK % x3) and slot it into the blades of mercy along with one of the poison gems from the third Reiterpallasch (Rapid Poison x6), you won’t be sacrificing damage — the first physical gem is equivalent to three regular ones, and the poison gem adds the equivalent of six Rapid Poison gems.
That’s one way to create different combinations.
(If the gem effects aren’t working the way you expect, it’s not an issue with the gems themselves — it’s just how each gem type interacts differently depending on the weapon and its element. You’ll have to experiment with different setups to see what works best.)
This is what the effect would look like on the Blades of Mercy with ×3 Physical damage and ×12 Rapid Poison:
If you don't understand something, feel free to ask, I'll try to reply with a translation xd
I apologize if the explanation ended up being too long, chaotic, hard to understand, if the translation wasn’t very good, or if I was too repetitive.
I hope this entire explanation is clear and that this save file helps someone who has always wanted to have all the best gems in Bloodborne but couldn’t get them legally, due to how insanely tedious farming is on PlayStation, lol. I also hope you enjoy experimenting and testing different builds and my gems, try any mod, or simply observing and testing deleted items and the fully unlocked map, all while not having progressed in the story or bosses. Thanks for reading.
This save was perfected according to my goal, and I achieved most of its features thanks to these mods:
"https://www.nexusmods.com/bloodborne/mods/108"
"https://www.nexusmods.com/bloodborne/mods/19"
"https://www.nexusmods.com/bloodborne/mods/121"
100% Save data
This save file is designed to give you complete freedom — explore the map, fight any boss, or experiment with different builds. It includes the best gems of every type, each with unique effects crafted by me. The goal is to replicate something as close as possible to a creative mode experience in Bloodborne. Perfect and ready to try any mod.
instalation :
Copy the "SPRJ0005" folder into your save game directory:
"ShadPS4\user\savedata\1\CUSA00900"
(Everything written in blue is the most recent addition)
-Max level
-NG+7
-All weapons at max level
-The best gems of every type
-Gems with rune-like effects, offering various utilities and more
(I’ll explain this in more detail below)
-All armor sets
-Deleted armors, weapons, and consumables
-All runes duplicated 3 times each
-All consumables
-All upgrade stones
-All key items
-All chalices
-All ritual materials
-All map shortcuts opened
-All bosses are ALIVE
-All lamps unlocked
-There are also chalices placed that I considered more interesting for experimenting, beyond the usual or farming chalices.
CAUTION:
All bosses are still alive, and all lamps are unlocked — including the lamps within the boss areas themselves.This means you might access certain zones at times when you normally shouldn't (with different moon cycles, closed doors, or non-functioning elevators).Also, entering a boss area without having defeated the boss beforehand can sometimes cause bugs — for example, getting stuck in the boss arena, which would force you to re-download the save files.
I recommend keeping a backup of the original files, just in case, and as a point of reference for restarting.
One of the coolest things about being able to access any area of the map during any moon cycles is that it lets you explore places at times in the story when you normally shouldn't be able to. If you've never tried it, I really recommend it—some of the results are surprisingly interesting. Yahargul, in particular, stands out as the most intriguing.
INVENTARY:
GEMS :
As for the gems, in the weapons of the inventory, there are gems for everything, of all types:Physical damage, Arcane, Blood, Fire, bolt, both in points or percentage,Blunt damage, thrust damage, Poor Man's, Fool man, Poison (both rapid and slow), HP recovery, all in droplet form,in their best versions, and some of my own creations, which I will explain further below.
-All radial and triangular gems are physical damage in %, as they are the most common, to make them easier to differentiate quickly.
-All weapons that deal elemental damage have one of their three versions with corresponding gems that enhance that damage or their characteristics.
Some weapons simply have gems of a specific damage or effect placed on them so they aren't scattered in the inventory, as that would be too chaotic. For example:
-The first 3 saw cleavers have elemental damage gems in %
-The first Saw Spear has 3 physical damage gems, but in the form of droplets.
-The third Hunter's Axe has 3 physical damage gems in points.
-The Third Church pick has 3 Nourishing Gems with +24.4% damage
-The third kirkHammer has 3 blunt damage gems.
-The third Ludwig's blade has 3 piercing damage gems.
-The third Reiterpallasch was used to store 3 HP recovery gems, each with 6 points.
-The third Rifle Spear has 3 slow poison gems.
-The second and third Stake Drivers have Poor Man's and Fool's gems.
-The third Logarius Wheel has 3 fast poison gems.
-The third bloodletter has 3 blood damage gems in points.
–As for the firearms, all of them are equipped with regular blood gems for increased damage, except for the first one, which has a gem that restores 6 HP per hit, and the last Evelyn, which has a gem that reduces stamina costs.
There are also some others with unique effects I created myself, and I’ll explain a few of those below.
The Nourishing Gems found at the Church Pick were among the last ones I added to the save. Based on my testing, these gems are only useful on weapons that deal Arcane, Fire, or Bolt damage — there's no real point in using them on weapons that only deal Physical or Blood damage (they're also useless on the Kos Parasite).Basically, what these gems do is boost both the Physical and Elemental damage of a weapon with one of those three elements, by the same amount.
The downside is that these ones are 24.4%, while standard elemental % gems usually go up to 28.1%.
So you're getting a dual damage boost, but slightly less than what you’d get from a pure elemental gem. If you want to try them out, here they are.
GEMS WITH UNIQUE AND OP EFFECTS:
All the gems previously mentioned in the weapons of the inventory were legal. In this case, regarding the gems stored, we’re talking about gems with the previously mentioned effects, but in large quantities, gems that have rune-like effects, or sets of 2 or 3 gems that complement each other.While some gems are very OP, to the point of literally one-shotting bosses, my intention was never to create OP gems just for the sake of it. Each gem or set has a purpose that brings something new or unique, whether it’s practicality in gameplay, or allowing for the enhancement of things that normally don't stand out in the game (like rapid poison), or even the ability to try and experiment with different gems that add or amplify effects in quantities that don’t limit anything or any weapon characteristic, which would normally be impossible in a legal playthrough.
Some gems don't have an icon, so at first it might look like there's no gem equipped, even though there actually is one
–Back to the character’s inventory, you’ll notice there are 3 Beast Claws. The first one has 2 gems — even though it looks like there’s only one.
The first gem has an invisible icon, but it’s there, and you can see its effects. The visible one is a Physical Damage gem, but it's strong enough to be equivalent to three regular 28.1% Physical gems (I'll talk more about these kinds of gems later).
The second gem has the same effect as the Beast Rune: just equipping the weapon will instantly turn you into a beast, so you won’t need to swap runes in the Hunter’s Dream. This way, you can access the full moveset of the weapon and get the max possible damage during combat — all legally.
– There are also 3 Kos Parasites in the inventory. One of them has 2 gems — again, one is invisible. The visible one is a Triple Arcane Damage gem, just like the one mentioned before. The second gem transforms you into a Lumenwood creature when you equip it.
– Another Parasite also has 2 gems, with one being invisible. It includes another Triple Arcane gem, but this time, the second gem lets you equip the Parasite without going through the transformation process.
In the firearms, I also created and placed gems with the effects mentioned earlier, but in this case, it allows you to do so with a more aesthetic intention or to use any other weapon that isn't one of the previous ones.
-In the inventory, there are 4 Hunter Pistols. The second one, just by equipping it, transforms the character into a beast and also allows you to use the Kos Parasite with that same transformation.
-The third pistol will transform you into a Lumen, and as an extra, to keep the pistol functioning as if it were using a regular gem, besides the transformation, it has the effect of HP recovery with 6 points.
-And the fourth one allows you to equip the Kos Parasite again without the need for the transformation, and also includes HP recovery once more.
– Lastly, regarding the firearms, you’ll notice there are quite a few Evelyns. All of the level 1 ones each have a gem that mimics the effect of a rune — for example, one increases max stamina, another boosts max HP, higher critical damage, and so on. These effects are slightly exaggerated, more specifically, they’re boosted to 6x the normal rune effect per gem.Now, I know I said I didn’t want to make anything overpowered just for the sake of it, but in this case, I think it’s still fun — since it gives you the ability to "switch runes" wherever you are, simply by swapping your pistol. If you check the gem info, you can see which effect it applies (even though the gem icon might be a bit bugged, the actual effect is still readable).And since I was already enabling rune-swapping one at a time, I figured I might as well go all in and max out each rune effect in a single gem. You can think of it kind of like activating a cheat — like in GTA, for example.One of the Evelyns has a regular HP recovery gem that heals 6 HP per hit — but again, 6x, so it’s great for healing if you’re out of vials, or just want to use it like a much better version of a standard regen gem. Another Evelyn has a stamina cost reduction gem, also boosted to 6x.
(The very last Evelyn at the bottom has a regular stamina cost reduction gem with the normal 1x effect)
This is what the bugged icon and its effect look like :
And this is what the effect of the 20% stamina gem X6 would look like on one of the Evelyns:
(Not all rune effects are included, as some were not deemed necessary (like the Eye, Heir, or Moon runes, since they are for farming), or unfortunately, they didn't work when applied to gems (like the Hunter rune and Radiance).)
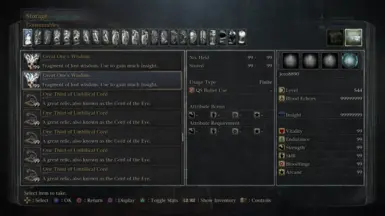
STORAGE:
(The weapons in the storage are simply being used as folders)
WORKSHOP WEAPONS :
Saw Cleaver:
There are 3 Saw Cleavers.-The first one has a set of 3 gems, designed to be placed in weapons that ONLY DEAL PHYSICAL DAMAGE. Together, these gems make the weapon cause all elemental damage (except Blood damage), and in a somewhat exaggerated way (a little OP). While you can see three effects in the gem info, in this case, these gems have more than what you can see, so I don’t recommend mixing these gems, as they can get confusing, and on their own, they cause effects that don’t lead to anything specific.
-The second Saw Cleaver is a set that does exactly the same as the previous one, but in this case, this set is for ALL WEAPONS THAT DEAL ELEMENTAL DAMAGE (except Blood). For example: Burial Blade (Arcane), Tonitrus (bolt), Moonlight Sword (Arcane), boom Hammer (Fire).
-And the third Saw Cleaver is another set that does the same, but now, FOR WEAPONS THAT DEAL BLOOD DAMAGE (Chikage, Simon's Bow, Bloodletter).
This is what the elements in the Blood Damage set would look like:
This is what that same blood setup would look like in battle in terms of damage:
(Keep in mind these videos are always in NG7)
Saw Spear:
There are 3 Saw Spears, again, 3 sets, each with 2 gems. They do exactly the same as the Saw Cleaver sets, but in this case, in a more balanced way. The previous ones could boost the same damage between 4 and 5 times each, but in this case, it’s up to 3. For the Blood set, physical damage isn’t boosted (due to space limitations), but since they only take up 2 gem slots, the missing boost can be added with gems that I’ll mention later.
-The first Saw Spear contains the set designed for physical damage weapons.
-The second one is for weapons that apply any elemental damage except Blood.
-And the last one is for those that apply Blood damage.
It’s important that each set is placed on a weapon of the element it was made for. If not, the effects won’t apply properly. Unfortunately, this was necessary due to how the effects interact with each weapon depending on its characteristics.
CHURCH WEAPONS:
In this category of weapons, the effects of the gems are as shown (except gems of the poor and fool man), so they are easy to recognize.All gems in the Church weapons category are damage gems we've seen before, but now there's one gem per weapon, with each having the same effect repeated up to 3 times. This means each gem is equivalent to 3 of that same type, allowing for combinations of up to 3 elements in a single weapon, boosting everything evenly without having to choose just one effect, thus using all the gem slot spaces, and each effect with the same limit it would normally have.
Church Pick:
First pick: Physical damage in %
Second pick: Blood damage in %
Third pick: Arcane damage in %
Fourth pick: Fire damage in %
Fifth pick: bolt damage in %
Church Hammer:
First hammer: Physical damage in points
Second hammer: Blood damage in points
Third hammer: Arcane damage in points
Fourth hammer: Fire damage in points
Fifth hammer: bolt damage in points
Bloodletter :
Only bloodletter : Nourishing Gem
Amigdalan arm :
First amigdalan arm : Blunt damage
Second amigdalan arm : Thrust damage
Beast claws :
First claws: Gem of the Poor Man
Second claws: Gem of the Fool Man
Kos parasite :
And finally, in the Church weapons section, you’ll find over ten Kos Parasites. I used them to add the last few missing gem types — some of which you probably won’t find very useful.Each Parasite has three gems with the same effect: the first one is a regular version, the second is 2x, and the third is 3x. That should give you plenty of options in terms of how and how much you want to use them.Out of all the different gem types on these Parasites, the ones I find most interesting are the ones that boost charged attack damage, reduce stamina costs, and increase weapon durability.As for the others — feel free to check them out and see if anything catches your eye.
This is what the effects of the Physical Damage x3 gem would look like:
Vileblood Weapons:
Reiterpallasch:
In this case, we have the poison gems. There are 3 Reiterpallasch
-The first one has a single gem that applies both rapid and slow poison, X3 times each. This means that just having this gem is equivalent to having 6 normal gems—3 for rapid poison and 3 for slow poison.
-The second Reiterpallasch applies slow poison X6 times, just like the previous one, but this one is purely slow poison.
-And the third one applies rapid poison, again X6 times, and it’s purely rapid poison.
Chikage:
There are only two Chikages, and this is where I placed two poison gems again, but in this case, they’re a bit more balanced as they apply poison only X3 times each.
-The first one applies slow poison X3 times.
-And the second one applies rapid poison X3 times.
And finally, there are 3 Rakuyos.The first one has 3 gems, each one applying 6x the effect of a single 33% Blood ATK Up gem. I made these gems mainly to avoid mixing them into the regular inventory — the idea was to have the ability to supercharge a firearm with just one of them, and make something like the Railgun way more destructive. And yeah, I know this kind of goes against what I said at the beginning, but obviously, if you want to slap all 3 of them onto Simon’s Bowblade, the Chikage, or the Butcher Knife and one-shot a boss… well, even if that wasn’t my original intention — no one’s stopping you ;)
The second Rakuyo has 3 HP regeneration gems, again boosted to 6x each. They heal super fast, great if you don’t want to use Blood Vials or just want a more convenient healing method.
And the last Rakuyo comes with 3 durability gems, each one also at 6x, to massively increase weapon durability.
These are two examples of how blood gems can be used:
All these gems are intended, as I mentioned earlier, to boost multiple damages or effects at once, without the need to choose one and sacrifice another. You simply enhance everything, or create combinations of damages and/or boost and highlight things that wouldn’t normally stand out (like poison). Thanks to these gems, for example, rapid poison can be applied with the same brutality that bleeding is applied in Elden Ring :
If you take the gem from the first pick (Physical ATK % x3) and slot it into the blades of mercy along with one of the poison gems from the third Reiterpallasch (Rapid Poison x6), you won’t be sacrificing damage — the first physical gem is equivalent to three regular ones, and the poison gem adds the equivalent of six Rapid Poison gems.
That’s one way to create different combinations.
(If the gem effects aren’t working the way you expect, it’s not an issue with the gems themselves — it’s just how each gem type interacts differently depending on the weapon and its element. You’ll have to experiment with different setups to see what works best.)
This is what the effect would look like on the Blades of Mercy with ×3 Physical damage and ×12 Rapid Poison:
If you don't understand something, feel free to ask, I'll try to reply with a translation xd
I apologize if the explanation ended up being too long, chaotic, hard to understand, if the translation wasn’t very good, or if I was too repetitive.
I hope this entire explanation is clear and that this save file helps someone who has always wanted to have all the best gems in Bloodborne but couldn’t get them legally, due to how insanely tedious farming is on PlayStation, lol. I also hope you enjoy experimenting and testing different builds and my gems, try any mod, or simply observing and testing deleted items and the fully unlocked map, all while not having progressed in the story or bosses. Thanks for reading.