


0 of 0


About this mod
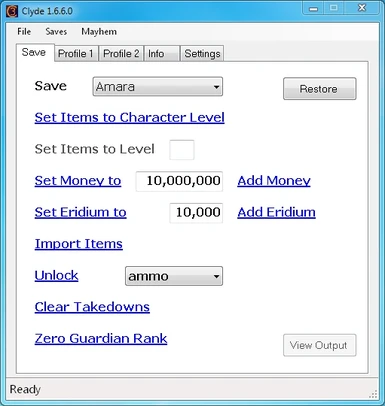
Graphical user interface for bl3-cli-saveedit, a collection of Python scripts written by apocalyptech to add money and eridium, change item levels, unlock things like inventory slots, skins, etc. in game save and profile files. You can also export saves & profile as JSON to modify and then import back to save file format.
- Requirements
- Permissions and credits
- Changelogs
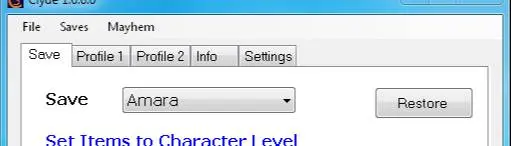
Clyde
Clyde is a graphical user interface (GUI) for apocalyptech's command line based bl3-cli-saveedit app, an app for manipulating Borderlands 3 save files. As a front end, Clyde is really just a convenience tool. It doesn't actually do anything itself – you must have bl3-cli-saveedit in order to modify your save files.
You can obtain bl3-cli-saveedit from Github or pypi.org. Follow the instructions at either place to install it. It's written in Python, so you will also need Python if you don't already have it. If you don't have Python, it seems to be easier to deal with if you install it just under your user (as opposed to for all users), and make sure you find the spot to have it add itself to your path.
In addition to formatting the command line parameters for bl3-cli-saveedit, Clyde automates the task of making backups of save files for you. You can also choose at any time to copy save files to a location of your choosing, for example to a thumb drive or network share.
Here's the standard disclaimer:
This software is provided 'as-is', without any express or implied warranty.
In no event will the author be held liable for any damages arising from
the use of this software.
Here's the thing. You are fiddling with your game save files. You are ultimately responsible for what happens with them. Although Clyde has been thoroughly tested, bizarre things can happen at any time. You should build your own level of trust using the program, making your own backup copies of your save files frequently enough that you won't lose that hard-farmed beautiful weapon you've acquired or erase the fiercest battle of all time against a badass. I know I do.
Prerequisites
Clyde was built with NET framework 4.8. It's highly likely that you already have it. Download from Microsoft if not.
bl3-cli-saveedit – the package install creates executables for the scripts. Clyde needs the executable versions.
Python – consult bl3-cli-saveedit documentation for version.
Installer
Clyde now has an installer. The installer needs elevated privileges in order to create desktop and start menu shortcuts, as well as writing uninstall information.
If you prefer to do a manual install, download the loose files and follow the instructions below in either the Quickstart or Installation sections.
If you're doing an update, all you really need to do is download the loose files (in the zip) and drop them in your Clyde directory, but the installer is capable of performing an update as well.
The installer does not install Python or the bl3-cli-saveedit package; you will still need to install those. I recommend installing Python under just your user as opposed to all users, and make sure you find and tick the checkbox for 'add python to path'.
If the installer is able to find the executable versions of the Python scripts, it will copy them to your Save Edit directory for you.
Quickstart
Install Python and bl3-cli-saveedit.
Create directories for Clyde, backup files, and saveedit files.
Drop the Clyde executable into the Clyde directory.
Copy the saveedit executables from the Python Scripts directory to the savedit directory you created.
Launch Clyde.
Choose Setup tab.
Supply the locations for the backup files, saveedit executables, and game save files.
Add save files and nicknames to Clyde if they weren't detected.
Use Clyde.
Installation
First you will need to install Python if you don't have it, as well as the bl3-cli-saveedit package. I found it easier to install Python for just my user, as opposed to all users. Make sure you find and tick the checkbox for 'add python to path'.
Clyde is a single executable, can run from anywhere, and needs no special privileges; you can put it under your Program Files folder or in a different location if you prefer. You will also need to create a directory for your backup files. Optionally [recommended] you can copy the saveedit files from the scripts folder, where they get installed, to a more convenient directory – the reason for this will be explained a little later. When you install the bl3-cli-saveedit package, executable files will be created. If you installed Python version 3.8 and you installed it for your user only (as opposed to for all users), these executable files will likely be located here:
Users/your_user/AppData/Local/Programs/Python/Python38/Scripts
AppData is a hidden folder. If you don't see it, you probably need to set your view options to show hidden files. If you don't find the files there, you can do a Windows file search for the file bl3-save-edit.exe and you should find the other eight exe files for the package in the same place.
The preferred setup looks like this:
/bl3-cli-saveedit
clyde.exe
Clyde.pdf
Clyde Sequence.pdf
bl3-profile-edit.exe
bl3-profile-info.exe
bl3-save-edit.exe
bl3-save-info.exe
.
.
/BL3 Saves
1_20200729093030.sav (these get created by Clyde as you execute operations on your saves)
1_20200728172615.sav
.
.
If you prefer, you can put the Clyde executable and/or its documentation files in a subdirectory of your Program Files, but it's probably tidier to just keep it all together.
Uninstallation
If you installed Clyde with the installer, you can either run the uninstall program directly from Clyde's directory or you can use Windows Control Panel's 'Programs and Features' to uninstall it. The installer will remove the Clyde executable, documentation, and Python scripts from the Clyde directory, but it won't delete any files you've created (extra save files, sequences, etc.)
To uninstall manually:
Delete the Clyde folder and executable.
Delete the other directories you created.
Navigate to:
/Users/your_user/AppData/Local
and delete the Clyde folder located there.
Follow uninstall instructions for the saveedit package and Python from their respective
documents.
Documentation
The files section contains two PDF files. Clyde.pdf contains the text on this page as well as detailed instructions for getting the most out of Clyde. Clyde Sequences.pdf describes the sequences feature in detail.
Capabilities
In addition to supporting all of the operations that apocalyptech provides in the bl3-cli-saveedit package, Clyde enables you to save items from your inventory or bank as comma delimited, tab delimited, or XML files. You can then open them at a later time to pull items back into your inventory/bank. You can open save files that you've obtained from friends or various places on the Internet and add items from them to your inventory/bank. Copying items between your character saves is quick and easy. Leveling items when you level is reduced to a mouse click. You do have to exit your game because it doesn't continually read the save file, but the game does keep the file updated, so you can alt-tab out and have Clyde save your inventory any time you want.
Troubleshooting/FAQ
I started up Clyde and everything is grayed out, I can't do anything, what's the use of this stupid program?
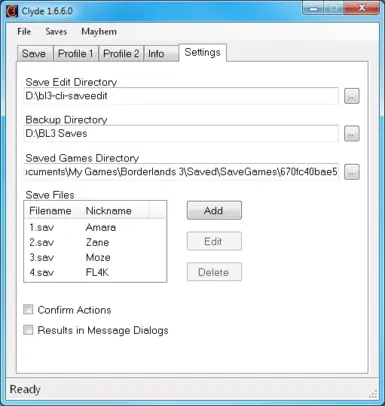
Your first task after downloading Clyde is to go to the Setup tab and supply locations to your game save files, the bl3-cli-saveedit files, and a directory to use for game save backups. Even if you don't want Clyde to save backups, there's no way around it – delete them after they've been created if you don't want the safety net.
Yeah I did that and everything's still grayed out.
- Check the Saved Games directory. If you navigate there on your own, do you see the save files? At minimum you should see a file named “1.sav” and a file named “profile.sav”. Clyde needs that entire directory path, including the huge weird hex number at the end.
- Check the Save Edit directory. Inside that directory you should have the nine save-edit apps: bl3-process-archive-saves.exe, bl3-profile-edit.exe, bl3-profile-import-json.exe, bl3-profile-import-protobuf.exe, bl3-profile-info.exe, bl3-save-edit.exe, bl3-save-import-json.exe, bl3-save-import-protobuf.exe, and bl3-save-info.exe. Note that these are not the python scripts (with a “py” extension), these are exe files that the package install produces. Clyde can't call the scripts, it needs the executables. If Clyde doesn't find those executables in the directory you have supplied for the Save Edit location, the operations will remain disabled. If you want to leave them in the Scripts folder, that's fine, but you need to point Clyde to that folder. If you don't know where they are, do a Windows search for one of the executables listed above.
- Supply a valid path for the save backups. Because Clyde doesn't run with elevated permissions, make sure it's a folder that Windows doesn't protect.
- Make sure you have at least one game listed in the Save Files list on the Setup tab. If it is empty, click the Add button, locate a save file, and give it a nickname. Then go to the Saves tab and select the nickname in the Save dropdown list.
My saveedit files aren't named the same as the ones you're listing, this is all messed up, wtf??
- You're probably looking at his python scripts. I feel your pain. I'm not a python dude; I just don't seem to have the constitution for it. Clyde uses the executable forms. Follow apocalyptech's installation instructions with the pip3 install thing, then you'll be able to find the executables I'm talking about, either in the Script directory I list way up in the Installation section or through a Windows search. If you can't get pip3 to work, Python probably isn't in your path. You can either add it manually or do what I did, uninstall Python and then reinstall it, this time making sure I found the checkbox for 'add to path'. I also found it easier to install for just my user. Then pip3 will work from a command window anywhere and the storm clouds will begin to thin.
I clicked one of the link thingies and nothing happened.
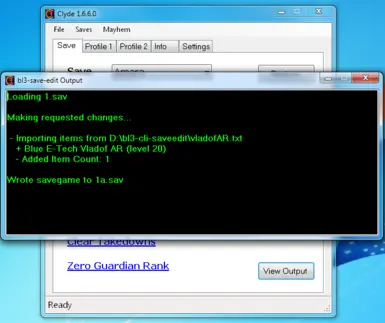
- Did the View Output button get enabled? If so, click it. The window that opens shows you the save edit app's output, or can contain information on what went wrong that can likely help you get on track. If the last line starts off with “Wrote savegame...” then the operation was probably a success. You can go to the Info tab and click the Read button to see the new stats, or go start up the game to verify the changes.
Any time I try to do something I get “Access to the path...is denied” - what's up with that?
- If you want to keep Clyde and the bl3-cli suite all together in the same directory, that's a great idea, but don't put them under Program Files. Move them up a level. Clyde copies the save files into the Save Edit directory to operate on them. Clyde is not allowed to write in Program Files because it's running without elevated privileges – which is as it should be.
bl3-cli-saveedit can write save files to JSON, how do I do that?
- On the Save tab, select the character you want to work with. If you want to write your profile to JSON, skip this step.
- Click the File menu and choose Export.
- In the Export File dialog, make sure JSON is selected as the type. If you're doing a character save, make sure the checkbox with the character's name is checked to the left of “Save”. If you're doing your profile, make sure that checkbox is checked.
- Clyde defaults to writing the JSON file to the Save Edit directory. You can use the little button to the right to choose a different directory or just type it in the box.
- Click OK.
bl3-cli-saveedit can write save files as raw protobufs, how do I do that?
- Follow the instructions for JSON but select Protobuf as the Type.
bl3-cli-saveedit can use JSON and raw protobufs as inputs for game files, how do I do that?
- On the Save tab, select the character you want to work with. If you're working with a profile, skip this step.
- Click the File menu and choose Import.
- Select JSON or Protobuf as appropriate.
- Check the checkbox for what it is you want to import, character and/or profile.
- If the source file name is as indicated in the filename box (to the right of the character name or 'Profile' checkboxes) and is located in your Save Edit directory, you can click OK. If not, you can click the little button to the right of the file name and locate the file just as you would on any File Open you've ever done.
- Click OK.
I have a really cool gun/shield/grenade mod... that I want to share with my buddy, but I want to hold on to it too, how do I do that?
- If it's not a uniquely named item, it can be hard to find in the item list, so in-game, equip whatever it is that you want to share.
- Select the character who's holding the item in the Save dropdown on the Save tab.
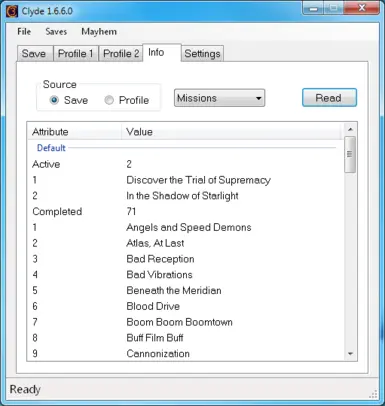
- Select the Info tab.
- Change the dropdown to either Items or All.
- Click the Read button.
- Click the 'Item List' link.
- Equipped items are at the bottom of the list. Scroll down and put a check beside the item(s) you want to share.
- If you want to use the in-game mailing system:
- Click the Copy button.
- In the Copy Items dialog, choose the same character that is holding the item.
- Click OK.
- Mail the duplicated item to your buddy in-game.
- If your buddy has Clyde and you want to transfer the item by email or thumb drive:
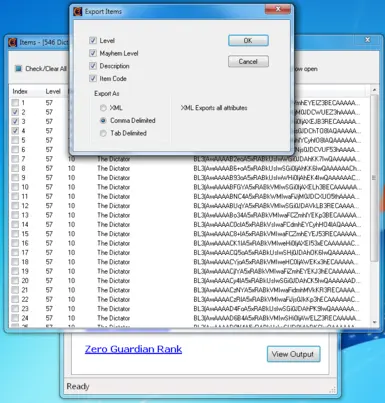
- Click the Export button.
- Choose a file type. If your buddy is savvy on Clyde, you can just leave it as XML. If not, choose Tab Delimited and save only the item code. Then your buddy can use the Import Items link on Clyde's main Save tab.
- Click OK.
- Choose a location and name for the file.
My buddy just sent me a file with a cool gun/shield/grenade mod... How do I get it into my character's inventory?
- If the file only contains item codes like the ones listed in Manipulating Items:
- Make sure your selected character is the one you want.
- Click the Import Items link on Clyde's Save tab.
- Locate the file in the file dialog.
- Optionally click Set Items to Character Level
- If the file was saved from Clyde as an XML, comma delimited, or tab delimited:
- Choose File menu and Open.
- Change the file extension filter in the bottom right of the file dialog to the appropriate file type.
- Locate the file in the file dialog.
- Clyde will show you the items contained in the file.
- Click the checkbox for each item you want.
- Click Copy.
- Select the Save in which you want to place the item(s).
- Click OK.
- Optionally click Set Items to Character Level.