


5 items

About this mod
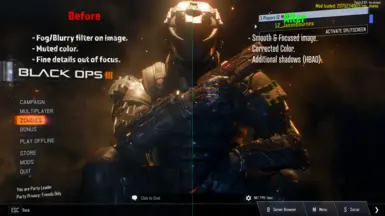
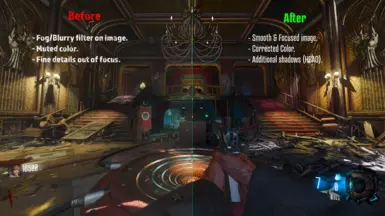
HD & 4K Realism (2 versions of each preset 'Smooth' & 'Sharp' + Optional HDR versions.)
- Permissions and credits
- Changelogs
Reshade Install & Setup: (Scroll down for IMPORTANT In-Game Settings and Setup below)
(Ignore this and skip straight to download if you already have my Fake_RTX reshade installed.)
➡️ Download https://reshade.me/
➡️ Open the setup program
➡️ Select black ops 3

➡️ Select DX 10/11/12

Install required shaders (2 options): (IMPORTANT)
> At the bottom it should say "Choose a preset file (.ini) to install only the effects in use:"
⤷ use my -sRGB_ReshadeInstallTemplate_DO_NOT_USE_FOR_GAMEPLAY for this step.
⤷ Alternatively, if you're an experienced Reshade user just make sure the following Reshade libraries are installed:
- Standard effects
- SweetFX
- Legacy effects
- Shaders by Brussel
- qUINT
- Color effects by prod80
- AstrayFX
- CShade
- iMMERSE
- Zentient Shaders
- Gshade-Shaders
⚠️⬆️ The above step is a requirement. You must use my template OR install the libraries listed manually.
⚠️⬆️ Failing to choose an option may lead to you not having all of the required shaders installed, leading to an unknown and unintended outcome.

➡️ After that is done, put the custom ReshadePresets.ini into D:\Program Files (x86)\Steam\steamapps\common\Call of Duty Black Ops III
In-Game Settings and Setup: (IMPORTANT)
➡️ Launch Bo3
➡️ Go to BO3 settings > Graphics, and set Display gamma to Computer (sRGB) and Brightness to '0.00' > Apply.
➡️ Next, open Reshade. (press home key)
➡️ Go to "Edit Global Processor definitions" under the home tab near the bottom. (see image below)
> Set RESHADE_DEPTH_INPUT_IS_REVERSED to 1 and press enter.

➡️ Click home tab again to force a loading screen. (multi color loading circle should appear)
➡️ Now open the Add-ons tab (very top of the menu) (example image below)
> Set "Aspect ratio heuristics" to "Similar aspect ratio"
> Set "Filter by depth buffer format" to "ALL"
> Select "copy depth before before clear operations"
> Select the blue string of numbers below that says reversed at the end of the string of text.
> Go back to the home tab, press home key to exit.

Applying reshade presets in-game:
Notes:
My custom presets info:
> -sRGBPreset_NO_EFFECT
> sRGB_HD_Clarity (good for custom maps that already have color correction embedded)
> sRGB_4K-Realism
Performance info: (based on a 4080, Max in-game settings @ 1440p)
HD Clarity FPS: 200+
4K Realism FPS: 160+
(Ignore this and skip straight to download if you already have my Fake_RTX reshade installed.)
➡️ Download https://reshade.me/
➡️ Open the setup program
➡️ Select black ops 3
➡️ Select DX 10/11/12
Install required shaders (2 options): (IMPORTANT)
> At the bottom it should say "Choose a preset file (.ini) to install only the effects in use:"
⤷ use my -sRGB_ReshadeInstallTemplate_DO_NOT_USE_FOR_GAMEPLAY for this step.
⤷ Alternatively, if you're an experienced Reshade user just make sure the following Reshade libraries are installed:
- Standard effects
- SweetFX
- Legacy effects
- Shaders by Brussel
- qUINT
- Color effects by prod80
- AstrayFX
- CShade
- iMMERSE
- Zentient Shaders
- Gshade-Shaders
⚠️⬆️ The above step is a requirement. You must use my template OR install the libraries listed manually.
⚠️⬆️ Failing to choose an option may lead to you not having all of the required shaders installed, leading to an unknown and unintended outcome.
➡️ After that is done, put the custom ReshadePresets.ini into D:\Program Files (x86)\Steam\steamapps\common\Call of Duty Black Ops III
In-Game Settings and Setup: (IMPORTANT)
➡️ Launch Bo3
➡️ Go to BO3 settings > Graphics, and set Display gamma to Computer (sRGB) and Brightness to '0.00' > Apply.
➡️ Next, open Reshade. (press home key)
➡️ Go to "Edit Global Processor definitions" under the home tab near the bottom. (see image below)
> Set RESHADE_DEPTH_INPUT_IS_REVERSED to 1 and press enter.
➡️ Click home tab again to force a loading screen. (multi color loading circle should appear)
➡️ Now open the Add-ons tab (very top of the menu) (example image below)
> Set "Aspect ratio heuristics" to "Similar aspect ratio"
> Set "Filter by depth buffer format" to "ALL"
> Select "copy depth before before clear operations"
> Select the blue string of numbers below that says reversed at the end of the string of text.
> Go back to the home tab, press home key to exit.
Applying reshade presets in-game:
- Press 'Home' at any time to open the reshade menu.
- At the top of the program is a drop down box. Use that box to select the custom preset, then click 'select' to enable it.
(you can also go into reshades settings and enable a 'switch' to enable/disable the reshade effects with the tap of a button.)
Notes:
- SMOOTH versions: use these on maps that appear to be too sharp.
- SHARP versions: use these on maps that need that extra little bit of crispness/sharpness.
- HD - versions were created for custom maps that already have vibrant colors etc, or players that simply just want a more clear image without full color correction.
My custom presets info:
> -sRGBPreset_NO_EFFECT
- Base preset. No modifications.
> sRGB_HD_Clarity (good for custom maps that already have color correction embedded)
- Enhanced image.
- Proper sharpness. (Adaptive)
- Removed filmic/hazy screen effect.
- Minor color correction.
- Smooth or Sharp. (DLAA/SMAA)
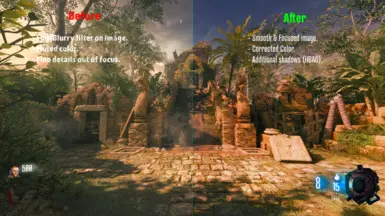
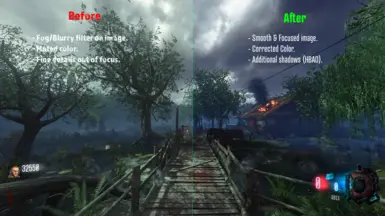
> sRGB_4K-Realism
- Enhanced image.
- Proper sharpness. (Adaptive)
- Removed filmic/hazy screen effect.
- Full color correction.
- Global illumination. (Simulates light rays)
- Eye adaptation. (lightly adjusts based on global lighting)
- Additional shadows.
- HBAO effects. (Additional shadows for depth)
- Smooth or Sharp (DLAA/SMAA)
- optional HDR versions.
Performance info: (based on a 4080, Max in-game settings @ 1440p)
HD Clarity FPS: 200+
4K Realism FPS: 160+