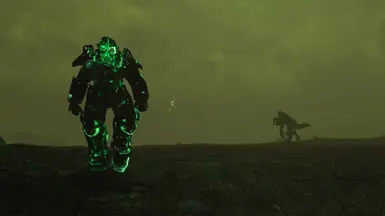
Adds a unique monster that wanders a large region of the map. Killing this monster will grant you a very unique, legendary set of T45d power armor that has interesting uses to make it viable in late-game. Also included is a sidequest for tracking down the monster after collecting various clues scattered throughout the world. Lore-friendly story.
Requirements
This mod does not have any known dependencies other than the base game.
Other user's assetsAll the assets in this file belong to the author, or are from free-to-use modder's resources
Upload permissionYou are not allowed to upload this file to other sites under any circumstances
Modification permissionYou must get permission from me before you are allowed to modify my files to improve it
Conversion permissionYou are not allowed to convert this file to work on other games under any circumstances
Asset use permissionYou must get permission from me before you are allowed to use any of the assets in this file
Asset use permission in mods/files that are being soldYou are not allowed to use assets from this file in any mods/files that are being sold, for money, on Steam Workshop or other platforms
Asset use permission in mods/files that earn donation pointsYou are not allowed to earn Donation Points for your mods if they use my assets
Console modding permissionThe author did not upload this mod to Bethesda.net for console users yet, but he or she will at some point
Author notes
This author has not provided any additional notes regarding file permissions
File credits
This author has not credited anyone else in this file
Donation Points system
Please log in to find out whether this mod is receiving Donation Points
This mod is my love-letter to Fallout 3, the game which introduced me to what became my favorite franchise of all time. The atmosphere, the bleakness, the eeriness, that puke-green color filter, and that sense of "what kind of interestingly awful thing will be in the next area," are all things I loved about that game. In this month of the game's anniversary, I wanted to share a little splash of that in Fallout 4.
The most organic way to experience this mod is to just install it and play. The quest will not start right away, but will instead trigger once you've found one of the clue notes scattered throughout the Commonwealth. If you find enough unique clues, the quest will update to begin tracking the monster on your map.
The monster is still ever-present in the world, even without the quest started. It is possible to encounter it without starting the quest at all. Entering combat with it will also start the quest. The quest will complete with XP granted once the monster is dead, regardless of how you started it.
This monster is intended for late-game combat, and it mostly roams areas that the player wouldn't go to until late in the campaign. Some of the clues required to track it are also found in late-game areas, so there is little risk of installing this mod on a fresh play-through.
Minimal Spoiler Section:
The earliest in-game way to begin the quest is to find one of the fliers in Concord, but there are many copies of this flier scattered throughout the game in towns/cities.
The other clues are unique and one-of-a-kind. You'll need at least three unique clues to have the monster tracked on your map (the aforementioned flier counts as one). These are mostly located in places you are likely to visit during the main campaign, so keep an eye out for notes and read terminal entries.
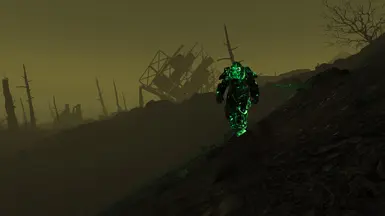
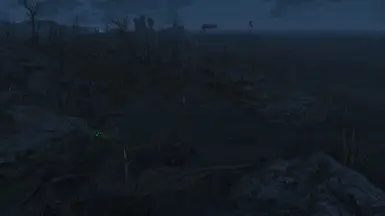
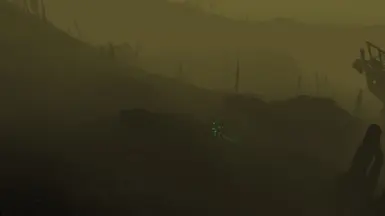
It's possible to encounter the monster organically without collecting all the clues as it wanders a large region of the map. Encountering it this way will still advance the quest and allow it to be completed. It's slow-moving, and fairly easy to spot if you're in the vicinity, so keep an eye open.
Walkthrough/Major Spoiler Section:
The monster roams a large region in the southwest part of the map. The area is large enough that it (intentionally) can be difficult to locate by just wandering around looking for it, but it's possible to complete it this way.
To have the monster tracked to your map to easily find it, you need at least three of four unique clues for the quest to advance to that stage. The clues and locations are below (exact note names/tiles will be different in-game):
Beware Flier: Dozens of copies throughout populated areas (only the first one you read will count towards the quest): Diamond City - Multiple Interior Cells, also laying around in the main outside cell in a few places GoodNeighbor - has the most, some inside interior cells, but also several laying around in rubble/alleyways Covenant - Garbage can outside the main gate, also one in the mayor's house Concord - Two located in separate buildings along the main road towards the Museum of Freedom
Terminal Entry: The recreation terminal in the lower main area of the Prydwen has an additional entry added to it (last entry on the list).
Raider Note: On a desk inside the Roadside Pines Motel. As of v1.12 this is pinned to one of the exterior door frames of the Roadside Pines Motel.
Atom Note: In the middle building in the Crater of Atom, on a desk next to the radio.
Cheat/Skip Section (I just want my armor!):
I still recommend killing the monster to take it from her directly. The best way to fight her (skipping the note collecting involved with the quest) is with the console command below:
setstage nmquest_glowing 45
This should start and/or advance the quest to the stage that adds a marker to your map. You may then go kill the monster to get the rewards and Glowing T-45d power armor set.
The reason I recommend doing it this way is that the monster will still be roaming a large area of the map unless the quest is completed. The armor is designed to be worn by late-game charactersby way of its constant radiation damage, and its positive perks are meant to make it comparable to other late-game armor even though it's still a T-45. Basically, if the monster itself and the area it roams are too difficult for your character to kill, the armor set might not be very useful to you yet either.
If you insist on skipping the fight altogether though, here are the other options:
Kill with console commands:
The commands below look up the monster's unique ID, then use it to move her to the player, and finally kill her all before closing the console.
sqv nmquest_glowing
This will return information about the quest. You want to look at the line that says: REF "The Glowing Nightmare." The 8-digit number that follows is the monster's ID. Then with the console still open, type the following commands in this exact order. Hit enter after each line.
00000000.moveto player (replace the 0's with the 8-digit number you looked up with the first command)
prid 00000000 (Again, use the monster's ID instead of 0's. This command is a precaution to ensure the monster is selected. Don't click on anything after typing this commend until you've input the next one below)
kill (self explanatory)
Close the console, and you should see the NPC dead on the ground next to you. The quest should show complete after a few seconds, and you may loot the power armor set from her corpse.
The last option involves just adding the armor set directly to your inventory without bothering with the NPC or quest. Note that all this does is place copies of each armor piece within your inventory. The monster will still be roaming around out there wearing its own set of it, and the quest will still be initialized for progress/completion at some point.
Type this in the console and hit Enter:
help t-45
It will return a list of t-45 items available in the game. There should be at least two sets of them with this mod installed (you'll see a list of T-45 armor pieces like the helm, body, arms, and then another list right below it of what appear to be the same pieces. These are actually different instances of the armor. If you just installed the mod, the bottom set will most likely be the Glowing set you're looking for. Make note of the 8-digit ID's that it lists after each one, and then type:
player.additem 00000000 (replace 0's with the ID it lists next to one of the T-45 pieces)
Do this for each piece (six times total for the whole set - helmet, body, 2x arms, 2x legs). When you close the console, the game should be showing each piece getting added to your inventory.
About the Armor:
This is a unique set of legendary T-45d armor with unique properties, an altered mesh, and two possible texture looks.
Enhancements from Vanilla T-45:
By default this has base stats comparable to a T-45 set with the "D" material lining, but has a much higher max-durability comparable to an X-01
Durability is doubled on the monster, so if you manage to kill it without doing a ton of damage to the armor itself, you'll have bonus durability stats until you need to repair it.
Like other T-45's, it's still cheap to repair - only requiring a bit of oil in addition to the usual T-45 repair costs
Along with the added textures/materials, the mesh is altered to look dented and melted
Unique Traits: This armor has two states based on what material you apply at a power armor crafting station
Glowing Material:
Has this mod equipped by default upon looting it.
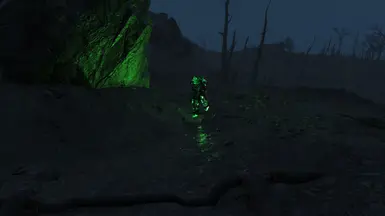
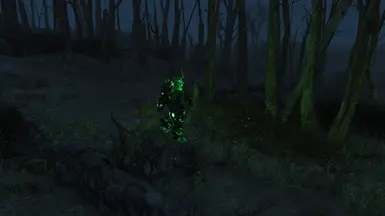
Has a unique burned metal texture with glow-map effects
Utilizes addon-nodes for lighting effects on each piece - with all pieces equipped it's roughly equivalent to a pip-boy light in terms of spread and brightness. These use add-on index 7005
Removes radiation resistance from all pieces
Reduces Charisma by 1 with each piece equipped (total of 6)
Each piece deals constant radiation damage while equipped - be careful fast traveling!!
This amounts to about 2 rads per-second on each piece if you are at 0 resistance, for a total of 12.
Hazmat suits aren't usable under power armor, so some suggested ways to negate this are:
Utilizing perks like Rad Resistant or Ghoulish
Swapping out with another piece or two of power armor that has radiation resistance, bonus if you also install a leaded mod
Using the Charred material for some of the pieces of this set, which restores their radiation resistance - both reducing rads by 2 and adding resistance for the rest.
Use Rad-X, Baked bloatflies, glowing blood packs, or vegetable soup
Even a small amount can reduce the effect substantially. I was able to reduce it to about 6 rads-per-second with only 10 radiation resistance.
The radiation damage can be a benefit for some builds, such as the healing granted by Ghoulish or the damage boost from Hancock's Isodoped.
but wait, there's good stuff too!
Each piece increases radiation damage dealt with radiation weapons
Keeps fusion cores charged sixteen times the detail longer! (Each piece does an equivalent percentage, adding up to 16x reduced fusion core drain with all pieces equipped. This includes when sprinting or using a jetpack.
The full set doesn't really need a headlamp, but you can still equip one if desired
NEW (V1.1) Grants additional perk with all pieces equipped - Frightening Legend
This perk is a combination of Intimidation (rank 1), Night Person (Rank 1), and Toughness (Rank 2)
It will appear or reappear based on if you have six pieces of this armor equipped with the glowing material applied
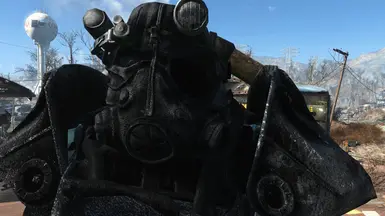
Charred Material:
You've scrubbed away the radiation, taking away its benefits and detriments
Charisma no longer takes a hit when pieces are equipped.
Restores radiation resistance to the armor
Graphically removes the glowmap and lighting nodes leaving just the burned metal texture
This is essentially a normal T-45d with durability comparable to an X-01 and a unique look. Without the radiation effects, the main reason you might still use this over other late-game armor is for the cheaper repair costs.
Other notes:
Both materials require Science 2 and Armorer 2 perks to create, but the glowing material will already be there by default.
All pieces can still equip the same Misc mods as regular T-45 armor, some of which have been recolored for this armor to better match it's aesthetic (like black paint on the jetpack)
Other Linings and Paint jobs cannot be applied
This mod creates its own armor assets, so it does not have any effect on vanilla T-45 armor looks or mods
(NEW) Installation Instructions (Pretty standard as far as mods go):
Using Vortex Mod Manager:
Click Download with Vortex here on the Files tab
If installed, the Vortex program should open up and start downloading it automatically
After the download finishes, check your Fallout 4 mods list and see that "The Glowing Nightmare" is showing active
Play the game like you normally would, the mod should be installed and working.
Manually:
Extract the contents of the .zip file to your 'Fallout 4 > Data' folder.
-For most Steam users this will be located in: This PC > Local Disk (C:) > Program Files (x86) > Steam > steamapps > common > Fallout -TheGlowingNightmare.esp file should be placed directly into this Data folder -Drag and drop the content folders inside each of the .zip file's Meshes, Textures, Scripts, and Materials folders to their identically named counterparts within your Data folder. -These should still be kept inside their subfolders - ie: all of the texture files should stay inside their 'GlowingT45_Textures' subfolder - you place this folder within your Textures folder so that the file path is Fallout 4 > Data > Textures > GlowingT45_Textures -If this isn't done correctly, the file paths might not match up, causing the mod not to work.
Start the game
On the main menu, click "MODS"
On the next screen, there should be an option at the bottom called LOAD ORDER
Open this, and ensure there is a checkmark next to TheGlowingNightmare.esp
Go back to the main menu, your game may prompt you to refresh if the mod wasn't already checked before
The mod should now be installed and working when you load up a Save
Change Log:
V1.1
Adds the ESL flag to the mod (prevents it from contributing towards the mod limit)
Adds a new perk with all glowing armor pieces equipped called Frightening Legend (see armor section above for details)
In accordance with quest lore, destroying the fusion core on the quest monster will no longer prompt it to exit its power armor
This will still slow it down, but will also remove the fusion core from its loot rewards
A bit more file clean up
Known Issues:
Occasionally the lighting effects (aside from the glowmap) will turn off on the glowing material when entering/exiting an interior cell. This can usually be fixed by switching between first person and third person perspectives. If that fails, entering and exiting the armor again will fix it. As far as I can tell this is an engine limitation with the way lighting on power armor furniture activates.
When first equipping any of the armor pieces, it may display them as 'missing' on the power armor condition part of the HUD if their item durability is still higher than maximum. This is another engine limitation where it doesn't recognize power armor pieces above maximum durability in that part of the HUD, but once they take enough damage to be within their normal range they will display as equipped and in good condition.
Please feel free to provide feedback and/or report bugs in the comments section. I'm just one dude working on this as a passion project on top of my other life responsibilities, so there is only so much testing I can do myself. Try to include as much detail in any issue reports as possible to help me pin down what might be causing the issue.