


0 of 0


About this mod
Simple Mod manager compatible with Season 0 and Season 1.25 (current patch)
(Updated with the latest patch for meshes)
- Permissions and credits
- Mirrors
- Changelogs
[UPDATE 13/02/2025]
I will be working on refresh of the manager later to only focus on managing and differents styles of managing the mods.
In theory the packer is no longer for the mods (only old and not updated mods is required) because the modder are updating their mods, only moving the mod to ~mods folder on the game is needed to work.
For now if you wanna still use the manager you can use it using this configuration:
- On settings set you enabled directory to the ~mods folder of your game
- Make sure the mods you add are on .pak format
Also as a bonus, the manager can manage mods collections/profiles which you can swap multiple collectons of mods up to change what you wanna use.
- This is located on settings, the button "Multiple mods profile"
--------------------------------------------------------------------------------------------------------------------------------
Support
I'm open for any kind of request for the app due more functionality is better or help with the directly, you can contact me via Discord (username: nordicboy3945)
Source code
If you wanna download the source code and compile it for yourselft or make a brach or download the last release (Releases)
Marvel Rivals - Mod Manager - WinUI3
How to install the app
Here is a guide if you got some problem installing the app. (Guide)
Marvel Rivals - Mod Manager
Mod manager build up using WinUI3, which was made in mind as a tool to be compatible with the Season 0 (using ~mods folder) and Season 1 (patch) (using Repak method)
How mods work on Marvel Rivals
In Season 0, mods in .pak format only needed to be placed directly into the ~mods folder in order to be used.
In Season 1 - pre patch, mods in order to be used must be unzipped (files in .pak format) and all mod files placed directly into the game's content folder.
In Season 1 - patch, mods in order to be used must be unzipped (files in .pak format) and all mod files packed on a single pak file to be later loaded.
How to configure the manager
For the Season 0, only it's needed to set the Enabled folder to the ~mods on the game content directory.
For the Season 1 (patch), it's needed to download (can be using the manager or another source) the Repak.
After that you can configure the mods you wanna install, after managing the mods, just remain to click on the button Unpack (to unpack the mod enabled) and at last Patch to apply the mods unpacked.
Mod manager
The mod manager is separated on three views, which are related between each other thought a layer of services.
Settings
Here you configure the directories necessary for the manager to work correctly. By default only the when the app is launched the first time (due it would create aa file usersettings_1.json to store the settings variables), it would create the folder MarvelRivalModManager on C:\Users\Public\Documents\. This default configuration can be change any time later.
Content Folder
Represent where the game content is located and where the mod would be deployed for the Season 1, the manager would try, on the first time is launched, to locate the Steam folder using the public registry values related to steam (SOFTWARE\VALVE\ and SOFTWARE\Wow6432Node\Valve\) . For example, on Steam is located in ~/steamapp/common/Marvel Rivals/MarvelGame/Marvel/Content.
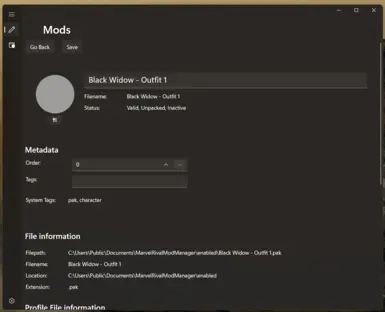
Mod directories
Represents the directories used to manage the enabled and disabled states of mods. This was made on this way to maintain compatibility with the Season 0 mod management, and for later use when a proper mod bypass for Season 1 is made.
There are two directories for this section Enabled and Disabled folder, were both are identical on structure. On the root of the folder the mods are stored, and a profile folder is created were each mod metadata is stored. Also if exists any image related for a mod, a folder images is created to store all the images related to the mod folder.
Unpacker
Represent were the mods are unpacked and merged to later be patched on the game content folder, also it contains the unpacker program (repak.exe) which is used to unpack .pak files with no hash password, also is used to pack the raw files again to later be moved to the game content
Options
Here you can found some optional features that can improve or adjust of how you wanna use the manager.
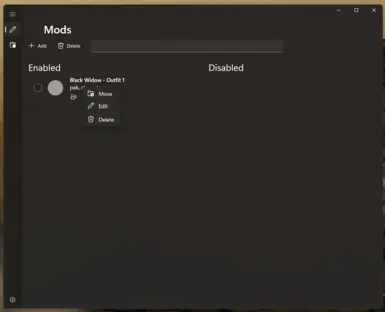
Manager
The manager separate the mods into two sections Enabled and Disabled, which each one represent a folder, described on the Settings section, and by default only Enabled mods would be patch into the game raw files.
The manager has a command bar with two options:
- Add: Open a dialog up to select a single o multiple mods, on formats (.pak, .zip, .rar and .7z). When a mod is added the mod would be decompressed to generate the metadata of the mod, in the case of the .pak files it would try to unpack it using the unpacker described on Settings section.
- Remove: Delete selected the mods from the lists and related content, metadata and images.
Next to the command bar, there is a search box, which you can filter mods of the list using the field Name and Tags (this include the system tags and custom tags).
To enable/disable a mod, you can select multiple mods and later just drag'n drop on the other list, each mod hace a context menu, which have the following options:
- Move: Move the mod to the othe list (enabled/disabled).
- Edit: Open editor view where you can edit some metadata of the mod like the name, logo and custom tags for search on the bar.
- Delete: Delete selected the mod related content, metadata and images.
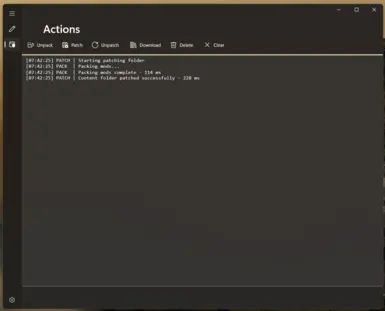
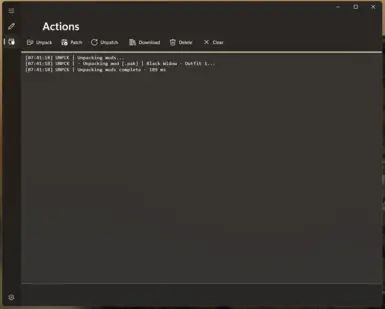
Actions
The actions view is more dedicated to apply the raw files of the mods (compressed or on .pak format).
Patch
Retrieve all the mods on the Enabled list, and try to unpack into raw files and merge all this content into a folder called extraction, located on the Unpacker folder, then retrieve all the mods that are marked as unpacked, pack all files into a single .pak file and move it to the game folder content. If there is a disabled mod that is unpacked the manager would try to remove the files affected on the extraction folder.
Unpatch
Tries to delete the generated .pak file on the content folder.
Download
This options would try to download from Mega Folder the files needed to the manager to work as the repak.exe.
Delete
Tries to delete the downloaded resources.
Clear
Only clear the logs of the console.
I will be working on refresh of the manager later to only focus on managing and differents styles of managing the mods.
In theory the packer is no longer for the mods (only old and not updated mods is required) because the modder are updating their mods, only moving the mod to ~mods folder on the game is needed to work.
For now if you wanna still use the manager you can use it using this configuration:
- On settings set you enabled directory to the ~mods folder of your game
- Make sure the mods you add are on .pak format
Also as a bonus, the manager can manage mods collections/profiles which you can swap multiple collectons of mods up to change what you wanna use.
- This is located on settings, the button "Multiple mods profile"
--------------------------------------------------------------------------------------------------------------------------------
Support
I'm open for any kind of request for the app due more functionality is better or help with the directly, you can contact me via Discord (username: nordicboy3945)
Source code
If you wanna download the source code and compile it for yourselft or make a brach or download the last release (Releases)
Marvel Rivals - Mod Manager - WinUI3
How to install the app
Here is a guide if you got some problem installing the app. (Guide)
Marvel Rivals - Mod Manager
Mod manager build up using WinUI3, which was made in mind as a tool to be compatible with the Season 0 (using ~mods folder) and Season 1 (patch) (using Repak method)
How mods work on Marvel Rivals
In Season 0, mods in .pak format only needed to be placed directly into the ~mods folder in order to be used.
In Season 1 - pre patch, mods in order to be used must be unzipped (files in .pak format) and all mod files placed directly into the game's content folder.
In Season 1 - patch, mods in order to be used must be unzipped (files in .pak format) and all mod files packed on a single pak file to be later loaded.
How to configure the manager
For the Season 0, only it's needed to set the Enabled folder to the ~mods on the game content directory.
For the Season 1 (patch), it's needed to download (can be using the manager or another source) the Repak.
After that you can configure the mods you wanna install, after managing the mods, just remain to click on the button Unpack (to unpack the mod enabled) and at last Patch to apply the mods unpacked.
Mod manager
The mod manager is separated on three views, which are related between each other thought a layer of services.
Settings
Here you configure the directories necessary for the manager to work correctly. By default only the when the app is launched the first time (due it would create aa file usersettings_1.json to store the settings variables), it would create the folder MarvelRivalModManager on C:\Users\Public\Documents\. This default configuration can be change any time later.
Content Folder
Represent where the game content is located and where the mod would be deployed for the Season 1, the manager would try, on the first time is launched, to locate the Steam folder using the public registry values related to steam (SOFTWARE\VALVE\ and SOFTWARE\Wow6432Node\Valve\) . For example, on Steam is located in ~/steamapp/common/Marvel Rivals/MarvelGame/Marvel/Content.
Mod directories
Represents the directories used to manage the enabled and disabled states of mods. This was made on this way to maintain compatibility with the Season 0 mod management, and for later use when a proper mod bypass for Season 1 is made.
There are two directories for this section Enabled and Disabled folder, were both are identical on structure. On the root of the folder the mods are stored, and a profile folder is created were each mod metadata is stored. Also if exists any image related for a mod, a folder images is created to store all the images related to the mod folder.
Unpacker
Represent were the mods are unpacked and merged to later be patched on the game content folder, also it contains the unpacker program (repak.exe) which is used to unpack .pak files with no hash password, also is used to pack the raw files again to later be moved to the game content
Options
Here you can found some optional features that can improve or adjust of how you wanna use the manager.
- Deploy on separate file: This refer on how you set the patch files on the game folder, by default the manager only set one unified file for all mods, but with this you can separate each mod per file.
- Evaluate mod when toggle (enable/disable): This refer of how often the manager will try to update the system information of the mod, by default now only evaluate once when the mod is added, with this you can evaluate the mod each time is updated (move to enable or disable or patch to the game).
- Ignore the packer tool: This refer that the manager will no use the unpacker tool at all if you wanna only manage the mods and not use the actions at all.
- Use parallel proccesing: This refer to proccess each mod/file/action on parallel to make a faster evaluation or patch in general.
Manager
The manager separate the mods into two sections Enabled and Disabled, which each one represent a folder, described on the Settings section, and by default only Enabled mods would be patch into the game raw files.
The manager has a command bar with two options:
- Add: Open a dialog up to select a single o multiple mods, on formats (.pak, .zip, .rar and .7z). When a mod is added the mod would be decompressed to generate the metadata of the mod, in the case of the .pak files it would try to unpack it using the unpacker described on Settings section.
- Remove: Delete selected the mods from the lists and related content, metadata and images.
Next to the command bar, there is a search box, which you can filter mods of the list using the field Name and Tags (this include the system tags and custom tags).
To enable/disable a mod, you can select multiple mods and later just drag'n drop on the other list, each mod hace a context menu, which have the following options:
- Move: Move the mod to the othe list (enabled/disabled).
- Edit: Open editor view where you can edit some metadata of the mod like the name, logo and custom tags for search on the bar.
- Delete: Delete selected the mod related content, metadata and images.
Actions
The actions view is more dedicated to apply the raw files of the mods (compressed or on .pak format).
Patch
Retrieve all the mods on the Enabled list, and try to unpack into raw files and merge all this content into a folder called extraction, located on the Unpacker folder, then retrieve all the mods that are marked as unpacked, pack all files into a single .pak file and move it to the game folder content. If there is a disabled mod that is unpacked the manager would try to remove the files affected on the extraction folder.
Unpatch
Tries to delete the generated .pak file on the content folder.
Download
This options would try to download from Mega Folder the files needed to the manager to work as the repak.exe.
Delete
Tries to delete the downloaded resources.
Clear
Only clear the logs of the console.