


0 of 0
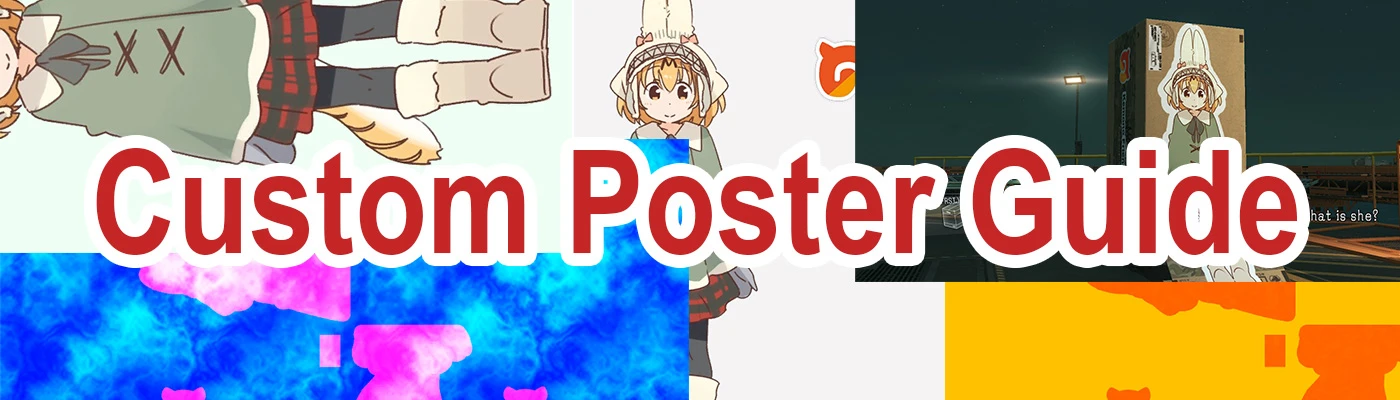
About this mod
A how-to guide on how to create and implement your own custom poster replacements, just like those in the game. Includes Photoshop files for guidance.
- Requirements
- Permissions and credits
This is an in-depth on how to make and implement your own custom box posters. It includes Photoshop files with references and (hopefully) clear instructions. This guide owes a lot to Hakanai312 and Morbidslinky for already doing a lot of this work.
1.1 Update - I made a really quick video guide and have included my own expanded poster modding resources that now includes stuff like menu icons.
0. The Basics
This guide is going to assume you know very little to none about modding. A box poster is made up of four separate .dds textures.
You can find a Photoshop CC plugin to save as .dds here
1. Before We Begin
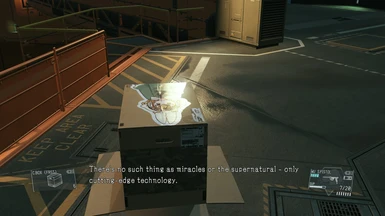
You can't change the function of each poster, nor can you add additional posters. The Soviet soldier poster will still cause guards to salute, even if your box shows an anime girl. For this, you will need:
2. Making the Textures
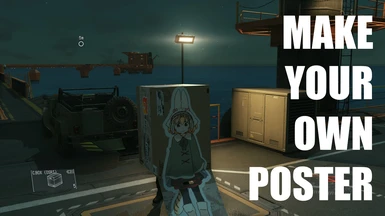
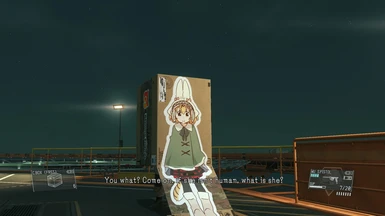
Start by finding an image you want, ideally one either very tall or very wide with some transparency to go on your box. Make a 512 x 1024px canvas and create what the poster will look like in the open world. You can't have transparency here. Vertical posters need to be rotated -90 degrees (so they are longways).
Decide which poster you want to replace and copy that folder from the Poster Modding Guide.
Save as a .dds file and overwrite the poster (it will have a file name something like "33fad46cc94c5.dds"). Choose "DXT1 RGB 4bpp | no alpha" and save.

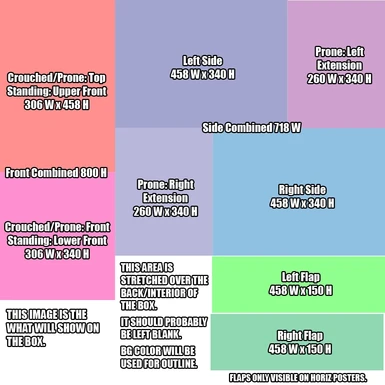
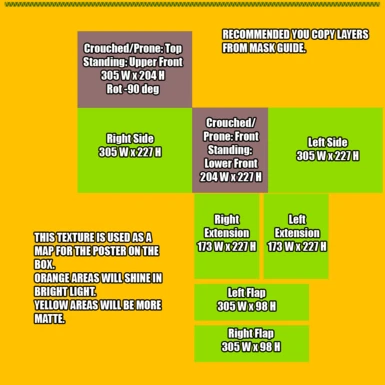
Open "Box Poster Image Guide.psd" in Photoshop. Drag the version you want on the box into it and place it where it belongs using the guides provided. Spacing around the edges matters, I recommend leaving a little bit of room on each side. For the sides, flip your layer horizontally so they will match. Additionally, the side flaps are only visible with the horizontal posters and will cover part of the side when not in prone.

Make sure your layers are where they belong in the "Align" layer group. The background color will become the outline around your poster. Make the text and colored box layers invisible. Save as a .dds and in the same folder as before, overwrite the file that ends with "_lym.dds"
NOTE: There are two ways of doing the next few steps, easy and hard. The easy way is... easier, but at the cost of skimping out on some things. The hard way matches how the vanilla box posters are done.
2a. The Easy Way

Go back to the image guide. Drag "carboard backdrop.dds" from the Poster Modding Resources and use it as your background. Use the Stroke layer style to give your posters an outline (if you wish) and save again.
Copy "Water and Filled Outline Backdrop.dds" into your working folder and rename it to take place of the file that ends with "_lbm.dds"
Copy "Shine backdrop - No Gloss.dds" into your working folder and rename it to take place of the file that ends with "_srm.dds"
Skip to Step 3
2b. The Hard Way
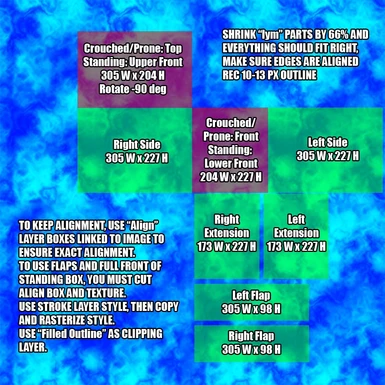
Open "Box Poster Mask Guide.psd" in Photoshop. Duplicate the "Align" group from the image guide to the mask guide. Shrink the entire group by about 66.67% (aka 2/3). Make sure the colored rectangle layers are visible and link them to your layers. For layers that go across multiple parts of the box you must carefully splice them (and their linked boxes) and drag/rotate them to their new positions (getting this right can be difficult). Use the colored guide and templates for reference, you have to be fairly precise. Once you're done, make all the text and rectangles invisible.

If you want an outline, use the stroke style on the whole group, I recommend 10-13px to match the vanilla game. Copy the group and merge it.
Place the pink Filled Outline Backdrop layer above and use it as a clipping layer. Save as a .dds file over the file that ends with "_lbm.dds"
Open "Box Poster Shine Guide.psd" and duplicate your merged layer from the mask guide into it. Use the orange Shine Backdrop layer as clipping layer just like the previous step. Save as a .dds file over the file that ends with "_srm.dds"
These last two files should have the exact same layout.
3. Packing Everything Up
By now, you should have 4 .dds images all saved in a folder.
They should look somewhat like the examples included in Poster Modding Resources (easy way will be a bit different).

3a. Building an Archive
You will only have to do this step once. Once you've done it, you won't have to again unless you delete the unpacked files.
Open "Archive Unpacker" included with File Monolith. For Archives, click the '...' and navigate to where MGSV is installed (By default this will be C:\Program Files (x86)\Steam\steamapps\common\MGS_TPP\). Open the master folder and select a_chunk7.dat, chunk2.dat, and chunk4.dat. Then choose a folder where you want the data to be unpacked to and click "Unpack".

These files are over 10GB, and unpacking may take a little while.
3b. Proliferation to Installation
From here on out, you must proliferate and build your files every time you make a change to them.
Open the "File Proliferator" included with File Monolith. For the top option, select all of your poster files (they must all sit in the same folder). At the bottom, under "Texture Options", check all three boxes and set your texture directory to where you unpacked your archives. Choose your output folder and build the directory structure. Select yes to delete leftover _ptfxs folders.
Edit: If some of your files are not appearing correctly ingame, try unpacking all of the game's archives.

Open MakeBite, included with SnakeBite. In the top right, select the folder in which you just proliferated to. Fill out however much info on the left as you want, but make sure you are building for the most recent version of MGSV. Select "Do it (build archive)" and choose where to save your complete mod file.

Finally, use SnakeBite to install your mod. If you have an old version, you should uninstall that first.
Launch the game to see how it looks.
NOTE: If you are replacing multiple posters at once, I recommend combining them all into one mod file. Not doing so can be wonky.
1.1 Update - I made a really quick video guide and have included my own expanded poster modding resources that now includes stuff like menu icons.
0. The Basics
This guide is going to assume you know very little to none about modding. A box poster is made up of four separate .dds textures.
You can find a Photoshop CC plugin to save as .dds here
- The first is the poster as it will appear in the world. It is a simple 512 x 1024px image.
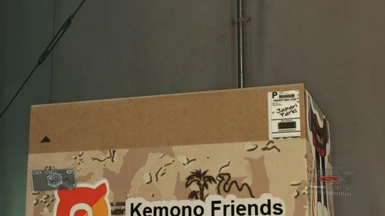
- The second is the actual image on the box (ends with "_lym"). It is a 1024 x 1024px image.
- The third is a mask (ends with "_lbm"). It has a colored pattern that will determine what parts of your image will be shown on the box and can be used for making outlines.
- The last determines glossiness (ends with "_srm"). It uses colors to determine what parts of your box will have a poster-like shine in bright light. More than likely, it will be the same as your mask.
1. Before We Begin
You can't change the function of each poster, nor can you add additional posters. The Soviet soldier poster will still cause guards to salute, even if your box shows an anime girl. For this, you will need:
- Mentioned above, a plugin for GIMP or your version of Photoshop to save as .dds textures
- File Monolith
- SnakeBite/MakeBite
2. Making the Textures
Start by finding an image you want, ideally one either very tall or very wide with some transparency to go on your box. Make a 512 x 1024px canvas and create what the poster will look like in the open world. You can't have transparency here. Vertical posters need to be rotated -90 degrees (so they are longways).
Decide which poster you want to replace and copy that folder from the Poster Modding Guide.
Save as a .dds file and overwrite the poster (it will have a file name something like "33fad46cc94c5.dds"). Choose "DXT1 RGB 4bpp | no alpha" and save.
Open "Box Poster Image Guide.psd" in Photoshop. Drag the version you want on the box into it and place it where it belongs using the guides provided. Spacing around the edges matters, I recommend leaving a little bit of room on each side. For the sides, flip your layer horizontally so they will match. Additionally, the side flaps are only visible with the horizontal posters and will cover part of the side when not in prone.
Make sure your layers are where they belong in the "Align" layer group. The background color will become the outline around your poster. Make the text and colored box layers invisible. Save as a .dds and in the same folder as before, overwrite the file that ends with "_lym.dds"
NOTE: There are two ways of doing the next few steps, easy and hard. The easy way is... easier, but at the cost of skimping out on some things. The hard way matches how the vanilla box posters are done.
2a. The Easy Way
Go back to the image guide. Drag "carboard backdrop.dds" from the Poster Modding Resources and use it as your background. Use the Stroke layer style to give your posters an outline (if you wish) and save again.
Copy "Water and Filled Outline Backdrop.dds" into your working folder and rename it to take place of the file that ends with "_lbm.dds"
Copy "Shine backdrop - No Gloss.dds" into your working folder and rename it to take place of the file that ends with "_srm.dds"
Skip to Step 3
2b. The Hard Way
Open "Box Poster Mask Guide.psd" in Photoshop. Duplicate the "Align" group from the image guide to the mask guide. Shrink the entire group by about 66.67% (aka 2/3). Make sure the colored rectangle layers are visible and link them to your layers. For layers that go across multiple parts of the box you must carefully splice them (and their linked boxes) and drag/rotate them to their new positions (getting this right can be difficult). Use the colored guide and templates for reference, you have to be fairly precise. Once you're done, make all the text and rectangles invisible.
If you want an outline, use the stroke style on the whole group, I recommend 10-13px to match the vanilla game. Copy the group and merge it.
Place the pink Filled Outline Backdrop layer above and use it as a clipping layer. Save as a .dds file over the file that ends with "_lbm.dds"
Open "Box Poster Shine Guide.psd" and duplicate your merged layer from the mask guide into it. Use the orange Shine Backdrop layer as clipping layer just like the previous step. Save as a .dds file over the file that ends with "_srm.dds"
These last two files should have the exact same layout.
3. Packing Everything Up
By now, you should have 4 .dds images all saved in a folder.
They should look somewhat like the examples included in Poster Modding Resources (easy way will be a bit different).
3a. Building an Archive
You will only have to do this step once. Once you've done it, you won't have to again unless you delete the unpacked files.
Open "Archive Unpacker" included with File Monolith. For Archives, click the '...' and navigate to where MGSV is installed (By default this will be C:\Program Files (x86)\Steam\steamapps\common\MGS_TPP\). Open the master folder and select a_chunk7.dat, chunk2.dat, and chunk4.dat. Then choose a folder where you want the data to be unpacked to and click "Unpack".
These files are over 10GB, and unpacking may take a little while.
3b. Proliferation to Installation
From here on out, you must proliferate and build your files every time you make a change to them.
Open the "File Proliferator" included with File Monolith. For the top option, select all of your poster files (they must all sit in the same folder). At the bottom, under "Texture Options", check all three boxes and set your texture directory to where you unpacked your archives. Choose your output folder and build the directory structure. Select yes to delete leftover _ptfxs folders.
Edit: If some of your files are not appearing correctly ingame, try unpacking all of the game's archives.
Open MakeBite, included with SnakeBite. In the top right, select the folder in which you just proliferated to. Fill out however much info on the left as you want, but make sure you are building for the most recent version of MGSV. Select "Do it (build archive)" and choose where to save your complete mod file.
Finally, use SnakeBite to install your mod. If you have an old version, you should uninstall that first.
Launch the game to see how it looks.
NOTE: If you are replacing multiple posters at once, I recommend combining them all into one mod file. Not doing so can be wonky.