


0 of 0
File information
Last updated
Original upload
Created by
dwvauadeUploaded by
dwvauadeVirus scan
Safe to use
Tags for this mod
Current section
About this mod
Allows VRM/non VRM custom models that replace crazy mita/cappie/kinda mita/mila/sleepy mita/short haired mita/player to be created/loaded.
- Requirements
-
This mod does not have any known dependencies other than the base game.
Mods requiring this file
- Permissions and credits
-
Credits and distribution permission
- Other user's assets All the assets in this file belong to the author, or are from free-to-use modder's resources
- Upload permission You are not allowed to upload this file to other sites under any circumstances
- Modification permission You must get permission from me before you are allowed to modify my files to improve it
- Conversion permission You are not allowed to convert this file to work on other games under any circumstances
- Asset use permission You must get permission from me before you are allowed to use any of the assets in this file
- Asset use permission in mods/files that are being sold You are not allowed to use assets from this file in any mods/files that are being sold, for money, on Steam Workshop or other platforms
- Asset use permission in mods/files that earn donation points You are not allowed to earn Donation Points for your mods if they use my assets
Author notes
This author has not provided any additional notes regarding file permissions
File credits
This author has not credited anyone else in this file
Donation Points system
Please log in to find out whether this mod is receiving Donation Points
If something is broken shout at me
INSTALLATION
Step 1: Download and install bepinex
You'll need this version here: https://github.com/BepInEx/BepInEx/releases/download/v6.0.0-pre.2/BepInEx-Unity.IL2CPP-win-x64-6.0.0-pre.2.zip
Extract the files into the game folder.
Step 2: Install mod
Make sure to run the game once to allow bepinex to install it's dependencies. Once you get to the main menu close the game then download the mod and extract the files and put them in the BepInEx -> plugins folder inside the game directory
If you are on steam deck or linux this mod can work on it. It should work just fine with proton using the following steam launch option in the properties for the game.
INSTALLING CUSTOM MODELS AND USAGE
Mods are categorized into folder in the BepInEx -> plugins -> models folder.
Once you run the mod once you should see the folders:
- all
- cappie
- crazy_mita
- kind_mita
- mila
- short_haired_mita
- sleepy_mita
- player
Mods should be put in the correct folder as specified by mod maker
You can then press F1 to open menu to change models
Keybinds config for F1 can be changed in file Bepinex\config\MS_CustomModels.cfg
CREATING CUSTOM MODELS
VRM Method (No Rigging)
Disclaimer:
Download Unity 2021.3.35 (https://unity.com/releases/editor/archive)
Next create a unity project using Unity 2021.3.35,
Download and Import the unity package MiSideCustomModels_vx.x.x.unitypackage from optional files(you'll need to unzip it first)
Refer to this video for how to import and export vrm from unity
New Video:
Old Video:
If the lighting of your vrm model looks too dark you might be able to fix the lighting issue in the MToon shader itself. Select a material
on your model then under Lighting -> Advanced Settings, try changing
"GI Intensity" to 0, then setting "LightColor Attenuation" to a value
higher than 0 (1) to increase the brightness when it's a dark scene.
You'll need to do this for each material the model uses.
Standard Method (Manual rigging required)
Step 1:
Download Unity 2021.3.35 (https://unity.com/releases/editor/archive)
Download blender (https://www.blender.org/download/)
Download the "Original Assets.zip" and extract fbx from it somewhere
(Note that this rig won't work Mila or player, you need use the "Mila Original Assets" or "Player Original Assets" fbx instead)
Step 2:
Open blender and go import fbx, look for "Mita.fbx" in the zip file you downloaded
earlier. Uncheck animation, and change scale to 100
Move model back to 0 0 0
Now make whatever changes you want, you can sculpt, remove mesh, retexture
whatever the hell you want but you must preserve the armature.you can
add meshes.bones (for extra jiggles, not explained here) but you cant go
removing or renaming bones or else you'll break animations.
If you want face shapekeys to work, rename your face/head shapekeys to the one found in mita's original head
and preserve the head object with the name "Head" when exporting
Note that if you have any mesh called "Head" you must have the same shapekeys (they don't need to be functional) added to it as the original head model or else you'll get errors in the console about out of bounds indices for shapekeys.
Additionally:
Shapekeys you name as "SLIDER_X", "SLIDER_Y" etc. will be configurable in game using the mod with a slider.
Meshes named as "TOGGLE_X", "TOGGLE_Y" etc. will be toggleable in game using the mod
If you are making a player mod it is recommended to separate the head from the body.
next export fbx and scale it down to 0.01 if u scaled it up when importing
Step 3:
Next create a unity project using Unity 2021.3.35,
Download and Import the unity package MiSideCustomModels_vx.x.x.unitypackage from optional files(you'll need to unzip it first)
Next drag and drop the exported fbx into unity assets
window, select the fbx and on the right VERY IMPORTANT MAKE SURE TO
UNCHECK "Convert Units" and click apply
The textures may not be correct when you reimport the model (especially when using the
whole/parts of the original model from the game. It is
advised to unpack the materials from the materials window seen in the previous step
and set them up again so that they look exactly like u want.
Drag model into scene, you'll see that there are two extra gameobjects to
which the rig is parented to for whatever reason when we import (dont
know how to make sure it doesnt happen), this doesn't break anything but
make sure to set the position and rotation of the two parents to 0,0,0
position and rotation
You can use VRM spring bones for physics. There are hundreds of guides out there on youtube on how to add them to your model
Next select your model in the scene then go -> MiSide -> Export rig swap FBX mod
From here you can select to keep certain meshes in the game (if for example you just want to replace the body or something)
Replace shaders will try fix your materials to match the in games materials
Player layers is only relevant if you are doing a player swap and is explained in depth within the export window
Step 4:
You can then click export and depending on what model u are replacing you can select
bepinex plugins\models\all folder or
plugins\models\mila for mila model swaps or
plugins\models\player for player model swaps
You're done! now when you launch your game you should see your custom model when u press F1
if want to share your mod, you'll see these other files in your
plugins\models folder
Hopefully its somewhat clear, I'm not the best at blender and stuff but I'll try my best to answer questions if I can
INSTALLATION
Step 1: Download and install bepinex
You'll need this version here: https://github.com/BepInEx/BepInEx/releases/download/v6.0.0-pre.2/BepInEx-Unity.IL2CPP-win-x64-6.0.0-pre.2.zip
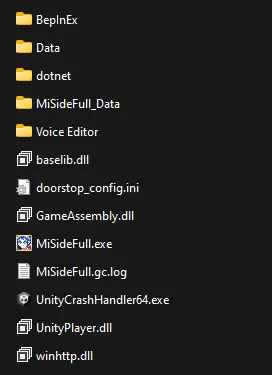
Extract the files into the game folder.
Miside
 |
  |-BepInEx
|- plugins
|- config
|- etc...
  |-dotnet
  |-MiSideFull_Data
  |-GameAssembly.dll
  |-MiSideFull.exe
  |-winhttp.dll
  |-etc...
Your game folder should look something like this now. Step 2: Install mod
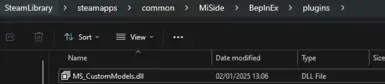
Make sure to run the game once to allow bepinex to install it's dependencies. Once you get to the main menu close the game then download the mod and extract the files and put them in the BepInEx -> plugins folder inside the game directory
If you are on steam deck or linux this mod can work on it. It should work just fine with proton using the following steam launch option in the properties for the game.
WINEDLLOVERRIDES="winhttp=n,b" %command%
If that fails please look here: https://docs.bepinex.dev/articles/advanced/proton_wine.html INSTALLING CUSTOM MODELS AND USAGE
Mods are categorized into folder in the BepInEx -> plugins -> models folder.
Once you run the mod once you should see the folders:
- all
- cappie
- crazy_mita
- kind_mita
- mila
- short_haired_mita
- sleepy_mita
- player
Mods should be put in the correct folder as specified by mod maker
You can then press F1 to open menu to change models
Keybinds config for F1 can be changed in file Bepinex\config\MS_CustomModels.cfg
CREATING CUSTOM MODELS
VRM Method (No Rigging)
Disclaimer:
Download Unity 2021.3.35 (https://unity.com/releases/editor/archive)
Next create a unity project using Unity 2021.3.35,
Download and Import the unity package MiSideCustomModels_vx.x.x.unitypackage from optional files(you'll need to unzip it first)
Refer to this video for how to import and export vrm from unity
New Video:
Old Video:
If the lighting of your vrm model looks too dark you might be able to fix the lighting issue in the MToon shader itself. Select a material
on your model then under Lighting -> Advanced Settings, try changing
"GI Intensity" to 0, then setting "LightColor Attenuation" to a value
higher than 0 (1) to increase the brightness when it's a dark scene.
You'll need to do this for each material the model uses.
Standard Method (Manual rigging required)
Step 1:
Download Unity 2021.3.35 (https://unity.com/releases/editor/archive)
Download blender (https://www.blender.org/download/)
Download the "Original Assets.zip" and extract fbx from it somewhere
(Note that this rig won't work Mila or player, you need use the "Mila Original Assets" or "Player Original Assets" fbx instead)
Step 2:
Open blender and go import fbx, look for "Mita.fbx" in the zip file you downloaded
earlier. Uncheck animation, and change scale to 100
Move model back to 0 0 0
Now make whatever changes you want, you can sculpt, remove mesh, retexture
whatever the hell you want but you must preserve the armature.you can
add meshes.bones (for extra jiggles, not explained here) but you cant go
removing or renaming bones or else you'll break animations.
If you want face shapekeys to work, rename your face/head shapekeys to the one found in mita's original head
and preserve the head object with the name "Head" when exporting
Note that if you have any mesh called "Head" you must have the same shapekeys (they don't need to be functional) added to it as the original head model or else you'll get errors in the console about out of bounds indices for shapekeys.
Additionally:
Shapekeys you name as "SLIDER_X", "SLIDER_Y" etc. will be configurable in game using the mod with a slider.
Meshes named as "TOGGLE_X", "TOGGLE_Y" etc. will be toggleable in game using the mod
If you are making a player mod it is recommended to separate the head from the body.
next export fbx and scale it down to 0.01 if u scaled it up when importing
Step 3:
Next create a unity project using Unity 2021.3.35,
Download and Import the unity package MiSideCustomModels_vx.x.x.unitypackage from optional files(you'll need to unzip it first)
Next drag and drop the exported fbx into unity assets
window, select the fbx and on the right VERY IMPORTANT MAKE SURE TO
UNCHECK "Convert Units" and click apply
The textures may not be correct when you reimport the model (especially when using the
whole/parts of the original model from the game. It is
advised to unpack the materials from the materials window seen in the previous step
and set them up again so that they look exactly like u want.
Drag model into scene, you'll see that there are two extra gameobjects to
which the rig is parented to for whatever reason when we import (dont
know how to make sure it doesnt happen), this doesn't break anything but
make sure to set the position and rotation of the two parents to 0,0,0
position and rotation
You can use VRM spring bones for physics. There are hundreds of guides out there on youtube on how to add them to your model
Next select your model in the scene then go -> MiSide -> Export rig swap FBX mod
From here you can select to keep certain meshes in the game (if for example you just want to replace the body or something)
Replace shaders will try fix your materials to match the in games materials
Player layers is only relevant if you are doing a player swap and is explained in depth within the export window
Step 4:
You can then click export and depending on what model u are replacing you can select
bepinex plugins\models\all folder or
plugins\models\mila for mila model swaps or
plugins\models\player for player model swaps
You're done! now when you launch your game you should see your custom model when u press F1
if want to share your mod, you'll see these other files in your
plugins\models folder
Hopefully its somewhat clear, I'm not the best at blender and stuff but I'll try my best to answer questions if I can