


16 items


About this mod
Reshade setting that tries to make the graphics of Silent Hill 2 Enhanced Edition the quality that it deserves.
- Requirements
- Permissions and credits
- Changelogs
Compatible with 3rd person mod view by ZealotTormunds!
After weeks of tweakings, learning Reshade and playthroughs , I finally present to you the ultimate Reshade Preset for Silent Hill 2 Enhanced Edition.
The aim of this reshade is to give this game that "something more" that all the fans around the world wanted, a faithful graphic overhaul that makes Silent Hill 2, one of my favourite game of all time, looks actually stunning and beautiful on par of the most recent modern games, without ruining gameplay or features of the game, like lighting or visual clarity.
NOTICE: This mod is intended to be used on the Silent Hill 2 Enhanced Edition version, this will NOT work on the original game alone, you need the
update properly installed!
This Reshade preset features:
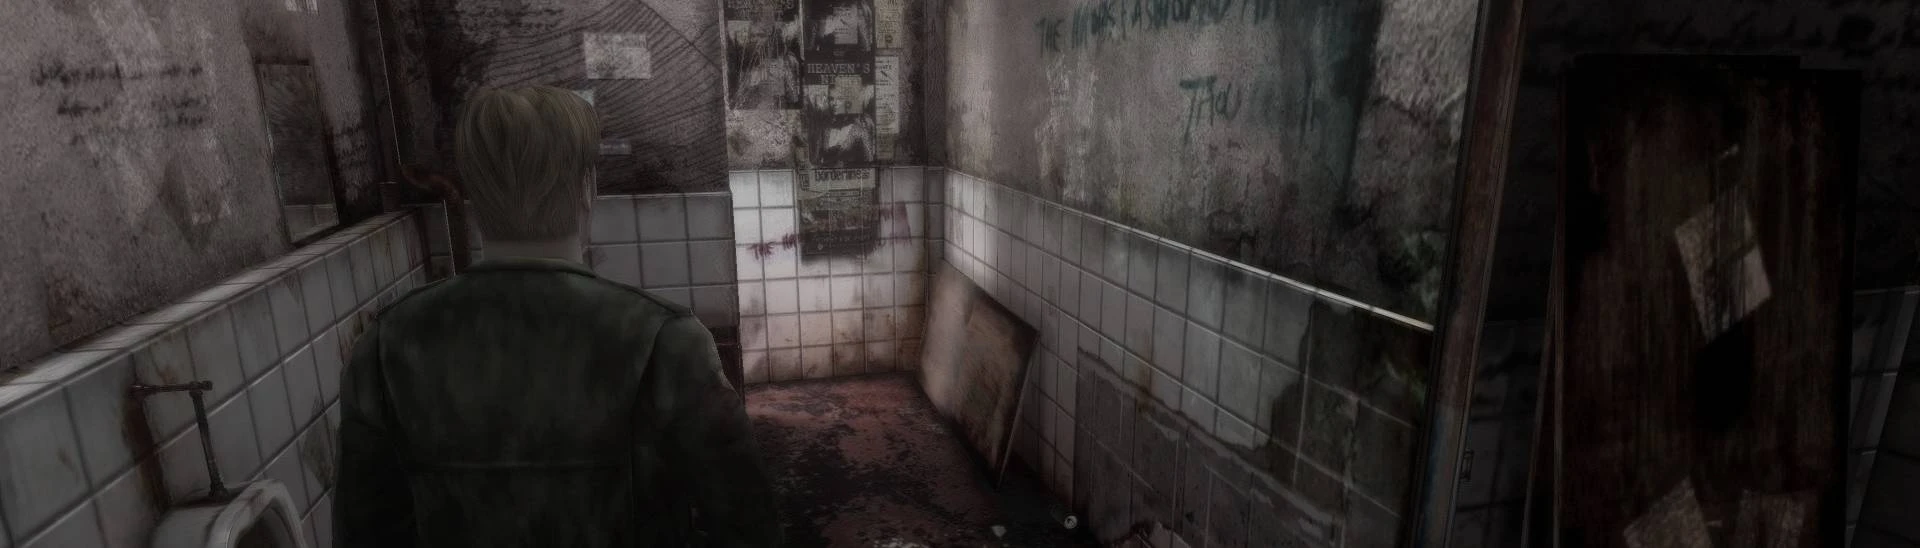
- Fine tuned Ambient Occlusion: AO that can be seen only within the fog limit, meaning that you still can't see farther than the fog permits you from the original game, but it enhances the close objects making them visible in a "see-through" effect.
- Color Rebalancing: no more bright green coat for James, now the overall look of the game is much more dark, decaying, making it more "natural" when it comes to real life colors, keeping a realistic visual.
- Lighting Overhaul: non-intrusive bloom and natural ambient lighting that makes all the dark places actually "dark" and all the bright places actually "bright". Furthermore, the gradient setting gives the fog a nice volumetric effect.
- Global illumination and reflections.
INSTALL INSTRUCTIONS:
1) First of all you need to have a Silent Hill 2 - Enhanced Edition already installed on your PC, with all the default options turned ON (for the install,
follow the link).
2) Download my Reshade Preset in the download section, and unzip it using any unzipping tool of your choice.
3) Download Reshade
4) Install Reshade following the step by step tutorial offered by the program:
- Run Reshade.exe. When asked, install the Reshade selecting "sh2pc.exe" inside your game directory.
- select DirectX9 for the default driver (DON'T PANIC IF IT SAYS IT'S NOT COMPATIBLE! The original game is built on DirectX8 but when you run it,
the Enhanced Edition patch "translates" the game in DirectX9, with the result that the game can run Reshade no problem).
- when asked, select my ReshadePreset.ini file previously extracted for the base install of all the main shaders.
- install the shaders. When finished, press the "finish" button.
5) Run the game as normal, when the overlay says that the reshade is properly installed, press the "home" button on your keyboard, skip the tutorial,
and be sure that in the "home" section, the box "Performance mode" in the bottom right of the overlay is ticked, it saves a good amount of GPU
usage!
6) Everything is done, good job! Now stop eating pizza and go play the game!
KNOWN ISSUES:
- The reshade puts always AO, DoF and other effects "on top" of the game, meaning that sometimes you see that a model projects shadows over
the subtitles or on prerendered images. Impossible to fix with my actual coding ability, but it's not a problem really, you'll get used to it, trust me!
And if you really care about the immersion, like I do, you could disable the subtitles through the in-game options in order to keep at least the
cutscenes as clean as possible.
- Gaussian Blur can be bothersome for some users, if this is the case you can disable it completely by pressing the "home" button during
gameplay, go to the home section of the overlay, find the GaussuanBlur and untick it.
Special thanks to the original Enhanced Edition Team, they made an extremely incredible job, without them any of this couldn't be possible!
After weeks of tweakings, learning Reshade and playthroughs , I finally present to you the ultimate Reshade Preset for Silent Hill 2 Enhanced Edition.
The aim of this reshade is to give this game that "something more" that all the fans around the world wanted, a faithful graphic overhaul that makes Silent Hill 2, one of my favourite game of all time, looks actually stunning and beautiful on par of the most recent modern games, without ruining gameplay or features of the game, like lighting or visual clarity.
NOTICE: This mod is intended to be used on the Silent Hill 2 Enhanced Edition version, this will NOT work on the original game alone, you need the
update properly installed!
This Reshade preset features:
- Fine tuned Ambient Occlusion: AO that can be seen only within the fog limit, meaning that you still can't see farther than the fog permits you from the original game, but it enhances the close objects making them visible in a "see-through" effect.
- Color Rebalancing: no more bright green coat for James, now the overall look of the game is much more dark, decaying, making it more "natural" when it comes to real life colors, keeping a realistic visual.
- Lighting Overhaul: non-intrusive bloom and natural ambient lighting that makes all the dark places actually "dark" and all the bright places actually "bright". Furthermore, the gradient setting gives the fog a nice volumetric effect.
- Global illumination and reflections.
INSTALL INSTRUCTIONS:
1) First of all you need to have a Silent Hill 2 - Enhanced Edition already installed on your PC, with all the default options turned ON (for the install,
follow the link).
2) Download my Reshade Preset in the download section, and unzip it using any unzipping tool of your choice.
3) Download Reshade
4) Install Reshade following the step by step tutorial offered by the program:
- Run Reshade.exe. When asked, install the Reshade selecting "sh2pc.exe" inside your game directory.
- select DirectX9 for the default driver (DON'T PANIC IF IT SAYS IT'S NOT COMPATIBLE! The original game is built on DirectX8 but when you run it,
the Enhanced Edition patch "translates" the game in DirectX9, with the result that the game can run Reshade no problem).
- when asked, select my ReshadePreset.ini file previously extracted for the base install of all the main shaders.
- install the shaders. When finished, press the "finish" button.
5) Run the game as normal, when the overlay says that the reshade is properly installed, press the "home" button on your keyboard, skip the tutorial,
and be sure that in the "home" section, the box "Performance mode" in the bottom right of the overlay is ticked, it saves a good amount of GPU
usage!
6) Everything is done, good job! Now stop eating pizza and go play the game!
KNOWN ISSUES:
- The reshade puts always AO, DoF and other effects "on top" of the game, meaning that sometimes you see that a model projects shadows over
the subtitles or on prerendered images. Impossible to fix with my actual coding ability, but it's not a problem really, you'll get used to it, trust me!
And if you really care about the immersion, like I do, you could disable the subtitles through the in-game options in order to keep at least the
cutscenes as clean as possible.
- Gaussian Blur can be bothersome for some users, if this is the case you can disable it completely by pressing the "home" button during
gameplay, go to the home section of the overlay, find the GaussuanBlur and untick it.
Special thanks to the original Enhanced Edition Team, they made an extremely incredible job, without them any of this couldn't be possible!