


Realistic Water Two - Watercolor
This section is a general guide to creating a custom watercolor plugin for RWT.
- Users/authors are free to share and upload their creations as they see fit.
- Donation Points are allowed.
- Please give credit where credit is due.
- We take no responsibility of any of these creations; therefore, seek the author of the plugin for support.
We've created a template plugin for users to start with as a base. It contains copies of all the waterTypes users should edit. The remainder of the waterTypes have custom colors for specific purposes. Though they could be included and edited, the template will not include them, since the original watercolor options also didn't. The watercolor plugins are meant to only cover the waters with RWT's default water color. This color is used on oceans, lakes, rivers, and more.
- Download the template from the Files section of the Nexus Mods page.
- Install the template with your mod manager.
- This files requires RWT to be installed and active!
- Grab xEdit if you haven't (SSEEdit in this case).
The waters of Skyrim have three colors associated with them: shallow, deep, and reflection. The shallow color is seen when the water is shallow (like water edges and shallow pools), but this color also helps blend the shallows into the deep color. The deep color is the main, predominate color of the water. Finally, the reflection color is used to blend reflections on the water (trees, buildings, etc.) into the other colors. To put it simply, this color is used to “tint” the reflection so it appears more natural looking on the water's surface.
The selection of the color is completely user preference. Users will have to use the RGB values for the desired colors to use during the template editing below.
Here are two web sources: Source 1 | Source 2
Tips:
- Users should select a deep color and then create the shallow and reflection colors from it.
- Higher brightness values will result in more of the water color being seen in-game.
- Lower saturation values and closer to white result in clearer water.
Edit the Template
- With RWT and the Template active and sorted, run xEdit.
- Double-click on the Template plugin.
- Once xEdit has loaded, expand the template plugin.
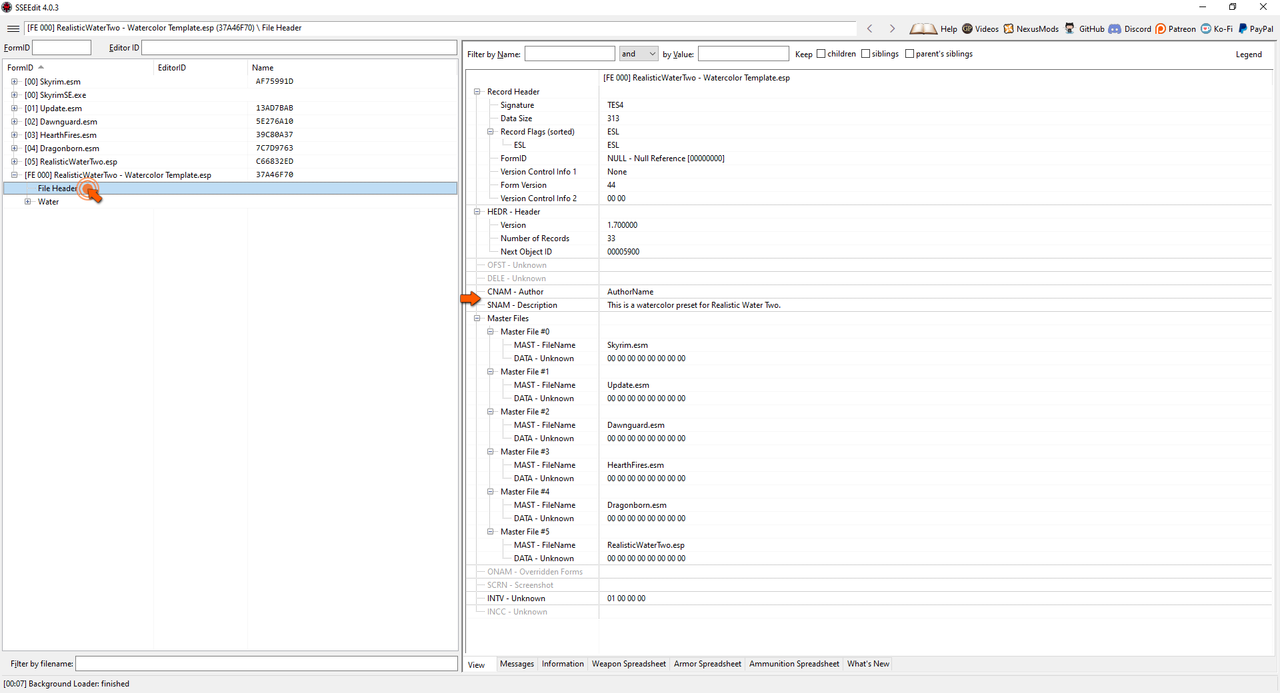
- Click on File Header. (reference)
- Find the CNAM - Author field and double-click it to open a textbox. Input your username and close the box to save it.
- Find the SNAM - Description field and double-click it. Input your own description, if desired, and save when finished.
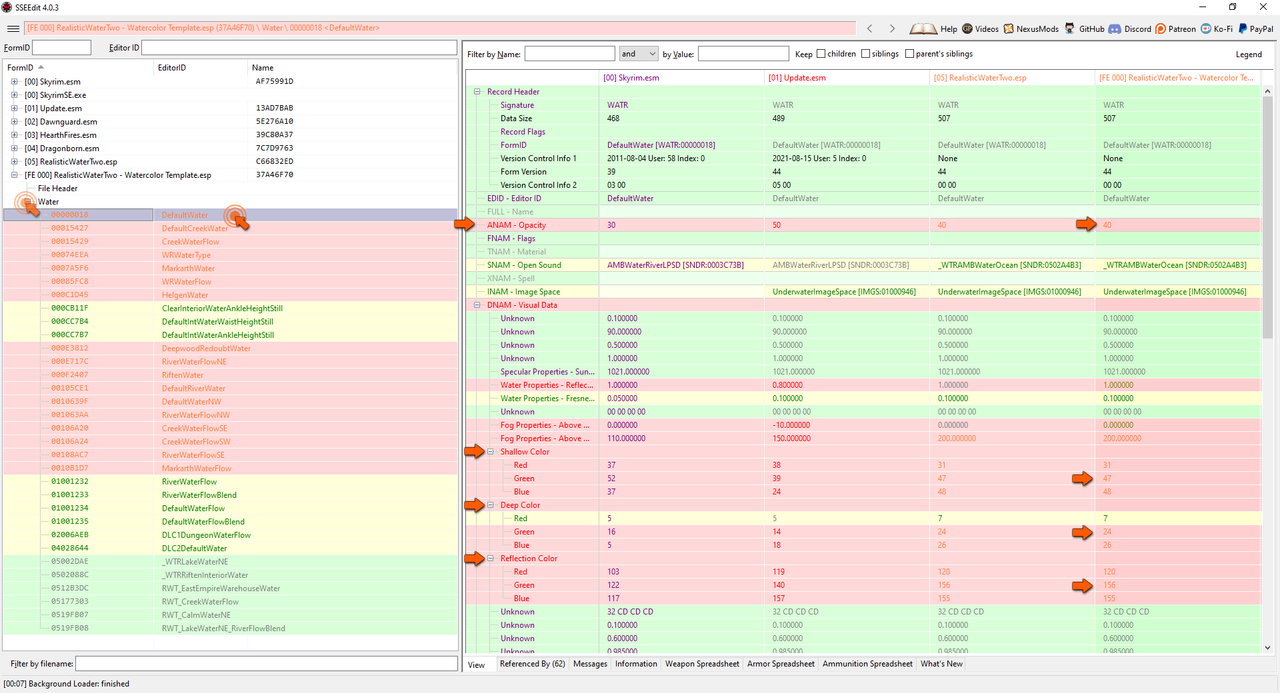
- Expand the Water tree. The waterType records listed all contain water colors for editing. (reference)
The following four fields are the only records users will want to address:
- ANAM - Opacity: changes the opacity of the water, thus the amount of color shown will also be affected.
- DNAM - Visual Data / Shallow Color
- DNAM - Visual Data / Deep Color
- DNAM - Visual Data / Reflection Color
From this point, users will simply need to plug in the RGB values for the three color records above, save the plugin, and test their changes in-game. View the results, adjust the colors, resave, retest...rinse and repeat until the desired results are achieved. It's that's easy to create a watercolor plugin! Welcome to modding!
Mesh Lighting via Texture Gradients
This article explains the new texture gradients included in RWT 3.0+ and how to open and save them. These gradients control the lighting on water meshes like foams, mists, splashes, etc.
- Users/authors are free to share and upload their creations as they see fit.
- Donation Points are allowed.
- Please give credit where credit is due.
- We take no responsibility of any of these creations; therefore, seek the author of the plugin for support.
- water_gradcreekfoam.dds - Controls the foam that is found on rocky streams.
- water_gradfallstopfoam.dds - Controls the slightly brighter foam found on top of waterfalls.
- water_gradfogskirt.dds - Controls the large fog volumes below large waterfalls.
- water_gradrapidfoam.dds - Controls the rapid water foam found on the surface of rivers.
- water_gradsplashes.dds - Controls splashes that are found on waterfalls, churning water, characters, waves, and river rapids.
- water_gradsplashesheavy.dds - Controls the small splashes found mainly on top and around large waterfalls.
- water_gradsplashesmist.dds - Controls mist clouds on some large waterfalls and churning water.
- water_gradsplashfoam.dds - Controls the foam on churning pools of water.
- water_gradsplashfoamcharacter.dds - Controls the foam effect produced after a character hits the water from jumping.
- water_gradsplashfoamsmall.dds - Controls the foam on the small splashes found mainly on top and around large waterfalls.
- water_gradsteamthick.dds - Controls the thick steam clouds found in the volcanic tundra.
- water_gradwaterfallfoam.dds - Controls the foam on large waterfalls.
- water_gradwaterfallmist.dds - Controls the mist effect on top of large waterfalls.
- water_gradwaterfallstreams.dds - Controls the foam streams that run down large waterfalls.
- water_gradwaterfallthinstreams.dds - Controls the foam and foam streams that are found on smaller "thin" waterfalls and on a few of the brighter city falls.
- water_gradwavefoam.dds - Controls the foam on the large waves found around the coasts of Skyrim and Solstheim.
What can I do?
You can do pretty much anything in a photo editing program like Paint.net or Photoshop. Change the brightness, saturation, hue, or alpha (transparency) of the textures to your liking.
What is the point of this?
If you run an ENB that is not playing ball with the lighting and looks way too bright, for example, this will be pretty helpful. Figure out what effect it is from the list above, open and edit it to your liking, then finally save it and check it out in-game. This is far better than editing lots of meshes and changing lots of values in every file. Now, editing one texture can make a change to a number of meshes in one go. Not only this, but people who stick closer to the default game with their lighting are no longer being punished. Specifically, making effects darker for ENB users will result in much too dark-looking effects for users who don't run ENB, which just isn't fair.
How do I open and save these textures?
You need a free program called Paint.net. Please follow the information outlined here on how to open and save these files. We would love to tell you how to make changes to the textures, but we are pretty busy and there are plenty of tutorials online. If you can use Paint, you can use this program. We believe in you!
You can also use Photoshop and the Intel Texture Works Plugin, but Photoshop is not free like Paint.net.
There is another free program called GIMP, but this doesn't have a user-friendly way to open these kinds of texture files yet. Maybe in the future!
Darker Gradient Textures File
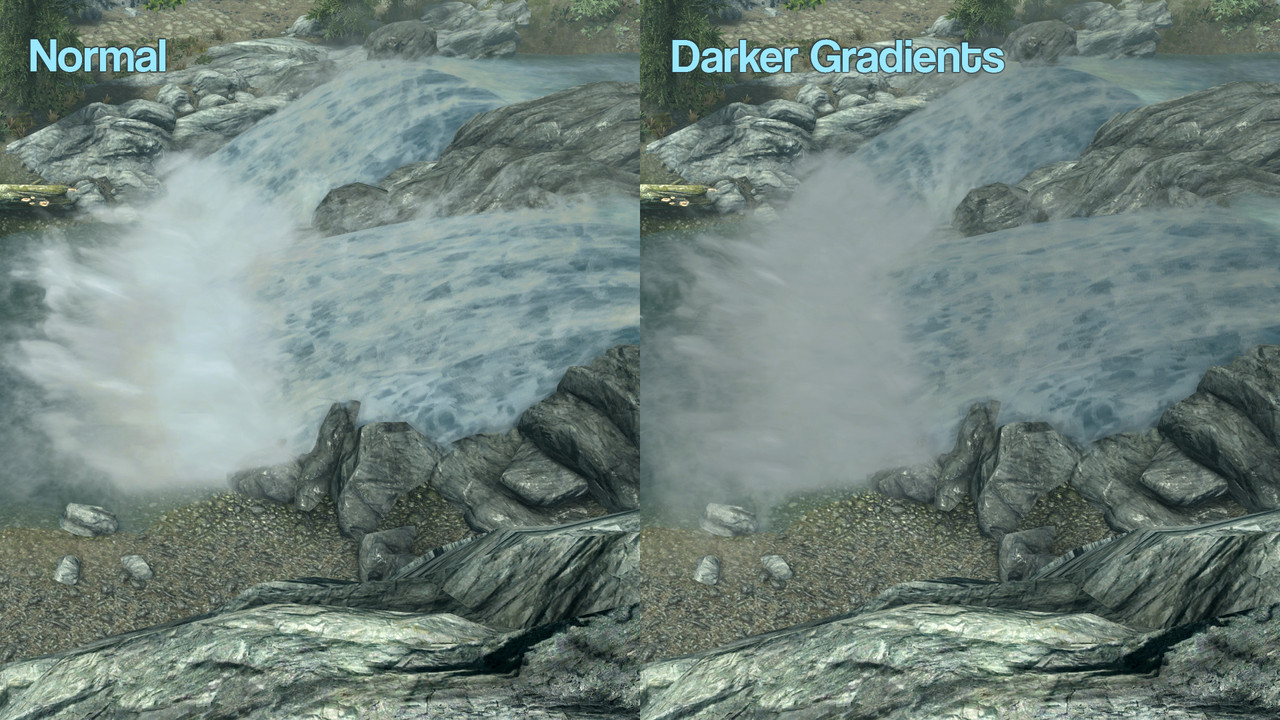
The file in the Optional Files are a set of darker gradient textures. Specifically, a -10 luminance was applied to all the textures. This darkens the textures and may work better for users having some issues will overly bright effects when using ENBs. Therefore, users can pick and choose the gradients they need (use the descriptions above) and install them; overwriting RWT's main files.
Else, install and test them too see the change a darker texture makes. Then use this knowledge to compare personal changes against. Knowing how a change looks in-game can help you adjust the gradients further, if needed. So this is just one example of the changes that can be made.