How to Clean Skyrim Game Files An infernalryan Skyrim Modding Guide
Overview This guide will provide instructions on how to properly clean game files, which include both vanilla game masters as well as user submitted mods. This guide applies to both Skyrim SSE/AE (Steam and GOG only) and Skyrim VR.
Guide Contents:
Preface including information on what cleaning is and why it is performed
Download and configure required tools including LOOT and xEdit
Cleaning process overview which will be used in the following sections when performing cleaning
Cleaning vanilla masters and other instructions if deciding to perform this
Cleaning other files including identifying and optionally backing up dirty mods
Further reading for links to other helpful information
Please consider ENDORSING if you found this guide helpful!
TL;DR Q: Should I learn this process? A: YES. Cleaning plugins is an important step in preventing and resolving certain issues. This information is outlined in section 1 (Preface).
Q: Is cleaning vanilla game masters necessary? A: NO, unless you plan to generate LOD using the large reference bugs workarounds option within DynDOLOD. In this case, cleaning is mandatory (source).
Outside of this scenario, cleaning vanilla masters is purely optional, and even considered "pointless" by many. Although well respected projects such as STEP recommend cleaning (source), this project specifically also utilizes DynDOLOD with the aforementioned option, which makes it a mandatory prerequisite if following their guide.
While there is a lot of anecdotal discussion on this topic, there is zero evidence that cleaning vanilla masters actually has any tangible benefits or drawbacks (there were previously issues with Apocrypha edits following cleaning which are no longer applicable). The offending records indicated by LOOT for Bethesda game masters are simply extraneous (in the case of ITMs) or not referenced by other mods (such as UDRs and deleted navmeshes), so should not impact gameplay or cause crashes, etc.. Large reference bugs (which are not related to cleaning at all, but can be fixed by DynDOLOD which itself REQUIRES cleaning for this option), at worst, may cause flickering as you approach them.
All this said, clean the files, or don't. It's up to you. If you plan to utilize DynDOLOD in the future, then yes, clean the vanilla masters so you can take advantage of the large reference bugs workaround. Either way, I encourage you to still read the following sections to gain a fundamental understanding of the reasons for and process of cleaning in the event you choose to do so.
1 Preface This section provides some prerequisite information on what cleaning is, why it is performed, and what types of records are affected.
1.1 What is cleaning? Cleaning undeletes deleted references and removes ITM (identical to master) records from plugins. That is all. If you'd like more (a lot more.. maybe too much) context to each of these types, and why they should be cleaned, expand the 'Spoiler' section below. Otherwise, skip to section 1.2.
Spoiler:
Show
1.1.1 ITM records Before we define what an ITM (identical to master) record actually is, first let's define some terminology. The term "master" is a bit ambiguous, as there are master records, and master plugins. Both are equally important in understanding what an ITM is. A master record is the record in a plugin where an object or instance of an object is initially defined. A master plugin is a plugin which another mod has defined as a dependency which must load before it in the load order.
An ITM record in a plugin is a record that shares all of the same values of, and is thus 100% identical to the master record when none of the mod's other masters have modified the record first. This last caveat is important. In other words, ITM doesn't just mean a record matches the master record. It means when looking at only a mod and all of its loaded masters, only the mod itself and the mod which defines the master record have the record present and there is effectively no change between the two.
This is different from a conflict winning record. One common component of compatibility patches is "unsetting" (i.e., reverting) a record changed by one plugin back to its initial (master) values. In such cases, even if the final record is technically identical to (the) master record, if it is also overriding another change to that same record by one of its other parent/master plugins, it is now a conflict winner, and no longer considered an "ITM" (this is a good thing). By properly defining plugin masters, this demonstrates a direct intention of the change.
If a compatibility patch is intended to function like the example above, but does NOT properly define its master plugins, the record may not be seen as a conflict winner, and instead may be (unintentionally) identified as an ITM and flagged (by LOOT) for cleaning. Performing cleaning on such a mod may cause undesirable effects. Masters are not added automatically in the Creation Kit or xEdit unless a master record is either directly referenced or overridden, so in this case it's up to the mod author to correct this by manually adding the appropriate master(s) to the plugin to fix the ITM status.
1.1.1.1 Why clean ITMs? ITMs are bad because they will override legitimate changes to records made by other mods if the plugin with ITMs is loaded after those legitimate changes. Additionally, ITMs are almost always accidental (see There are no intentional ITMs). One major cause of these ITMs is actually through normal use of the Creation Kit. If you accidentally modify something within the CK (accidental click and drag is common when trying to select something, ugh..), even if you undo that change (CTRL+Z, for example), congratulations, the record has been added to your plugin. In this case, instead of deleting the record when undoing the change, the CK keeps it as an ITM. This is also referred to as a "dirty" edit. Although not the fault of the mod author, if they are not diligent in cleaning these out themselves, they will leave ITMs in their released mod(s). Mod users are pretty diligent in finding these, and often they are reported to and fixed by mod authors, but this is not always the case. Knowing how to perform cleaning is helpful for these mods especially, and is recommended.
1.1.1.2 What about vanilla master ITMs? ITMs in vanilla master files are moot. These plugins are always loaded first (at least when using a modern Mod Manager), so the dangers of these ITMs overriding another plugin's changes is zero.
1.1.1.3 Are there legitimate ITMs? Allegedly, there are some cases where mods intentionally leave in ITMs, but I've not personally encountered this in my experience. The only benefit to doing this would be to ensure the mod in question always has the winning record, no matter what mod(s) are loaded before it. Such mods would almost certainly require you to load them at or near the bottom of your load order. The only advice I can give for any mods that have ITMs is to "check with the mod author" and/or review the mod page's posts and bug tabs.
1.1.2 Deleted references Deleted references, also referred to as UDRs which stands for Undeleted and Disabled References (yes, this seems backwards as we're technically talking about the deleted record itself, not the process of undeleting it in this context), describe a record that has been given the "deleted" flag by another plugin (master records are never flagged this way). When this flag is set, the record is not loaded into the game/memory, and any mod that attempts to call (i.e., "reference") it can cause crashes and/or other game bugs.
The cleaning process unsets this flag, assigns the "initially disabled" flag instead, and sets the Z-axis position to -30,000 units, where it is no longer visible in the Creation Kit. This is a much better approach and has essentially the same exact effect as deleting the reference, but without any potential for issues.
1.1.2.1 Why clean UDRs? Deleted references, in general, are dangerous. When not corrected these can and do cause CTDs. It is important to fix these when informed by LOOT for user-created mods. Mod users can also report these to the mod author, and educate them on the proper way of removing (i.e., "disabling") an object from the game world without applying this flag.
1.1.2.2 What about vanilla master UDRs? Similarly to ITMs, the impact of these records in vanilla game masters is negligible. This is because all vanilla game masters are loaded first, and so these offending records should never even be available to mod authors for modification with official tools. If a mod author used CLEANED vanilla master files in the creation of their mod and reused a deleted reference, yes, that is a problem, however, this is a wild exception and mostly hypothetical. In either case, this would likely not go unnoticed by the community.
1.1.2.3 Deleted navmeshes Occasionally you will see LOOT messages which refer to deleted navmeshes. This is a special type of deleted reference, however, due to the nature and sensitivity of these record types, they remain untouched during the cleaning process, as attempting to repair these can actually cause more problems than they fix. Although you will receive notifications of deleted navmeshes while cleaning, these are purely informational. These are not automatically corrected.
For user-created mods, it is the responsibility of the mod author to fix these. These can occur as an unintended consequence of using the Creation Kit (i.e., a "dirty" edit), or alternatively, while not as common in recent years, these can also occur when a mod requires navmesh changes and a mod author simply deletes conflicting navmeshes before creating their own. Modern techniques recommend a similar method to these authors as a standard deleted reference when navmesh updates are required, which is to move the unneeded mesh(es) far under the game world, out of sight, rather than delete them. There are utilities out there which can help to resolve these automatically (such as the Undelete Navmesh Tool scripts), but these are intermediate-level tools and there is no guarantee they will work for all cases.
1.2 LOOT warnings LOOT will warn you of any mods which contain either ITMs or UDRs, and recommend cleaning. Unless a mod specifically says NOT to perform cleaning, it is always advised to follow LOOT recommendations given the impact of these findings, which are detailed in the sections above.
1.2.1 Warnings for vanilla master files Again, cleaning these files is optional. As mentioned in previous sections, the main reason "against" cleaning vanilla master files is because there is no evidence to suggest doing so yields any positive benefits. While in theory the same reasons cleaning is recommended for other mods are also valid for vanilla masters, because they are always loaded before any other mods, the impact is pretty much zero. You can safely ignore these warnings in LOOT if you decide you do not wish to clean masters.
1.3 Why does DynDOLOD require cleaning? DynDOLOD requires the cleaning of all plugins that contain deleted large references as a prerequisite in order to use the large reference bugs workarounds (source). This includes the vanilla master files. The program will not even start if all UDRs are not addressed in the load order prior to launching, and will display an error similar to the image below. So cleaning vanilla masters when using this option is mandatory.
2 Download and configure required tools This section details all of the tools required to identify issues and perform cleaning. It assumes you are already using either Vortex or Mod Organizer 2 as your Mod Manager.
2.1 LOOT (MO2 only) In addition to providing automated load order sorting (not covered here), LOOT is required to identify mods which need cleaning. Skip to section 2.2 if you are using Vortex (which already includes LOOT), or already have LOOT installed and configured as an executable in MO2, otherwise, follow the instructions below (expand the 'Spoiler' tag).
Spoiler:
Show
Download the latest applicable version from the main mod page 'FILES' tab using the 'MANUAL DOWNLOAD' button.
When completed, locate this file in your web browser downloads folder (it is a .exe file).
Run the Installer. Select a destination folder (example: 'C:\Modding\Tools\LOOT\') and complete installation. You do not need to Launch LOOT upon completion.
Next, within MO2, click the executables dropdown (next to the 'Run' button), and select '<Edit...>' (Default executables for SSE are shown, yours may differ).
On the dialog that opens, if no entry for 'LOOT' already exists, click the '+' icon on the left and select 'Add from file…'.
Browse to the folder you installed LOOT to (example: 'C:\Modding\Tools\LOOT\'), and double-click the 'LOOT.exe' file.
Your screen should look something like this (with your actual executables and paths).
Click 'OK'.
2.2 xEdit xEdit is a tool used for examining and editing plugin files for Bethesda games. It provides an interface to read all data contained in ESM, ESP and ESL files and is most often used to create patches and for advanced conflict resolution. Additionally, the scripting capabilities within xEdit allow for functionality such as Quick Auto Cleaning (QAC). This is what we are configuring xEdit to do. Skip to section 3 if you already have xEdit (for your version of Skyrim) installed AND configured as an executable for QAC, otherwise, follow the instructions below.
2.2.1 Download and extract xEdit Skip to section 2.2.2 if you already have an up-to-date version of xEdit downloaded and installed for at least one other Bethesda game, otherwise, proceed.
Download the latest version from the main mod page 'FILES' tab using the 'MANUAL DOWNLOAD' button. Be sure to press any 'DOWNLOAD' buttons on the following page if the mod does not start downloading automatically.
When completed, locate this file in your web browser downloads folder (it is a .7z file).
Extract this .7z file to a folder of your choice (example: 'C:\Modding\Tools\'). This should create a folder within this directory called 'SSEEdit X.X.X', depending on the version installed.
For the purpose of this guide, when referring to your '<xEdit filename>', you will use 'SSEEdit.exe'. When referring to your '<xEditQAC filename>', you will use 'SSEEditQuickAutoClean.exe'.
While 'xEdit' is the common name for the program, you may also see this with names such as 'SSEEdit', 'TES5VREdit', 'FO4Edit', etc.. These are all effectively the same exact file, just renamed. All renaming the file does is launch xEdit directly into a game-specific version of the program without requiring a command line parameter. For example, launching 'SSEEdit.exe' does the exact same thing as launching 'FO4Edit.exe -sse' (even though the latter would seem to only launch xEdit for Fallout 4). Knowing this is helpful, as this means you can run the same version of xEdit for multiple games, rather than downloading and/or renaming the program all of your games individually. The steps below provide instructions on renaming this for specific games (e.g., 'TES5VREdit') or general use (e.g., 'xEdit'). If you have (or plan to have) multiple Bethesda games active at once, I recommend renaming to 'xEdit' and using the same program for each game using command line parameters.
2.2.2 Rename files and folders (optional) Skip to section 2.2.3 if you don't care about renaming the xEdit files and folders, or have already done so for another game or previous Skyrim installation, otherwise, proceed with the steps below (expand the 'Spoiler' tag). If you are using an install of xEdit which you are also using for another game, renaming the files will require you to update that game's xEdit executables in the last step of this section.
Spoiler:
Show
Open the folder you extracted the files to (example: 'C:\Modding\Tools\') and optionally rename the 'SSEEdit X.X.X' folder inside based on your game.
SSE - Rename to 'SSEEdit' or 'xEdit', with or without version number.
Skyrim VR - Rename to 'TES5VREdit' or 'xEdit', with or without version number.
Open this folder.
Rename the 'SSEEdit.exe' file based on your game.
SSE - Keep the same or rename to 'xEdit.exe'.
Skyrim VR - Rename to 'TES5VREdit.exe' or 'xEdit.exe'.
Rename the 'SSEEditQuickAutoClean.exe' file based on your game.
SSE - Keep the same or rename to 'xEditQuickAutoClean.exe'.
Skyrim VR - Rename to 'TES5VREditQuickAutoClean.exe' or 'xEditQuickAutoClean.exe'.
If you've renamed the files, your '<xEdit filename>' and '<xEditQAC filename>' should now reflect these new names for the sections below.
If you are already using these xEdit executables above for other Bethesda games, you may need to modify their binary path to point to your newly renamed files.
2.2.3 Configure executable Setup of this executable is different depending on the Mod Manager chosen. Follow only one of the two options based on your Mod Manager of choice (open their respective 'Spoiler' tag).
2.2.3.1 Option 1: Vortex
Spoiler:
Show
2.2.3.1.1 Add the xEdit program If you have already configured a base xEdit executable, I still recommend reviewing the steps below so your executables have parity. For everyone else, proceed as well.
Within Vortex, ensure you are on the 'Dashboard' tab on the left menu.
Within the 'Tools' widget, there should be an entry for either 'SSEEdit' (if SSE game is selected) or 'TES5VREdit' (if Skyrim VR game is selected). This number of columns in the 'Tools' list will depend on the width of the Vortex window.
Click the vertical ellipses (i.e., "kebab") icon next to the entry, and select 'Edit'. Both a one column and two column depiction of the 'Tools' menu are shown below.
On the following screen, click the folder icon at the right of the 'Target' field, navigate to the folder your xEdit program resides in, select your '<xEdit filename>', and click the 'Open' button.
In the 'Command Line' field, add the following depending on your Game and your ('<xEdit filename>'). See below.
SSE (SSEEdit.exe): <leave blank>
SSE (xEdit.exe): -sse
Skyrim VR (SSEEdit.exe): -tes5vr
Skyrim VR (TES5VREdit.exe): <leave blank>
Skyrim VR (xEdit.exe): -tes5vr
In the 'Name' field, optionally change to 'xEdit' or leave it as-is (which would read 'SSEEdit' or 'TES5VREdit' by default), depending on your naming preference.
Your window should look something like the following (your options may vary slightly based on the above). An example is shown for both SSE and Skyrim VR game versions.
Click the 'Save' button.
2.2.3.1.2 Add the xEditQuickAutoClean program
Within Vortex, ensure you are on the 'Dashboard' tab on the left menu.
Click the + button at the very bottom row (and furthest to the right, if applicable) of the 'Tools' menu and select the 'New…' option.
On the following screen, in the 'Name' field, set this to one of the following, depending on the game and naming preference:
SSE: SSEEditQuickAutoClean, SSEEditQAC, xEditQuickAutoClean, or xEditQAC
Skyrim VR: TES5VREditQuickAutoClean, TES5VREditQAC, xEditQuickAutoClean, or xEditQAC
Click the folder icon at the right of the 'Target' field, navigate to the folder your xEdit program resides in, select your '<xEditQAC filename>', and click the 'Open' button.
In the 'Command Line' field, add the following depending on your Game and your ('<xEditQAC filename>'). See below.
Your window should look something like the following (your options may vary slightly based on the above). An example is shown for both SSE and Skyrim VR game versions.
Click the 'Save' button.
2.2.3.1.3 Tool organization
Optionally drag an executable (by grabbing the left-most box for the entry) to another location in your 'Tools' list (placing the QAC shortcut directly under your regular xEdit entry, for example).
The 'Enable toolbar' button can also be checked to show the tools in the top of the main Vortex window. SSE and Skyrim VR examples are shown below.
You're done!
2.2.3.2 Option 2: Mod Organizer 2
Spoiler:
Show
2.2.3.2.1 Add the xEdit program If you have already configured a base xEdit executable, I still recommend reviewing the steps below so your executables have parity. For everyone else, proceed as well.
Within MO2, click the executables dropdown (next to the 'Run' button), and select '<Edit...>' (Default executables for SSE are shown, yours may differ).
In the 'Modify Executables' dialog that opens, if no entry for xEdit already exists, click the '+' icon on the left and select 'Add from file…'.
Browse to the folder your xEdit program resides in, select your '<xEdit filename>', and click the 'Open' button.
In the 'Name' field, optionally set/change this to one of the following, depending on your game and naming preference:
SSE: 'SSEEdit' or 'xEdit'
Skyrim VR: 'TES5VREdit', or 'xEdit'
In the 'Arguments' field, add the following depending on your Game and your ('<xEdit filename>'). See below.
SSE (SSEEdit.exe): <leave blank>
SSE (xEdit.exe): -sse
Skyrim VR (SSEEdit.exe): -tes5vr
Skyrim VR (TES5VREdit.exe): <leave blank>
Skyrim VR (xEdit.exe): -tes5vr
Your window should look something like the following (your options may vary slightly based on the above). An example is shown for both SSE and Skyrim VR game versions.
Click 'Apply'.
2.2.3.2.2 Add the xEditQuickAutoClean program
Ensure you are still in the 'Modify Executables' window, if not, open it by clicking the executables dropdown (next to the 'Run' button) in the main MO2 window, and select '<Edit...>', as with the previous section.
In this dialog, click the '+' icon on the left and select 'Add from file…'.
Browse to the folder your xEdit program resides in, select your '<xEditQAC filename>', and click the 'Open' button.
In the 'Name' field, set this to one of the following, depending on your game and naming preference:
SSE: SSEEditQuickAutoClean, SSEEditQAC, xEditQuickAutoClean, or xEditQAC
Skyrim VR: TES5VREditQuickAutoClean, TES5VREditQAC, xEditQuickAutoClean, or xEditQAC
In the 'Arguments' field, add the following depending on your Game and your ('<xEditQAC filename>'). See below.
Your window should look something like the following (your options may vary slightly based on the above). An example is shown for both SSE and Skyrim VR game versions.
Click 'OK'.
You're done!
Note – When reviewing these executables later, the 'Force load libraries' option will likely have been auto-enabled. This is fine.
3 Cleaning process The steps below correspond to the steps found on the official xEdit Cleaning Guide. This same process will be used for all files, so you can refer to this process when performing the steps in subsequent sections of this guide. Do not clean any files yet until reaching section 4 or section 5 of this guide. This is simply the process overview.
3.1 Run the QuickAutoClean Executable Instructions have been provided for both Vortex and Mod Organizer 2. Follow only one of the two options based on your Mod Manager of choice (open their respective 'Spoiler' tag).
3.1.1 Option 1: Vortex
Spoiler:
Show
If you have enabled the toolbar, simply click the QuickAutoClean shortcut from the top left of the Vortex window (example shown with SSE, your name may be different).
If not, navigate to the 'Dashboard' tab on the left, and click the QuickAutoClean icon in the 'Tools' widget (example shown with SSE, your name may be different).
You're done! Skip to section 3.2.
3.1.2 Option 2: Mod Organizer 2
Spoiler:
Show
Simply select the QuickAutoClean program from the executables dropdown and click the 'Run' button (example shown with SSE, your name may be different).
You're Done!
3.2 Choose the file to clean
Once you run the QuickAutoClean Executable you will see the plugin selection screen. Choose a plugin to clean by double clicking on the file name or place a checkmark next to the filename and click 'OK'.
After choosing the file to clean xEdit will perform all the required cleaning needed automatically.
Once xEdit finishes you will see the LOOT report and xEdit will say the cleaning process has finished in the Messages tab (example shown below with highlights).
The file should save automatically.
Close xEdit.
3.3 Final steps for Vortex users Skip to section 4 if NOT using Vortex. Because we are modifying files outside of the Vortex mod staging folder, after performing cleaning, Vortex will complain that external changes have been made (in this case, the staging folder files and the newly cleaned files no longer match). We will need to provide conflict resolution for these so that Vortex knows which of these files to use. Obviously we want to use the newly cleaned versions. Follow these steps below (expand the 'Spoiler' tag).
Spoiler:
Show
Once you have completed cleaning ALL of the plugin(s) you want, deploy mods.
In the 'External Changes' dialog that pops up, select 'Use newer file' (default option) for each mod. Alternatively, you can click the 'Use newer file for all changes' link at the top to select this for all mods, but this should be the default option for all mods anyway.
Click the 'Confirm' button.
You're done!
4 Cleaning vanilla masters Since there is a specific order for cleaning these files, they have been placed first in this guide. Skip to section 5 if you have chosen not to clean these files, otherwise, proceed with the steps below. Remember to use the process in section 3 above when performing the cleaning.
4.1 Create a new mod for cleaned masters It is important to ensure you do not overwrite your base game files in the event something goes wrong or you decide to no longer use cleaned masters. This will prevent you from having to utilize the Steam console to redownload unmodified game files. Instructions have been provided for both Vortex and Mod Organizer 2. Follow only one of the two options based on your Mod Manager of choice (open their respective 'Spoiler' tag).
4.1.1 Option 1: Vortex
Spoiler:
Show
Deploy mods. This will ensure if any current masters for those using "best of both worlds" methods have these files available in the /Data folder.
Open your game folder by clicking the 'Open…' button in the main application taskbar, and select 'Open Game Folder'.
Open the '/Data' folder inside.
Create a new folder inside of here called 'Cleaned Vanilla Masters'.
Copy the following files into this new folder:
Dawnguard.esm
Dragonborn.esm
HearthFires.esm
Update.esm
Drag the 'Cleaned Vanilla Masters' folder into the 'Drop File(s)' section of Vortex, which is found at the bottom of the 'Mods' tab. This may take a bit to fully import. Watch the notification area in the top right of Vortex to see when completed. Since this folder contains multiple plugins, when asked whether you'd like to enable these, select 'Enable all'.
This will create a mod called 'Cleaned Vanilla Masters.7z' and add it to your list. In addition to appending a .7z extension to your mod name, it actually creates an archive (which we will delete later).
Double-click this new mod in the list to open its properties panel.
Remove the '.7z' from the name and/or rename it entirely (based on your preference) and change the 'Source' to 'User-Generated' (to get rid of the warning icon).
Deploy mods (again).
Go back to the Skyrim /Data folder you previously had open and delete the 'Cleaned Vanilla Masters' folder (we no longer need it).
If you want to to delete the .7z files automatically generated when dragging and dropping these folders (they are not required and are needlessly taking up space), navigate to '%appdata%\Vortex\downloads\skyrimse' (without quotes – you can paste this in an explorer window, the Windows Win+R Run dialog, or the start menu search bar) and delete the following files:
Cleaned Vanilla Masters.7z
You can now close the folder(s) you opened before.
Skip to section 3.2 when done.
4.1.2 Option 2: Mod Organizer 2
Spoiler:
Show
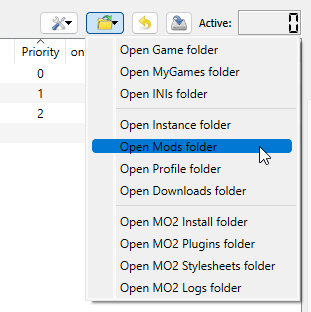
From the folder dropdown icon at the top right of the mod list window within MO2 (next to the 'wrench' dropdown), select 'Open Mods folder'.
Create a folder called 'Cleaned Vanilla Masters' and open it.
Move this folder aside for a moment.
From the right side of the main MO2 window (under the executables dropdown), select the 'Data' tab. This will show your Skyrim /Data folder instance managed by MO2.
From this view, right-click on the 'Dawnguard.esm' file and select 'Reveal in Explorer'. This will open the mod folder (or /Data folder if using stock game files) which contains this file. This should be the same folder that contains your other currently used vanilla master files, so if you've previously performed a "best of both worlds" downgrade and have created a 'mod' to store these files in, they will be here. See below for example (your 'Data' tab will likely look different).
With the folder open, copy the following files into the 'Cleaned Vanilla Masters' folder you set aside earlier:
Dawnguard.esm
Dragonborn.esm
HearthFires.esm
Update.esm
When finished, select MO2 to ensure it is the active window and hit the 'F5' button on your keyboard. This will refresh the application and display our new folder (mod) now at the bottom of the mod list on the left.
Enable the mod by clicking the checkbox to the left of the mod name in the mod list on the left side of the main MO2 window.
Feel free to move this mod higher in the list to better organize it with your existing mods, just ensure that no other mods overwrite any files in it. If files are being overwritten, there will be a lightning bolt with a red minus sign (either by itself or along with a green plus sign)
You're done! You can now close the folder(s) you opened before.
4.2 Perform master file cleaning Masters should be cleaned in the following order. Be sure to use the process from section 3.
Perform cleaning on Update.esm.
Once completed, perform cleaning on Dawnguard.esm
Once completed, perform cleaning on Hearthfire.esm
Once completed, perform cleaning on Dragonborn.esm.
4.3 Perform manual fix on Dawnguard.esm (optional) While not technically 'cleaning', there is an edit made in Dawnguard.esm which actually blocks an official fix in Update.esm. This is Optional. Many mods (such as USSEP) already correct this record so if you plan to use this mod you do not need to fix it here. Skip to section 5 if you want to opt out of these manual changes, otherwise proceed (expand the 'Spoiler' tag).
Spoiler:
Show
4.3.1 Launch xEdit (NOT QuickAutoClean) This process requires that you launch the xEdit program, NOT the QuickAutoClean program as we've done in previous steps. Instructions have been provided for both Vortex and Mod Organizer 2. Follow only one of the two options based on your Mod Manager of choice (open their respective 'Spoiler' tag).
4.3.1.1 Option 1: Vortex
Spoiler:
Show
If you have enabled the toolbar, simply click the standard xEdit shortcut from the top left of the Vortex window (example shown with SSE, your name may be different).
If not, navigate to the 'Dashboard' tab on the left, and click the standard xEdit icon in the 'Tools' widget (example shown with SSE, your name may be different).
You're done! Skip to section 3.2.
4.3.1.2 Option 2: Mod Organizer 2
Spoiler:
Show
Simply select the standard xEdit program from the executables dropdown and click the 'Run' button (example shown with SSE, your name may be different).
You're Done!
4.3.2 Remove XEZN subrecord referring to RiftenRatwayZone
On the plugin selection screen, double-click the 'Dawnguard.esm' entry.
When the plugins are loaded, in the 'FormID' field in the top left of xEdit, enter '00016BCF' (without quotes) and hit <Enter>.
With the record selected, ensure your content window is scrolled to the right far enough to see the 'Dawnguard.esm' column, scroll down to the bottom, and right-click the 'RiftenRatwayZone [ECZN:0009FBB9]' entry. Select 'Remove' from the right-click menu.
Click the 'Yes I'm absolutely sure' button.
Quit xEdit.
When prompted to 'Save changed files:', ensure 'Dawnguard.esm' is selected, uncheck the 'Backup plugins' box at the bottom of the window, and press 'OK'.
5 Cleaning other files For all other files indicated dirty by LOOT, you will want to perform cleaning. The following sections will instruct you on identifying and fixing them, with the option of backing up files first.
5.1 Identify "dirty" plugins indicated by LOOT Instructions have been provided for both Vortex and Mod Organizer 2. Follow only one of the two options based on your Mod Manager of choice (open their respective 'Spoiler' tag).
5.1.1 Option 1: Vortex
Spoiler:
Show
Navigate to the 'Plugins' tab on the left of the main Vortex window
In the 'Flags' column, select the 'Dirty' option.
This list will identify all plugins that LOOT recommends cleaning.
Take note of the <plugin name> in the 'Name' column of this list. This is the name of the plugin you will need to load with QuickAutoClean in upcoming steps.
This list will not update automatically as you are cleaning plugins. This is because Vortex requires conflict resolution with these cleaned files, which will occur once mods are deployed. This is also covered in the cleaning process in section 3. Don't worry about this until after all mods have been cleaned.
Skip to section 5.2.
5.1.2 Option 2: Mod Organizer 2
Spoiler:
Show
Select the LOOT program from the executables dropdown and click the 'Run' button.
In the right panel of LOOT, mods which require cleaning will be indicated by a yellow "warning" block (example shown).
Optionally, rather than scrolling your entire list of mods to find those that require cleaning, you can simply perform a search using the 'Search Cards' button, and typing the phrase 'cleaning'. Clicking the 'Find Next' and 'Find Previous' buttons will immediately jump to the next plugin in the list, making them easier to find.
Take note of the <plugin name> in the right panel of LOOT above the yellow "warning" block. This is the name of the plugin you will need to load with QuickAutoClean in upcoming steps.
This list will not automatically update as you are performing cleaning of your mods. Instead, you will want to keep this program open for the whole process (set the window off to the side) and perform cleaning of each plugin recommended.
When you initially switch back to your MO2 program to perform the actual cleaning steps, MO2 will likely indicate that it is locked while LOOT is running. Click the 'Unlock' button. This will allow you to keep LOOT open to the side (to review which files need to be cleaned) while performing other actions within MO2 (like backing up and cleaning plugins).
5.2 Backup mods before cleaning (optional) Backing up files is not required since most of these can simply be redownloaded/reinstalled (much more easily than vanilla game masters), but offers a way to easily undo changes made by cleaning, if desired. Skip to section 5.3 if you do not wish to create plugin backups, otherwise proceed. Instructions have been provided for both Vortex and Mod Organizer 2. Follow only one of the two options based on your Mod Manager of choice (open their respective 'Spoiler' tag).
5.2.1 Option 1: Vortex
Spoiler:
Show
From the 'Dirty' filter view from the previous section, the mods listed (with exception of unmanaged mods, such as vanilla game masters or Creation Club content which have not been added as Vortex-managed mods) should have their mod name displayed in the 'Mod' column (example below).
Take note of the <plugin name> in the 'Name' column, then click the text link in the 'Mod' column which will jump to the 'Mods' tab and highlight the selected mod.
Right-click this mod in the mod list and select 'Open in File Manager'
With the folder open, make a copy of the relevant <plugin name> from the previous step, and rename it <plugin name>.dirty (example, 'Inigo.esp.dirty').
You should now have 2 versions of this plugin in the folder: the original and the .dirty version.
If you need to revert this backup in the future, simply open this folder again and delete the cleaned (.esp) plugin, then remove the .dirty extension from your backup file.
Skip to section 5.3.
5.2.2 Option 2: Mod Organizer 2
Spoiler:
Show
Ensure the 'Plugins' tab is selected on the right side of the MO2 window.
In the 'Filter' box in the very bottom right corner of the MO2 window, type the <plugin name> you noted earlier.
Right-click the applicable plugin name and select 'Open Origin in Explorer' (example below).
With the folder open, make a copy of the relevant <plugin name> from the previous step, and rename it <plugin name>.dirty (example, 'Inigo.esp.dirty').
You should now have 2 versions of this plugin in the folder: the original and the .dirty version.
If you need to revert this backup in the future, simply open this folder again and delete the cleaned (.esp) plugin, then remove the .dirty extension from your backup file.
5.3 Clean all remaining plugins With your "dirty" file list open, and all desired backup(s) performed (if any), you will now just need to perform a QuickAutoClean for all applicable plugins. This process is outlined in section 3. Here are some final notes.
Vortex users – Remember to deploy mods when finished and perform conflict resolution outlined in section 3.3. Once you perform this your "dirty" file list should update, and be clear of any mods (unless you are not cleaning vanilla masters, which will still appear).
MO2 users – It is recommended to keep LOOT open for the entire duration so you can easily see which mods require cleaning without having to keep opening the program. Once all cleaning is done for all applicable mods, close LOOT and re-open it to validate that all of your plugins have been properly cleaned by ensuring there are no more yellow "warning" blocks (unless you are not cleaning vanilla masters, which will still appear).
5.3.1 Batch cleaning for MO2 users (optional) Skip to section 6 if NOT using MO2. If you are an MO2 user, there is a plugin which can be installed which will automate cleaning of all remaining plugins so that you do not have to click each plugin manually. This functionality is provided by the Batch Plugin Cleaner plugin. While optional, it can be a real time saver. If this is of interest to you, follow the instructions below by expanding the 'Spoiler' tag.
Spoiler:
Show
IMPORTANT NOTE – This plugin requires MO2 version 2.5 or greater. Before proceeding, you will want to ensure you are using a compatible version or the plugin will not work. Official MO2 releases can be found on Nexus, but release candidates (which contain additional fixes and patches prior to an official release) can be found on Github. Newer versions can be installed on top of your existing version without impacting your current Skyrim load order, so you should be able to upgrade without any negative impact. Once you have verified your version is supported, continue with the steps below.
5.3.1.1 Installation Follow the steps below to download and install the plugin.
Download the latest version from the main mod page 'FILES' tab – ensure you click the 'MANUAL DOWNLOAD' link (this will not install with your Mod Manager).
When completed, open this file from your web browser downloads folder (it is a .7z file).
Extract the contents of the file into the /plugins folder of your MO2 folder. For example, if you installed MO2 into 'C:\Modding\MO2', extract this to 'C:\Modding\MO2\plugins'.
If done correctly, you should now have a 'BatchPluginCleaner.py' file inside of /plugins (example: 'C:\Modding\MO2\plugins\BatchPluginCleaner.py').
Close MO2 if it is open.
Re-open MO2.
Verify this is installed correctly by navigating to the 'Tools > Tool Plugins' menu of the main menu bar. You should now see a 'Clean Plugins' entry.
5.3.1.2 Configuration Before the plugin can be run, initial configurations are required. NOTE – Don't worry if you are running Skyrim VR – The QAC function will work fine even when launched with SSE game parameters.
In order for this plugin to execute the xEdit QAC functionality properly, the following requirements need to be met:
The xEdit executable name in MO2 MUST be called 'SSEEdit' – This is an easy change as depending on settings from section 2.2.3.2, you can either rename the existing or duplicate the entry to have this name.
The 'Binary' MUST be pointing to a file called 'SSEEdit.exe' – The plugin currently does not honor a Binary name of 'xEdit.exe' with the '-sse' argument. If you have configured it this way, it will require that you either rename the actual xEdit.exe to SSEEdit.exe, or make a copy of the xEdit.exe file and call it SSEEdit.exe and point the executable to that file.
If requirements are met, the MO2 executable should look like the following (your path and other executables in your list may differ from those below):
5.3.1.2.1 GOG version If running Skyrim for GOG, xEdit may complain about a missing .ini file, or something else. Follow these instructions to proactively set some options to prevent this. Expand the 'Spoiler' tag to proceed.
Spoiler:
Show
Navigate to 'Tools > Settings…'.
Under the 'Plugins' tab, scroll to the bottom under the 'Tool' section, and select the 'Clean Plugins' entry.
Change the 'explicit_data_path' and 'explicit_ini_path' options to 'true'.
Your settings should now look like this:
Click the 'OK' button.
5.3.1.3 Cleaning process Once the executable is configured properly, follow the steps below to clean remaining plugins. NOTE – if you have a lot of plugins that require cleaning, you may want to plan this process to run during a period you are not at your computer (e.g., before you go to bed) as it may take a while.
Ensure you have your LOOT window open and set aside.
Navigate to the 'Tools > Tool Plugins' menu of the main menu bar and select the 'Clean Plugins' entry (this is also selectable from the 'Tools' icon, which looks like puzzle pieces).
NOTE – By default this will open with ALL plugins selected except the Bethesda Skyrim masters. DO NOT JUST HIT THE CLEAN BUTTON!. You do not want to simply clean all plugins in your list blindly. It is important to only clean plugins that require cleaning.
When the Clean Plugins window opens, click the 'Select None' button to deselect all plugins.
Referring to your LOOT window which should be open, select ONLY the plugins within that program that indicate cleaning is recommended.
Once all recommended plugins have been selected, click the 'Clean' button.
The program will now perform batch cleaning on the selected mods. NOTE – This process cannot be stopped once started, except by killing the Mod Organizer process.
6 Further reading See below for links to other helpful information.
6.1 Other Guides See my guides page on Nexus for other helpful Skyrim modding guides.
6.2 Changelog See below for changes made to this document.
Version 1.6.7 (04/04/2024)
Added section 5.3.1 for Batch Plugin Cleaner instructions for MO2 users
Slightly increased default font size for article readability
Other minor corrections and formatting changes
Added changelog
Version 1.4 (03/18/2024)
Initial release
Please leave a comment with any issues or suggestions!
Hi sorry for the late response, I must have missed this comment before.
The link should send you to xEdit/SSEEdit (not JContainers SE) as that's the utility that performs the cleaning :) that aside, don't worry so much about the *reqManualFix message, especially not for vanilla masters. These almost always refer to the fact that deleted navmeshes were detected during the cleaning process (hence, the "nav: 1" in your output under each CRC). Since navmeshes cannot be fixed automatically by xEdit, the program will throw the *reqManualFix message, indicating they would need to be fixed manually.
That said, it's safe to say that time has proven no user mods (of any significance anyway) have ever attempted to reference these deleted navmeshes, which is why guides like mine do not contain a process of manual correction for these. These messages are safe to ignore for vanilla masters.
This said, when receiving this message for user-created mods, the author should absolutely be notified of these messages and/or a cleaning report should be submitted to the LOOT team to prevent issues down the line, but this is on the author(s) to correct for their own mods, not mod users.
Hey love your work and thank you for your guides. I followed through with your Skyrim intil setup guide and I was wondering do we copy the Skyrim dawgaurd.esm, etc from the Skyrim updated masters or no? thank you
Yes, you will want to use the most up to date masters that you have when doing the cleaning, so if you've updated them, use those. This ensures maximum compatibility with other mods that require those .esm updates to be present when creating their mods.
Short of submitting a cleaning report to the LOOT team, you don't need to do anything. Most users probably wouldn't go through this effort anyway. The files show as clean within LOOT, so the warnings go away. I think that's what most people are after.


9 comments
I get it on all masters.
EDIT: LOOT cleaning report? I just saw your comment below. Guess the link is wrong though.
The link should send you to xEdit/SSEEdit (not JContainers SE) as that's the utility that performs the cleaning :) that aside, don't worry so much about the *reqManualFix message, especially not for vanilla masters. These almost always refer to the fact that deleted navmeshes were detected during the cleaning process (hence, the "nav: 1" in your output under each CRC). Since navmeshes cannot be fixed automatically by xEdit, the program will throw the *reqManualFix message, indicating they would need to be fixed manually.
That said, it's safe to say that time has proven no user mods (of any significance anyway) have ever attempted to reference these deleted navmeshes, which is why guides like mine do not contain a process of manual correction for these. These messages are safe to ignore for vanilla masters.
This said, when receiving this message for user-created mods, the author should absolutely be notified of these messages and/or a cleaning report should be submitted to the LOOT team to prevent issues down the line, but this is on the author(s) to correct for their own mods, not mod users.
Hope this helps!