Managing Creation Club Content with Your Mod Manager
An infernalryan Skyrim Modding Guide


Overview
This guide will provide instructions on how to manage Creation Club content with your Mod Manager. This includes the 4 free Creation Club mods which came with Skyrim version 1.6, as well as all Anniversary Upgrade content.

Guide Contents:

    • Preface including prerequisites and Skyrim VR information
    • Prepare Creation Club content into the main Skyrim game folder
    • Add Creation Club mods to your Mod Manager using one of the available options
    • Further reading for links to other helpful information


Please consider ENDORSING if you found this guide helpful!


1   Preface
If Creation Club files are left in the Skyrim /Data folder, they cannot be enabled or disabled with your Mod Manager at all (they are always enabled). Even if you copy the files directly into a single "mod" that can be managed by your Mod Manager, many (but not all) of the Creation Club mods cannot simply be toggled on and off in the plugin list for some reason. Mod Organizer 2 can get around this by allowing you to 'hide' and 'unhide' files themselves in the mod's 'Filetree' list, but Vortex has no native ability to do so. This requires Vortex users to either rename or delete files which cannot be toggled off or manually copy each mod to its own respective mod entry in the 'Mods' tab. Since there are 70 Anniversary Upgrade mods alone, this is both tedious and even confusing given it must be done by filename, which may not be intuitive. It is for this reason that following the steps in this guide is (highly) recommended. Having the ability to easily toggle these mods on and off from the mod list will save time and sanity.

1.1   Prevent game updates
When managing Creation Club files with a Mod Manager, we are moving the files out of their default Skyrim /Data folder location. If the game performs any kind of update (either accidental or manual), or the files are otherwise redownloaded, or 'verified', they will be placed back into the default location, which may re-enable some of the mods you have disabled. To prevent this, we want to ensure game updates are disabled. If you have not done so already, see my quick guide on how to Prevent Skyrim from Updating.

1.2   Skyrim VR compatibility
If you have Skyrim VR and also own Skyrim SSE/AE (on Steam or GOG), you can perform this same process to import these files into Skyrim VR version 1.4.15 as well. This is assuming you have followed a process to update Skyrim game masters (or just download the free CC mods) and/or download Anniversary Upgrade content. Note that there is a minor incompatibility with Skyrim VR and the free CC Survival Mode mod, so instead of disabling (or deleting it), it is highly recommended that you instead use the Survival Mode Prompt Removed mod to keep CC Survival Mode enabled in your mod list (to maintain compatibility with other mods that depend on it, such as USSEP), but disable the in-game ability to enable it entirely.


2   Prepare Creation Club content
These steps will provide instructions on preparing all Creation Club content files so that one of the provided options can be used to manage them within your Mod Manager.

2.1   Prepare free Creation Club files
See below on how to prepare these based on your specific criteria.

  • The Free CC content includes the following files:
    • ccBGSSSE001-Fish.bsa
    • ccBGSSSE001-Fish.esm
    • ccBGSSSE025-AdvDSGS.bsa
    • ccBGSSSE025-AdvDSGS.esm
    • ccBGSSSE037-Curios.bsa
    • ccBGSSSE037-Curios.esl
    • ccQDRSSE001-SurvivalMode.bsa
    • ccQDRSSE001-SurvivalMode.esl
  • If these files are already in your Skyrim /Data folder, skip to section 2.2.
  • If you are already currently managing these mods in your Mod Manager, locate them and COPY the files (back) into your Skyrim /Data folder and skip to section 2.2.
  • If you do not have these files (either because you deleted them, are running Skyrim version 1.5.97, or are running Skyrim VR), see my guide on Downloading Free CC Content Files. Do not proceed until you have obtained the files.


2.2   Prepare Anniversary Upgrade files (if applicable)
Skip to section 3 if you down not own the Anniversary Upgrade DLC, otherwise, see below for how to prepare these based on your specific criteria.

  • The Anniversary Upgrade content includes many files (70 mods, 140 total files). See my Skyrim Game Files List (section 4) if you'd like the entire list of files, otherwise, these all have the naming format 'ccXXXsse0XX-filename.xxx' (.bsa, .esl, .esm).
  • If these files are already in your Skyrim /Data folder, skip to section 3.
  • If you are already currently managing these mods in your Mod Manager, locate them and COPY the files (back) into your Skyrim /Data folder and skip to section 3 (we will DELETE the other files later as part of each option below).
  • If you do not have these files, but own the Anniversary Upgrade on Steam, see my Downloading Anniversary Upgrade and 'Creations' Content (Steam) guide (coming soon). This INCLUDES steps to download the files even from a downgraded version
  • If you do not have these files, but own the Anniversary Upgrade on GOG (even if you are running Skyrim VR or Skyrim primarily on Steam), see my Downloading Anniversary Upgrade Content (GOG) guide (coming soon).


3   Add Creation Club mods to your Mod Manager
Next we will be adding the Creation Club content that we prepared earlier to your Mod Manager. There are several options on how to perform this listed below in the order of most to least recommended. Follow only one of the options and their associated step(s) below, based on your preference (expand their respective 'Spoiler' tag).

3.1   Option 1: Curation Club plugin (MO2 only)
The Curation Club plugin will separate all Creation Club content into their own individual mods within MO2 automatically with a single click so that you can easily toggle them on or off, depending on preference. This option is for MO2 users only since it is a plugin specifically for that application. NOTE – This plugin requires MO2 version 2.5 or greater so will not work on version 2.4.4 or below.

Spoiler:  
Show

3.1.1   Install Curation Club for MO2
Skip to section 3.1.2 if the Curation Club plugin is already installed, otherwise, proceed with the steps below.

    • Download the latest version from the main mod page 'FILES' tab – ensure you click the 'MANUAL DOWNLOAD' link (this will not install with your Mod Manager).
      • NOTE – Ignore the message on the mod page stating the plugin does not work, I have tested this prior to posting instructions.
    • When completed, open this file from your web browser downloads folder (it is a .zip file).
    • Extract the contents of the file into the /plugins folder of your MO2 folder. For example, if you installed MO2 into ' C:\Modding\MO2', extract this to ' C:\Modding\MO2\plugins'.
    • If done correctly, you should now have a ' curationclub' folder inside of /plugins (example: ' C:\Modding\MO2\plugins\curationclub').
    • Close MO2 if it is open.
    • Re-open MO2.
    • Verify this is installed correctly by navigating to the 'Tools > Tool Plugins' menu of the main menu bar (you can also click the "puzzle" icon in the main icon bar). You should now see a 'Curation Club' entry.


    • You are done!


3.1.2   Run Curation Club
    • Open the Skyrim /Data folder.
    • Open the ' CC Content' folder inside.
    • MOVE all files in this folder back to the Skyrim /Data folder (cut and paste may be easier).
    • DELETE the ' CC Content' folder when finished.
    • Click the 'Curation Club' entry from the 'Tools > Tool Plugins' menu of the main menu bar (you can also click the "puzzle" icon in the main icon bar).
    • The following window should be shown:


    • Ensure the 'Root Builder Support' checkbox is checked.
    • Click the 'OK' button. It may appear the program is frozen but give it a few seconds to complete.
    • You should now see individual entries in your mod list for all 4 free DLC mods as well all mods contained in the Anniversary Upgrade (if applicable).
    • These can be moved higher in your mod list in MO2 to organize them better with your other mods.
    • Optionally, you can organize these with separators. For example:
      • Creation Club Content - Free DLC
        • Creation Club - Fishing
        • Creation Club - Rare Curios
        • Creation Club - Saints & Seducers
        • Creation Club - Survival Mode
      • Creation Club Content - Anniversary Upgrade
        • All other CC mods
    • Enable any/all of these mods that you would like to use by clicking the checkbox to the left of the mod name in the mod list on the left side of the main MO2 window.
    • Skip to section 4 when done.


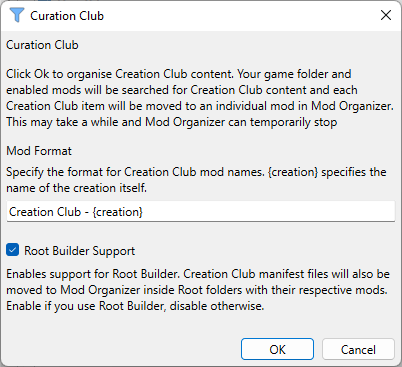
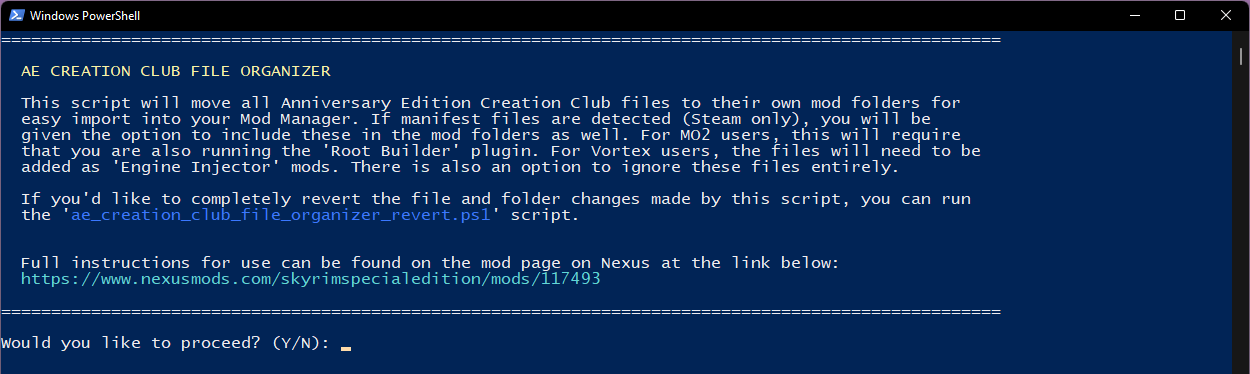
3.2   Option 2: AE Creation Club File Organizer
This is a PowerShell script that I wrote which provides the exact same functionality as the Curation Club plugin, but does not require MO2 (which means Vortex users can also use it). It works on a file and folder level (rather than a mod level within your Mod Manager), so should never break as a result of future Mod Manager and/or Skyrim game updates.

Spoiler:  
Show

3.2.1   Download and install scripts
    • Download the latest version from the main mod page 'FILES' tab – ensure you click the 'MANUAL DOWNLOAD' link (this will not install with your Mod Manager).
      • NOTE – Ignore the Installation and Usage instructions on the page as we are covering those here.
    • Extract the files to your Skyrim /Data folder.


3.2.2  Open PowerShell and run the script
In order to execute the script, we have to launch PowerShell a certain way to ensure we bypass the system's execution policy (otherwise the script will not run). This will affect the current instance only, so when PowerShell is closed, the current system policy will be reinforced again.

    • Open your Skyrim /Data folder (the scripts should already be in here).
    • Click on the address bar at the top. This will highlight the location (yours may be different).


    • With the folder highlighted, type ' powershell -ExecutionPolicy Bypass' to replace the text and hit enter.


    • This will open PowerShell directly in this folder.
    • Type the following and hit enter:
      • .\ae_creation_club_file_organizer.ps1
        • NOTE – you can simply type 'ae' and then press the 'TAB' key until the .ps1 file above is shown.


    • You will be prompted with this screen:


    • If you are OK to proceed, type 'Y' (or just hit 'Enter'). This will start processing the files.
      • If you are using Steam, and the Anniversary Upgrade manifest files are detected, you will be prompted with the following:

      • Enter your preferred selection from the list of options. This will determine your mod folder setup depending on the Mod Manager you are using. Once you enter your selection, the script will continue to process.
    • When finished, the script should show the following (your output may differ slightly depending on the number of files moved and/or manifest file selection):


    • Close PowerShell.
    • Open the Skyrim ' .\Data\CC Content' folder that was just created. You should now see a list of applicable folders for the mods detected by the script (see example image below):


    • Keep this folder open and move it aside for a moment.


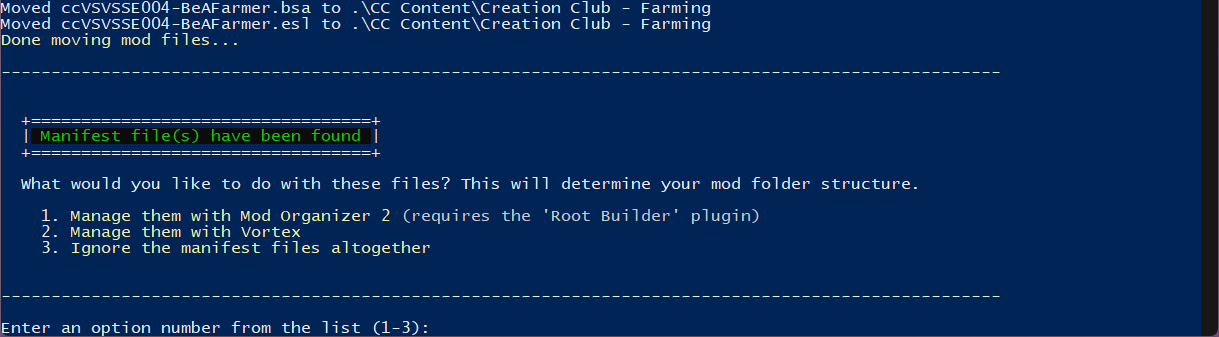
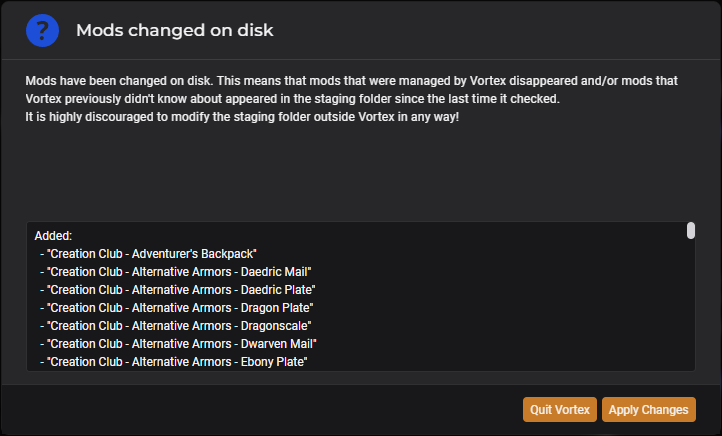
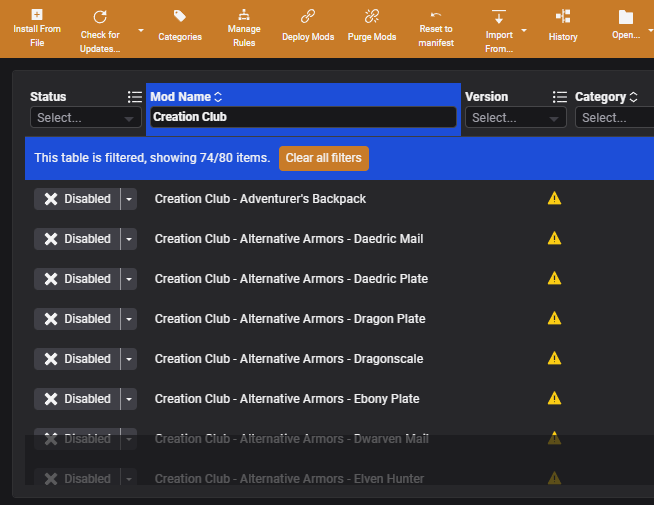
3.2.3   Import mods into Mod Manager
The next step is to import these folders into your Mod Manager. Follow only one of the two options based on your Mod Manager of choice (expand their respective 'Spoiler' tag).

3.2.3.1   Option 1: Vortex

Spoiler:  
Show

    • Open your mod staging folder by clicking the 'Open…' button in the main application taskbar, and select 'Open Mod Staging Folder'.


    • From the ' CC Content' folder we set aside in the previous section, COPY (or MOVE) ALL folders into the mod staging folder.
      • Note – Do NOT drag these files/folders into the "Drop File(s)" section of the Vortex application as this could modify our intentional file structure of the mods in a way that makes them unusable (this is the case when opting to manage the .manifest files). Additionally, dragging a folder into Vortex also automatically creates a .7z file which unnecessarily takes up space.
    • Close Vortex.
    • Re-open Vortex.
    • When opening, you will be prompted with the following message (example image below, your prompt may differ depending on the name of your mods):


    • Click the 'Apply Changes' button.
    • In the 'Mod Name' field of the mod list, type 'Creation Club'. This should filter your list to show the mods we just imported (they are all currently disabled).


    • Double-click the first entry in the list to open its properties panel and make the following updates.
      • IMPORTANT – If manifest files were found when running the script and you selected option 2 (Manage them with Vortex), you MUST change the 'Mod Type' in the properties list to 'Engine Injector'. This will ensure the mod is installed in your main Skyrim game folder, rather than the /Data folder, otherwise, these mods will not load properly.
      • Optionally change the 'Source' to 'User-Generated' (to get rid of the warning icon in the list).
    • Repeat this process of updating properties for ALL files you imported. Don't worry, although tedious, you only have to do this once. If you are not managing manifest files you can effectively skip the above step entirely as long as you don't mind seeing the warning icon.
    • Enable any/all of your preferred CC mods in Vortex.
    • If you were previously managing any Creation Club content with Vortex, disable and/or delete those mod(s) now since the process we performed will completely replace the old mod(s) (assuming they were included for processing with the script).
    • You can now delete the ' CC Content' folder from your Skyrim /Data folder. If you moved the files in the previous section, the folder should be empty. If you copied all files (rather than moving them), you can optionally keep this folder as a backup for all of your CC content.
    • Skip to section 4 when done.


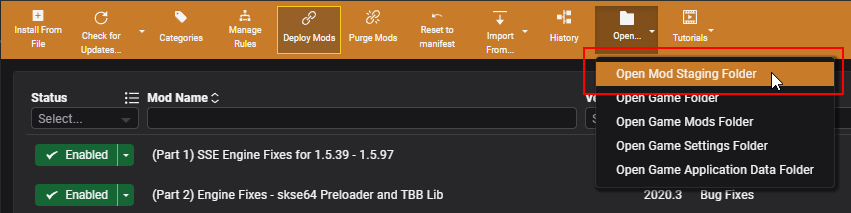
3.2.3.2   Option 2: Mod Organizer 2

Spoiler:  
Show

    • From the folder dropdown icon at the top right of the mod list window within MO2 (next to the 'wrench' dropdown), select 'Open Mods folder'.


    • From the ' CC Content' folder we set aside in the previous section, COPY (or MOVE) ALL folders into the mods folder.
    • When finished, select MO2 to ensure it is the active window and hit the 'F5' button on your keyboard. This will refresh the application and display our new folders added at the bottom of the mod list on the left.
    • Feel free to move the mods higher in the list to better organize with your other mods. There shouldn't be any other mods conflicting if you did not have these files previously.
    • Optionally, you can organize these with separators. For example:
      • Creation Club Content - Free DLC
        • Creation Club - Fishing
        • Creation Club - Rare Curios
        • Creation Club - Saints & Seducers
        • Creation Club - Survival Mode
      • Creation Club Content - Anniversary Upgrade
        • All other CC mods
    • Enable any/all of your preferred CC mods by clicking the checkbox to the left of the mod name in the mod list on the left side of the main MO2 window.
    • If you were previously managing any Creation Club content with MO2, disable and/or delete those mod(s) now since the process we performed will completely replace the old mod(s) (assuming they were included for processing with the script).
    • You can now delete the ' CC Content' folder from your Skyrim /Data folder. If you moved the files in the previous section, the folder should be empty. If you copied all files (rather than moving them), you can optionally keep this folder as a backup for all of your CC content.
    • Skip to section 4 when done.


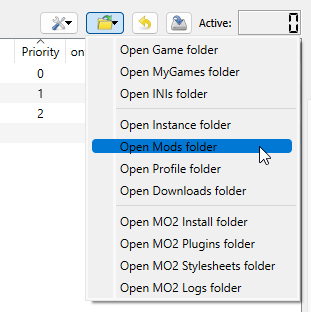
3.3   Option 3: Anniversary Edition Content Picker mod
This mod provides an easy-to-use FOMOD installer with names and descriptions for each Creation Club mod, allowing you to easily decide which mod(s) you want to actually install and use. The only downside here is that you cannot simply enable and disable mods at will, you have to re-run the installer to select which content you'd like. This comes with a little bit less granularity than the above options, and also requires an additional 3.5GB of space (with all Anniversary Upgrade content) since a copy of the files also needs to remain in the.zip file/installer so that the reinstall can be re-run at another time. That said, if you have the space, the inline descriptions can be of huge benefit when selecting which content to enable.

Spoiler:  
Show

3.3.1   Prepare mod installation files
This mod is special in that you need to unpack it, add files to it, then repack it before it can be installed. The steps below provide instructions for this process.

    • Download the latest version of 'Anniversary Edition Content Picker' from the main mod page 'FILES' tab – ensure you click the 'MANUAL DOWNLOAD' link (this will not install with your Mod Manager).
    • Extract the files to a temporary location (e.g., ' C:\temp').
    • MOVE the ' CC Content' folder from the steps above to this temporary folder. The folder should already contain its own ' CC Content' folder, so you are just adding your files to it.
    • Select all 3 folders within the temporary folder. These folders are:
      • CC Content
      • fomod
      • Images
    • With the folders selected, re-compress into a .zip file.
      • This can be done using a 3rd party tool (such as 7zip, Winrar, etc.) or by the 'Send to > Compressed (zipped) folder' option in the default Windows right-click context menu. Be sure to (re-)name the file ' Anniversary Edition Content Picker.zip'.
    • Move this folder aside for a moment.


3.3.2   Install the mod
Follow only one of the two options based on your Mod Manager of choice (expand their respective 'Spoiler' tag).

3.3.2.1   Option 1: Vortex

Spoiler:  
Show

    • Drag the ' Anniversary Edition Content Picker.zip' file from the above temporary folder into the 'Drop File(s)' section of Vortex, which is found at the bottom of the 'Mods' tab. NOTE – This may take several minutes to fully import as the file size for this mod is quite large.
    • The FOMOD installer should automatically open when the file is done importing.


    • Proceed through the FOMOD installer and select all of the content you wish to use.
    • When completed, double-click the 'Anniversary Edition Content Picker.zip' entry in the list to open its properties panel.
    • Remove the '.zip' from the name and change the 'Source' to 'User-Generated' (to get rid of the warning icon).
    • Ensure the mod is enabled (Vortex should auto-enable this after installation).
    • You can now completely remove the temporary folder you created earlier (e.g., ' C:\temp').
    • NOTE – You can always reinstall this mod if your requirements change at any time by right-clicking the mod in the mod list, and selecting 'Reinstall' to re-run the FOMOD installer and re-select which CC content you wish to enable/disable, so your current selections are not permanent.
    • Skip to section 4 when done.


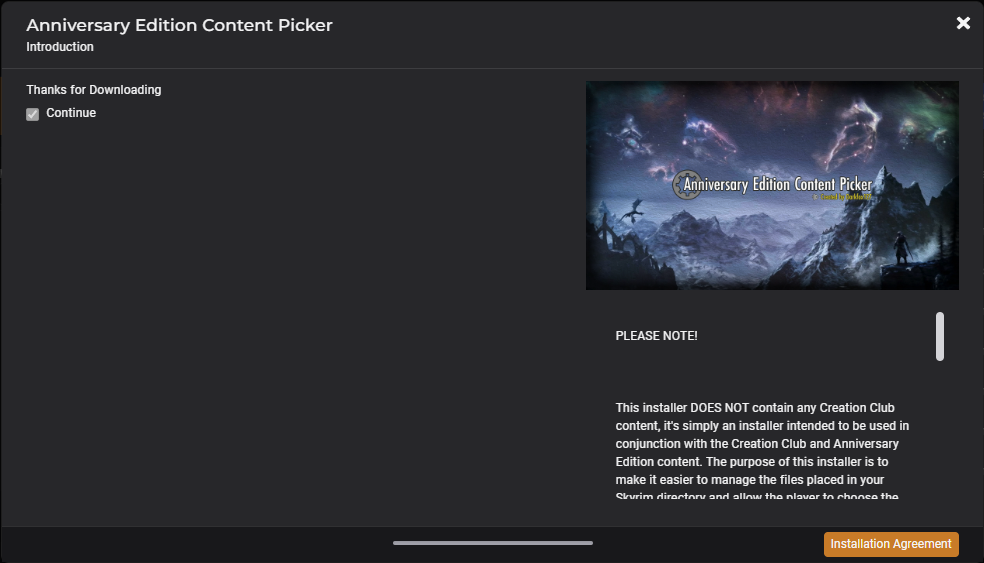
3.3.2.2   Option 2: Mod Organizer 2
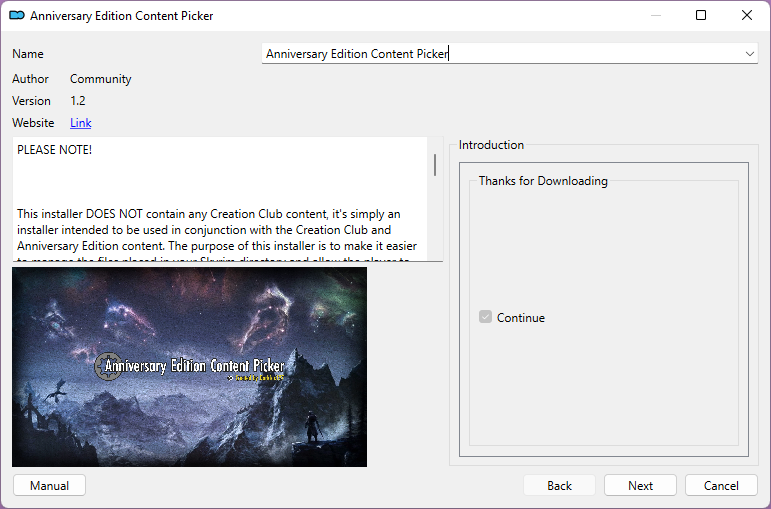
Spoiler:  
Show

    • Drag the ' Anniversary Edition Content Picker.zip' file from the above temporary folder into the 'Downloads' tab on the right side of the main MO2 window. NOTE – This may take a minute to copy as the file size for this mod is quite large.
    • Double-click the file in the 'Downloads' tab in MO2 to install. The FOMOD installer should open.


    • Proceed through the FOMOD installer and select all of the content you wish to use.
    • When done, it may take a minute to extract/copy all of the selected mod files.
    • Enable the mod by clicking the checkbox to the left of the mod name in the mod list on the left side of the MO2 window.
    • You can now completely remove the temporary folder you created earlier (e.g., ' C:\temp').
    • NOTE – You can always reinstall this mod if your requirements change at any time by right-clicking the mod in the mod list, and selecting 'Reinstall Mod' to re-run the FOMOD installer and re-select which CC content you wish to enable/disable, so your current selections are not permanent.
      • Be sure you do NOT delete the ' Anniversary Edition Content Picker.zip' file from the 'Downloads' tab of the main MO2 window, otherwise you won't be able to perform the reinstall later.
  • Skip to section 4 when done.


4   Further reading
See below for links to other helpful information.

4.1   Creation Club mod descriptions
If you'd like more information to help decide which mods to enable or disable, descriptions for all of the official Creation Club content can be found on the following websites:


4.2   Other Guides
See my guides page on Nexus for other helpful Skyrim modding guides.


4.3   Changelog
See below for changes made to this document.

  • Version 1.13 (04/27/2024)
    • Initial release


Please leave a comment with any issues or suggestions!

Article information

Added on

Edited on

Written by

infernalryan

15 comments

  1. quinnte
    quinnte
    • supporter
    • 0 kudos
    I'm not sure I'm understanding this properly. In step 3.3.1, it says to "MOVE the ' CC Content' folder from the steps above to this temporary folder." I checked the steps above for information on the CC Content folder. There isn't one.

    I made sure I ran the game first and verified that it says all the Anniversary content is installed, but there's no CC Content folder. I don't know what to do at this point.

    Edit: I'm going to assume the "CC Content" folder is referencing the SSE/Data folder, and I should move all the files in Data to the CC Content folder in C:\temp. If that's wrong, advice would be appreciated.
    1. infernalryan
      infernalryan
      • premium
      • 66 kudos
      Hello,

      Another user brought this to my attention for this guide as well - Sorry for the confusion. See below:

      Thanks for the feedback - This portion of the guide was originally part of my initial setup guide but I moved it here, so after some review it appears that not all users will have the "CC Content" folder or root builder installed.

      You can ignore the part about the CC Content folder if you didn't have it. Do you have Root Builder installed? If not, keep the 'Root Builder Support' option UNCHECKED in the Curation Club window, and try again. I will update this guide to better reflect these as optional.
    2. quinnte
      quinnte
      • supporter
      • 0 kudos
      So what am I supposed to zip into the FOMOD archive exactly? I put the Data folder in there, and followed the rest of the steps, but now everything is just broken. Do I just copy the Anniversary files into CC Content?

      I guess I'm not clear on what to do in step 3.3 at all if the CC Content folder is supposed to be ignored.

      Edit: ok I think I got it. I unpacked the mod, copied just the anniversary files to the 'CC Content' folder and repacked it. Then in Vortex I did the 'selective install' to make sure only those files got installed. seems to have worked correctly. Vortex isn't giving me any errors now.
    3. infernalryan
      infernalryan
      • premium
      • 66 kudos
      Sorry for the late response. Yes, in my initial setup guide, the 'CC Content' folder just contains all of the Skyrim 1.6 free and paid CC content, which includes all ccXXXsse0XX-filename.xxx files (.bsa, .esl, .esm). I actually use this folder name specifically because of the option you chose here, since that content picker mod uses that folder name as well. Again, sorry for confusion. I had overlooked this when moving the information over to this guide here, and plan to provide clarification in a future update. Glad you got things sorted.
  2. VaderGod2305
    VaderGod2305
    • member
    • 0 kudos
    Question, I followed all the steps up to step 8 of section 3.1.2. After hitting ok and checking off "Root Builder Support," nothing happens and there are no mods in my mod list. What could I have done to cause this? One thing that struck me as odd was taking the CC content out of a "CC Content folder." I did not have this and instead just had all the CC files loose in the Data folder already. Don't think that would cause an issue but if I was supposed to make the CC Content folder beforehand or if it was already supposed to be there it could be a clue.
    1. infernalryan
      infernalryan
      • premium
      • 66 kudos
      Thanks for the feedback - This portion of the guide was originally part of my initial setup guide but I moved it here, so after some review it appears that not all users will have the "CC Content" folder or root builder installed.

      You can ignore the part about the CC Content folder if you didn't have it. Do you have Root Builder installed? If not, keep the 'Root Builder Support' option UNCHECKED in the Curation Club window, and try again. I will update this guide to better reflect these as optional.

      Let me know if this works. If not, I'll try again on my machine. The plugin should still work but I haven't had to use it in a while since you only need to run it one time.
  3. KickinGrass95
    KickinGrass95
    • member
    • 0 kudos
    I followed the directions and it finally stopped giving me errors for the creation content missing for mods that required those 4 fishing and survival mods etc. BUT now none of the other creation content is in game AND I can't have multiple followers and I have tried reordering and using different various follower mods. Is this related to the copying of files directly? 

    Edit: I see you have a gog AE version guide coming soon....eta? 
    1. infernalryan
      infernalryan
      • premium
      • 66 kudos
      Can you clarify your setup? Which option(s) did you pick from the guide above? What version/platform of Skyrim are you running (e.g., 1.6.1170 steam)? Which mod manager are you using?

      FWIW the creation club content does not have anything to do with multiple followers - you will need a follower framework mod to do this.

      Also, I'm not sure what you are referring to for GOG AE version guide coming soon? I have an initial setup guide for GOG already, can you tell me where you saw this coming soon?
  4. DarthKillDu
    DarthKillDu
    • premium
    • 4 kudos
    Thank you so much for this guide! I used it on my FO4 CC content works Great! Only use what I need for UFO4P and that it. 
  5. AizenV
    AizenV
    • member
    • 86 kudos
    any reason why to put them in the game folder?  (Vortex)
    it cause my game to CTD in the main menu. 
    I return them to \Data, the game works as usual. 

    Additionally, the 4 CC included in free AE update should be excluded from this whole process, otherwise that will corrupt USSEP which depends on those. I spent half a day trying to figure out why my CreationKit kept crashing, finally found out that was the problem. 😅
    1. infernalryan
      infernalryan
      • premium
      • 66 kudos
      Which option from step 3 are you using? The instructions here are not implying you should put these directly in your Skyrim game folder (they should still be in /Data), however, the intention of these steps is to create separate "mods" within your mod manager that you can toggle on/off (like any other mod). Perhaps I need to clarify the process you are using so please let me know which one.
    2. AizenV
      AizenV
      • member
      • 86 kudos
      it's point 3.2.3.1.8. (Vortex), 
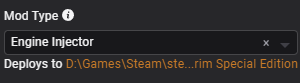
      it's said to change the 'Mod Type' in the properties list to 'Engine Injector'. 

      I remember only used that to install SSE Engine Fixes part 2. 
    3. infernalryan
      infernalryan
      • premium
      • 66 kudos
      As stated in 3.2.3.1 step 8, the only time you would change the 'Mod Type' to 'Engine Injector' is if the script found manifest files while processing (see 3.2.2 step 7 for image). This is because the manifest files are found in the 'Creations' folder off of your main game folder, so setting to 'Engine Injector' just instructs Vortex to use the Skyrim main game folder instead of the /Data folder as its base folder for the mod (otherwise it would not detect these files). In this case, each mod should have the following structure:

      Mod folder
      .\Creations (includes manifest file)
      .\Data (includes mod + .bsa)

      If the script did NOT find manifest files, do NOT set as 'Engine Injector' type, otherwise you will be putting these mod files in the main Skyrim game folder which is not valid/correct.

      Hope this helps.
  6. Mightyandyman
    Mightyandyman
    • supporter
    • 0 kudos
    I used the second option and it found 4 mods, fishing, Rare Curios, Saints & Seducers and Survival Mode, If I disable any the game CTD's 
    1. infernalryan
      infernalryan
      • premium
      • 66 kudos
      Can you elaborate a bit? Which (game) version of Skyrim are you using? Are you using updated masters, and if so, what version? Which Mod Manager are you using? Are you saying you successfully used the tool to separate these into their own respective folders, and added them to your Mod Manager without issue? What happens when you start the game with them enabled - does this work fine? Does the issue only occur when you disable these individual mods?