A Windows PowerShell script that sorts AE CC content into separate folders, similar to the Curation Club plugin for MO2. This allows Vortex users to benefit from the functionality as well.
Requirements
DLC requirements
DLC name
Anniversary Edition
Permissions and credits
Credits and distribution permission
Other user's assetsAll the assets in this file belong to the author, or are from free-to-use modder's resources
Upload permissionYou are not allowed to upload this file to other sites under any circumstances
Modification permissionYou must get permission from me before you are allowed to modify my files to improve it
Conversion permissionYou are not allowed to convert this file to work on other games under any circumstances
Asset use permissionYou must get permission from me before you are allowed to use any of the assets in this file
Asset use permission in mods/files that are being soldYou are not allowed to use assets from this file in any mods/files that are being sold, for money, on Steam Workshop or other platforms
Asset use permission in mods/files that earn donation pointsYou are not allowed to earn Donation Points for your mods if they use my assets
Author notes
This author has not provided any additional notes regarding file permissions
File credits
This author has not credited anyone else in this file
Donation Points system
Please log in to find out whether this mod is receiving Donation Points
Changelogs
Version 1.0
Initial release
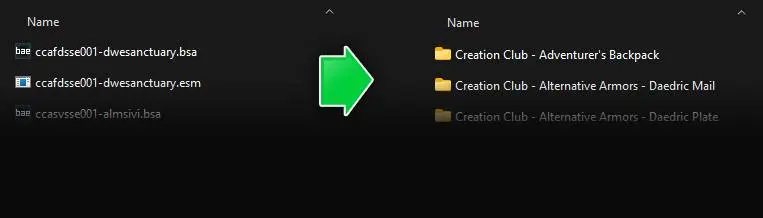
Overview This is a windows PowerShell script that moves all official Creation Club content found in your Skyrim /Data folder (this can include the 4 free Skyrim 1.6 DLC files and/or all Anniversary Upgrade files) into their own dedicated folders with intuitive names so that they can be easily managed by your Mod Manager of choice and individually enabled or disabled. This (optionally) includes all .manifest files that are found during execution of the script for Steam users. This script does NOT do anything with other in-game purchased Creation Club content or "Creations" (just official ones as part of the AE update).
Benefits
Spoiler:
Show
The script is functionally exactly the same as the Curation Club plugin for MO2, but because it does not rely on a specific Mod Manager (or Mod Manager version), users with Vortex or MO2 version 2.4.4 and lower can benefit from the functionality. This uses file and folder structure only as its criteria, so should never break as a result of future Mod Manager and/or Skyrim game updates. Additionally, compared to a mod like Anniversary Edition Content Picker (which is still a great mod), you will not need as much disk space, as that mod requires you to maintain a copy of all Creation Content files in the installer .zip file (about 3.5GB compressed) so that the FOMOD can be re-run at any time to change your selections.
Requirements
The 4 free Creation Club DLC mods (which are included with all versions of Skyrim version 1.6) and/or the Anniversary Upgrade files downloaded and installed into their default location (the Skyrim /Data folder).
If you do not have the 4 free Creation Club DLC mods and are running Skyrim version 1.5.97, or Skyrim VR (but also own a copy of SSE), see my guide on Downloading Free CC Content Files to obtain them.
If you are already managing your CC content in some other manner, you will need to copy (or move) those files back into your Skyrim /Data folder so the script can process them.
If using Steam, it is also recommended that you lock your Skyrim manifest file (we will be moving stock game files and don't want them to redownload).
Installation Simply download the scripts from the 'FILES' tab and extract them to your Skyrim /Data folder (this is where your game masters and other mod files reside).
Usage Follow directions below to run the script and perform all additional actions specific to your Mod Manager.
Step 1 (of 2): Open PowerShell and run the script In order to execute the script, we have to launch PowerShell a certain way to ensure we bypass the system's execution policy (otherwise the script will not run). This will affect the current instance only, so when PowerShell is closed, the current system policy will be reinforced again.
Open your Skyrim /Data folder (the scripts should already be in here).
Click on the address bar at the top. This will highlight the location (yours may be different).
With the folder highlighted, type 'powershell -ExecutionPolicy Bypass' to replace the text and hit enter.
This will open PowerShell directly in this folder.
Type the following and hit enter:
.\ae_creation_club_file_organizer.ps1
(NOTE – you can simply type 'ae' and then press the 'TAB' key until the .ps1 file above is shown).
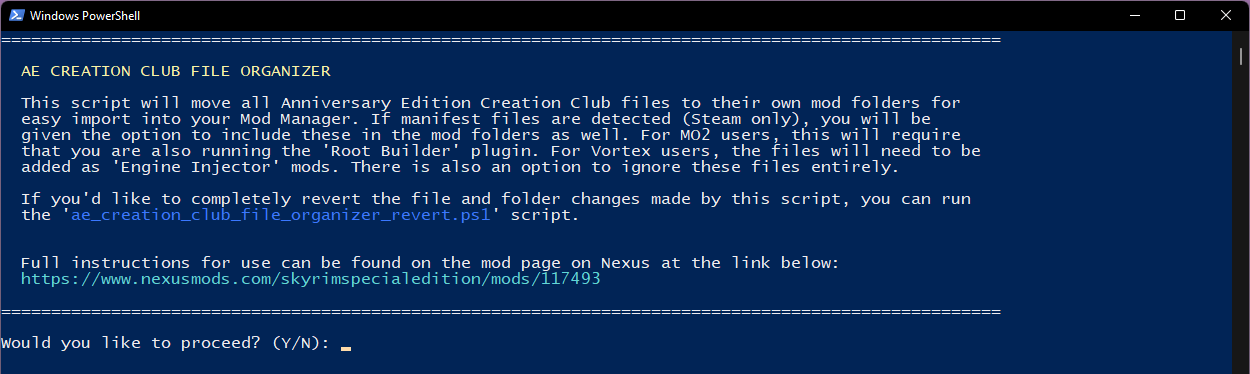
You will be prompted with this screen:
If you are OK to proceed, type 'Y' (or just hit 'Enter'). This will start processing the files.
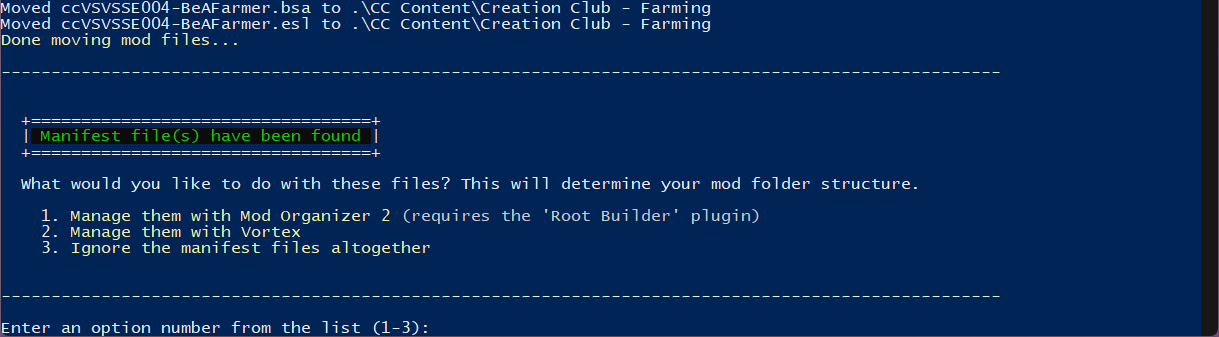
If you are using Steam, and the Anniversary Upgrade manifest files are detected, you will be prompted with the following:
Enter your preferred selection from the list of options. This will determine your mod folder setup depending on the Mod Manager you are using. Once you enter your selection, the script will continue to process.
When finished, the script should show the following (your output may differ slightly depending on the number of files moved and/or manifest file selection):
Close PowerShell.
Open the Skyrim '.\Data\CC Content' folder that was just created. You should now see a list of applicable folders for the mods detected by the script (see example image below):
Keep this folder open and move it aside for a moment.
Reverting file moves If you would like to revert all of the file moves performed and new folders created from running the main script, perform the following:
Spoiler:
Show
Move the folders back into the Skyrim '.\Data\CC Content' folder (if you had moved them out).
Run the 'ae_creation_club_file_organizer_revert.ps1' script, which should be in the Skyrim /Data folder, being sure to follow the same steps above to open PowerShell so that the script has permissions to run.
This will move all files (mods and manifest) back to their original locations.
Step 2 (of 2): Import mods into Mod Manager The next step is to import these folders into your Mod Manager. Follow only one of the two options based on your Mod Manager of choice (expand their respective 'Spoiler' tag).
Option 1: Vortex
Spoiler:
Show
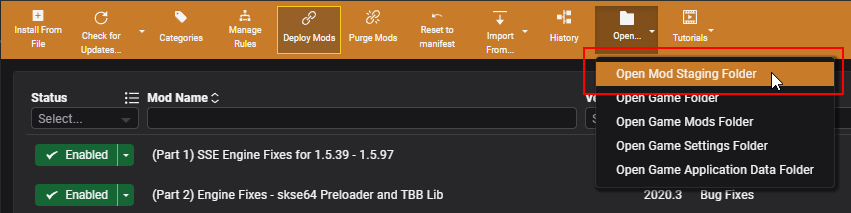
Open your mod staging folder by clicking the 'Open…' button in the main application taskbar, and select 'Open Mod Staging Folder'.
From the 'CC Content' folder we set aside in the previous section, COPY (or MOVE) ALL folders into the mod staging folder.
Note – Do NOT drag these files/folders into the "Drop File(s)" section of the Vortex application as this could modify our intentional file structure of the mods in a way that makes them unusable (this is the case when opting to manage the .manifest files). Additionally, dragging a folder into Vortex also automatically creates a .7z file which unnecessarily takes up space.
Close Vortex.
Re-open Vortex.
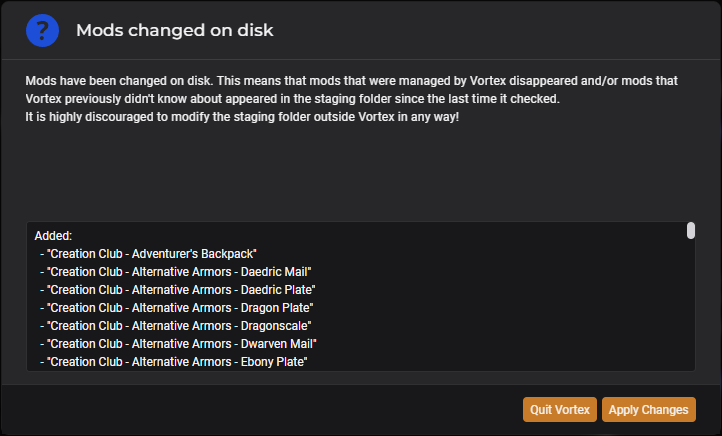
When opening, you will be prompted with the following message (example image below, your prompt may differ depending on the name of your mods):
Click the 'Apply Changes' button.
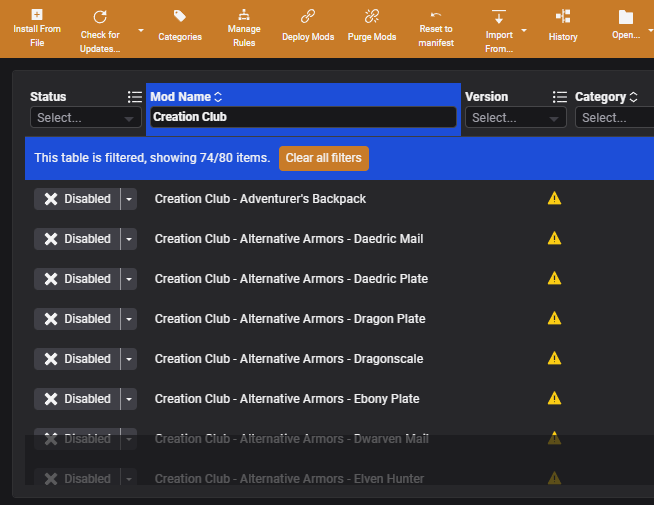
In the 'Mod Name' field of the mod list, type 'Creation Club'. This should filter your list to show the mods we just imported (they are all currently disabled).
Double-click the first entry in the list to open its properties panel and make the following updates.
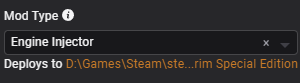
IMPORTANT – If manifest files were found when running the script and you selected option 2 (Manage them with Vortex), you MUST change the 'Mod Type' in the properties list to 'Engine Injector'. This will ensure the mod is installed in your main Skyrim game folder, rather than the /Data folder, otherwise, these mods will not load properly.
Optionally change the 'Source' to 'User-Generated' (to get rid of the warning icon in the list).
Repeat this process of updating properties for ALL files you imported. Don't worry, although tedious, you only have to do this once. If you are not managing manifest files you can effectively skip the above step entirely as long as you don't mind seeing the warning icon.
Enable any/all of your preferred mods in Vortex.
If you were previously managing any Creation Club content with Vortex, disable and/or delete those mod(s) now since the process we performed will completely replace the old mod(s) (assuming they were included for processing with the script).
You can now delete the 'CC Content' folder from your Skyrim /Data folder. If you moved the files in the previous section, the folder should be empty. If you copied all files (rather than moving them), you can optionally keep this folder as a backup for all of your CC content.
You are done!
Option 2: Mod Organizer 2
Spoiler:
Show
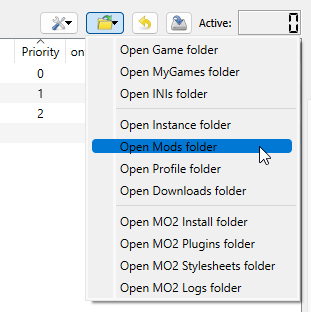
From the folder dropdown icon at the top right of the mod list window within MO2 (next to the 'wrench' dropdown), select 'Open Mods folder'.
From the 'CC Content' folder we set aside in the previous section, COPY (or MOVE) ALL folders into the mods folder.
When finished, select MO2 to ensure it is the active window and hit the 'F5' button on your keyboard. This will refresh the application and display our new folders added at the bottom of the mod list on the left.
Enable any/all of your preferred mods by clicking the checkbox to the left of the mod name in the mod list on the left side of the main MO2 window.
Feel free to move the mods higher in the list to better organize with your other mods. There shouldn't be any other mods conflicting if you did not have these files previously.
If you were previously managing any Creation Club content with MO2, disable and/or delete those mod(s) now since the process we performed will completely replace the old mod(s) (assuming they were included for processing with the script).
You can now delete the 'CC Content' folder from your Skyrim /Data folder. If you moved the files in the previous section, the folder should be empty. If you copied all files (rather than moving them), you can optionally keep this folder as a backup for all of your CC content.
You are done!
Resources See below for links to other helpful information.
Creation Club mod descriptions If you'd like more information to help decide which mods to enable or disable, descriptions for all of the official Creation Club content can be found on the following websites: