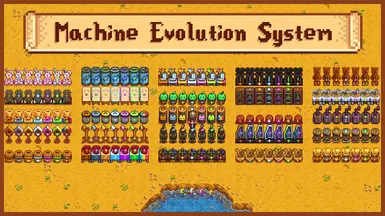
Objects around the Valley have awakened and gained new powers. This mod adds 26 brand-new, fully configurable, tiered machines to the game. Unlock new playstyles and experience the game in an entirely different way!
Other user's assetsSome assets in this file belong to other authors. You will need to seek permission from these authors before you can use their assets
Upload permissionYou are not allowed to upload this file to other sites under any circumstances
Modification permissionYou must get permission from me before you are allowed to modify my files to improve it
Conversion permissionYou are not allowed to convert this file to work on other games under any circumstances
Asset use permissionYou must get permission from me before you are allowed to use any of the assets in this file
Asset use permission in mods/files that are being soldYou are not allowed to use assets from this file in any mods/files that are being sold, for money, on Steam Workshop or other platforms
Asset use permission in mods/files that earn donation pointsYou are not allowed to earn Donation Points for your mods if they use my assets
Author notes
This author has not provided any additional notes regarding file permissions
File credits
This author has not credited anyone else in this file
Donation Points system
Please log in to find out whether this mod is receiving Donation Points
Changelogs
Version 1.0.4
FIX: The Fish Chamber's "Ban Legendary Fish" option now works as intended.
Version 1.0.3
FIX: The "Unlocked from Start" feature now works as intended.
FIX: The Tea Table's "Ban Stardrop Tea" option now works as intended.
Version 1.0.2
FIX: The Forage Box now works as intended.
Version 1.0.1
FIX: The Squirrel Friend now works as intended.
FIX: The Chinese translation has been updated.
Version 1.0.0
Initial release.
Donations
No donations accepted
Available in English US, Chinese ZH, French FR, Hungarian HU, Korean KO, Portuguese PTBR, Russian RU and Spanish ES (files included)
Machine Evolution System adds 26 brand-new, fully configurable, tiered machines to the game. Upgrading your machines will enhance them in a variety of ways. Through an extensive configuration system provided by Generic Mod Config Menu, you can:
Gain access to all machine recipes instantly, regardless of requirements.
Customize the crafting recipes for each machine.
Fully customize processing times, input and output quantities, and the quality of the final products.
Choose whether machines should copy the quality of the input item.
Boost the value of weaker products with configurable multipliers.
Unlock new, goal-based production bonuses as you progress.
Access entirely new and exciting features unique to Machine Evolution System.
The Machine Evolution System features six upgrade tiers: Steel, Gold, Diamond, Iridium, Radioactive and Prismatic. With the Upgrade Packs introduced by tlitookilakin's incredible Machine Upgrade System, players can upgrade their machines and unlock all the benefits mentioned above. The Machine Upgrade System also allows for extensive customization of the upgrade process, giving you full control over the system. You can:
Choose the amounts of resources needed to craft an upgrade pack, allowing you to customize the difficulty to your preference.
Change the resources required to craft each upgrade, giving you control over the materials you wish to use.
Additionally, you can change the appearance of the machines. You have the option to choose from:
Spoiler:
Show
Neon Jewel (default), Neon Jewel ~ Desaturated, Only Jewel, Only Jewel ~ Desaturated
In the Google Drive document linked above, you will find a complete list of all the new machines introduced in Machine Evolution System, including the default values and unlocking requirements. If you prefer not to leave NexusMods, the same information—excluding default values and unlocking requirements—is available in the spoiler below.
Spoiler:
Show
Chocolate Bunny
This Chocolate Bunny steals chocolate items from other people's pantries. Its loot increases as your friendship with Abigail, Evelyn, and Jodi grows.
Spoiler:
Show
This machine produces Chocolate items when placed. It receives an output bonus if the player has a friendship of 4 hearts with Abigail, Evelyn or Jodi. It also multiplies the value of items priced from 100 to 400. Configuration You can configure:
The minutes required for production.
The output quantity.
The output quality.
The value multiplier for cheap items.
The output bonus amount.
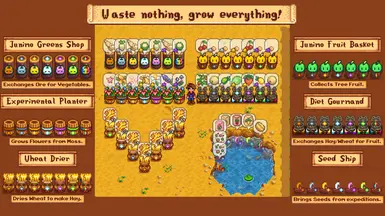
Diet Gourmand
This Diet Gourmand exchanges Hay or Wheat for seasonal fruit. The amount of fruit exchanged increases with your Farming level.
Spoiler:
Show
This machine produces seasonal fruit when given Hay or Wheat. It receives an output bonus if the player has achieved Farming levels 3, 6 and 9.
Configuration You can configure:
The minutes required for production.
The amount of Hay or Wheat required.
The output quantity.
The output quality.
The output bonus amount.
Dionysus' Delight
This amphora, blessed by Dionysus, fills with alcohol on Fridays, Saturdays, and Sundays. The amount it fills increases based on the number of beverages you have made.
Spoiler:
Show
This machine produces a random alcohol item on Fridays, Saturdays, and Sundays (production begins the day before). It receives an output bonus if the player has made 50, 100 or 150 beverages. It also multiplies the value of items with a price from 100 to 400. It increases the in-game stat of “beveragesMade”.
Configuration You can configure:
The output quantity.
The output quality.
The value multiplier for cheap items.
The output bonusamount.
Egg Lair
A mysterious being uses this birdhouse to leave random eggs, with additional eggs appearing based on the number of Chicken and Duck eggs you have collected.
Spoiler:
Show
This machine produces random eggs. It receives an output bonus if the player has collected 50 Chicken Eggs, 100 Chicken Eggs, 50 Duck eggs or 100 Duck eggs. It increases the in-game stat of “chickenEggsLayed” and “duckEggsLayed”.
Configuration You can configure:
The minutes required for production.
The output quantity.
The output quality.
The output bonus amount.
Experimental Planter
This Experimental Planter grows random flowers when Moss is added. The number of flowers increases with your Farming level.
Spoiler:
Show
This machine produces random flowers when Moss is put in. It receives an output bonus if the player has achieved Farming levels 3, 6 and 9. It gives Farming experience.
Configuration You can configure:
The minutes required for production.
The amount of Moss required.
The output quantity.
The output quality.
The output bonus amount.
Fish Chamber
This chamber uses advanced technology to replicate fish placed inside. The amount of fish obtained increases with the number you have caught.
Spoiler:
Show
This Machine replicates the fish that is put in. Fish are divided into six brackets depending on how expensive they are. The more expensive they are, the more they take to be replicated. This machine receives an output bonus if the player has caught 50, 100 or 150 fish. It gives Fishing experience.
Configuration You can configure:
The minutes required for production.
The output quantity.
The output quality.
Whether the machine copies the quality of the input item. This setting overrides the quality configuration.
The output bonus amount.
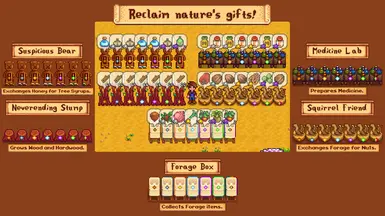
Forage Box
Place this forage box outside to collect forage from its surroundings. It gathers different items from the Mines, Beach, Desert, and Secret Woods. The amount of items collected increases based on your Foraging level.
Spoiler:
Show
This machine produces forage items based on its location. It collects different items when placed at the entrance to the Mines, on the Beach, in the Desert or in the Secret Woods. It receives an output bonus if the player has achieved Foraging levels 3, 6 and 9. It also brings additional items when those levels are met.
Having the Gatherer profession will have a 20% chance to double this machine’s produce. Having the Botanist profession will always make this machine’s output Iridium quality. It gives Foraging experience and increases the in-game stats of “itemsForaged” and “caveCarrotsFound”.
Configuration You can configure:
The minutes required for production.
The output quantity.
The output quality.
The output bonus amount.
Garbage Nest
This Garbage Nest generates trash every day. The amount increases depending on how many trash cans you have checked.
Spoiler:
Show
This machine produces trash items every day. It receives an output bonus if the player has checked 50, 100 or 150 trash cans. It also brings additional items when those thresholds are met.
Since the original effect of The Alleyway Buffet book cannot be applied to this machine, instead it multiplies the amount of trash you get. It also increases the in-game stat of “trashCansChecked”.
Configuration You can configure:
The output quantity.
The 'The Alleyway Buffet' output multiplier.
The output bonus amount.
Hat Mouse's Stand
You place this. It give hats. Okay?
Spoiler:
Show
This machine outputs random Hats. Hats have been divided in tiers that are unlocked as the machine is upgraded.
Tier 1 (base): Tailored hats and any modded hat.
Tier 2 (Steel): Player Action hats. Those obtained by fishing, opening geodes, etc.
Tier 3 (Gold): Treasure Chest hats. Those obtained in treasure chests.
Tier 4 (Diamond): Special Shop hats. Those purchased in special shops.
Tier 5 (Iridium): Event or Quest hats. Those obtained in certain events or quests.
Tier 6 (Radioactive): Achievement hats. Those purchased in the Abandoned House Shop after unlocking an achievement.
Tier 7 (Prismatic): Ultra Rare Drop hats. Those dropped very rarely by monsters or player actions.
Configuration You can configure the days required for production.
Joja Eats
Order food for delivery with Joja Eats using Joja Coins. The amount received increases depending on how many dishes you have cooked.
Spoiler:
Show
This machine outputs a random dish or cooking item when a Joja Coin is put in. It receives an output bonus if the player has cooked 50, 100 or 150 dishes.
Joja Coins are purchased at Joja Mart (or Pierre’s General Store if you have completed the Community Center).
Configuration You can configure:
The minutes required for production.
The amount of Joja Coins required.
The output quantity.
The output quality.
The output bonus amount.
Joja Prime
Order items for delivery with Joja Prime. Use Joja Digests for furniture, Joja Coupons for clothing, and Joja Gift Cards for boots.
Spoiler:
Show
This machine outputs random items depending on the input. Joja Digests output random Furniture. Joja Coupons output random Clothes. Joja Gift Cards output random Boots. Boots have been divided in tiers that are unlocked as the machine is upgraded.
Tier 1 (base): Sneakers, Rubber Boots, Leather Boots and any modded Boots.
Tier 2 (Steel): Work Boots, Combat Boots and Tundra Boots.
Tier 3 (Gold): Leprechaun Shoes, Thermal Boots and Cowboy Boots.
Tier 4 (Diamond): Dark Boots, Firewalker Boots and Genie Shoes.
Tier 5 (Iridium): Space Boots and Crystal Shoes.
Tier 6 (Radioactive): Emily’s Magic Boots and Cinderclown Shoes.
Tier 7 (Prismatic): Mermaid Boots and Dragonscale Boots.
Joja Digests, Joja Coupons and Joja Gift Cards are purchased at Joja Mart (or Pierre’s General Store if you have completed the Community Center). Configuration You can configure:
The days required for production.
The amount of Joja Digests, Coupons and Gift Cards required.
Junimo Fruit Basket
Junimos put seasonal tree fruits in this basket. The number of fruits increases with your Farming level.
Spoiler:
Show
This machine produces seasonal tree fruit when placed. It receives an output bonus if the player has achieved Farming levels 3, 6 and 9. It gives Farming experience.
Configuration You can configure:
The minutes required for production.
The output quantity.
The output quality.
The output bonus amount.
Junimo Greens Shop
Bring Junimos Copper, Iron, or Gold Ore in exchange for seasonal vegetables. They will give you more vegetables depending on your Farming level.
Spoiler:
Show
This machine produces seasonal vegetables when given Copper, Iron or Gold Ore. It receives an output bonus if the player has achieved Farming levels 3, 6 and 9.
Copper Ore outputs vegetables with a price of 0-150.
Iron Ore outputs vegetables with a price of 150-300.
Gold Ore outputs vegetables with a price of 300+.
Configuration You can configure:
The minutes required for production.
The amount of ore required.
The output quantity.
The output quality.
The output bonus amount.
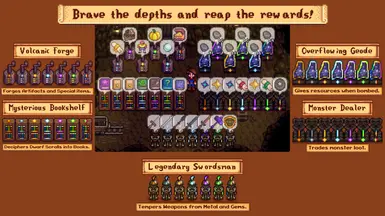
Legendary Swordsman
Offer this swordsman a Copper Bar, Iron Bar, Gold Bar, Diamond, Iridium Bar, Radioactive Bar or Prismatic Shard, and it will give you a random weapon in return.
Spoiler:
Show
This machine outputs random Weapons when a metal bar or gem is input. Weapons have been divided in tiers that are unlocked as the machine is upgraded. Each metal bar or gem has a different weapon pool.
Copper Bars: level 1 Vanilla weapons.
Iron Bars: level 2-3 Vanilla weapons.
Gold Bars: level 4-6 Vanilla weapons.
Diamonds: level 7-8 Vanilla weapons.
Iridium Bars: level 9-10 Vanilla weapons.
Radioactive Bars: level 11-12 Vanilla weapons.
Prismatic Shards: level 13+ weapons and all modded weapons.
Configuration You can configure the minutes required for production.
Medicine Lab
Use this lab to create medicine by combining Forage and Honey. The amount you create increases as your friendship with Harvey, George, and Maru grows.
Spoiler:
Show
This machines produces random medicine when combining Forage and Honey. It receives an output bonus if the player has a friendship of 4 hearts with Harvey, George or Maru.
Configuration
The minutes required for production.
The amount of input required.
The output quantity.
The output quality.
Whether the machine copies the quality of the input item. This setting overrides the quality configuration.
The output bonus amount.
Monster Dealer
This dealer exchanges a piece of common monster loot for a different item from the same monster line. The amount it gives you increases based on the monsters you have killed.
Spoiler:
Show
This machine produces random loot from the same monster line's input. It receives an output bonus if the player has killed 100, 300 or 500 monsters. It also produces additional items when the player has killed 100, 300 or 500 monsters from that same monster line. Additionally, if the player has read the Monster Compendium book, there is a 3% chance for the machine to double its output.
When it comes to the monster lines: the most common item in the group is traded for a different item from the same group. For example: putting Slime in might give you Dwarf Scrolls, Sap, Diamonds or the Pink Cake, as all of these are dropped by enemies in that line.
The monster lines are configured as follows:
Slime line. All slimes (except for the Tiger Slime).
Bug Meat line. All bug-like enemies.
Crab line. All crabs.
Geode line. All duggies (except for the Magma Duggy).
Bat Wing line. All bats.
Fiber line. All golems.
Coal line. All dust sprites.
Solar Essence line. All Ghosts, Heads, Squids and Mummies.
Bone Fragment line. All Skeletons, Pepper Rexes and Skulls.
Void Essence line. All Shadow Folk, Serpent and Spiders.
Cinder Shards line. All Volcano Dungeon enemies.
Configuration You can configure:
The minutes required for production.
The amount of input required.
The output quantity.
The output bonus amount.
Mysterious Bookshelf
This bookshelf turns Dwarf Scrolls into books. It generates additional books based on the amount of Lost Books you have found.
Spoiler:
Show
This machine produces random books when Dwarf Scrolls are input. It receives an output bonus if the player has found 5, 10 or 21 Lost Books.
Books have been divided in tiers that are unlocked as the machine is upgraded.
Tier 3 (Gold): expensive books (Way of the Wind 1 and 2, Horse: The Book, Ol' Slitherlegs).
Tier 4 (Diamond): event books (The Alleyway Buffet, Raccoon Journal, The Art O'Crabbing).
Tier 5 (Iridium): random drop books (Monster Compendium, Treasure Appraisal Guide, Book of Mysteries, Friendship 101, Jewels of the Sea, Jack be Nimble, Jack be Thick, Woody's Secret).
Tier 6 (Radioactive): late game books (The Diamond Hunter, Mapping Cave Systems).
Tier 7 (Prismatic): includes every book in the game, including modded books.
Configuration You can configure:
The minutes required for production.
The output quantity.
The output bonus amount.
Neverending Stump
This stump produces Wood and Hardwood every morning. The amount of wood it produces depends on how many sticks and stumps you have chopped.
Spoiler:
Show
This machine produces Wood and Hardwood every morning. It receives a Wood output bonus if the player has chopped 50 or 100 sticks and a Hardwood output bonus if the player has chopped 50 or 100 stumps. Having the Forester profession multiplies this machine’s output by 25%. If the player has read the Woody’s Secret book, there is a 5% chance for the machine to double its output. It gives Foraging experience.
Configuration You can configure:
The output quantity.
The output bonus amount.
Overflowing Geode
Throw a bomb inside to collect mineral resources. The larger the bomb, the more resources are gathered. The number of items found depends on how many mineral resources have been discovered. Additional items may drop randomly.
Spoiler:
Show
This machine outputs random mineral resources when a bomb is input. The bigger the bomb, the bigger the output. It receives an output bonus if the player has collected 50, 100 or 150 specific resources. Having the Miner profession will increase the Copper, Iron, Gold, Iridium and Radioactive Ore drops by 1. It gives Mining experience.
Mineral resources have been divided in tiers that are unlocked as the machine is upgraded.
Stone is the only guaranteed drop, while the other resources have a 50% chance of dropping. It is to say: you could get all items with one bomb or you could just get stone.
Configuration You can configure:
The amount of input required.
The output quantity for each bomb.
The output bonus amount.
Seed Ship
Place this ship in a body of water to send it on an expedition. The more seeds you have sown, the more it will bring back.
Spoiler:
Show
This machine produces random seasonal seeds when placed in a body of water. It receives an output bonus if the player has sown 100, 300 or 500 seeds.
Configuration You can configure:
The minutes required for production.
The output quantity.
The output bonus amount.
Squirrel Friend
Give this squirrel forage and it will give nuts in return. The amount it gives increases as your friendship with Emily, Jas, and Vincent grows.
Spoiler:
Show
This machine produces nuts when forage is input. It receives an output bonus if the player has a friendship of 4 hearts with Emily, Jas or Vincent. It gives Foraging experience.
Configuration You can configure:
The minutes required for production.
The output quantity.
The output quality.
Whether the machine copies the quality of the input item. This setting overrides the quality configuration.
The output bonus amount.
Suspicious Bear
Some people say this bear brings tree syrup items when it is given Honey. Perhaps the amount it gives increases based on your Foraging level.
Spoiler:
Show
This machine produces random tree syrup items when Honey is input. It receives an output bonus if the player has achieved Foraging levels 3, 6 and 9.
Configuration You can configure:
The minutes required for production.
The output quantity.
The output quality.
The output bonus amount.
Tea Table
This tea table fills with tea on Mondays, Tuesdays, Wednesdays, and Thursdays. The amount it fills increases based on the number of beverages you have made.
Spoiler:
Show
This machine produces tea on Mondays, Tuesdays, Wednesdays and Thursdays (production begins the day before). It receives an output bonus if the player has made 50, 100 or 150 beverages. It also multiplies the value of items with a price from 100 to 400. It increases the in-game stat of “beveragesMade”.
Configuration You can configure:
The output quantity.
The output quality.
The value multiplier for cheap items.
The output bonus amount.
Volcanic Forge
Forge artifacts by combining Sap with Clay, Bone Fragments, Algae, or Soggy Newspapers. The number of artifacts forged increases based on how many items you have donated to the Museum. You can also forge premium items using Pumpkins, Diamonds, or Artifact Troves.
Spoiler:
Show
This machine produces artifacts or special items when certain items are input. It receives an output bonus if the player has donated 25, 50 or 75 items to the Museum. It gives Mining experience.
These are the materials used by the Volcanic Forge.
Soggy Newspapers make items with the scroll_item context tag (like Dwarf Scrolls).
Green and White Algae make items with the marine_item context tag (like the Dried Starfish).
Bone Fragments make items with the prehistoric_item context tag (like the Prehistoric items).
Clay makes any Artifact that doesn’t fit above.
Pumpkins make Golden Pumpkins.
Diamonds make Pearls.
Artifact Troves make Treasure Chests.
Configuration You can configure:
The minutes required for production.
The amount of input required.
The amount of Sap required.
The output quantity for regular and premium items.
The output bonus amount.
Weather Totem
Place this outside during rain or a storm, and it will generate a random warp totem. The number it generates increases based on the amount of items you have crafted. It works differently in the Desert and on the Island.
Spoiler:
Show
This machine produces random totems depending on the weather or location. It receives an output bonus if the player has crafted 50, 100 or 150 items. This machine is compatible with the Rain and Storm-like weathers introduced by Weather Wonders and Project Danger Weather.
These are the conditions:
If the weather is Rainy or Stormy, you can get any totem in the game (including modded) except for the Desert, Island and Qi’s Arena totems.
If you place it in the Desert, you can only get the Desert totem.
If you place it on the Ginger Islands, you can only get the Island totem.
Configuration You can configure:
The minimum and maximum output quantity.
The output bonus amount.
Wheat Drier
Spoiler:
Show
Put Wheat in to dry it into Hay. The amount produced increases based on your Farming level.
3.0 Features This machine produces Hay when Wheat is input. It receives an output bonus if the player has achieved Farming levels 3, 6 and 9. There’s a chance to double the Hay output depending on the quality of the Wheat (15% for Silver, 50% for Gold, and 100% for Iridium).
Configuration You can configure:
The minutes required for production.
The amount of Wheat required.
The output quantity.
The output bonus amount.
Machine Evolution System is compatible with everything, as it does not modify any vanilla assets or those of other mods, and only adds and builds on new content. It is safe to install alongside any mods and at any point in your playthrough. It will never cause any conflicts or errors.
However, I do not know if it works as intended with the Android version of SMAPI. If the frameworks that Machine Evolution System relies on—Content Patcher, Extra Machine Configs, Machine Terrain Framework, and Machine Upgrade System—work on Android, then Machine Evolution System should as well.
Machine Evolution System has been fully coded with context tags, allowing mod authors to easily integrate or exclude their content. To do so, all that is needed is to add the appropriate context tags to their items. This Google Drive document has all the answers you need.
Machine Evolution System includes all available languages in the main release. If you are a translator and would like to see MES in your language, simply go to the mod's i18n folder, translate the appropriate .json file, and send it to me via Discord (@nachonline) or email ([email protected]).
the MES Beta Test Group for their hard work, especially Scarlett, JC and Lassa.
Machine Evolution System may seem new, but it has been six months in the making. Development took three months, followed by three more months of private beta testing. I have done my best to cater to all kinds of players and to bring something truly innovative. If you enjoy it, please consider endorsing the mod—it means a lot and helps support the ongoing work to keep it fun and exciting. Have fun!