


2 items

File information
Created by
MrCementKnightUploaded by
MrCementKnightVirus scan
Some manually verified files
About this mod
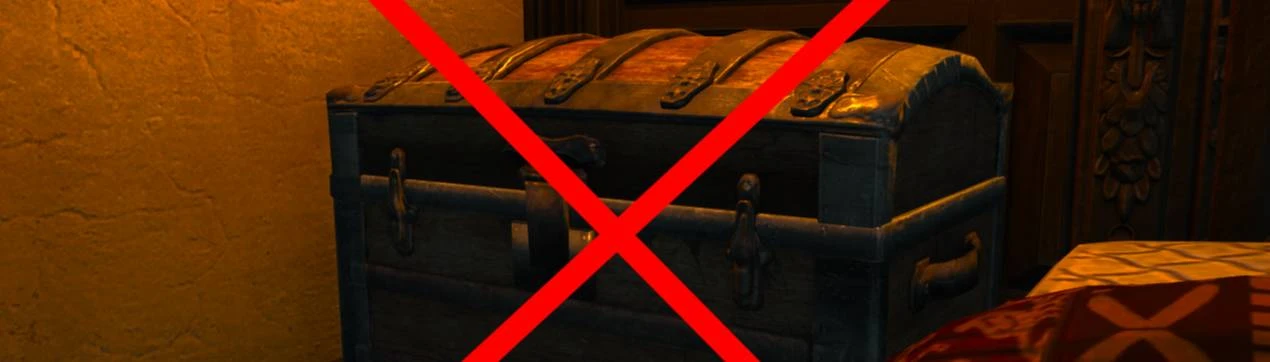
Disables interaction with the stash and hides the interaction prompt and map icon.
- Permissions and credits
- Changelogs
- Donations
Available in both Next Gen and Old Gen. (Details of supported versions can be found on the Files page.)
DETAILS
Purpose of the Mod
Mod Features List
Friendly Stash Patch
Future Objectives
INSTALLATION
OTHERS
DETAILS
Purpose of the Mod
- This mod was made to fix an issue where interact prompts would still appear even when stash interactions were turned off in the Friendly Stash options.
- However, you can still use all the features of this mod without the Friendly Stash.
Mod Features List
- You cannot interact with stashes on the field.
- Stashes do not display interact prompts.
- The stash icon will not appear on the map. (However, the icon on the minimap could not be erased.)
Friendly Stash Patch
- This patch contains code from Friendly Stash and is published with permission from its author.
- When used in conjunction with Friendly Stash, the following features can be used by overwriting the Friendly Stash files with the Friendly Stash Patch in the options file.
- If the "Use Roach as Stash" option is on, the Roach interaction prompt will change to a stash prompt while using Witcher Senses, and a shortcut key to open the stash menu will appear. (In that case, it is still possible to ride Roach.)
- If the Use Roach as Stash option is on and you are using a gamepad, Action=PanelStash (shortcut to open the stash menu) will only be enabled when the stash interaction prompt is displayed on the roach.
Due to the original game mechanics, Geralt cannot jump if Roach is presented with an interaction prompt.Therefore, by binding Action=PanelStash to the same button as jump (IK_Pad_B_CIRCLE by default), Action=PanelStash will be available on gamepads as well. - There are no compatibility issues without using patches.
Future Objectives
- This mod is still unfinished and cannot remove the stash icon from the minimap.
- I'll update the mod in the future when I figure out how to do that.
INSTALLATION
Spoiler:
Show
Install
Uninstall
Mod Limit Fix (For Old Gen v1.32/1.31)
How to Merge Scripts
- Download the main file, unzip it, and place the "Mods" folder inside it into your game's main directory. (The game's main directory is the directory where folders such as "bin", "content", and "DLC" are located.)
- If you want to use a mod manager, we recommend The Witcher 3 Mod Manager instead of Vortex.
- Use the Script Merger to merge conflicts with other mods.
Uninstall
- Delete files you added to the game.
- Re-merge conflicts using the Script Merger.
Mod Limit Fix (For Old Gen v1.32/1.31)
- If you want to use more than 10 mods with Old Gen v1.32/1.31, you need Mod Limit Fix.
How to Merge Scripts
Spoiler:
Show
First, read the Script Merger instruction page carefully and follow its instructions.
When Script Merger loads the files, they will be listed as shown in the image below.

On the left, conflicting mods are listed by file.
On the right, merged mods are listed by file.
If you do not merge, the file of the mod with the highest priority (the mod shown in darker color in the conflict list) will be loaded. (Priority can be set in the The Witcher 3 Mod Manager.)
Select the files you want to merge and click the "Create Selected Merge" button.
Depending on the mod, the mod author may instruct you not to merge conflicts, so please check the instructions carefully before merging.
If manual merging is required, a window similar to the image below will pop up.

In the upper row, the conflict locations of three files, A, B, and C from the left, are displayed.
A is the vanilla file, B and C are conflicting mod files.
The code of the merged file is displayed at the bottom.
If you select "B" and/or "C" from the top toolbar, the code from the selected files will be added to the merged file. (In the image above, both B and C are selected in that order.)
Click the "Go to Next Unsolved Conflict" button to the left of "A" on the toolbar to display the next conflict location.
Once all conflicts have been merged, close the window and save.
How to Choose B or C
It is better to select both B and C to enable all mod functions.
However, if two mods change the exact same part, you will have to choose one.
When doing so, be careful not to break the format of the code. Even if you don't have any coding knowledge, you should be able to see that the code is written according to some rules. Don't break it.
Look at the C code in the image above.
The parts in red are different from vanilla, the parts in yellow are conflicting parts, and the parts in gray are already included in the merged file.
The part between {} is a code block, and the block title is written at the top or left side of the block.
If you do not select C at the end, the title that is supposed to be attached to the gray code block will be lost, so it will deviate from the mod's expectations.
Therefore, I chose the codes in the order of B and C.
If selecting both B and C breaks the code, select only one.
Alternatively, you might be able to avoid using the toolbar buttons and instead merge them correctly by copying the code from the conflicting files and pasting it into the appropriate part of the code in the merged file.
List of Codes to Watch Out for:
{}:
event:
function:
return:
if():
else:
var:
//:
/**/:
When Script Merger loads the files, they will be listed as shown in the image below.
On the left, conflicting mods are listed by file.
On the right, merged mods are listed by file.
If you do not merge, the file of the mod with the highest priority (the mod shown in darker color in the conflict list) will be loaded. (Priority can be set in the The Witcher 3 Mod Manager.)
Select the files you want to merge and click the "Create Selected Merge" button.
Depending on the mod, the mod author may instruct you not to merge conflicts, so please check the instructions carefully before merging.
If manual merging is required, a window similar to the image below will pop up.
In the upper row, the conflict locations of three files, A, B, and C from the left, are displayed.
A is the vanilla file, B and C are conflicting mod files.
The code of the merged file is displayed at the bottom.
If you select "B" and/or "C" from the top toolbar, the code from the selected files will be added to the merged file. (In the image above, both B and C are selected in that order.)
Click the "Go to Next Unsolved Conflict" button to the left of "A" on the toolbar to display the next conflict location.
Once all conflicts have been merged, close the window and save.
How to Choose B or C
It is better to select both B and C to enable all mod functions.
However, if two mods change the exact same part, you will have to choose one.
When doing so, be careful not to break the format of the code. Even if you don't have any coding knowledge, you should be able to see that the code is written according to some rules. Don't break it.
Look at the C code in the image above.
The parts in red are different from vanilla, the parts in yellow are conflicting parts, and the parts in gray are already included in the merged file.
The part between {} is a code block, and the block title is written at the top or left side of the block.
If you do not select C at the end, the title that is supposed to be attached to the gray code block will be lost, so it will deviate from the mod's expectations.
Therefore, I chose the codes in the order of B and C.
If selecting both B and C breaks the code, select only one.
Alternatively, you might be able to avoid using the toolbar buttons and instead merge them correctly by copying the code from the conflicting files and pasting it into the appropriate part of the code in the merged file.
List of Codes to Watch Out for:
{}:
- The part between {} is treated as one block.
event:
function:
- If the title of a code block between {} starts with "function" or "event", the block is treated as one section.
- When a section is loaded, the code is loaded in order from the top, and the section ends when "return" is loaded or all the code is loaded.
return:
- Finish that section. The code after the next ";" will not be loaded.
if():
- Only if the condition in parentheses is met will the code written next be loaded.
else:
- Used following an "if" statement. Code written next to "else" will only be loaded if the condition of the "if" statement is not met.
var:
- If a line of code within a section begins with "var", that code must be placed at the beginning of the section.
//:
/**/:
- The part to the right of "//" or the part between "/*" and "*/" is commented out and will not be loaded into the game.
OTHERS
- If you like the mod, I would appreciate it if you could click the Endorse and Vote buttons at the top of this page.
- Please also check out the other mods I've created.
- If you have any questions or comments, please feel free to post them on the Posts page. I won't respond to every question, but other people may do so for you.