DescriptionThis mod should allow you to replace the following:
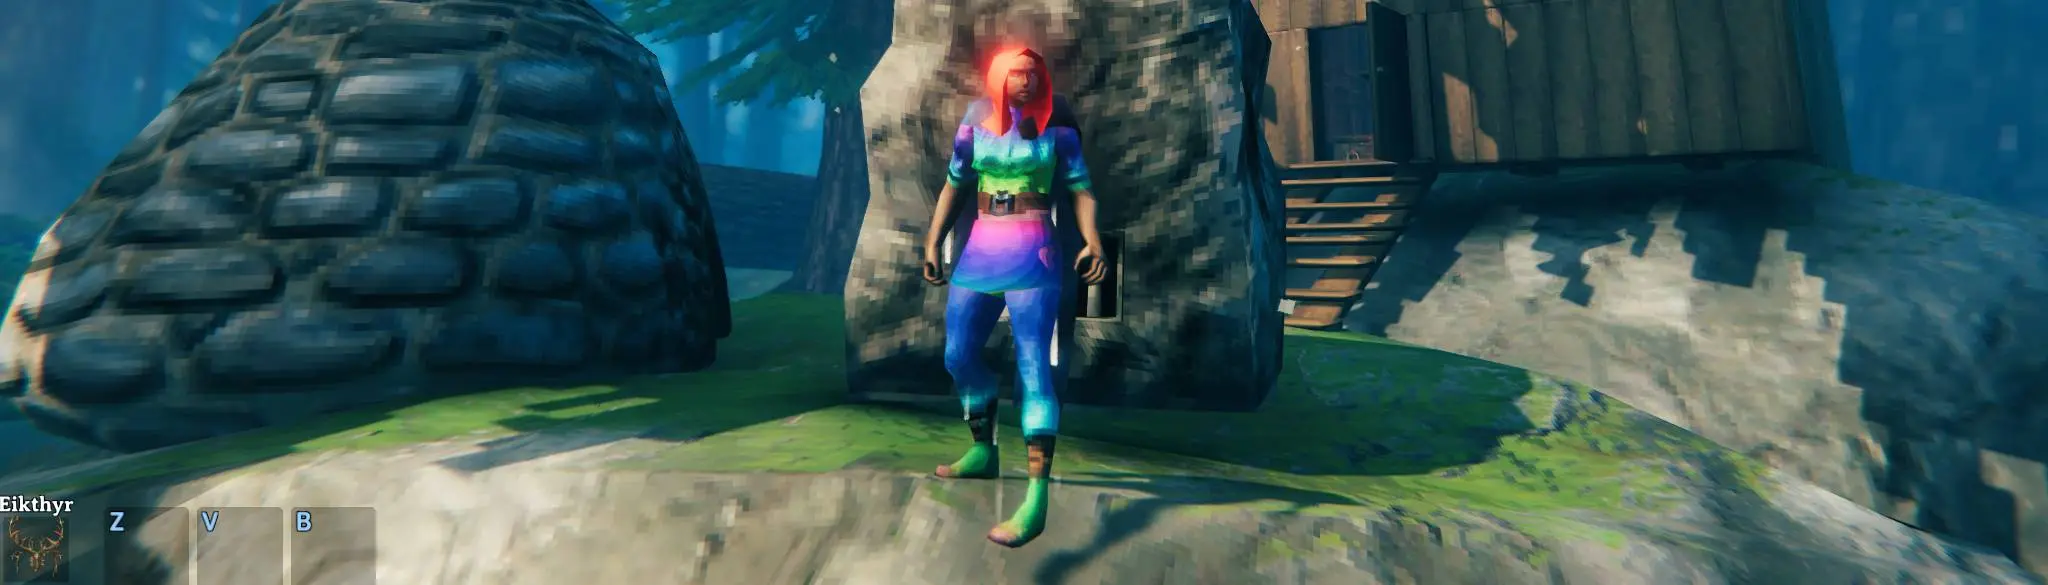
- player model textures
- item inventory icons
- equipment textures like armor, weapons, and tools
- terrain and water textures
- environmental textures
- special location textures (villages, crypts, rune stones, etc.)
- world object textures, almost everything else in the game world
It also now supports layers, so you can apply multiple textures to the same vanilla texture (see
Layers below).
To create your own custom textures requires basic reading comprehension! It's not that difficult, but please read all of the information below
carefully before asking for help.
Basic UsageTo extract the vanilla textures for reference, I use
Asset Studio. The textures are in the
valheim_Data/sharedassets files.
To replace a texture, you simply add a
png file to the folder
BepInEx/plugins/CustomTextures with the proper name format explained below, and then load the game.
You can also organize textures into subfolders! If you are publishing a texture pack I encourage you to do this, to allow easy install and removal.
Also, if you are publishing a texture pack, putting your textures in a CustomTextures folder before creating the zip file will allow Vortex to install them automatically!To reload world textures while in game, there is a hotkey (default
Page Down). Note: this doesn't reload any vanilla textures, so if you remove a custom texture file, you'll have to restart the game to see the vanilla texture again.
For a list of mods creating custom textures with this mod, click on
Requirements above this description.
Here's some kind person's video on how to use this mod with premade texture packs.Filter ModeValheim textures use
point filtering, which makes them look pixelated up close. If you want to use
bilinear or
trilinear filtering for higher-res textures, place your textures in a subfolder named
bilinear or
trilinear and the mod will change the filter mode for those textures (they can still be in sub-subfolders if you choose).
File Naming SummaryFile names are made up of up to four parts, prefixes, identifiers, property names, and layer names. To get most of this information, use the scene dump (see
Scene Dump below)
You create file names starting with a prefix, usually followed by an underscore, then an identifier, then the property name (and optionally an underscore followed by a layer name, as explained under
Layers), i.e. for a complete texture replacement:
<prefix>_<identifier><propertyName>.png
or for a layer:
<prefix>_<identifier><propertyName>_<layerName>.pngYou end up with a file name like this, and you place it somewhere in the
CustomTextures folder.
Property names are usually prefixed by an underscore, so don't forget that too. Also, if you have Windows hiding your file extensions, don't
add
.png to the end or you'll end up with a file called
<prefix>_<identifier><propertyName>.png.png which won't work. Seriously, just have Windows show file extensions, it's dumb that it doesn't.
Here's an explanation of each of the four parts:
PrefixesThe following prefixes are implemented, based on the type of thing being modified:
- player_model for player textures
- atlas_item_icons for inventory icons
- object for object textures
- armor for armor textures
- zone for water textures
- terrain for terrain textures
- environment for environment textures
- location for special locations
For objects, water, terrain, environment, and location textures, the prefix can be further modified as follows:
- <prefix>renderer - for replacing textures on specific named renderers on specific named things
- <prefix>mat - for replacing textures on specific named materials on specific named things
- <prefix>renderermat - for replacing textures on specific named materials on specific named renderers on specific named things
- <prefix>texture - for replacing specific named textures on specific named things
e.g.:
environmentrenderermat_YggdrasilBranch_branch_yggdrasil_branch (Instance)_MainTex.png will replace the main texture on the
yggdrasil_branch (Instance) material on the
branch renderer on the
YggdrasilBranch environment object.
You can also use the following prefixes based on the name of the component:
- texture for universally replacing a texture (where supported)
- renderer for replacing the texture on any named renderer
- mat for replacing the texture on any named material:
So, some easiers way to do the above are:
texture_yggbark_d_MainTex.pngmat_yggdrasil_branch (Instance)_MainTex.pngIdentifiersYou can find the identifiers used with the above prefixes in the scene dump. More on this in each detailed section below.
Property NamesYou can find the property names in the scene dump as well. Mostly you'll want to replace
_MainTex and maybe
_BumpMap or
_SkinBumpMap.
Layer Names:See
Layers below.
Replacement TypesHere's the details on each type of replacement:
Player TexturesFor the base player character texture, use the following syntax:
player_model_<modelNumber><suffix>.pngReplace
<modelNumber> with either
0 for male or
1 for female. E.g.:
player_model_1_MainTex.pngItem Inventory IconsThese are the little images that show up in your inventory to represent an in game item. They are all on a single graphic called
sactx-2048x2048-Uncompressed-IconAtlas-61238c20 #845.
To replace the inventory icon sheet create an equivalent sheet called:
atlas_item_icons.pngYou can use any resolution, as it will be scaled to fit.
You can also replace a single item icon using a layer (see
Layers below).
Object and Armor Textures
Note: Equipment and world objects are now all considered objects. The mod will still recognize the items_ prefix, just for backwards compatibility.Besides player models and inventory icons, everything else this mod affects is considered an
object.
For example:
- Resources like coal and wood
- Tools like hammers and cultivators
- Plants, trees, bushes
- Building blocks
- Enemies
Armor is for what the object looks like when you're wearing it (as opposed to throwing it on the ground with the rest of your crap).
The general filename syntax for all of these things is:
<prefix>_<identifier><suffix>.pngPrefixes:The following prefixes for objects and armor are now implemented:
- object - used to change all textures of the type <suffix> on a specific world object type. <identifier> should be the object spawn name
- objectrenderer (objectmesh also works, but is depreciated) - used to change all textures of the type <suffix> on a specific renderer on a specific object. The <identifier> (see Identifiers) should be the object name and the renderer name, separated by underscore: <objectName>_<rendererName>
- objecttexture - used to change a specific named texture of the type <suffix> on every renderer on a specific object. The <identifier> (see Identifiers) should be the object name and the texture name, separated by underscore: <objectName>_<textureName>
- objectmat - used to change textures on all specifically named materials on a specific object. The <identifier> (see Identifiers) should be the object name and the material name, separated by underscore: <objectName>_<materialName>
- objectrenderermat - used to change textures on a specifically named material on a specifically named renderer on a specific object. The <identifier> (see Identifiers) should be the object name and the material name, separated by underscore: <objectName>_<rendererName>_<materialName>
- texture - used to change all instances of a specific texure of the type <suffix> on all objects and items that use that texture. The <identifier> (see Identifiers) should be the texture name (not necessarily the exported file name!)
- renderer - used to change textures of the type <suffix> on all instances of a specific renderer on all objects and items. The <identifier> (see Identifiers) should be the renderer name.
- mat - used to change textures of the type <suffix> on all instances of a specific material on all objects and items. The <identifier> (see Identifiers) should be the material name.
- armor - used to change the chest or legs of armor items - note that the rest of the armor's parts are affected by object_ rather than this.
Suffixes:Note: Suffixes have been overhauled. Old suffixes of _texture and _bump are still recognized but should be replaced with the actual property name. Suffixes tell the mod which texture you want to replace, called "
properties".
The scene dump gives a list of properties for each material on an object, e.g.:
object ArmorIronChest has 1 SkinnedMeshRenderers:
SkinnedMeshRenderer name: IronArmor
smr IronArmor has 1 materials
IronArmorChest_mat (Instance):
properties:
_MainTex IronArmorChest_d
_BumpMap IronArmorChest_n
_EmissionMap
_MetallicGlossMap IronArmorChest_m
_StyleTex
armor ArmorIronChest has Material:
Armor name: IronArmorPlayer_chest
properties:
_MainTex
_ChestBumpMap IronArmorChestPlayer_n
_ChestMetal IronArmorChestPlayer_m
_ChestTex IronArmorChestPlayer_d
_LegsBumpMap
_LegsMetal
_LegsTex
_SkinBumpMap
This object has both a skinned mesh renderer and an armor material. They are separate.
The
object is all the fancy bits that get stuck on the player.
The
armor is the texture that gets pasted onto the player's legs and chest.
Each property is shown with its texture name (if there is one), e.g. the name of the object's
_MainTex is
IronArmorChest_d.
_MainTex refers to the main texture. Mostly that's the one you want to replace. For armor, however, replacing _MainTex may not do anything - replacing it with a transparent texture seems to work best. To change the actual armor, you need to use
_ChestTex and / or
_LegsTex and make sure it's only covering the area of the actual armor (see the exported
IronArmorChestPlayer_m.png for example). So, you would want to create the following:
object_ArmorIronChest_MainTex.pngarmor_ArmorIronChest_ChestTex.png
Armor is complicated, best to experiment!
IdentifiersTo get identifiers for objects, use names on the spawn list here:
https://www.reddit.com/r/valheim/comments/lig8ml/spawn_item_command_list/They will also be in the scene dump mentioned above.
Water and Terrain TexturesWater and terrain textures use a similar syntax to objects, i.e.:
<prefix>_<identifier><suffix>.pngWaterWater textures are inside of zone objects, so in the scene dump you'll now see:
zone _GameMain has 2 MeshRenderers:
MeshRenderer name: WaterSurface
mr WaterSurface has 1 materials
water (Instance):
properties:
_FoamTex foam
_Normal nRHPu
_FoamHighTex foam_highres
_NormalFine normalmap2
_RandomFoamTex random_foam
MeshRenderer name: sub_water_opak_thingyu
mr sub_water_opak_thingyu has 1 materials
water_bottomplane (Instance):
properties:The prefix here is
zone, So use, e.g.:
zone__GameMain_FoamTex.png (note the double underscore!)
TerrainRight after the zone entry, you'll see:
terrain _GameMain, prefab _Zone (UnityEngine.GameObject)
properties:
_MainTex grass
_NoiseTex Noise
_ClearedMaskTex
_CliffNormal gouacherock_big_n
_CultivatedNormal cultivated_n
_DiffuseTex0 diffuse0
_DirtNormal dirt_normal_generated
_ForestNormal forest_n
_GrassNormal grass_normal_generated
_PavedNormal paved_n
_RockNormal gouacherock_n
_SnowNormal snow_normalThe prefix here is
terrain, so use, e.g.:
terrain__GameMain_DiffuseTex0.pngThe
diffuse0 texture appears to have sixteen tiles with different terrain types on it. You can see an example of its use in the screenshots.
Environment TexturesEnvironment textures are things like rain, clouds, fog, and that big-assed tree thing in the sky.
The scene dump shows, e.g.:
environment YggdrasilBranch has 1 MeshRenderers:
MeshRenderer name: branch
mr branch has 2 materials
yggdrasil_branch (Instance):
properties:
_MainTex yggbark_d
_BumpMap yggbark_n
_EmissiveTex yggdrasil_emissive
_MossTex ygg_moss
_EmissiveMaskTex yggdrasil_emissivmask
_RefractionNormal
yggdrasil_branch_leafs (Instance):
properties:
_MainTex ygg_leaf_d
_BumpMap ygg_leaf_n
_EmissiveTex
_MossTex
_EmissiveMaskTex
_RefractionNormalSo, as mentioned above:
environmentrenderermat_branch_yggdrasil_branch (Instance)_MainTex.png will replace the main texture on the
yggdrasil_branch (Instance) material on the
branch renderer, on the
YggdrasilBranch environment object.
Special LocationsLocation prefabs are separate from the rest of the game models, so must be handled separately. They have a lot of renderers, so they can take a lot of time to iterate through. For this reason, you can disable location replacement in the config. Also, locations must use the
location prefix (
texture_ will have no effect).
LayersLayers allow you to apply a partial texture on top of an existing or modified texture. For everything but sprites, this works in the same way:
Texture LayersTo add a layer to anything but a sprite sheet, use the same syntax as if you were replacing that type of texture in the appropriate section above and add
_<YourLayerName> to the end. So, for player eye texture of a mod called
RealEyes, it would be:
player_model_0_MainTex_RealEyes.png<YourLayerName> can be set to whatever you want, as long as it is unique and
does not contain any underscores.
Sprite LayersSprite layers for the item icons sheet work differently, overwriting a patch of the sprite sheet completely. As a result, the sprite layer png should only be the size of the patch you want to replace. The file format for item icons layers is as follows:
atlas_item_icons_<startX>_<startY>_<sheetWidth>_<sheetHeight>.pngThis is because you may be working with upscaled textures, so you need to let the mod know how big the theoretical sheet you are working with is. The mod will compare it to the existing sheet (or sheet replaced by another texture) and figure out the scale of your layer texture from that. So, to replace the wooden shield texture, for example, I use a 64x64 pixel png called:
atlas_item_icons_1224_1840_2048_2048.pngThis tells it that my png is from a sheet
2048x2048 pixels big (equal to the vanilla sheet size) and to replace the existing sheet with my 64x64 pixel png starting with pixel
1224x1840 as the top left corner.
ExamplesLet's take an example from the scene dump:
object VikingShip has 1 SkinnedMeshRenderers:
SkinnedMeshRenderer name: sail_full
smr sail_full has 1 materials
sail (Instance):
properties:
_MainTex sail_diffuse
_BumpMap sail_normal
_EmissiveTex
_MossTex
You can choose which prefix and identifier to use, based on what you want to do:
1. Set All Textures on an Object Typeobject_VikingShip_MainTex.pngThis replaces the main texture of every material in the object, so if an object uses multiple textures it probably won't work well. This wouldn't work well for our example, as there are a bunch of MeshRenderers on the ship as well. If we want to change the bump map, we can use:
object_VikingShip_BumpMap.png2. Set All Instances of a Texturetexture_sail_diffuse_MainTex.pngThis replaces all textures that have the name
sail_diffuse, so every object that uses that texture should be affected. For our example it would replace the
sails on other ship types as well if they use that texture.
3. Set a Texture for a Single Mesh On an Object Typeobjectrenderer_VikingShip_sail_full_MainTex.png This will replace the texture of any renderer named
sail_full on all
VikingShip objects.
4. Set a Texture By Name On an Object Typeobjecttexture_VikingShip_sail_diffuse_MainTex.pngThis will replace any texture named
sail_diffuse on all
VikingShip objects.
4. Set a Partial Texture LayerAny of the above examples could alternatively be added as a partial layer by adding a layer name on to the end. So if you just want to add a decal onto the sail of the viking ship, you could do:
objecttexture_VikingShip_sail_diffuse_MainTex_CoolSkullAndCrossBones.png
ConfigA config file
BepInEx/config/aedenthorn.CustomTextures.cfg is created after running the game once with this mod).
You can adjust the config values by editing this file using a text editor or in-game using the
Config Manager.
Scene DumpTo get all the information you need to make the names above, set the config option
DumpSceneTextures to
true, then run the game and load into your world once. A file
BepInEx/plugins/CustomTextures/scene_dump.txt should be created. You can set it back to
false after you've dumped the textures, otherwise it will recreate the file every time you run the game.
This mod is still a work in progress.
TechnicalTo install this mod, the easiest way is to just use
Vortex, the Nexus Mods mod manager. It should take care of all dependencies.
To install manually, place the dll file in the BepInEx/plugins folder. You will need BepInEx.
Code is at
https://github.com/aedenthorn/ValheimMods.
If you want to complain or ask for help or help me test my mods, you can visit
my Discord server.
Click here for a list of all my mods for Valheim.