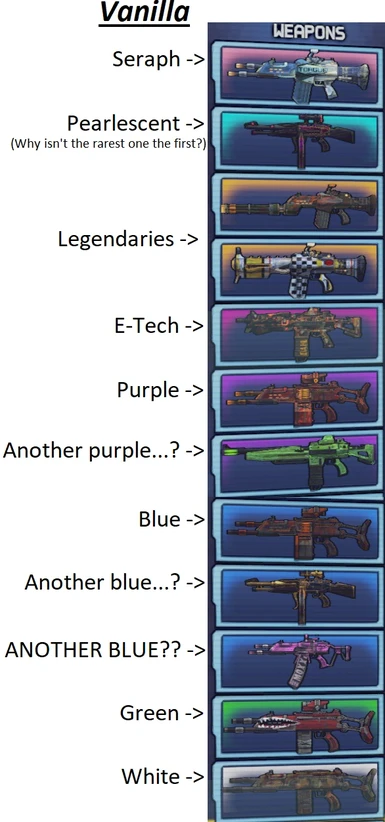
Concering almost all items being Gemstone rarity when using the Rarity Color Fix alongside the UCP:
This happens because the UCP made a change to how it adds the Gemstone rarity, which is incompatible with Rarity Color Fix. This will be fixed whenever the UCP gets updated to 5.0.
The current way to fix this is disabling the Gemstone rarity from the UCP when using Rarity Color Fix.
Yes it is fairly easy to edit rarity levels yourself. If you open the mod and navigate "Rarity Color FIx -> Rarity Color Change -> up to "set WillowGame.GlobalsDefinition RarityLevelColors...", you'll be greeted by this: https://i.imgur.com/dAXRVcT.png
Min/Max Level is the rarity which is assigned to a piece of gear. Blue gear will have the value 3 for example. the RGB values are the ones you're looking for. Simply changing these should change the color of that specific rarity.
Not sure what exactly i'm doing wrong but the mod just isn't working for me. All of the items are the base game rarities and I'm not sure why since it doesn't say there are any conflicting files.
EDIT: Mod works as intended, I just forgot to update my comment.
For people wandering how to download the mod (With the community patch btw):
First: Download Borderlands community mod manager. - Click "Tools" on the top bar of the manager when you launch it. - Click "Setup game files for mods" On the left you will see the borderlands 2 options (It should detect it automatically). - Turn "Hexedit executable" on by clicking "Apply" next to it - Assign the console key you want next to "Console key" button - Click ok
Second: Download Unofficial community patch. - Take the "Patch.txt" file from the community patch and drop it in your borderlands 2 binary (The binary is should be located in SteamLibrary\steamapps\common\Borderlands 2\Binaries) - Open the mod manager and click "File" then "Open" - Click on borderlands 2 binary (On the right of the screen) - Click on the "patch.txt" file and click open Here you can change the the options of the patch if you want.
Lastly: Download the rarity color fix mod - Extract the mod where ever you want - In the mod manager, click "File" then "Import mod file" - Look for the mod in the place you downloaded it to and click on it - Click "Open" This should make the mod appear in the manager and make you able to change the settings
---IMPORTANT--- To make mods run in game, when you load into the main menu, click the button you assigned the console to and type "exec patch.txt", now close it and go in game the mods should be working.
I noticed that legendary coms are not affected by editing the color of the legendary rarity. Is there a way to change them as well so they match my other legendaries?
It's there a way to make white items transparent or reduce the alpha? I think the 'A' value in code corresponds to this, but it didn't affect the color.


35 comments
This happens because the UCP made a change to how it adds the Gemstone rarity, which is incompatible with Rarity Color Fix. This will be fixed whenever the UCP gets updated to 5.0.
The current way to fix this is disabling the Gemstone rarity from the UCP when using Rarity Color Fix.
Min/Max Level is the rarity which is assigned to a piece of gear. Blue gear will have the value 3 for example. the RGB values are the ones you're looking for. Simply changing these should change the color of that specific rarity.
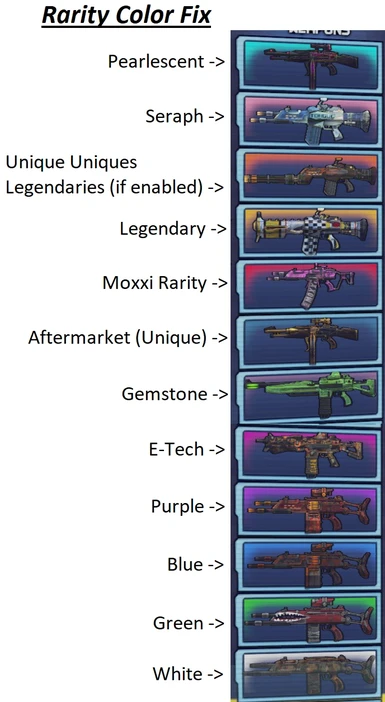
The relevant levels are:
1-1: White Gear
2-2: Green Gear
3-3: Blue Gear
4-4: Purple Gear
6-6: Magenta Gear
12-30: Custom Gemstone Rarity
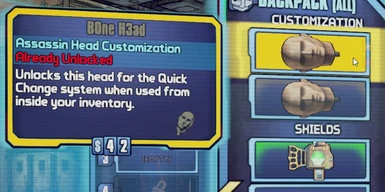
31-40: Custom Heads & Skins Rarity
41-50: Custom Aftermarket Rarity
51-60: Custom Moxxi Rarity
61-70: Custom Legendary Rarity
71-80: Custom "Unique Uniques" Rarity
81-90: Custom Seraph Rarity
181-499: Money Rarity
I don't remember which one Pearlescent was, some of the ones after 499 were. Have fun experimenting.
This mod is what I was looking for, thanks for mading it!
By the way, is this mod compatible with the Pre-Sequel too?
For people wandering how to download the mod (With the community patch btw):
First: Download Borderlands community mod manager.
- Click "Tools" on the top bar of the manager when you launch it.
- Click "Setup game files for mods"
On the left you will see the borderlands 2 options (It should detect it automatically).
- Turn "Hexedit executable" on by clicking "Apply" next to it
- Assign the console key you want next to "Console key" button
- Click ok
Second: Download Unofficial community patch.
- Take the "Patch.txt" file from the community patch and drop it in your borderlands 2 binary (The binary is should be located in SteamLibrary\steamapps\common\Borderlands 2\Binaries)
- Open the mod manager and click "File" then "Open"
- Click on borderlands 2 binary (On the right of the screen)
- Click on the "patch.txt" file and click open
Here you can change the the options of the patch if you want.
Lastly: Download the rarity color fix mod
- Extract the mod where ever you want
- In the mod manager, click "File" then "Import mod file"
- Look for the mod in the place you downloaded it to and click on it
- Click "Open"
This should make the mod appear in the manager and make you able to change the settings
---IMPORTANT---
To make mods run in game, when you load into the main menu, click the button you assigned the console to and type "exec patch.txt", now close it and go in game the mods should be working.