Hey folks, Sorry being late to add a note, RL has me away from modding/games for a bit... Anyways, CP77 patch 1.2 has dropped and with that it looks as if the folder at the end of the file path is now called "mod" NOT "patch" as it says in the guide, so replace that one word and it should do the trick!
Thank you so much for the support choombas! To be honest, this is essentially a documentation of my journey learning Photoshop, CP77Tools, and the game archives to make my OWN tattoos. Once I realized just how many questions I had to ask it made sense to share the knowledge and hopefully help that learning curve a bit for someone else. The process was not a quick one, but if others can get some good use out of it then it was worth it. Since this was a learning experience for me I may have overlooked something. I went over it many times but I am only human. So if anyone spots any errors or something that causes confusion that I could explain better, please let me know. As long as you aren't being and @ss about it I welcome feedback. I will also do my best to help where I can by answering any questions you may have.
Please feel free to add some images of your creations! I would love to see what everyone comes up with! Good luck and happy modding!
In v1.1 I have updated 'Basic Guide & Tips' to reflect the troubleshooting I have helped some users with.
I also fixed an error in the 'Help with Files Names' pdf where Google Docs had auto capitalized the first letter in each of the listed file names which could cause issues for anyone who copied them.
(THANK YOU to chidosity for bringing it to my attention!!)
Nothing else is different between v1.0 & v1.1 so I added a new file that includes ONLY the updated .pdf's for anyone who already downloaded the Layout Template v1.0 file.
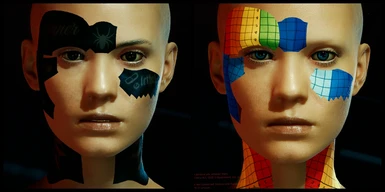
Layout Templates For Custom Tattoos - ARMS ONLY (01/29/2021) - MAIN FILES
Spoiler:
Show
I have uploaded a NEW 'Layout Template' as a separate file for adding custom designs directly onto the skin texture of the ARMS ONLY mesh.
This texture and mesh is only used by V and will not affect npcs.
The mesh is for the FULL arm, but a majority of the texture is mirrored so keep that in mind when picking a design.
Includes separate texture layers for males and females.
File includes .psd template, .pdf guide & images, folders structured for use with CP77 Tools, and vanilla texture files.
Layout Templates For Custom Tattoos - ARMS ONLY (Masculine V) (01/29/2021) - OPTIONAL FILES
Spoiler:
Show
OPTIONAL download available that is designed for compatibility with the awesome mod:
This option includes all of the same components as the MAIN 'Arms only' file but the textures are replaced to be compatible with 'Masculine V skin overhaul'
Template includes separate layers for the 'Hairy' and 'Hairless' options available within the skin overhaul mod.
See images section for examples.
MALE ONLY!
Tattoo Removal (02/24/2021) - MISCELLANEOUS FILES
Spoiler:
Show
While it may seem like this is the complete opposite of the point of this entire mod page it does come in handy. For example, if you decide you want to temporarily turn off either your face or body tattoos just to take some screenshots or to test a mod out. This will keep you from having to make a new character or use a save editor to do it. Then when you are ready just remove the .archive and you will have your amazing tattoos back!
The download file includes three .archive files: face only, body only, full (both)
Look on the description page under "Test Mods" for install instructions if needed
(Thank you to chidosity who originally had the idea to upload this as a mod but has since deleted the page.)
If anyone is still struggling with getting this to work in 2024, feel free to read below -- this is just what I managed to learn after working with this mod post 2.1.
1. Download and extract this mod 2. Download and extract CP2077Tools -- make sure you download this version -> https://www.nexusmods.com/cyberpunk2077/mods/8?tab=files&file_id=5686 3. Download and install *NET 5.0* -> https://dotnet.microsoft.com/en-us/download/dotnet/5.0 4. Download and install Photoshop plug-in *Intel Texture Works* -> https://gametechdev.github.io/Intel-Texture-Works-Plugin/ 5. In your Cyberpunk 2077 game directory cmd and input -> dotnet tool install -g --prerelease wolvenkit.cli and enter 6. In the CP2077Tools directory cmd and input -> cp77tools and enter 7. From your Cyberpunk 2077 game directory, COPY this file -> oo2ext_7_win64.dll (bin\x64\oo2ext_7_win64.dll) and paste it into (\CP77Tools-8-1-2-1612548061\Release\net5.0-windows\win-x64) 8. Follow directions in Night City Tattoo mods to create your tattoo. (USE THE GUIDE IMAGES AVAILABLE, THEY SHOW STEPS THAT ARE NOT SHOWN IN THE TEXT GUIDE!!!)
hi i made modifications on tattoo 1 template. it worked prerfecly until 1.63. now it work but it appears on the left leg and not on the back. did the file changed?
Hey, sorry for replying to this old post but I thought maybe somebody else also has this problem. I had this issue too and for me it worked to just vertically flip the photoshop file before saving as a DDS (but make sure to flip the *whole* canvas, not just the layer). The tattoos were also showing up much lighter for some reason, but I just made them darker in PS and then it worked as well. Hope you found a solution after all! :)
Hi! Thank you for your work, it's really helpful <3 But i have one problem with arms texture replaces. I think i did everything right, no errors or problems, but texture isn't showing in the game at all. Maybe someone can help me, maybe i've missed something? Thank u sm.
ok, now i've made it, i can see it in game, everything seems fine, but only when my tattoo is the only .archive file in the 'mod' folder. when i put any other .archive in path, my tattoo just invisible
can someone help me to understand what's going on? :[ thank u <3
Hi, I think I have encountered the same problem as you, nothing happens when I put my .archive file in the mod folder, do you mind telling me how you solved the problem?
Thanks! I still don't know how tf I managed to get it working, but with the help of the guide and trying random s#*! (the guide was super helpful, I'm just a gonk) my V now has the tattoos I designed for her! I literally smile everytime I see them while playing.
Really, thanks for the mod, and the time you take explaining and making guides for us dum-dums.


")


 + solid background")


")

")
")


107 comments
-
1
-
2
-
3
- ...
-
6
-
JumpSorry being late to add a note, RL has me away from modding/games for a bit...
Anyways, CP77 patch 1.2 has dropped and with that it looks as if the folder at the end of the file path is now called "mod" NOT "patch" as it says in the guide, so replace that one word and it should do the trick!
Steam:
\SteamLibrary\steamapps\common\Cyberpunk 2077\archive\pc\mod
GOG:
\GOGLibrary\Games\Cyberpunk 2077\archive\pc\mod
Epic:
\EpicLibrary\Cyberpunk 2077\archive\pc\mod
Let me know how it goes, PM if needed! Good luck & happy modding!!
To be honest, this is essentially a documentation of my journey learning Photoshop, CP77Tools, and the game archives to make my OWN tattoos. Once I realized just how many questions I had to ask it made sense to share the knowledge and hopefully help that learning curve a bit for someone else. The process was not a quick one, but if others can get some good use out of it then it was worth it.
Since this was a learning experience for me I may have overlooked something. I went over it many times but I am only human. So if anyone spots any errors or something that causes confusion that I could explain better, please let me know. As long as you aren't being and @ss about it I welcome feedback. I will also do my best to help where I can by answering any questions you may have.
Please feel free to add some images of your creations! I would love to see what everyone comes up with!
Good luck and happy modding!
(Thank you to Tzarev for his permission and for providing the modded texture files!)
(Thank you to chidosity who originally had the idea to upload this as a mod but has since deleted the page.)
1. Download and extract this mod
2. Download and extract CP2077Tools -- make sure you download this version -> https://www.nexusmods.com/cyberpunk2077/mods/8?tab=files&file_id=5686
3. Download and install *NET 5.0* -> https://dotnet.microsoft.com/en-us/download/dotnet/5.0
4. Download and install Photoshop plug-in *Intel Texture Works* -> https://gametechdev.github.io/Intel-Texture-Works-Plugin/
5. In your Cyberpunk 2077 game directory cmd and input -> dotnet tool install -g --prerelease wolvenkit.cli and enter
6. In the CP2077Tools directory cmd and input -> cp77tools and enter
7. From your Cyberpunk 2077 game directory, COPY this file -> oo2ext_7_win64.dll (bin\x64\oo2ext_7_win64.dll) and paste it into (\CP77Tools-8-1-2-1612548061\Release\net5.0-windows\win-x64)
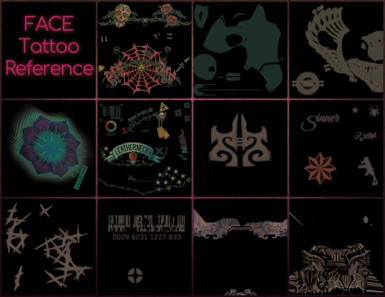
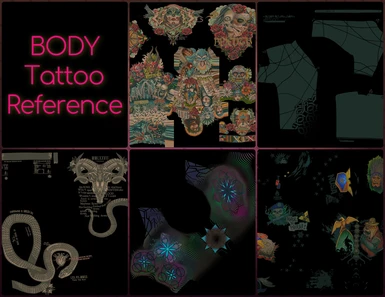
8. Follow directions in Night City Tattoo mods to create your tattoo. (USE THE GUIDE IMAGES AVAILABLE, THEY SHOW STEPS THAT ARE NOT SHOWN IN THE TEXT GUIDE!!!)
Would it be possible for you to do a quick YT tutorial on how to make a tat using your resources?
If not, its all good! thank you in advance
Hi! Thank you for your work, it's really helpful <3But i have one problem with arms texture replaces. I think i did everything right, no errors or problems, but texture isn't showing in the game at all. Maybe someone can help me, maybe i've missed something? Thank u sm.
ok, now i've made it, i can see it in game, everything seems fine, but only when my tattoo is the only .archive file in the 'mod' folder. when i put any other .archive in path, my tattoo just invisible
can someone help me to understand what's going on? :[
thank u <3
Really, thanks for the mod, and the time you take explaining and making guides for us dum-dums.
-
1
-
2
-
3
- ...
-
6
-
Jump