Quick update. It seems Gamma Correction was being applied twice. I think something changed with the 2.13 update. Anyway, new update should fix this and should properly match SDR better.
I fixed a couple of issues related to LUT processing that seem to have not applied saturation properly. This was most noticeable with CyanideX's LUT switcher, but I should all be fixed now.
I made so other Quality-of-Life changes, like recommended defaults if you're in HDR or in SDR. It will read the Windows HDR Peak brightness and compute the reference white for your display's capabilities (eg: 203 nits for 1000, or 172 nits for 800).
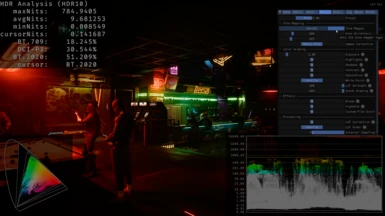
I went back to try to fix some reports of raised blacks and discovered the game really does need Gamma Correction for HDR. After that I had to adjust the defaults from what they were. The contrast and other had to be adjusted. After doing a lot of checking, the game was made for that 2.2 look. But CDPR made a lot of mistakes and the HDR implementation ended up just being worse, including black levels that were higher than SDR *even with Gamma Correction* being on.
Here's the game in SDR vs how it now looks in HDR (you might need Google Chrome to see it in HDR):
I didn't exactly try to 100% match SDR shadows and black floor. It just ended up coming out that way after all the adjustments. If you want the older look: Gamma Correction: Menus, Shadows 40, Contrast 70, Saturation 70, and Flare 0.
That said, not every display and environment can probably handle that level of black. I do suggest reducing the Flare option which should give you a bit more visibility near black.
I was looking for a solution because the dark scenes on my Alienware AW3423DW OLED panel are so dark to the point I can't see anything, with monitor on HDR400 or 1000. A reddit post suggested this mod so gave it a crack. When installing Reshade 2.0 from the link in the installation guide, I just chose Cyberpunk then clicked next on the other options.
I'm not super across Reshade or how to use it, but I installed it and all three presets looked the same really and it was still ultra dark and can't see anything, so I assume I just need to tweak the sliders for contrast etc until something makes sense.
Main issue though, is that the game just crashes to desktop within a minute or so. First time it crashed when I hit the scan button, second time I was just idling in a dark location to check the visibility.
Game runs perfectly fine without the addon, and I only have a couple of addons for some QOL stuff and nothing for lighting etc.
I updated to current Reshade 6.4.1, and it lasted longer this time before it crashed, but still crashed after maybe 5 minutes. I'm at Rocky Ridge with Panam.
I've uninstalled Reshade, and game runs fine again.
Any suggestions?
Win 11 Asus Strix 4080 576.02 nVidia drivers 5800X3D with 32GB RAM
The only suggestion I have is to uninstall re-shade, then when you install it again make sure to uncheck all add-ons that it may suggest. When it asks for a game, instead of selecting from the list click on Browse. Then find your CP2077 installation directory, go into the subdirectory Bin, then X64 and you should see the Cyberpunk .exe file. Click on it, and click on Open.
Once the installation is concluded then install this mod again and start the game and see if it works better.
Thanks for this brilliant Reshade addon. finally my Cyberpunk 2077 looks great! Colours and light and shade are finally balanced.
For those wondering how to get started with this, here's what I did after reading lots of the comments. I'm still learning a lot about HDR calibration and LUTs etc, but performing these steps helped me understand (or at least cross-reference) some of what I was doing. My instructions are quite long so that you can hopefully understand what it is you're doing along the way, even if you're relatively new to modding/Reshade etc.
We're going to be obtaining and noting two HDR values: Max Luminance and White Reference. Ok, let's go [click 'Show' the spoiler]:
Spoiler:
Show
1) Search for and install 'Windows HDR Calibration' app from the Microsoft Store app in Windows.
1a) Run this app and follow the calibration steps. 1b) Make a note of the number (of nits) during the SECOND (the bright white one; NOT the FIRST pitch black one) 'Max Luminance' step so you know what to cross-reference later. Mine was 450.
Note that this number (of nits) may be lower than your monitor's marketed max nits - it was for me, because I choose to run my MSI MPG341CX OLED in it's 'True Black 400' mode; not its 'Peak 1000 nits' mode. Due to my room lighting and distance from the screen, I prefer inky blacks vs extreme brightness. However, this is just how I prefer this particular monitor and it is probably different for you and yours.
Also, be honest with yourself when calibrating. There's nothing to gain by gaming the results. My max luminance came out at 450 nits, which is odd, right? Considering I have my monitor set to 'True Black 400', you might think it would be 400.
Calibration tip: don't look directly at the brighter calibration images - I find that if I use my peripheral vision, I can more easily tell when the whole image becomes white.
2) Next, use the formula located here (originally provided by this Reshade addon's author CLShortFuse in the comments) to calculate/confirm your 'White Reference' value:
You just need to change the value of 'x' (the number at the end which is probably displaying as my 450, if you have used my link) to your calibrated Max Luminance you noted earlier and recalculate by hitting Enter on your keyboard or clicking the '=' (equals) sign at the far right of the formula's text box. My result was 110.9289, which - for our purposes, is rounded up to 111.
------------------------------------------------------------------------------------------------------------------------ So we now have our two HDR values: In my case, these are: Max Luminance = 450 and White Reference = 111. What are yours? ------------------------------------------------------------------------------------------------------------------------
3) Next, we will install 'Reshade with addon support' and this modpage's 'Reshade addon' by following the Installation instructions on the Description page or by following these slightly re-worded steps:
3a) FIRST, INSTALL RESHADE: Go here: https://reshade.me/ and download the latest version by scrolling to the bottom of the page and clicking: 'Download ReShade x.x.x with full add-on support'. NOTE: YOU MUST GET A 'WITH ADDON SUPPORT' VERSION FOR THIS NEXUS MOD, WHICH IS A ACTUALLY A 'RESHADE ADDON' (NOT A RESHADE PROFILE OR A MOD) TO WORK! 3b) Copy the file you downloaded ('ReShade_Setup_x.x.x_Addon.exe') to the following folder inside your game folder: \\*PATH TO MY GAME*\Cyberpunk 2077\bin\x64\ You know you're in the right place if you see your 'Cyberpunk2077.exe' in the same folder. 3c) Run 'ReShade_Setup_x.x.x_Addon.exe' and read then click 'OK' for the popup message that warns you only to use the 'addon' version of Reshade with singleplayer games, which is fine for Cyberpunk 2077. 3d) Click the 'Browse' button and select your 'Cyberpunk2077.exe' in your \\PATH TO MY GAME\Cyberpunk 2077\bin\x64\ folder. Then click 'Next'. 3e) On the next screen, make sure 'MS DirectX 10/11/12' is selected, then click 'Next' 3f) On the next 2 screens, click 'Skip' and then 'Finish'. Reshade (with addon support) is now installed just for Cyberpunk 2077. (Reshade is designed to be installed per game, so you can have many different Reshade addons or profiles for different games.)
4) Then install CLShortFuse's 'RenoDX' Reshade addon:
6a) Download the 'RenoDX for CP2077' Reshade addon from this nexus modpage's 'Files' tab. 6b) It's just one file, which you need to move or copy into the same folder where you installed Reshade (with addon support) in step 5: \\*PATH TO MY GAME*\Cyberpunk 2077\bin\x64\
5) Load the game and when your main menu has finished loading, press the HOME key on your keyboard to open the Reshade overlay. You can 'skip' the Reshade tutorial if you want, because we're actually not here to use Reshade. We're here to use the RenoDX Reshade addon, which has its own window in the Reshade graphical interface.
Here's where we can cross-reference our HDR values that we obtained earlier.
If this is the first time you have loaded the game since calibration, your 'Max Luminance' and 'White Reference' should be displayed in the RenoDX Reshade addon window as: Peak Brightness and Game Brightness respectively. (Max Luminance = Peak Brightness, White Reference = Game Brightness)
If your Peak Brightness and Game Brightness values do not match your calibration results, try clicking the little 'Refresh' button to the right of each one. (I had to do this because I had previously loaded the game BEFORE I performed Windows HDR calibration.)
I use this Reshade addon with loads of other mods. Of most relevance, I use theCyanideX's awesome LUTs. I use their 'LUT Switcher' with their 'PREEM LUT 3.0 switcher pack'. I also use their 'Weather Switcher' and 'Preem Weather'. With this combination, I'm finally happy with how my game looks. I no longer have blown out colours and all kinds of imbalanced visual weirdness. No doubt your own combination of mods will inform how well any of this will work for you, but keep experimenting until you're happy with it - it's worth the work!
Thanks again to CLShortFuse for their RenoDX Reshade addon. :)
Hi! The mod looks amazing, but unfortunately it crashes every time I enter menus in game,. Any idea what could be causing this? It's a fresh install of Cyberpunk, I've double checked the installation instructions as well.
If it's any help, I am running 4070ti super with 572.42 drivers as of posting this, 9800X3D and 64GB of ram. Game is installed on NVme drive.
Woah this helped me. Used 6.4.1. I was crashing for a day and a half when I would exit the main menu. Bump for anyone else who is having issues when exiting the menu trying to go back into the game. I tried EVERYTHING else under the sun.
If I install Reshade 6.2 game launches but crashes on main menu. If I install the newest version 6.4.1 the game crashes on startup. So idk how to use this mod...
For everyone whose RenoDX ADDON menu is not showing up: just put renodx-cp2077.addon64 into the plugins folder (\Cyberpunk 2077\bin\x64\plugins) and it should work fine! (dunno why this isn't written in the instruction..)


337 comments
-
1
-
2
-
3
- ...
-
16
-
JumpI fixed a couple of issues related to LUT processing that seem to have not applied saturation properly. This was most noticeable with CyanideX's LUT switcher, but I should all be fixed now.
I made so other Quality-of-Life changes, like recommended defaults if you're in HDR or in SDR. It will read the Windows HDR Peak brightness and compute the reference white for your display's capabilities (eg: 203 nits for 1000, or 172 nits for 800).
I went back to try to fix some reports of raised blacks and discovered the game really does need Gamma Correction for HDR. After that I had to adjust the defaults from what they were. The contrast and other had to be adjusted. After doing a lot of checking, the game was made for that 2.2 look. But CDPR made a lot of mistakes and the HDR implementation ended up just being worse, including black levels that were higher than SDR *even with Gamma Correction* being on.
Here's the game in SDR vs how it now looks in HDR (you might need Google Chrome to see it in HDR):
I didn't exactly try to 100% match SDR shadows and black floor. It just ended up coming out that way after all the adjustments. If you want the older look: Gamma Correction: Menus, Shadows 40, Contrast 70, Saturation 70, and Flare 0.
That said, not every display and environment can probably handle that level of black. I do suggest reducing the Flare option which should give you a bit more visibility near black.
bin\x64\ReShade.log:147:20:12:29:314 [ 5884] | WARN  | [RenoDX] mods::shader::OnCreatePipelineLayout(shader injection oversized: 32/28 )
bin\x64\ReShade.log:153:20:12:29:315 [ 5884] | WARN  | [RenoDX] mods::shader::OnInitPipelineLayout(Params not created for: 000001DB367F46F0)
bin\x64\ReShade.log:276:20:12:32:997 [ 5884] | WARN  | [RenoDX] mods::shader::OnInitPipelineLayout(Params not created for: 000001DDAAA04070)
bin\x64\ReShade.log:282:20:20:32:139 [ 5884] | WARN  | Reference count for ID3D12CommandQueue0 object 000001DD77AF0480 (000001BA2F860650) is inconsistent (7).
Could this be a cause for my CTDs?
-so the default as how you calibrated it is 50 everything, RenoDRT tonemapper, exposure 1.0?
-don't muck w/ the default in-game HDRpq10 settings?
I'm not super across Reshade or how to use it, but I installed it and all three presets looked the same really and it was still ultra dark and can't see anything, so I assume I just need to tweak the sliders for contrast etc until something makes sense.
Main issue though, is that the game just crashes to desktop within a minute or so. First time it crashed when I hit the scan button, second time I was just idling in a dark location to check the visibility.
Game runs perfectly fine without the addon, and I only have a couple of addons for some QOL stuff and nothing for lighting etc.
I updated to current Reshade 6.4.1, and it lasted longer this time before it crashed, but still crashed after maybe 5 minutes. I'm at Rocky Ridge with Panam.
I've uninstalled Reshade, and game runs fine again.
Any suggestions?
Win 11
Asus Strix 4080
576.02 nVidia drivers
5800X3D with 32GB RAM
Once the installation is concluded then install this mod again and start the game and see if it works better.
For those wondering how to get started with this, here's what I did after reading lots of the comments.
I'm still learning a lot about HDR calibration and LUTs etc, but performing these steps helped me understand (or at least cross-reference) some of what I was doing.
My instructions are quite long so that you can hopefully understand what it is you're doing along the way, even if you're relatively new to modding/Reshade etc.
We're going to be obtaining and noting two HDR values: Max Luminance and White Reference. Ok, let's go [click 'Show' the spoiler]:
1a) Run this app and follow the calibration steps.
1b) Make a note of the number (of nits) during the SECOND (the bright white one; NOT the FIRST pitch black one) 'Max Luminance' step so you know what to cross-reference later. Mine was 450.
Note that this number (of nits) may be lower than your monitor's marketed max nits - it was for me, because I choose to run my MSI MPG341CX OLED in it's 'True Black 400' mode; not its 'Peak 1000 nits' mode. Due to my room lighting and distance from the screen, I prefer inky blacks vs extreme brightness. However, this is just how I prefer this particular monitor and it is probably different for you and yours.
Also, be honest with yourself when calibrating. There's nothing to gain by gaming the results. My max luminance came out at 450 nits, which is odd, right? Considering I have my monitor set to 'True Black 400', you might think it would be 400.
Calibration tip: don't look directly at the brighter calibration images - I find that if I use my peripheral vision, I can more easily tell when the whole image becomes white.
2) Next, use the formula located here (originally provided by this Reshade addon's author CLShortFuse in the comments) to calculate/confirm your 'White Reference' value:
https://www.wolframalpha.com/input?i=10+%5E+%280.03460730900256+%2B+%280.757737096673107+*+log10%28x%29%29%29%3Bx%3D450
You just need to change the value of 'x' (the number at the end which is probably displaying as my 450, if you have used my link) to your calibrated Max Luminance you noted earlier and recalculate by hitting Enter on your keyboard or clicking the '=' (equals) sign at the far right of the formula's text box. My result was 110.9289, which - for our purposes, is rounded up to 111.
------------------------------------------------------------------------------------------------------------------------
So we now have our two HDR values: In my case, these are: Max Luminance = 450 and White Reference = 111. What are yours?
------------------------------------------------------------------------------------------------------------------------
3) Next, we will install 'Reshade with addon support' and this modpage's 'Reshade addon' by following the Installation instructions on the Description page or by following these slightly re-worded steps:
3a) FIRST, INSTALL RESHADE: Go here: https://reshade.me/ and download the latest version by scrolling to the bottom of the page and clicking: 'Download ReShade x.x.x with full add-on support'.
NOTE: YOU MUST GET A 'WITH ADDON SUPPORT' VERSION FOR THIS NEXUS MOD, WHICH IS A ACTUALLY A 'RESHADE ADDON' (NOT A RESHADE PROFILE OR A MOD) TO WORK!
3b) Copy the file you downloaded ('ReShade_Setup_x.x.x_Addon.exe') to the following folder inside your game folder: \\*PATH TO MY GAME*\Cyberpunk 2077\bin\x64\
You know you're in the right place if you see your 'Cyberpunk2077.exe' in the same folder.
3c) Run 'ReShade_Setup_x.x.x_Addon.exe' and read then click 'OK' for the popup message that warns you only to use the 'addon' version of Reshade with singleplayer games, which is fine for Cyberpunk 2077.
3d) Click the 'Browse' button and select your 'Cyberpunk2077.exe' in your \\PATH TO MY GAME\Cyberpunk 2077\bin\x64\ folder. Then click 'Next'.
3e) On the next screen, make sure 'MS DirectX 10/11/12' is selected, then click 'Next'
3f) On the next 2 screens, click 'Skip' and then 'Finish'.
Reshade (with addon support) is now installed just for Cyberpunk 2077. (Reshade is designed to be installed per game, so you can have many different Reshade addons or profiles for different games.)
4) Then install CLShortFuse's 'RenoDX' Reshade addon:
6a) Download the 'RenoDX for CP2077' Reshade addon from this nexus modpage's 'Files' tab.
6b) It's just one file, which you need to move or copy into the same folder where you installed Reshade (with addon support) in step 5: \\*PATH TO MY GAME*\Cyberpunk 2077\bin\x64\
5) Load the game and when your main menu has finished loading, press the HOME key on your keyboard to open the Reshade overlay. You can 'skip' the Reshade tutorial if you want, because we're actually not here to use Reshade. We're here to use the RenoDX Reshade addon, which has its own window in the Reshade graphical interface.
Here's where we can cross-reference our HDR values that we obtained earlier.
If this is the first time you have loaded the game since calibration, your 'Max Luminance' and 'White Reference' should be displayed in the RenoDX Reshade addon window as: Peak Brightness and Game Brightness respectively. (Max Luminance = Peak Brightness, White Reference = Game Brightness)
If your Peak Brightness and Game Brightness values do not match your calibration results, try clicking the little 'Refresh' button to the right of each one. (I had to do this because I had previously loaded the game BEFORE I performed Windows HDR calibration.)
I use this Reshade addon with loads of other mods. Of most relevance, I use theCyanideX's awesome LUTs. I use their 'LUT Switcher' with their 'PREEM LUT 3.0 switcher pack'. I also use their 'Weather Switcher' and 'Preem Weather'. With this combination, I'm finally happy with how my game looks. I no longer have blown out colours and all kinds of imbalanced visual weirdness. No doubt your own combination of mods will inform how well any of this will work for you, but keep experimenting until you're happy with it - it's worth the work!
Thanks again to CLShortFuse for their RenoDX Reshade addon. :)
I just wanted to thank you! You are the boss
It's a fresh install of Cyberpunk, I've double checked the installation instructions as well.
If it's any help, I am running 4070ti super with 572.42 drivers as of posting this, 9800X3D and 64GB of ram. Game is installed on NVme drive.
The only other mods I have installed is:
Weathermancer
Redscript
RED4ext
Native Settings UI
Cyber Engine Tweaks
Codeware
latest is 6.4.0 as per writing. try updating it
So idk how to use this mod...
-
1
-
2
-
3
- ...
-
16
-
Jump