Upgrading from System-EX Make sure to remove System-EX before using this mod (delete r6/scripts/SystemEx).
I'm getting compilation errors, corrupted scripts, my game won't start, my game crashes... This means you have a user side issue that isn't specific to Cyberware-EX. In most cases, it's either a missing requirement, or installed requirement of the wrong version. Follow the general troubleshooting instructions for any mod: — Check r6/logs/redscript_rCURRENT.log for errors — Check r6/logs/redscript_rCURRENT.log to verify that r6/scripts/CyberwareEx/CyberwareEx.reds and other scripts are present — Check red4ext/logs/ for errors — Do a clean install of the mod, i.e. uninstall the previous version of the mod before installing the new one — Update the game to the required version — Install and update all requirements to required versions — Uninstall any potentially conflicting mods — Read redscript comments for known issues and fixes — Read RED4ext comments for known issues and fixes — Read TweakXL comments for known issues and fixes
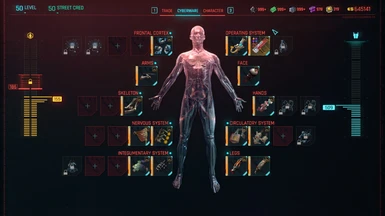
There are no errors, but I still can't use the mod... First of all, verify that mod is running. You should see this watermark in top right corner of Hub > Cyberware and Ripperdoc screens:
If there's no watermark, the mod is not installed or running, and you have to follow the previous answer. If you see the watermark, the mod is already running, read mod description to make sure you understand how it suppose to work and how to configure it for your needs.
Install process for basic, extended, and override versions:
Spoiler:
Show
step 0: Download "Cyberware-Ex" s main file manually or with a mod launcher, if you want to use extended or override mode install "CyberwareEx-Addon-ExtendedSlots" or "CyberwareEx-Addon-OverrideMode" from the optional files respectively, manual or mod manager downloads work here too. This should work, now you have the base version of the game you want
Expansion Customization Process Guide:
Spoiler:
Show
Step 0: Follow the install process for basic, extended, and override versions. Then MANUALLY DOWNLOAD (don't use mod manager) the "CyberwareEx-Config-ExpansionMode" from optional files. step 1: open the config, copy it's r6, and past it in the main Cyberware-Ex's folder alongside it's R6 merging the two folders. step 2: Go to "...\r6\scripts\CyberwareEx" and open the file there called "CyberwareEx.Customization.reds" with any text editor you fancy, I use VS code personally. step 3: Delete all the code in there and paste this code provided here there instead
Spoiler:
Show
module CyberwareEx.Customization import CyberwareEx.* public class UserConfig extends DefaultConfig { public static func SlotExpansions() -> array<ExpansionArea> = [
ExpansionArea.Create(gamedataEquipmentArea.SystemReplacementCW, [ // write lines for extra operating system slots BELOW here
]), ExpansionArea.Create(gamedataEquipmentArea.FrontalCortexCW, [ // write lines for extra frontal cortex slots BELOW here
]), ExpansionArea.Create(gamedataEquipmentArea.CardiovascularSystemCW, [ // write lines for extra circulatory/cardiovascular system slots BELOW here
]), ExpansionArea.Create(gamedataEquipmentArea.NervousSystemCW, [ // write lines for extra nervous system slots BELOW here
]), ExpansionArea.Create(gamedataEquipmentArea.IntegumentarySystemCW, [ // write lines for extra Integumentary System slots BELOW here
]), ExpansionArea.Create(gamedataEquipmentArea.ArmsCW, [ // write lines for extra Arms slots BELOW here
]), ExpansionArea.Create(gamedataEquipmentArea.HandsCW, [ // write lines for extra hand slots BELOW here
]), ExpansionArea.Create(gamedataEquipmentArea.LegsCW, [ // write lines for extra leg sots BELOW here
]),
ExpansionArea.Create(gamedataEquipmentArea.MusculoskeletalSystemCW, [ // write lines for extra skeleton sots BELOW here
step 3.5: This is some notes of caution, reading isn't needed but advised nonetheless. Capitalization will be a killer, make sure you watch that carefully, every tree has a name and they are body, reflexes, technical ability, intelligence, and cool. The difference between master, milestone, and perk is very different. Each tree has 4 tiers of milestones, not all are visible, but those ones are still there, perks are the small cubes that branch off these milestones. A master is the milestone at the very top of the tree. Some milestones and perks have multiple levels, if level isn't displayed just use 1 as a default. If your adding multiple requirements for different slots, look at my code at the end of this section and look at how the commas are placed at the end of the additional lines/requirements.
step 4: Here is how to add an additional cyberware slot for the OS (operating systems). Remember, do this for ALL the systems you want extra of otherwise you'll only have the base amounts.
Spoiler:
Show
step 4.1: First find line 6, where it states "// write lines for extra operating systems BELOW here".
step 4.2: Underneath the line found in step 4, using same indentation, write: "ExpansionSlot.Create()" as this is the main code always used/called to create a new slot.
step 4.3: inside of the parenthesis of "ExpansionSlot.Create()" write: "Tech_Central_Milestone_3, 3" making the line now ExpansionSlot.Create(gamedataNewPerkType.Tech_Central_Milestone_3, 3) spoiler below will explain this in the next step if you are lost.
Spoiler:
Show
"ExpansionSlot.Create()" is used to make a new expansion slot, inside you will specify which one and what it's perk dependency is. Format for it: "gamedataNewPerkType.Tree_Branch_MilestoneOrPerk_MilestoneNumber_PerkBranch, level". "gamedataNewPerkType" will always be there followed by a period in case you missed it. "Tree" is the tree it's in from the following list: "Body", "Reflexes", "Cool", "Intelligence", and, in this case, "Tech". Then you will do it's branch which is either: "Master", "Left", "Right", or as in this case "Central". Next is MilestoneOrPerk which you will put either "Milestone" for Milestones and "Perk" for either a Perk or a Master. Next and possibly last is the MilestoneNuber which you will fill in with "1", "2", or "3" depending on the MILESTONES place on the tree from bottom being 1 and top being 3, unless it's a mastery perk in which case 1 is the farthest left one and it increases by 1 for each mastery to the right you go, no specific placement to my knowledge. For PerkBranch, If you did a milestone or master instead of a perk you will not use this and will leave it blank and delete the underscore before it otherwise, you will add a "1", "2", "3", or "4" depending on where it is, if they're placed in the corners you will use top left as 1, bottom left is 2, top right is 3, and bottom right is 4. if they're on the left and right slide then far right is 3, mid right is 1, mid left is 2, and far left is 4. Now the final thing, is level which will be "1" or more depending on the MILESTONE OR PERKS level, not the player level, and if it doesn't have a level then just leave it as "1". Anddddddd your done. Great, now repeat it for everything you want. If this doesn't work refer to my example code at the bottom, or reply to this asking about it and if I see it I'll try to help.
Great now you've got it all set up! Hopefully... Anyways here's the one I use as of the moment, feel free to use it as an example code. If anything is confusing ask try the cyberpunk modding discord!
Spoiler:
Show
module CyberwareEx.Customization import CyberwareEx.* public class UserConfig extends DefaultConfig { public static func SlotExpansions() -> array<ExpansionArea> = [
ExpansionArea.Create(gamedataEquipmentArea.SystemReplacementCW, [ // write lines for extra operating system slots BELOW here ExpansionSlot.Create(gamedataNewPerkType.Tech_Central_Milestone_3, 3) ]), ExpansionArea.Create(gamedataEquipmentArea.FrontalCortexCW, [ // write lines for extra frontal cortex slots BELOW here ExpansionSlot.Create(gamedataNewPerkType.Intelligence_Central_Perk_2_3, 1), ExpansionSlot.Create(gamedataNewPerkType.Intelligence_Central_Milestone_3, 2) ]), ExpansionArea.Create(gamedataEquipmentArea.CardiovascularSystemCW, [ // write lines for extra circulatory/cardiovascular system slots BELOW here ExpansionSlot.Create(gamedataNewPerkType.Body_Central_Perk_1_4, 1) ]), ExpansionArea.Create(gamedataEquipmentArea.NervousSystemCW, [ // write lines for extra nervous system slots BELOW here ExpansionSlot.Create(gamedataNewPerkType.Tech_Central_Milestone_3, 2) ]), ExpansionArea.Create(gamedataEquipmentArea.IntegumentarySystemCW, [ // write lines for extra Integumentary System slots BELOW here ExpansionSlot.Create(gamedataNewPerkType.Tech_Central_Milestone_3, 1), ExpansionSlot.Create(gamedataNewPerkType.Tech_Central_Perk_3_3, 1) ]), ExpansionArea.Create(gamedataEquipmentArea.ArmsCW, [ // write lines for extra Arms slots BELOW here ExpansionSlot.Create(gamedataNewPerkType.Tech_Central_Perk_3_2, 1) ]), ExpansionArea.Create(gamedataEquipmentArea.HandsCW, [ // write lines for extra hand slots BELOW here ExpansionSlot.Create(gamedataNewPerkType.Tech_Central_Perk_3_2, 1) ]), ExpansionArea.Create(gamedataEquipmentArea.LegsCW, [ // write lines for extra leg sots BELOW here ExpansionSlot.Create(gamedataNewPerkType.Reflexes_Central_Milestone_2, 1), ExpansionSlot.Create(gamedataNewPerkType.Reflexes_Central_Milestone_2, 2) ]),
ExpansionArea.Create(gamedataEquipmentArea.MusculoskeletalSystemCW, [ // write lines for extra skeleton sots BELOW here ExpansionSlot.Create(gamedataNewPerkType.Reflexes_Central_Milestone_2, 1) ]) ]; public static func CombinedAbilityMode() -> Bool = false }
Override Customization Process Guide:
Spoiler:
Show
Step 0: Follow the install process for basic, extended, and override versions. Then MANUALLY DOWNLOAD (don't use mod manager) the "CyberwareEx-Config-OverrideMode" from optional files.
step 1: open the config, copy it's r6, and past it in the main Cyberware-Ex's folder alongside it's R6 merging the two folders.
step 2: Go to "...\r6\scripts\CyberwareEx" and open the file there called "CyberwareEx.Customization.reds" with any text editor you fancy, I use VS code personally.
step 3: Delete all the code in there and paste this code provided here there instead. Remember, do this for ALL the systems you want extra of otherwise you'll only have the base amounts.
Spoiler:
Show
module CyberwareEx.Customization import CyberwareEx.* public class UserConfig extends DefaultConfig {
public static func UpgradePrice() -> Int32 = 10000 // price for buying new slot public static func ResetPrice() -> Int32 = 5000 // price for reseting slot public static func SlotOverrides() -> array<OverrideArea> = [ //Write lines for extra arms below here //Write lines for extra Cardiovascular System below here
//Write lines for extra Frontal cortex below here
//Write lines for extra Hands below here
//Write lines for extra Integumentary systems below here
//Write lines for extra legs below here
//Write lines for extra skeleton below here
//Write lines for extra nervous system below here
//Write lines for extra operating systems(Cyberdeck, Sandevistan, beserk) below here
]; public static func CombinedAbilityMode() -> Bool = false }
step 3.5: This is some notes of caution, reading is VERY STRONGLY advised nonetheless. Capitalization will be a killer, make sure you watch that carefully. When adding slots using my prewritten guide code, if you're adding something outside of the OS lines, end the code line with a comma, ALWAYS. Post your config code if you get errors please, it will make everyone's life easier.
step 4: Here is how to add an additional cyberware slot for the OS (operating systems) and customize the price.
Spoiler:
Show
4.1: To change the prices, you will find a "// price for buying new slot" in the configuration file, immediatly to the left of it will be the number "10000" which is the base price. Change that number to change it's price, the reset price is right below it.
step 4.2: First find line 34, where it states "// write lines for extra operating systems BELOW here".
step 4.3: Underneath the line found in step 4, using same indentation, write: "OverrideArea.Create()" as this is the main code always used/called to create a new slot.
step 4.4: inside of the parenthesis of "OverrideArea.Create()" write: "gamedataEquipmentArea.SystemReplacmentCW", this will tell the code to go to Systems to add more slots, after that you will write ", 4" which will have it set the TOTAL slots for the OS to 4. Your code should be: "OverrideArea.Create(gamedataEquipmentArea.SystemReplacementCW, 4)", the spoiler below will explain this if you are lost.
Spoiler:
Show
"OverrideArea.Create()" is used to set the number of slots, inside you will specify how many. Format for it: "gamedataNewPerkType.TypeCW, ammount". "gamedataNewPerkType" will always be there followed by a period in case you missed it. "TypeCW" is the type of cyberware, heres the list: Arms = "ArmsCW"; Circulatory System = "CardiovascularSystemCW"; Frontal Cortex = "FrontalCortexCW"; Hands = "HandsCW"; Integumentary System = "IntegumentarySystemCW"; Legs = "LegsCW"; Skeleton = "MusculoskeletalSystemCW"; Nervous System = "NervousSystemCW"; and finally OS = "SystemReplacementCW". Anddddddd your done. Great, now repeat it for everything you want. If this doesn't work refer to my example code at the bottom, or reply to this asking about it and if I see it I'll try to help.
Great now you've got it all set up! Hopefully... Anyways here's the one I use as of the moment, feel free to use it as an example code. If anything is confusing try the modding discord!
Spoiler:
Show
module CyberwareEx.Customization import CyberwareEx.* public class UserConfig extends DefaultConfig {
public static func UpgradePrice() -> Int32 = 10000 // price for buying new slot public static func ResetPrice() -> Int32 = 5000 // price for reseting slot public static func SlotOverrides() -> array<OverrideArea> = [ //Write lines for extra arms below here OverrideArea.Create(gamedataEquipmentArea.ArmsCW, 2), //Write lines for extra Cardiovascular System below here OverrideArea.Create(gamedataEquipmentArea.CardiovascularSystemCW, 6),
//Write lines for extra Frontal cortex below here OverrideArea.Create(gamedataEquipmentArea.FrontalCortexCW, 6),
//Write lines for extra Hands below here OverrideArea.Create(gamedataEquipmentArea.HandsCW, 4),
//Write lines for extra Integumentary systems below here OverrideArea.Create(gamedataEquipmentArea.IntegumentarySystemCW, 6),
//Write lines for extra legs below here OverrideArea.Create(gamedataEquipmentArea.LegsCW, 4),
//Write lines for extra skeleton below here OverrideArea.Create(gamedataEquipmentArea.MusculoskeletalSystemCW, 6),
//Write lines for extra nervous system below here OverrideArea.Create(gamedataEquipmentArea.NervousSystemCW, 6),
//Write lines for extra operating systems(Cyberdeck, Sandevistan, beserk) below here OverrideArea.Create(gamedataEquipmentArea.SystemReplacementCW, 4) ]; public static func CombinedAbilityMode() -> Bool = false }
Here's a simple snippet for CET to further help you find necessary perks. Just copy-paste it as one line to CET console and press Enter. It will print all perk codes with their names: for _, perk in ipairs(TweakDB:GetRecords('gamedataNewPerk_Record')) do print(perk:EnumName().value, ":", GetLocalizedText(perk:Loc_name_key())) end
Uhhhh, am I the only one who caught that in one section he tells us the code is OverrideArea.Create(gamedataEquipmentArea.SystemReplacementCW, #), but then in the one just below it's OverrideArea.Create(gamedataNewPerkType.SystemReplacementCW, #)
Need some clarification which code to use, but tried both and neither work. No comp errors, but there are no extra slots in RipperDeck or if I visit a RipperDoc in game....before you ask, YES I have the watermark for Cyberware-EX so it's working.
The gamedataEquipmentArea.SystemReplacementCW is correct. The other one will throw a compilation error, and it it doesn't it means your changes are not compiled by redscript.
Custom Slot Config Guide for the Expansion Mode I couldn't find a guide so I spent a few hours figuring it out myself, so I might as well share
You need to download the config .zip CyberwareEx-Config-ExpansionMode, follow install instructions, then edit the CyberwareEx.Customization.reds module file using any text editor (ex: Notepad).
The structure of the module: module CyberwareEx.Customization import CyberwareEx.* public class UserConfig extends DefaultConfig { public static func SlotExpansions() -> array = [ ExpansionArea.Create(gamedataEquipmentArea.SystemReplacementCW, [ ←---- Line specefies slot area ‾‾‾‾‾‾‾‾‾‾‾‾‾‾‾‾‾‾‾ | Area of the body (listed below) ─┘
ExpansionSlot.Create(gamedataNewPerkType.Body_Central_Perk_1_2, 3) ←---- Line creates 1 slot and specifies ‾‾‾‾‾‾‾‾‾‾‾‾‾‾‾‾‾‾‾‾‾ | perk required to unlock it | | Perk UID (refer to link below) ─┘ └─ Perk level (1, 2 or 3 depending on perk) ]), ... ]; ... }
Area of the body can be any of: ArmsCW, CardiovascularSystemCW (Circulatory System), EyesCW, FrontalCortexCW, HandsCW, IntegumentarySystemCW, LegsCW, MusculoskeletalSystemCW (Skeleton), NervousSystemCW or SystemReplacementCW (Operating System).
Perk UID is made up as such: AttributeType_PositionInPerkTree_Class_PerkYOrder_PerkIndex. To understand the classification better, here is a rough diagram for the Body attribute tree. You might have to do a bit of trial and error to get the right PerkIndex.You don't have to manually make up the name, you can reference this list of all perk UID's.
Some perks have multiple parts/stages so you can specify that with Perk level (ex: Adrenaline Rush perk can be perk level 1, 2 or 3, while Painkiller can only be level 1)
Example: ExpansionArea.Create(gamedataEquipmentArea.SystemReplacementCW, [ ExpansionSlot.Create(gamedataNewPerkType.Tech_Central_Milestone_3, 3), //<-- add a comma if another slot follows after ExpansionSlot.Create(gamedataNewPerkType.Tech_Master_Perk_3, 1) ]), //<-- add a comma if another area follows after ExpansionArea.Create(gamedataEquipmentArea.LegsCW, [ ExpansionSlot.Create(gamedataNewPerkType.Reflexes_Central_Perk_1_3, 1) ]) The above adds two cyberware slots to the Operating System and one slot to the Legs. Operating system: the first slot unlocks after obtaining the Level 3 License to chrome perk in the Tech tree, the second slot unlocks after obtaining the Edgerunner perk in the Tech tree. Legs: the slot unlocks after obtaining the Parkour perk in the Reflex tree.
Thanks to psiberx for giving such customizability options and this wonderful mod!
Is there by chance a mod that works with this that allows you to equip two blunt arm cyberware specifically? Like two gorilla at once but different damage types.
there is no customization.reds file what am i supposed to do these are the files inside CyberwareEx.Global.reds CyberwareEx.OverrideMode.reds CyberwareEx.reds
I agree I have the same issue and I tried these instructions from the author on main page:
ABILITIES ACTIVATION
If you have only one active ability, it can be activated by pressing ability key as in base game.
If you have more than one active ability, they can be activated separately: — Overclock: Press ability key when in focus mode (scanner) — Berserk: Press ability key while blocking with fists or melee weapon — Sandevistan: Press ability key when not in focus mode and not blocking
------------
I have MK Praline cyberdeck in first slot, falcon sandevistan in second slot and overlcock ability unlocked. When I press E sandevistan activates fine, but even when in focus mode pressing E does not activate overclock.
I can't seem to install Doomsayer and Sentry optics at the same time, they both automatically install to the second face slot regardless of what I try.


3331 comments
Upgrading from System-EX
Make sure to remove System-EX before using this mod (delete r6/scripts/SystemEx).
I'm getting compilation errors, corrupted scripts, my game won't start, my game crashes...
This means you have a user side issue that isn't specific to Cyberware-EX.
In most cases, it's either a missing requirement, or installed requirement of the wrong version.
Follow the general troubleshooting instructions for any mod:
— Check r6/logs/redscript_rCURRENT.log for errors
— Check r6/logs/redscript_rCURRENT.log to verify that r6/scripts/CyberwareEx/CyberwareEx.reds and other scripts are present
— Check red4ext/logs/ for errors
— Do a clean install of the mod, i.e. uninstall the previous version of the mod before installing the new one
— Update the game to the required version
— Install and update all requirements to required versions
— Uninstall any potentially conflicting mods
— Read redscript comments for known issues and fixes
— Read RED4ext comments for known issues and fixes
— Read TweakXL comments for known issues and fixes
There are no errors, but I still can't use the mod...
First of all, verify that mod is running.
You should see this watermark in top right corner of Hub > Cyberware and Ripperdoc screens:
If there's no watermark, the mod is not installed or running, and you have to follow the previous answer.
If you see the watermark, the mod is already running, read mod description to make sure you understand how it suppose to work and how to configure it for your needs.
https://discord.gg/redmodding
Here is a google doc on it, at the bottom is some resources however all the text is mostly the same however the text below is better formated.
Install process for basic, extended, and override versions:
step 0: Download "Cyberware-Ex" s main file manually or with a mod launcher, if you want to use extended or override mode install "CyberwareEx-Addon-ExtendedSlots" or "CyberwareEx-Addon-OverrideMode" from the optional files respectively, manual or mod manager downloads work here too.
This should work, now you have the base version of the game you want
Expansion Customization Process Guide:
Step 0: Follow the install process for basic, extended, and override versions. Then MANUALLY DOWNLOAD (don't use mod manager) the "CyberwareEx-Config-ExpansionMode" from optional files.
step 1: open the config, copy it's r6, and past it in the main Cyberware-Ex's folder alongside it's R6 merging the two folders.
step 2: Go to "...\r6\scripts\CyberwareEx" and open the file there called "CyberwareEx.Customization.reds" with any text editor you fancy, I use VS code personally.
step 3: Delete all the code in there and paste this code provided here there instead
module CyberwareEx.Customization
import CyberwareEx.*
public class UserConfig extends DefaultConfig {
    public static func SlotExpansions() -> array<ExpansionArea> = [

        ExpansionArea.Create(gamedataEquipmentArea.SystemReplacementCW, [
            // write lines for extra operating system slots BELOW here

        ]),
        ExpansionArea.Create(gamedataEquipmentArea.FrontalCortexCW, [
            // write lines for extra frontal cortex slots BELOW here

        ]),
        ExpansionArea.Create(gamedataEquipmentArea.CardiovascularSystemCW, [
            // write lines for extra circulatory/cardiovascular system slots BELOW here

        ]),
        ExpansionArea.Create(gamedataEquipmentArea.NervousSystemCW, [
            // write lines for extra nervous system slots BELOW here

        ]),
        ExpansionArea.Create(gamedataEquipmentArea.IntegumentarySystemCW, [
            // write lines for extra Integumentary System slots BELOW here

        ]),
        ExpansionArea.Create(gamedataEquipmentArea.ArmsCW, [
            // write lines for extra Arms slots BELOW here

        ]),
        ExpansionArea.Create(gamedataEquipmentArea.HandsCW, [
            // write lines for extra hand slots BELOW here

        ]),
        ExpansionArea.Create(gamedataEquipmentArea.LegsCW, [
            // write lines for extra leg sots BELOW here

        ]),

        ExpansionArea.Create(gamedataEquipmentArea.MusculoskeletalSystemCW, [
            // write lines for extra skeleton sots BELOW here

        ])
    ];
    public static func CombinedAbilityMode() -> Bool = false
}
step 3.5: This is some notes of caution, reading isn't needed but advised nonetheless. Capitalization will be a killer, make sure you watch that carefully, every tree has a name and they are body, reflexes, technical ability, intelligence, and cool. The difference between master, milestone, and perk is very different. Each tree has 4 tiers of milestones, not all are visible, but those ones are still there, perks are the small cubes that branch off these milestones. A master is the milestone at the very top of the tree. Some milestones and perks have multiple levels, if level isn't displayed just use 1 as a default. If your adding multiple requirements for different slots, look at my code at the end of this section and look at how the commas are placed at the end of the additional lines/requirements.
step 4: Here is how to add an additional cyberware slot for the OS (operating systems). Remember, do this for ALL the systems you want extra of otherwise you'll only have the base amounts.
step 4.1: First find line 6, where it states "// write lines for extra operating systems BELOW here".
step 4.2: Underneath the line found in step 4, using same indentation, write: "ExpansionSlot.Create()" as this is the main code always used/called to create a new slot.
step 4.3: inside of the parenthesis of "ExpansionSlot.Create()" write: "Tech_Central_Milestone_3, 3" making the line now ExpansionSlot.Create(gamedataNewPerkType.Tech_Central_Milestone_3, 3) spoiler below will explain this in the next step if you are lost.
"ExpansionSlot.Create()" is used to make a new expansion slot, inside you will specify which one and what it's perk dependency is. Format for it: "gamedataNewPerkType.Tree_Branch_MilestoneOrPerk_MilestoneNumber_PerkBranch, level".
"gamedataNewPerkType" will always be there followed by a period in case you missed it. "Tree" is the tree it's in from the following list: "Body", "Reflexes", "Cool", "Intelligence", and, in this case, "Tech". Then you will do it's branch which is either: "Master", "Left", "Right", or as in this case "Central". Next is MilestoneOrPerk which you will put either "Milestone" for Milestones and "Perk" for either a Perk or a Master. Next and possibly last is the MilestoneNuber which you will fill in with "1", "2", or "3" depending on the MILESTONES place on the tree from bottom being 1 and top being 3, unless it's a mastery perk in which case 1 is the farthest left one and it increases by 1 for each mastery to the right you go, no specific placement to my knowledge. For PerkBranch, If you did a milestone or master instead of a perk you will not use this and will leave it blank and delete the underscore before it otherwise, you will add a "1", "2", "3", or "4" depending on where it is, if they're placed in the corners you will use top left as 1, bottom left is 2, top right is 3, and bottom right is 4. if they're on the left and right slide then far right is 3, mid right is 1, mid left is 2, and far left is 4. Now the final thing, is level which will be "1" or more depending on the MILESTONE OR PERKS level, not the player level, and if it doesn't have a level then just leave it as "1". Anddddddd your done. Great, now repeat it for everything you want. If this doesn't work refer to my example code at the bottom, or reply to this asking about it and if I see it I'll try to help.
Great now you've got it all set up! Hopefully... Anyways here's the one I use as of the moment, feel free to use it as an example code. If anything is confusing ask try the cyberpunk modding discord!
module CyberwareEx.Customization
import CyberwareEx.*
public class UserConfig extends DefaultConfig {
    public static func SlotExpansions() -> array<ExpansionArea> = [

        ExpansionArea.Create(gamedataEquipmentArea.SystemReplacementCW, [
            // write lines for extra operating system slots BELOW here
            ExpansionSlot.Create(gamedataNewPerkType.Tech_Central_Milestone_3, 3)
        ]),
        ExpansionArea.Create(gamedataEquipmentArea.FrontalCortexCW, [
            // write lines for extra frontal cortex slots BELOW here
            ExpansionSlot.Create(gamedataNewPerkType.Intelligence_Central_Perk_2_3, 1),
            ExpansionSlot.Create(gamedataNewPerkType.Intelligence_Central_Milestone_3, 2)
        ]),
        ExpansionArea.Create(gamedataEquipmentArea.CardiovascularSystemCW, [
            // write lines for extra circulatory/cardiovascular system slots BELOW here
            ExpansionSlot.Create(gamedataNewPerkType.Body_Central_Perk_1_4, 1)
        ]),
        ExpansionArea.Create(gamedataEquipmentArea.NervousSystemCW, [
            // write lines for extra nervous system slots BELOW here
            ExpansionSlot.Create(gamedataNewPerkType.Tech_Central_Milestone_3, 2)
        ]),
        ExpansionArea.Create(gamedataEquipmentArea.IntegumentarySystemCW, [
            // write lines for extra Integumentary System slots BELOW here
            ExpansionSlot.Create(gamedataNewPerkType.Tech_Central_Milestone_3, 1),
            ExpansionSlot.Create(gamedataNewPerkType.Tech_Central_Perk_3_3, 1)
        ]),
        ExpansionArea.Create(gamedataEquipmentArea.ArmsCW, [
            // write lines for extra Arms slots BELOW here
            ExpansionSlot.Create(gamedataNewPerkType.Tech_Central_Perk_3_2, 1)
        ]),
        ExpansionArea.Create(gamedataEquipmentArea.HandsCW, [
            // write lines for extra hand slots BELOW here
            ExpansionSlot.Create(gamedataNewPerkType.Tech_Central_Perk_3_2, 1)
        ]),
        ExpansionArea.Create(gamedataEquipmentArea.LegsCW, [
            // write lines for extra leg sots BELOW here
            ExpansionSlot.Create(gamedataNewPerkType.Reflexes_Central_Milestone_2, 1),
            ExpansionSlot.Create(gamedataNewPerkType.Reflexes_Central_Milestone_2, 2)
        ]),

        ExpansionArea.Create(gamedataEquipmentArea.MusculoskeletalSystemCW, [
            // write lines for extra skeleton sots BELOW here
            ExpansionSlot.Create(gamedataNewPerkType.Reflexes_Central_Milestone_2, 1)
        ])
    ];
    public static func CombinedAbilityMode() -> Bool = false
}
Override Customization Process Guide:
Step 0: Follow the install process for basic, extended, and override versions. Then MANUALLY DOWNLOAD (don't use mod manager) the "CyberwareEx-Config-OverrideMode" from optional files.
step 1: open the config, copy it's r6, and past it in the main Cyberware-Ex's folder alongside it's R6 merging the two folders.
step 2: Go to "...\r6\scripts\CyberwareEx" and open the file there called "CyberwareEx.Customization.reds" with any text editor you fancy, I use VS code personally.
step 3: Delete all the code in there and paste this code provided here there instead. Remember, do this for ALL the systems you want extra of otherwise you'll only have the base amounts.
module CyberwareEx.Customization
import CyberwareEx.*
public class UserConfig extends DefaultConfig {

    public static func UpgradePrice() -> Int32 = 10000 // price for buying new slot
    public static func ResetPrice() -> Int32 = 5000 // price for reseting slot
    public static func SlotOverrides() -> array<OverrideArea> = [
        //Write lines for extra arms below here
        //Write lines for extra Cardiovascular System below here

        //Write lines for extra Frontal cortex below here

        //Write lines for extra Hands below here

        //Write lines for extra Integumentary systems below here

        //Write lines for extra legs below here

        //Write lines for extra  skeleton below here

        //Write lines for extra nervous system below here

        //Write lines for extra operating systems(Cyberdeck, Sandevistan, beserk) below here

    ];
    public static func CombinedAbilityMode() -> Bool = false
}
step 3.5: This is some notes of caution, reading is VERY STRONGLY advised nonetheless. Capitalization will be a killer, make sure you watch that carefully. When adding slots using my prewritten guide code, if you're adding something outside of the OS lines, end the code line with a comma, ALWAYS. Post your config code if you get errors please, it will make everyone's life easier.
step 4: Here is how to add an additional cyberware slot for the OS (operating systems) and customize the price.
4.1: To change the prices, you will find a "// price for buying new slot" in the configuration file, immediatly to the left of it will be the number "10000" which is the base price. Change that number to change it's price, the reset price is right below it.
step 4.2: First find line 34, where it states "// write lines for extra operating systems BELOW here".
step 4.3: Underneath the line found in step 4, using same indentation, write: "OverrideArea.Create()" as this is the main code always used/called to create a new slot.
step 4.4: inside of the parenthesis of "OverrideArea.Create()" write: "gamedataEquipmentArea.SystemReplacmentCW", this will tell the code to go to Systems to add more slots, after that you will write ", 4" which will have it set the TOTAL slots for the OS to 4. Your code should be: "OverrideArea.Create(gamedataEquipmentArea.SystemReplacementCW, 4)", the spoiler below will explain this if you are lost.
"OverrideArea.Create()" is used to set the number of slots, inside you will specify how many. Format for it:
"gamedataNewPerkType.TypeCW, ammount".
"gamedataNewPerkType" will always be there followed by a period in case you missed it. "TypeCW" is the type of cyberware, heres the list: Arms = "ArmsCW"; Circulatory System = "CardiovascularSystemCW"; Frontal Cortex = "FrontalCortexCW"; Hands = "HandsCW"; Integumentary System = "IntegumentarySystemCW"; Legs = "LegsCW"; Skeleton = "MusculoskeletalSystemCW"; Nervous System = "NervousSystemCW"; and finally OS = "SystemReplacementCW". Anddddddd your done. Great, now repeat it for everything you want. If this doesn't work refer to my example code at the bottom, or reply to this asking about it and if I see it I'll try to help.
Great now you've got it all set up! Hopefully... Anyways here's the one I use as of the moment, feel free to use it as an example code. If anything is confusing try the modding discord!
module CyberwareEx.Customization
import CyberwareEx.*
public class UserConfig extends DefaultConfig {

public static func UpgradePrice() -> Int32 = 10000 // price for buying new slot
public static func ResetPrice() -> Int32 = 5000 // price for reseting slot
public static func SlotOverrides() -> array<OverrideArea> = [
//Write lines for extra arms below here
OverrideArea.Create(gamedataEquipmentArea.ArmsCW, 2),
//Write lines for extra Cardiovascular System below here
OverrideArea.Create(gamedataEquipmentArea.CardiovascularSystemCW, 6),

//Write lines for extra Frontal cortex below here
OverrideArea.Create(gamedataEquipmentArea.FrontalCortexCW, 6),

//Write lines for extra Hands below here
OverrideArea.Create(gamedataEquipmentArea.HandsCW, 4),

//Write lines for extra Integumentary systems below here
OverrideArea.Create(gamedataEquipmentArea.IntegumentarySystemCW, 6),

//Write lines for extra legs below here
OverrideArea.Create(gamedataEquipmentArea.LegsCW, 4),

//Write lines for extra skeleton below here
OverrideArea.Create(gamedataEquipmentArea.MusculoskeletalSystemCW, 6),

//Write lines for extra nervous system below here
OverrideArea.Create(gamedataEquipmentArea.NervousSystemCW, 6),

//Write lines for extra operating systems(Cyberdeck, Sandevistan, beserk) below here
OverrideArea.Create(gamedataEquipmentArea.SystemReplacementCW, 4)
];
public static func CombinedAbilityMode() -> Bool = false
}
Just copy-paste it as one line to CET console and press Enter.
It will print all perk codes with their names:
for _, perk in ipairs(TweakDB:GetRecords('gamedataNewPerk_Record')) do print(perk:EnumName().value, ":", GetLocalizedText(perk:Loc_name_key())) end
Need some clarification which code to use, but tried both and neither work. No comp errors, but there are no extra slots in RipperDeck or if I visit a RipperDoc in game....before you ask, YES I have the watermark for Cyberware-EX so it's working.
The other one will throw a compilation error, and it it doesn't it means your changes are not compiled by redscript.
I couldn't find a guide so I spent a few hours figuring it out myself, so I might as well share
You need to download the config .zip CyberwareEx-Config-ExpansionMode, follow install instructions, then edit the CyberwareEx.Customization.reds module file using any text editor (ex: Notepad).
The structure of the module:
module CyberwareEx.Customization
import CyberwareEx.*
public class UserConfig extends DefaultConfig {
  public static func SlotExpansions() -> array = [
    ExpansionArea.Create(gamedataEquipmentArea.SystemReplacementCW, [   ←---- Line specefies slot area
                                               ‾‾‾‾‾‾‾‾‾‾‾‾‾‾‾‾‾‾‾
                                                            |
                           Area of the body (listed below) ─┘

      ExpansionSlot.Create(gamedataNewPerkType.Body_Central_Perk_1_2, 3)   ←---- Line creates 1 slot and specifies
                                               ‾‾‾‾‾‾‾‾‾‾‾‾‾‾‾‾‾‾‾‾‾  |          perk required to unlock it
                                                            |         |
                            Perk UID (refer to link below) ─┘         └─ Perk level (1, 2 or 3 depending on perk)
    ]),
    ...
  ];
  ...
}
Area of the body can be any of: ArmsCW, CardiovascularSystemCW (Circulatory System), EyesCW, FrontalCortexCW, HandsCW, IntegumentarySystemCW, LegsCW, MusculoskeletalSystemCW (Skeleton), NervousSystemCW or SystemReplacementCW (Operating System).
Perk UID is made up as such: AttributeType_PositionInPerkTree_Class_PerkYOrder_PerkIndex. To understand the classification better, here is a rough diagram for the Body attribute tree. You might have to do a bit of trial and error to get the right PerkIndex. You don't have to manually make up the name, you can reference this list of all perk UID's.
Some perks have multiple parts/stages so you can specify that with Perk level (ex: Adrenaline Rush perk can be perk level 1, 2 or 3, while Painkiller can only be level 1)
Example:
ExpansionArea.Create(gamedataEquipmentArea.SystemReplacementCW, [
ExpansionSlot.Create(gamedataNewPerkType.Tech_Central_Milestone_3, 3), //<-- add a comma if another slot follows after
ExpansionSlot.Create(gamedataNewPerkType.Tech_Master_Perk_3, 1)
]), //<-- add a comma if another area follows after
ExpansionArea.Create(gamedataEquipmentArea.LegsCW, [
ExpansionSlot.Create(gamedataNewPerkType.Reflexes_Central_Perk_1_3, 1)
])
The above adds two cyberware slots to the Operating System and one slot to the Legs.
Operating system: the first slot unlocks after obtaining the Level 3 License to chrome perk in the Tech tree, the second slot unlocks after obtaining the Edgerunner perk in the Tech tree.
Legs: the slot unlocks after obtaining the Parkour perk in the Reflex tree.
Thanks to psiberx for giving such customizability options and this wonderful mod!
these are the files inside
CyberwareEx.Global.reds
CyberwareEx.OverrideMode.reds
CyberwareEx.reds
When i press E both sandy and overclock gets activated
ABILITIES ACTIVATION
If you have only one active ability, it can be activated by pressing ability key as in base game.
If you have more than one active ability, they can be activated separately:
— Overclock: Press ability key when in focus mode (scanner)
— Berserk: Press ability key while blocking with fists or melee weapon
— Sandevistan: Press ability key when not in focus mode and not blocking
------------
I have MK Praline cyberdeck in first slot, falcon sandevistan in second slot and overlcock ability unlocked. When I press E sandevistan activates fine, but even when in focus mode pressing E does not activate overclock.
i have the quest to get the free tiger class upgrade but it does not show up in the shop any help?