


0 of 0


")
")
")
")
About this mod
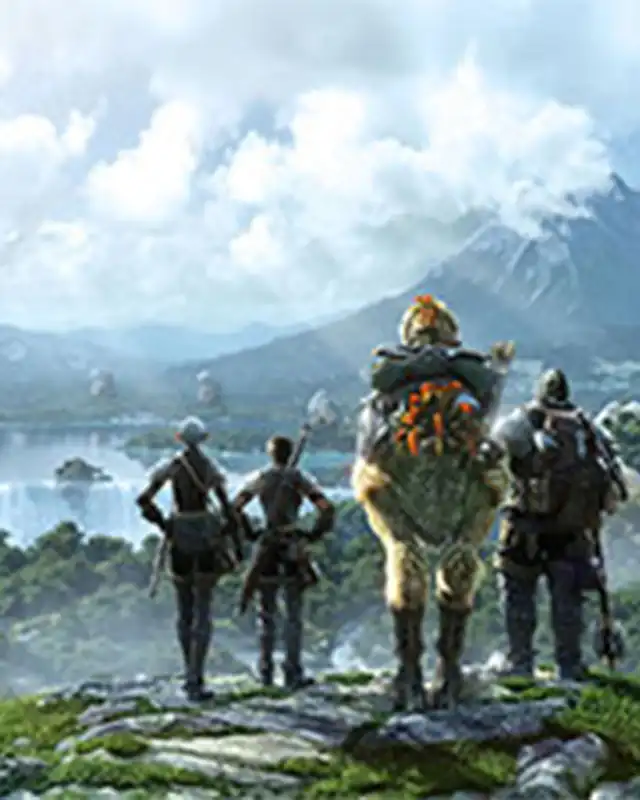
ipsuShade is a ReShade preset collection (with GShade support) that aims to deliver maximum quality at maximum FPS with the Gameplay, GameplayLite and Questing preset types, but also provide high fidelity screenshots with the Screenie and Ultimate preset types.
- Requirements
- Permissions and credits
- Mirrors
UPDATE V2.0.0 AVALIABLE NOW ON MY GITHUB:
https://github.com/ipsusu/ipsuShade
I WILL UPDATE NEXUSMODS IN A FEW WEEKS, SORRY!
OLD VERSION INFORMATION:
· IpsuShade ·
⠀
https://github.com/ipsusu/ipsuShade
I WILL UPDATE NEXUSMODS IN A FEW WEEKS, SORRY!
OLD VERSION INFORMATION:
· IpsuShade ·
⠀
IpsuShade is a ReShade preset collection (with GShade support) that aims to deliver maximum quality at maximum FPS with the Gameplay, GameplayLite and Questing preset types, but also provide high fidelity screenshots with the Screenie and Ultimate preset types.

⠀
Each preset type comes in a range of 7 included colour variants. These colours are:
Each preset type comes in a range of 7 included colour variants. These colours are:

· How do I use the Ipsusu Presets (IpsuShade) on a fresh ReShade install? ·
⠀
- Download the .zip of IpsuShade with ReShade folder names through the link above.
- Drag and drop the two ReShade folders found inside the IpsuShade_ReShadeFolderRelease.zip into your FFXIV installation \game\
directory. Be sure to merge and overwrite the existing reshade-presets and reshade-shaders folders.- For the Steam version, your directory is most likely:
C:\Program Files (x86)\Steam\steamapps\common\FINAL FANTASY XIV Online\game\ - For the Windows version, your directory is most likely:
C:\Program Files (x86)\SquareEnix\FINAL FANTASY XIV - A Realm Reborn\game\
- For the Steam version, your directory is most likely:
⠀
Note. The existing folders should be named reshade-presets and reshade-shaders. If they are called gshade-presets and gshade-shaders
please read the section below as you have an installation that has been migrated from a GShade install.
⠀
Note. The existing folders should be named reshade-presets and reshade-shaders. If they are called gshade-presets and gshade-shaders
please read the section below as you have an installation that has been migrated from a GShade install.
⠀
- Once in-game, open the ReShade overlay (by pressing the Home key by default) and navigate to the Ipsusu folder inside your reshade-presets folder.
- If you dragged the files while the game was still open, you need to press Reload on the bottom left of the overlay to get them to show up
- If you dragged the files while the game was still open, you need to press Reload on the bottom left of the overlay to get them to show up
- Simply double click any of the .ini presets to enable them. See the the top of this page for an explanation of the presets.
- Click the two dots at the top (the "..") to go back to the main folder if you would like to swap to another creator's preset (if you have any installed).
- Click the two dots at the top (the "..") to go back to the main folder if you would like to swap to another creator's preset (if you have any installed).
- You should now have a perfectly working install of IpsuShade!
· How do I use the IpsuShade if I migrated to ReShade from a GShade install? ·
The Ipsusu presets were originally (and currently) included with a GShade install.
As such, you should already have the presets and you will be able to find them in the gshade-presets\Ipsusu\ folder!
- Click the gshade-presets folder from your migrated install and scroll down to find the Ipsusu folder.
- Simply double click any of the .ini presets to enable them. See the the top of this page for an explanation of the presets.
- Click the two dots at the top (the "..") to go back to the main folder if you would like to swap to another creator's preset.
If you need it (you probably don't):
⠀
⠀
Download Mirror (GitHub)
· How do I use the Ipsusu Presets (IpsuShade) with a GShade install? ·
The Ipsusu presets are included with GShade installs by default through their installer.
GShade Disclaimer
GShade is a closed source fork of ReShade that includes specific improvements to usability and compatibility with whitelisted games. There was an incident in early Feburary 2023 where a poor decision was made by GShade's sole developer. The 4.1.1 update included anti-tampering code within the GShade installer that would restart Windows if a specific 3rd-party program was used to trigger functions within the installer to download certain assets independently (in an attempt to bypass a new GShade license agreement for certain textures and shaders). This code was removed after the obvious extremely negative reaction to the restart function from the community, but the reputational damage was already done. Therefore, do use this program at your own judgement. However, I do not want to punish innocent users who may not be able to use ReShade (e.g., Linux and Mac users) or may not have the technical ability to follow the install guides above. I have always held the stance that anyone may use and redistribute my presets or textures (as explained in my license). My assets were excluded from the GShade license as they have always been offered freely and independently on my GitHub. I encourage my presets to be bundled with any possible ReShade forks in the future (please do get in touch!).
⠀⠀
After installation, you will be able to find the Ipsusu presets in the gshade-presets\Ipsusu\ folder!
- Click the gshade-presets folder if it is not already selected, and scroll down to find the Ipsusu folder.
- Simply double click any of the .ini presets to enable them. See the the top of this page for an explanation of the presets.
- Click the two dots at the top (the "..") to go back to the main folder if you would like to swap to another creator's preset.
- Click the two dots at the top (the "..") to go back to the main folder if you would like to swap to another creator's preset.
· Contact and Donate ·
⠀You can donate or tip me some lunch money here:
⠀

⠀
You can contact me easiest on my Twitter. Just send me a DM.
⠀
If you don't have Twitter you can find and DM me on Discord @ ipsusu.
⠀
I also check my Reddit DMs semi-regularly.
⠀
If you don't have Twitter you can find and DM me on Discord @ ipsusu.
⠀
I also check my Reddit DMs semi-regularly.
This NexusMods page is a alternative version of the main IpsuShade repo on GitHub. If anything is not up-to-date here, please check there. It also has additional troubleshooting information. Limited support will be offered on NexusMods, because this site is kinda... poopy.
FINAL FANTASY is a registered trademark of Square Enix Holdings Co., Ltd. © SQUARE ENIX CO., LTD. All Rights Reserved.