Other user's assetsAll the assets in this file belong to the author, or are from free-to-use modder's resources
Upload permissionYou are not allowed to upload this file to other sites under any circumstances
Modification permissionYou must get permission from me before you are allowed to modify my files to improve it
Conversion permissionYou are not allowed to convert this file to work on other games under any circumstances
Asset use permissionYou must get permission from me before you are allowed to use any of the assets in this file
Asset use permission in mods/files that are being soldYou are not allowed to use assets from this file in any mods/files that are being sold, for money, on Steam Workshop or other platforms
Asset use permission in mods/files that earn donation pointsYou are not allowed to earn Donation Points for your mods if they use my assets
Author notes
This author has not provided any additional notes regarding file permissions
File credits
This author has not credited anyone else in this file
Donation Points system
Please log in to find out whether this mod is receiving Donation Points
Changelogs
Version 2.4.6
Added Mrs Claus Outfit to The Holiday Spirit
Added Mr Claus Outfit to The Holiday Spirit
Updated Blueprint Apparate Commands in Files Tab
Version 2.4.5
Replaced Chunk ID Conflict Manager v1.09 with an archived version
Version 2.4.4
Added a new section called "The Holiday Spirit"
Added Santa Hats and Mistletoe in "The Holiday Spirit"
Added Hot Chocolate - Object Replacer in "The Holiday Spirit"
Updated Instructions in Merging section of the guide
Version 2.4.3
Added Immersive ModPack to Immersion Mods
Removed Immersive Classes
Removed Immersive Common Rooms
Removed Immersive Meals
Removed Immersive Hogsmeade
Updated Instructions in Merging section of the guide
Updated Blueprint Apparate Commands in Files Tab
Version 2.4.2
Updated UE4SS in Modding Tools
Version 2.4.1
Added Ultra Plus - Ray Reconstruction - Performance and Hotfixes
Added Merlin Trial Finder in Quality of Life
Removed Ascendio III
Removed Ultra Plus Fairytail Lighting
Removed Ultra Plus Sherlock Lighting
Updated Blueprint Apparate Commands in Files Tab
Version 2.3.1
Added "Diverse NPC Uniforms Spring Version - Archived" to Diverse NPC Uniforms in Clothing (Use at own Risk)
Version 2.3
Added Black Relic Robes in Clothing
Version 2.2
Added Change House - UI in UI Improvements
Added Change Weather - UI in UI Improvements
Added Auto Loot and Interactions in Quality of Life
Added PickaColor Merlin Robes in Clothing
Updated Blueprint Apparate Commands in Files Tab
Version 2.1
Added Toggle HUD Elements in UI Improvements
Added Default Spell Color Change in Spells
Added Protego Colour Change in Spells
Updated Blueprint Apparate Commands in Files Tab
Version 2.0
Added new section called Hairs
Version 1.8
Updated Instructions in Merging section of the guide
Updated UE4SS in Modding Tools
Version 1.7.5
Slight change to the Merging section of the guide
Changed description of Time Dilator in Immersion Mods
Version 1.7.4
Added Icon Bug Fix in Bug Fixes
Added Treasure Vault Finder in Quality of Life
Added Disable Wind Effects in Quality of Life
Updated Blueprint Apparate Commands in Files Tab
Version 1.7.3
Added SQL Mod Menu in Modding Tools
Updated Blueprint Apparate Commands in Files Tab
Version 1.7.2
Added More Spell Sets in Quality of Life
Added QuickUtilities in Quality of Life
Updated Blueprint Apparate Commands in Files Tab
Version 1.7.1
Updated Instructions in Merging section of the guide
Added Immersive 4in1 to Merging section of the guide
Version 1.7
Added Immersive Hogsmeade in Immersion Mods
Added Timeskip in Quality of Life
Added Skip Merlin Trials in Quality of Life
Updated Blueprint Apparate Commands in Files Tab
Version 1.6.3
Updated Instructions in Merging section of the guide
Added Immersive 3in1 in Merging section of the guide
Added Hogwarts Legacy 60 FPS FMVs - Alternative Google Drive Link for Faster Download in Quality of Life
Version 1.6.2
Added Class System in Immersion Mods
Version 1.6.1
Slightly changed description of RoR Upgrado in Quality of Life
Version 1.6
Added RE-UE4SS in Modding Tools
Added Crystal Clear MiniMap in UI Improvements
Added Guiding Trail Enhancements in UI Improvements
Added a new section called Unsupported Flight
Added NPC Finder in Quality of Life
Updated Blueprint Apparate Commands in Files Tab
Version 1.5
Added Open Bugged Doors to Bugfixes
Updated Immersive Common Rooms description
Updated Bird In Hand Bug Fix description
Updated Blueprint Apparate Commands in Files Tab
Version 1.4
Added a new section called Spells
Added Change Seasons - UI to UI Improvements
Updated Blueprint Apparate Commands in Files tab
Version 1.3.2
Added Dark Arts Outfit - Feminine Reshape in Clothing
Version 1.3.1
Removed Immersive Prefect Patrols since Night Curfew already includes a version
Version 1.3
Added Chunk ID Conflict Manager to Modding Tools
Added Apparate UI in UI Improvements
Added Vendor Refresh Button in Quality of Life
Added Sell All Button in Quality of Life
Added Better Broom Upgrades in Quality of Life
Added Broom Speedometer in Quality of Life
Added Percival Rackham Trial Bug Fix in Bug Fixes
Changed Description of UI Core in many areas
Updated Blueprint Apparate Commands in Files Tab
"GUIDE IS CURRENTLY OUTDATED DUE TO LATEST GAME UPDATE BUT WILL BE REVISITING AT A FUTURE DATE"
This is a guide for Hogwarts Legacy that will transform your experience at Hogwarts school of Witchcraft and Wizardry. I've included a list of my favorite mods that touches on many aspects of the game. From visuals, to performance, clothing, UI improvements and even bugfixes. My own reshade preset is also available for download in the files tab.
Requirements: below are PC requirements that Avalanche Software recommends
Spoiler:
Show
Recommendations:
1. 7zip (recommended) or WinRAR since we'll be downloading many mods that require you have at least one.
2. 15GB of free drive space (not including the game install).
3. We'll be starting the game from a fresh install, which means you have to uninstall the game via either Steam or Epic. Whichever place you purchased it.
Q: But TheWitch, I already have 100+ hours in the game so why should I??? A: You're free to use your previous save, but to get the most out of your experience, it's recommended to start fresh as a new 5th year!
4. After uninstalling, make sure all traces of the game is removed from your drive. navigate to Steam/steamapps/common. If a Hogwarts Legacy folder is present, delete it.
5. Navigate to C:/Users/YourUserName/Appdata/Local/HogwartsLegacy/Saved/SavedGames/Filewithnumber. For me that number is 130219447, but it might be different for you! Open that folder up and this is where your save files are.
6. If you wish to backup your previous saves, now is your chance to do so. If not, then proceed to step 7.
Q: But I can't find the AppData folder! Help! A: For Windows 10, in the upper left-hand corner of the window click on "View" then put a checkmark beside "Hidden Items". For Windows 11, click the "View" button in the upper right-hand corner, "Show", then "Hidden Items".
7. Delete the Hogwarts Legacy folder (C:/Users/YourUserName/Appdata/Local/Hogwarts Legacy)
8. For some users, disabling HAGS (Hardware Accelerated GPU Scheduling) seems to solve many issues related to crashing. keep in mind that disabling HAGS also disables your ability to use Frame Generation. in-game. If you prefer to use Frame Gen, then skip step 9.
9. Go to "Windows Settings<System<Graphics", and disable "Hardware Accelerated GPU Scheduling" if you have it enabled.
10. Install the game.
11. Launch the game at least once for it to generate your Engine.ini file. No need to create your new 5th year just yet though!
12. Come back here and get started on the guide!
Spoiler:
Show
Spoiler:
Show
Blueprint Apparate Modloader by Narknon Allows loading of blueprint mods without requiring a DLL hook. Can load a user-defined list of logic mods, meant to alleviate the problem of logic mods overwriting each other.
This mod loader will add a menu that you can open with the F1 key, you can add logic mods with this menu and your list of mods will be saved and automatically loaded every time the level is loaded in.
Installation: Install by dropping the zBPApparate_P.pak, zBPApparate_P.ucas, and zBPApparate_P.utoc files in your "...\Hogwarts Legacy\Phoenix\Content\Paks\~mods" folder. If you do not have a ~mods folder, create one.
This comes with no built-in mods, this is just a way for mod authors and users to use multiple logic mods without them overwriting and conflicting with each other, and without the need for a DLL.
How to use(users): To use the menu press the F8 key, and a menu should open up. With this menu opened you can click in the uppermost white box to enter a mod name and press enter to load the mod.
To exit the menu simply click out of the text box and hit F8 again.
Changing Hotkey: To change the Hotkey used to open BP Apparate in game, navigate to your Engine.ini file (for Steam this is located in "\Users\Username\AppData\Local\Hogwarts Legacy\Saved\Config\WindowsNoEditor\Engine.ini"). Add the following text with your desired key selected:
Note that number keys and numpad keys must be spelled out (e.g., Zero; NumPadZero). However the "F" keys are basic (e.g., F7).
Known Issues: Certain mods may not load (pressing Enter will not clear the entered text). This means that the blueprint mod has a conflict or is not loading, it is not related to BP Apparate directly. Try renaming the blueprint mod files to start with ! or ~
How to use(modders): The mod loader simply loads up custom map instances, and those maps must be placed in this specific UE4 project path; "/Content/CustomContent/", for example "/Content/CustomContent/MyMod.umap" Inside that newly created map, Blueprints -> Open Level Blueprint (at the top), and create your logic there or spawn your own blueprint and continue from there. Pak your level and any related assets, and once in-game just open the mod menu (F8) and type in your mod name (umap name).
Instructions for making BP Apparate-compatible mods can be found here (it's easy): ModLoader Mod Creation (the guide was made for Stray but the same principles apply)
Make sure you package your mod with IO Store turned on. See: https://github.com/narknon/CCFF7RUproj#to-pak-files-as-ucasutoc
Credits: This mod loader is heavily based on YuriLewd from KH3's mod loader.
Spoiler:
Show
IMPORTANT NOTE: UICore is safe to use. The only caveat being the map menu black screen bug. Luckily, this only occurs if you open your map in the Field Guide. As long as you open the map directly and NEVER THROUGH THE FIELD GUIDE!!!, you'll never experience this bug. UICore by Dekita A simple 'core' mod containing common widgets and logic used by other ui based mods.
REQUIREMENTS / HOW TO USE: A modloader such as UE4SS or Apparate Modloader is required to use logic mods. All mods that use the UICore require logic to add the UI to the game screen, and perform actions.. You should also load this mod via your chosen modloader. DONT LOAD THE SAME MOD IN BOTH MODLOADERS
Install this mods .pak, .utoc, and .ucas files to Hogwarts Legacy\Phoenix\Content\Paks\~mods. Press F8 (when in game) to open the modloader menu, type DekUICore. This mod should now be listed within the apparate modloader menu.
NOTE: If your having trouble getting the mod working with apparate modloader, try renaming the mod files to have a ! in front of their name. This seems to be a priority issue when using a lot of mods.
KNOWN ISSUES: This mod uses pak chunk 1311 and may be incompatible with other mods that do so.
Spoiler:
Show
Hogwarts Mod Merger by IridiumIO Standalone Utility to combine and edit mods, enabling previously incompatible mods to work together. Currently able to merge mods that use PhoenixShipData.sqlite and English localization strings.
Merge multiple mod files together, allowing conflicting mods to work together
Currently only works for mods that Modify PhoenixShipData.sqlite and Main-enUS.binMore options including .ini merging is coming soon
Instructions:
Download Hogwarts Mod Merger.zip and extract to a folder of your preference
Run Hogwarts Mod Merger
Click "Add" and find the .pak file/s for the mods you want to add. Note: Not all mods can be merged in this way; the tool will notify you if this is the case.
A preview of the changes will show up in the table on the right, under the respective tab. Most mods will only modify the Phoenix Database, some will modify both Phoenix and Localization strings.
Repeat Step 3 for any other mods you want to add. Mods higher on the list will override lower mods if there are conflicts, so the order you add them matters! You can right-click to promote or demote a mod to change its priority.
Optional: Select each mod in the left list in turn, and right-click to edit or delete the entry. For Localization strings, you instead double-click the value box to edit
Click "Preview Merged Changes": This will show all the game changes that will be written to a new mod file on the right. This will remove any duplicate entries by default if two mods make the exact same change. Lines can be edited/deleted from this preview as in Step 6.
Click "Build Merged Mod".
The output folder will open. Copy the created "zMergedMods_P.pak" file to your ~mods folder (Should be in HogwartsLegacy/Phoenix/Content/Paks/~mods). You can rename the mod whatever you want. It should also be at the bottom of your mod list! Add as many "z"s to the start of the mod name to ensure this.
Variable: You should be able to delete the individual mods and only keep the merged one - however, if a mod changes more than just the PhoenixShipData.sqlite or language files, this will break them - in this case, keep both the merged mod and the original mod. You will have to play around with the mod order to make sure they work properly
Planned Features (In progress):
For mods that clash with each other (for example, two mods that both want to change the cooldown of Avada Kedavra), allow you to choose which mod has priority and/or manually edit the selected change to whatever you want.
Allow merging mods that change control schemes and keybindings, or any ".ini" changes in general.
Easily make your own mods that modify the database (contains many variables in the game, including cooldowns, unlocked waypoints, challenges, inventory slots, money, health, magic, duelling combos, etc.). I'll release this as a separate tool to avoid bogging this one down too much.
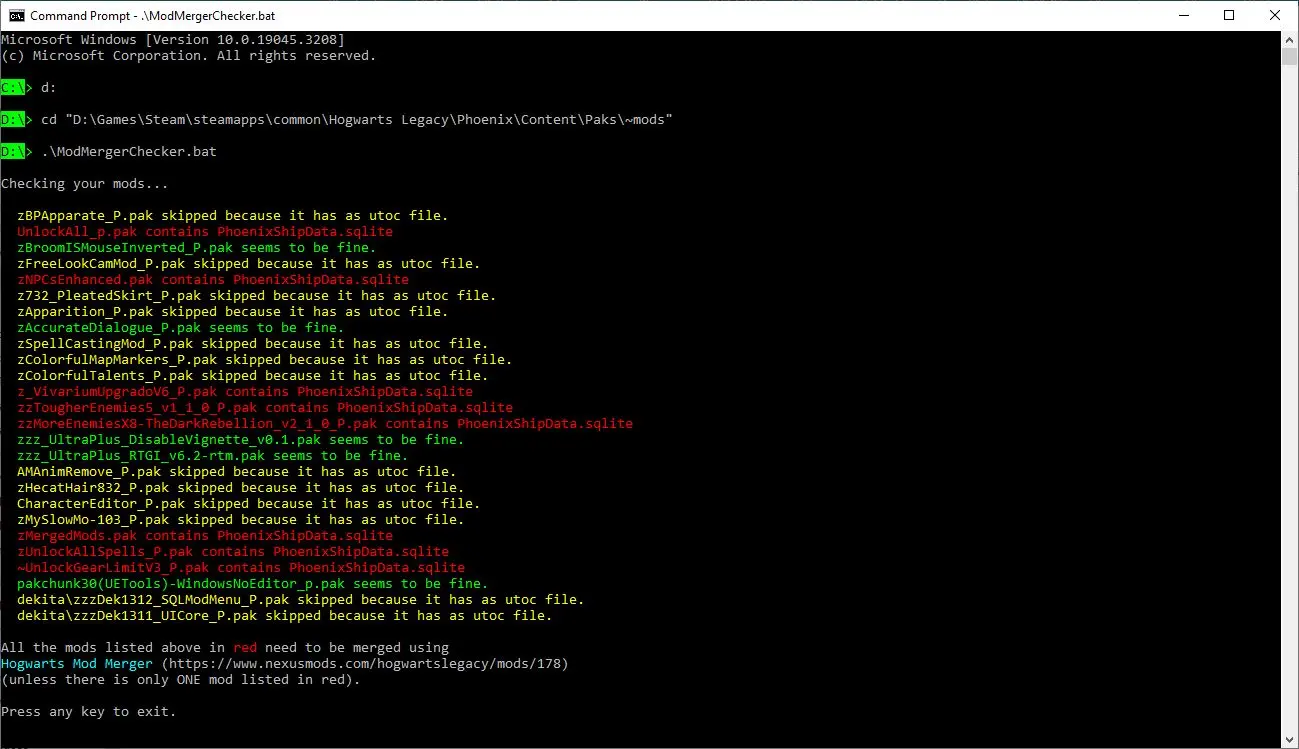
Some mods need to be "merged" using the Hogwarts Mod Merger program. But which ones? If the mod creator doesn't tell you that their mod needs to be merged it can be very difficult to tell, and back in the early days (especially before the Mod Merger program was created) mod creators didn't tell you. Well, worry not! This script can tell you which of the mods in your ~mods folder need merging.
The reason certain mods need to be merged is because they edit the game's SQL data stored in the PhoenixShipData.sqlite file. But the game can only hold one copy of this file, so if more than one mod tries to import an edited version of it, whichever one loads last will overwrite all of the others. The solution is to apply the changes from all your mods to a single copy of the file and then load that into the game. That is exactly what the Hogwarts Mod Merger program does. But before you use it you need to know which files need merging.
This script figures that out by unpacking every .pak file (except the ones with an associated .utoc file, because those are a different type of mod) to see if there's a copy of the PhoenixShipData.sqlite file inside. If there is, it will list that .pak file in red.
Installation
Download the mod.
Extract the ModMergerChecker.bat file and the MANIFEST folder into your Steam\steamapps\common\Hogwarts Legacy\Phoenix\Content\Paks\~mods\ folder.
Make sure the ModMergerChecker.bat file and the MANIFEST folder didn't end up in Steam\steamapps\common\Hogwarts Legacy\Phoenix\Content\Paks\~mods\Phoenix\Content\Paks\~mods\ by mistake!If they did, move them toSteam\steamapps\common\Hogwarts Legacy\Phoenix\Content\Paks\~mods\and delete the unnecessarySteam\steamapps\common\Hogwarts Legacy\Phoenix\Content\Paks\~mods\Phoenix folder.
Usage - Easy Methods
Either:
Double click ModMergerChecker.bat in Windows Explorer.
Or:
Drag & drop ModMergerChecker.bat from Windows Explorer to your desktop while holding ALT.
That will create a shortcut. Feel free to rename it.
Double-click the shortcut to run the batch file.
As you can see in the above example, there are eight pak files in my ~mods folder (or sub-folders thereof) that need to be merged. I need to remove all eight of these pak files from my ~mods folder and merge them into a singe zMergedMods.pak file using Hogwarts Mod Merger. That merged file should be the only one in the ~mods folder when I run the game.
How to Un-Install
Just delete ModMergerChecker.bat from your ~mods folder. You can also delete the MANIFEST folder unless you've installed my PakChunk Checker or Mod Localization Checker mod(s), in which case leave MANIFEST alone or you'll break those mods.
Known Issues
The following are known issues. If you encounter any others let me know in the POSTS section.
Result: pakchunk30(UETools) failed to unpack - This is nothing to worry about. UETools does not contain PhoenixShipData.sqlite.
Spoiler:
Show
Mod Localization Checker by icouldifiwantedto A windows batch script to check whether any of the mods in your ~mods folder need to be merged because they contain localization (language) files.
Introduction
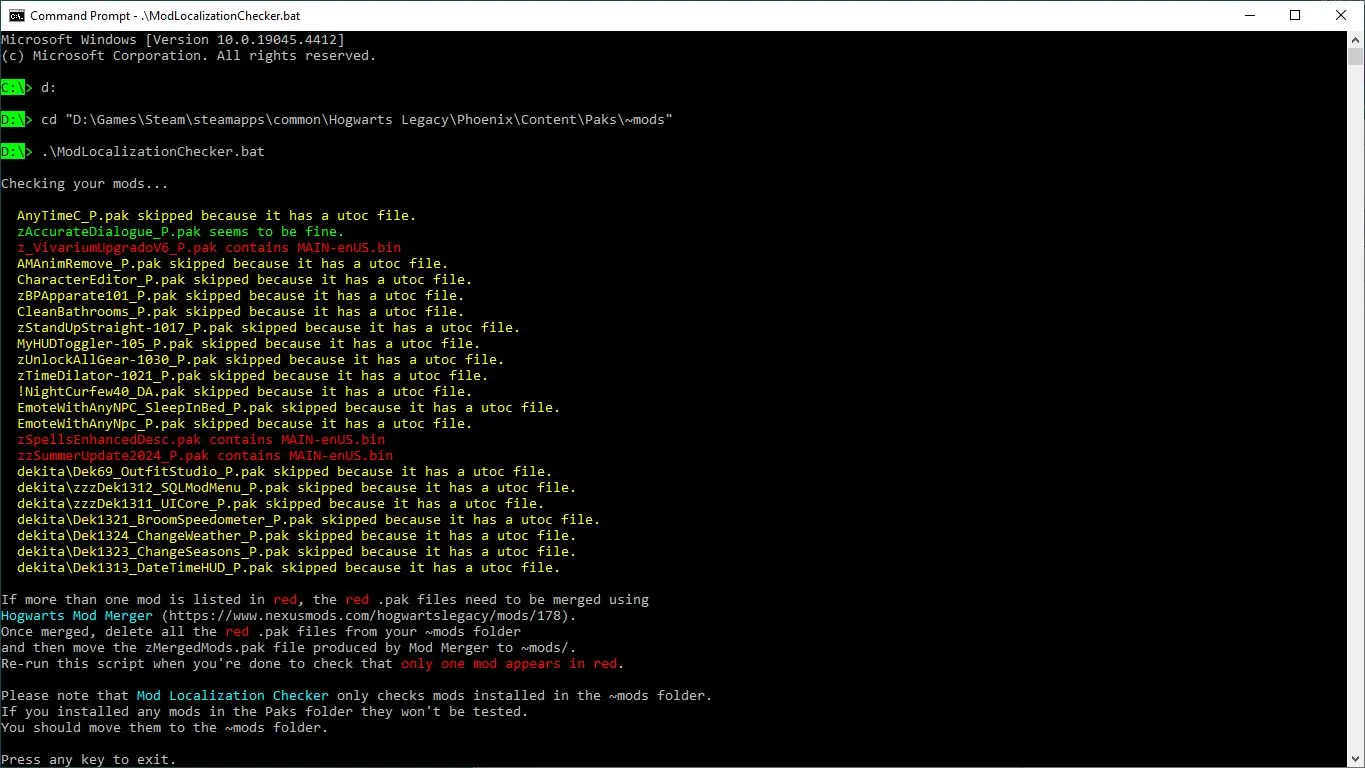
Some mods need to be "merged" using the Hogwarts Mod Merger program. But which ones? It's reasonably well-known that mods which change the SQL database need to be merged. What's less well-known is that mods containing localization (language) files also need to be merged.
The reason these mods need to be merged is because they edit the game's langauge data stored in the MAIN-enUS.bin file. But the game can only hold one copy of this file, so if more than one mod tries to import an edited version of it, whichever one loads last will overwrite all of the others. The solution is to apply the changes from all your mods to a single copy of the file and then load that into the game. That is exactly what the Hogwarts Mod Merger program does. But before you use it you need to know which files need merging.
This script figures that out by unpacking every .pak file (except the ones with an associated .utoc file, because those are a different type of mod) to see if there's a copy of the MAIN-enUS.bin file inside. If there is, it will list that .pak file in red.
Or to put it another way:
Some mods contain the PhoenixShipData.sqlite SQL database. Some mods contain the MAIN-enUS.bin language file. Some mods contain both. You need to merge all the mods that contain either PhoenixShipData.sqlite or MAIN-enUS.bin or both into a single zMergedMods.pak file by loading them all into Hogwarts Mod Merger at the same time. If you've previously merged some you don't need to merge them from scratch, you can just merge any new ones with your old zMergedMods.pak file.
Installation
Download the mod.
Extract the ModLocalizationChecker.bat file and the MANIFEST folder into your Steam\steamapps\common\Hogwarts Legacy\Phoenix\Content\Paks\~mods\ folder.
Make sure the ModLocalizationChecker.bat file and the MANIFEST folder didn't end up in Steam\steamapps\common\Hogwarts Legacy\Phoenix\Content\Paks\~mods\Phoenix\Content\Paks\~mods\ by mistake!If they did, move them toSteam\steamapps\common\Hogwarts Legacy\Phoenix\Content\Paks\~mods\and delete the unnecessarySteam\steamapps\common\Hogwarts Legacy\Phoenix\Content\Paks\~mods\Phoenix folder.
Usage - Easy Methods
Either:
Double click ModLocalizationChecker.bat in Windows Explorer.
Or:
Drag & drop ModLocalizationChecker.bat from Windows Explorer to your desktop while holding ALT.
That will create a shortcut. Feel free to rename it.
Double-click the shortcut to run the batch file.
As you can see in the above example, there are three pak files in my ~mods folder (or sub-folders thereof) that need to be merged. I need to remove all three of these pak files from my ~mods folder and merge them into a singe zMergedMods.pak file using Hogwarts Mod Merger. That merged file should be the only one in the ~mods folder when I run the game.
How to Un-Install
Just delete ModLocalizationChecker.bat from your ~mods folder. You can also delete the MANIFEST folder unless you've installed my Pak Chunk Checker or Mod Merger Checker mod(s), in which case leave MANIFEST alone or you'll break those mods.
Known Issues
The following are known issues. If you encounter any others let me know in the POSTS section.
Result: pakchunk30(UETools) failed to unpack - This is nothing to worry about. UETools does not contain MAIN-enUS.bin.
This script will only look for the MAIN-enUS.bin file. It will not look for other language files. That's because Hogwarts Mod Merger can only merge English language files.
Spoiler:
Show
PakChunk Checker by icouldifiwantedto A windows batch script to check whether any of the mods in your ~mods folder use the same pakchunk.
Introduction
There's already a Chunk ID Conflict Manager to resolve pakchunk conflicts, but I didn't want to resolve conflicts. I just wanted to check whether the mod I'd just created conflicted with any of the mods I already had. So I created this batch script to check. It doesn't resolve any conflicts, it just tells you if there are any.
Installation
Download the mod.
Extract the PakChunkChecker.bat file and the MANIFEST folder into your Steam\steamapps\common\Hogwarts Legacy\Phoenix\Content\Paks\~mods\ folder.
Make sure the PakChunkChecker.bat file and the MANIFEST folder didn't end up in Steam\steamapps\common\Hogwarts Legacy\Phoenix\Content\Paks\~mods\Phoenix\Content\Paks\~mods\ by mistake!If they did, move them toSteam\steamapps\common\Hogwarts Legacy\Phoenix\Content\Paks\~mods\and delete the unnecessarySteam\steamapps\common\Hogwarts Legacy\Phoenix\Content\Paks\~mods\Phoenix folder.
Usage - Easy Methods
Either:
Double click PakChunkChecker.bat in Windows Explorer.
Or:
Drag & drop PakChunkChecker.bat from Windows Explorer to your desktop while holding ALT.
That will create a shortcut. Feel free to rename it.
Double-click the shortcut to run the batch file.
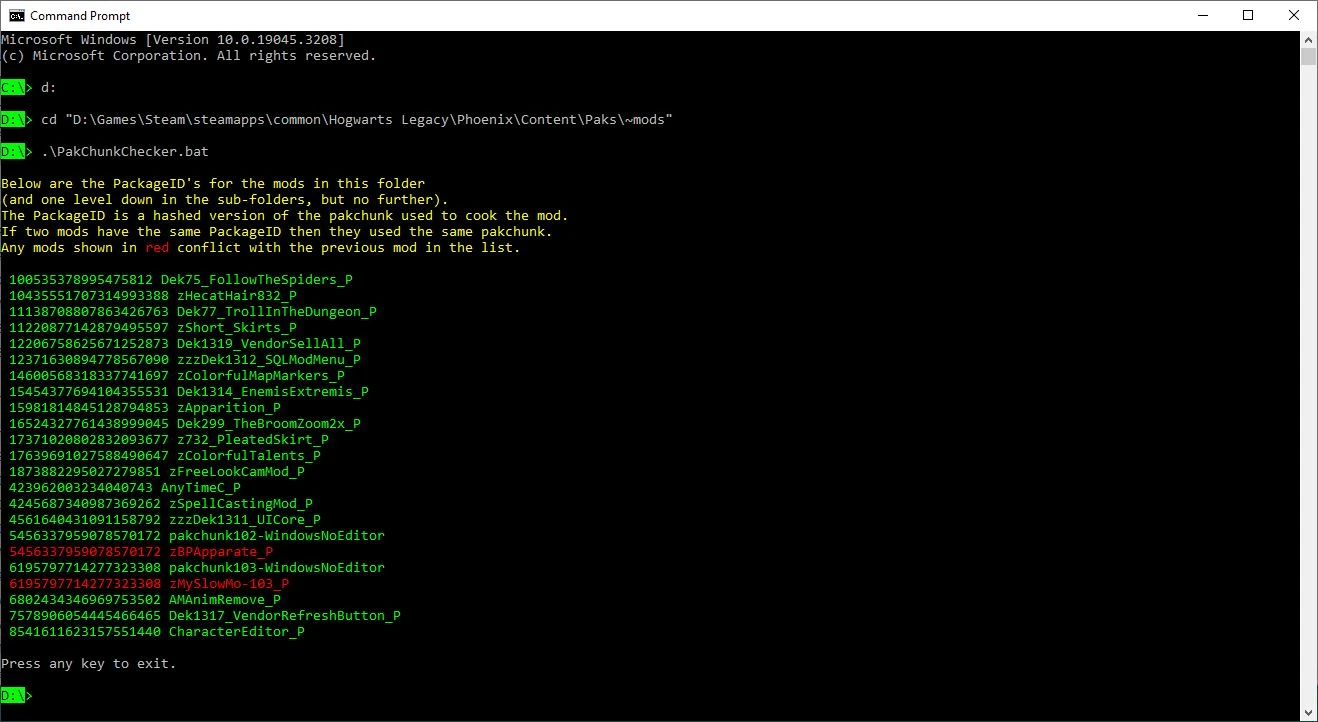
As you can see in the above example the zBPApparate_P mod (Blueprint Apparate Modloader) conflicts with pakchunk102-WindowsNoEditor (which is the mod I just created). They both have the same PackageID (which is a hashed copy of the pakchunk number). If two mods have the same PackageID then they must have been cooked using the same pakchunk number.
We can't usually tell what pakchunk was used (because the hash function can't be reversed) but in this case we can tell (from the filename, and because I just created it) that pakchunk102-WindowsNoEditor used pakchunk 102 so the zBPApparate_P mod must have also used pakchunk 102. I must therefore use a different pakchunk for my mod.
My zMySLowMo-103_P mod also conflicts with pakchunk103-WindowsNoEditor (which is an earlier version of the same mod which I hadn't bothered to rename and forgot to delete).
Just delete PakChunkChecker.bat from your ~mods folder. You can also delete the MANIFEST folder unless you've installed my Mod Merger Checker, in which case leave MANIFEST alone or you'll break that mod.
Conflicts
If you find any mods with conflicts please report them in the POSTS section so the community becomes aware of them. Thank you! 😘
Known Issues
This script searches your ~mods folder (and all the sub-folders), but mods placed one folder up from there (i.e. in the Paks folder) will also be loaded into the game and won't be found by this script. If you've put any mods in your Paks folder you should move them to your ~mods folder.
Acknowledgements
Thank you to Menv for UEcastoc, which my script uses to generate the manifests.
Tool that uses Menv's https://github.com/gitMenv/UEcastoc/releases tool locatied in the /cpp/main.exe .... once you open the mod manager it will need you to go to settings after clicking off the red box that should appear on first run. Once in settings navigate to your mods folder for Hogwarts and drag and drop the mods folder to the settings asking for the folder. Then navigate to the main.exe location and drag and drop that as well.
When this is done and all your conflicting mods are installed(Chunk id not mods that modify the same assets) click scan and all your utoc mods will appear. click fix and when they all turn green run the game and they should no longer crash the game.
User Guide 1. Download this mod and Menv's UEcastoc tool(link in requirements) and unpack both files somewhere. 2. Open the UnrealModManager and click off the red box that appears on the first run and go to the settings section in the mod manager. 3. Navigate to the folder where your mods for Hogwarts are stored, drag and drop the ~mods folder into the settings section that asks for the folder. 4. Navigate to the location of the main.exe file(\UEcastoc-1.0.1\cpp\main.exe) and drag and drop it into the settings section as well. 5. Exit settings and click the "Scan" button in the mod manager. 6. All of your utoc mods should appear. Click "Fix." 7. When all the mods turn green, run the game, your mods using the same chunk should no longer crash the game.
*always scan before clicking fix *always backup first
Spoiler:
Show
RE-UE4SS for Hogwarts Legacy by Narknon UE4SS is a Lua scripting system, blueprint modloader and live debugger for UE4 games. Nexus mirror of latest UE4SS Release for Hogwarts Legacy.
UE4SS is a Lua scripting system, blueprint mod loader and live debugger for UE4/5 games. Check out the GitHub Repository for more information.
1) Download the File. 2) Extract the file with 7zip/WinZip/WinRar. 3) Drag and drop into your Hogwarts Legacy Directory in the following locations.
Make sure you have completely removed the old version of the Mod
Spoiler:
Show
SQL Mod Menu by Dekita ALL your favourite database mods in one place, wrapped in a beautiful user interface, able to be toggled at will... SQL Mod Menu allows users to set/toggle SQL operations (database mods) to be triggered at runtime!!
Features:
Run SQL Operations & Queries on the game database
Set SQL Operations to run at runtime
Easily toggle active 'SQL Mods'
No need to merge SQL mod files
No need to update your SQL mods after each game patch
UI resembles default game menus and elements
50+ Default Database Mods!!!
Default Database Mods Include:
Godmode::HP
Godmode::Defense
Godmode::Damage
No Random Gear (always max gear stats)
x99 Plants&Potions Limit
Unlock Alohamora III
Unlock Unforgivables
Unlock Learned Spells
Hogwarts Express::Morning Schedule
Hogwarts Express::Evening Schedule
Hogwarts Express::Extra Schedule
Wandering Graphorn
Wandering Phoenix
Wandering Beasts
Wandering Birds
Gain Knuts On Damaged
Lose Knuts On Cast Spell
Max Wiggenwelds
Max Potions&Plants
Max Ingredients
MANY MORE!
KNOWN ISSUES: Need to reload world/game to get certain active mod / SQL changes to take effect. This mod uses pak chunk 1312 and may be incompatible with other mods that do so. Old version used pak chunk id 72.
REQUIREMENTS / HOW TO USE: UICore - ALWAYS REQUIRED - Regardless of chosen modloader. A modloader such as UE4SS or Apparate Modloader (recommended) is required to use logic mods. DONT LOAD THE SAME MOD IN BOTH MODLOADERS
With Apparate Modloader: Install this mods .pak, .utoc, and .ucas files to Hogwarts Legacy\Phoenix\Content\Paks\~modsPress F8 (when in game) to open the modloader menu, type DekSQLModMenu This mod should now be listed within the apparate modloader menu.NOTE: If your having trouble getting the mod working with apparate modloader, try renaming the mod files to have a ! in front of their name. This seems to be a priority issue when using a lot of mods.
Spoiler:
Show
IMPORTANT!!!: With the exception of Icon Bug Fix (This needs to always be in your ~mods folder), Bugfixes are only meant to be installed if you encounter a bug(s). They are not meant to be installed if you aren't encountering said bug(s). It's also not good practice to leave a bugfix installed after your issue has been resolved in-game.
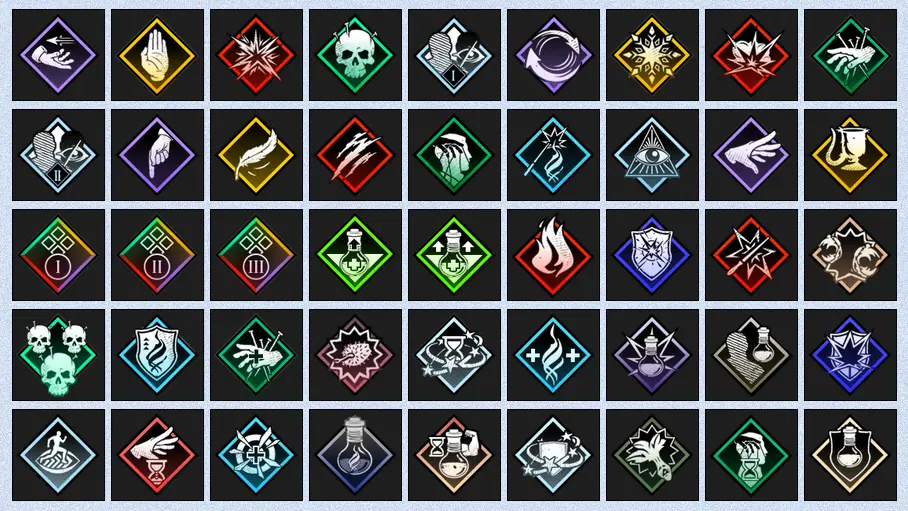
There's a Data Table inside the game files which lists all the icons used in the game. If a modder creates new icons they must add them to this list or they won't show up in the game. Unfortunately, if two mods both contain the icon Data Table they will conflict and one mod will break the other. This results in the new icons showing up with a white "!" inside a red triangle (see the pic in the banner above).
This mod will fix that problem by gathering all the new icons in one place.
When new mods emerge which add more icons I will update this mod.
Installation and Usage
I would recommend installing the mod manually as described below. You should be able to install the mod automatically using Vortex if you like (then skip to step 4 below), but Vortex can be a bit unreliable with Hogwarts Legacy mods (it doesn't always delete mods properly) so beware!
Download this mod.
Unzip the contents.
Move the .utoc, .ucas, and .pak files to the Steam\steamapps\common\Hogwarts Legacy\Phoenix\Content\Paks\~mods\ folder.
That's it!
How to Un-install
Either:
If you installed it via Vortex: Disable or Uninstall it via Vortex. BUT also CHECK that it's gone from the ~mods folder afterwards.
Delete the .utoc, .ucas, and .pak files from the ~mods folder.
If you know of any others with broken icons please let me know in the POSTS section.
Conflicts
This mod uses pakchunk 999. You can check if that conflicts with any of your existing mods by running my PakChunk Checker batch script after you've installed this mod. If it does conflict, you can fix it using the Chunk ID Conflict Manager.
Spoiler:
Show
Prof Fig Final Repository Bug Fix II by icouldifiwantedto A simplified fix for the game-breaking Prof Fig Final Repository Bug (HL-8823 / HL-9020) which prevents players from talking to Prof Fig and progressing to the Final Trial.
Introduction
This is a simple fix for official bug number HL-8823 (and duplicates like HL-9020) also known as the game-breaking "Prof Fig Final Repository Bug".
WARNING: This mod is not automatic. You have to hit ALT-f at the appropriate moment to make it work. (See the Usage section below.)
This is a massively simplified version of the original bug fix. (You will find the original here.)
I am not affiliated with WB Games or Avalanche.
Installation
I would recommend installing the mod manually as described below. You should be able to install the mod automatically using Vortex if you like (then skip to step 4 below), but Vortex can be a bit unreliable with Hogwarts Legacy mods (it doesn't always delete mods properly) so beware!
Download the mod.
Unzip the contents.
Move the .utoc, .ucas, and .pak files to the Steam\steamapps\common\Hogwarts Legacy\Phoenix\Content\Paks\~mods\ folder.
Type ProfFigBugFix in the little window and hit the Enter key on your keyboard.
The word ProfFigBugFix should disappear and reappear lower down in that window with an X next to it. If it doesn't - if it stays on the top line - then either a) you put the .utoc, .ucas and .pak files in the wrong folder, or b) one of your existing mods is already using pakchunk 1043. Use my PakChunk Checker to check that. If you have a pakchunk conflict see the Conflicts section below.
Press F8 again to close the modloader window.
Note that you only need to follow the above process once. From now on the mod will just work.
Usage
Hit ALT-f if the mission objective says "Talk to Professor Fig" but Fig has no interact prompt.
A message will appear on-screen to indicate whether the mod succeeded or failed.
How to Un-Install EITHER: If you installed it via Vortex: Disable or Uninstall it via Vortex. BUT also CHECK that it's gone from the ~mods folder afterwards.
OR: Delete the .utoc, .ucas, and .pak files from the ~mods folder.
Conflicts
This mod uses pakchunk 1043. You can check if that conflicts with any of your existing mods by running my PakChunk Checker batch script after you've installed this mod. If it does conflict, you can fix it using the Chunk ID Conflict Manager.
Spoiler:
Show
Bird In Hand Bug Fix by icouldifiwantedto A fix for the game-breaking Bird In Hand Bug (HL-19013) where the game doesn't progress after you defeat the poachers.
Introduction
This is a fix for official bug number HL-19013 also known as the game-breaking "Bird In Hand Bug".
This bug has two causes. From version 3 of this mod onwards, the mod will attempt to fix both.
WARNING: This mod is not automatic. You have to hit ALT-e at the appropriate moment to make it work. (See the Usage section below.)
I am not affiliated with WB Games or Avalanche.
Installation
I would recommend installing the mod manually as described below. You should be able to install the mod automatically using Vortex if you like (then skip to step 4 below), but Vortex can be a bit unreliable with Hogwarts Legacy mods (it doesn't always delete mods properly) so beware!
Download the mod.
Unzip the contents.
Move the .utoc, .ucas, and .pak files to the Steam\steamapps\common\Hogwarts Legacy\Phoenix\Content\Paks\~mods\ folder.
Type BirdInHandBugFix in the little window and hit the Enter key on your keyboard.
The word BirdInHandBugFix should disappear and reappear lower down in that window with an X next to it. If it doesn't - if it stays on the top line - then either a) you put the .utoc, .ucas and .pak files in the wrong folder, or b) one of your existing mods is already using pakchunk 1042. Use my PakChunk Checker to check that. If you have a pakchunk conflict see the Conflicts section below.
Press F8 again to close the modloader window.
Note that you only need to follow the above process once. From now on the mod will just work.
Usage
Hit ALT-e if the fight with the poachers has ended but the game does not progress.
The mod will attempt to fix the bug up to 20 times over the next 10 seconds.
If it fails you will see a message on-screen 10 seconds later to say that the bug fix failed. If so, let me know in the POSTS section.
If it succeeds you will see a message on-screen to say that:
EITHER: The bug fix succeeded, in which case the mission will resume immediately. Poppy will speak to Dorran and Elik, but since they already left they won't reply. (There's nothing I can do about that, but once you open the doors to the next room a cut-scene will start and the centaurs will reappear.) Eventually the next quest prompt will appear. It can take up to 20 seconds though so don't be alarmed if it doesn't appear right away.
OR: You need to save & reload your game. If so, do that. The quest will then progress. (You will be transported back to the room's entrance for some reason. Run over to the centaurs if you want to hear what they're saying.) PLEASE NOTE: If the door prompt doesn't appear within 30 seconds or so, press CTRL-ALT-e to force the door open.
Save the game and uninstall the mod.
How to Un-Install EITHER: If you installed it via Vortex: Disable or Uninstall it via Vortex. BUT also CHECK that it's gone from the ~mods folder afterwards.
OR: Delete the .utoc, .ucas, and .pak files from the ~mods folder.
Conflicts
This mod uses pakchunk 1042. You can check if that conflicts with any of your existing mods by running my PakChunk Checker batch script after you've installed this mod. If it does conflict, you can fix it using the Chunk ID Conflict Manager.
Spoiler:
Show
Locked Menu Bug Fix by icouldifiwantedto Unlocks menu items which are incorrectly greyed-out after you've completed tasks like the Deathly Hallows mission. V2 also unlocks the tool wheel.
Introduction
During tasks like the Deathly Hallows mission some of the menu items are disabled (they're greyed-out and cannot be selected). Once you've completed the mission they should be re-enabled but due to a bug in the game they sometimes remain disabled and there is no way for the player to re-enable them. This mod will do so. Version 2 will also re-enable the tool wheel.
Installation
You should be able to install the mod automatically using Vortex (then skip to step 4 below), but Vortex can be a bit unreliable with Hogwarts Legacy mods (it doesn't always delete mods properly) so I would recommend installing it manually as follows:
Download the mod.
Unzip the contents.
Move zUnlockMenuTabs-1012_P.utoc, zUnlockMenuTabs-1012_P.ucas, and zUnlockMenuTabs-1012_P.pak to the Steam\steamapps\common\Hogwarts Legacy\Phoenix\Content\Paks\~mods\ folder.
Type UnlockMenuTabs in the little window and hit the Enter key on your keyboard.
The word UnlockMenuTabs should disappear and reappear lower down in that window with an X next to it. If it doesn't - if it stays on the top line - then either a) you put the .utoc, .ucas and .pak files in the wrong folder, or b) one of your existing mods is already using pakchunk 1009. Use my PakChunk Checker to check that. If you have a pakchunk conflict see the Conflicts section below.
If it worked you should see a message on-screen saying that the mod has initialised.
Press F8 again to close the modloader window.
Press ALT-Scroll_Lock to unlock your menu.
Note that you only need to follow the above process once. From now on the key binding will just work.
Usage
Once installed, start the game and load your most recent save. Hit ALT-Scroll_Lock to unlock your menus.
How to Un-Install
Either:
1) If you installed it via Vortex: Disable or Uninstall it via Vortex. BUT also CHECK that it's gone from the ~mods folder afterwards. 2) Delete zUnlockMenuTabs-1012_P.utoc, zUnlockMenuTabs-1012_P.ucas, and zUnlockMenuTabs-1012_P.pak from the ~mods folder.
Conflicts
This mod uses pakchunk 1012. You can check if that conflicts with any of your other mods by running my PakChunk Checker batch script after you've installed the mod. If it does conflict, you can use the Chunk ID Conflict Manager to resolve the conflict.
Spoiler:
Show
Fluxweed Seed Bug Fix by icouldifiwantedto A bug fix for the Magic Neep Timothy Teasdale Fluxweed Seed Bug, where you're supposed to collect some Fluxweed Seeds but the shop doesn't have any, which prevents you from completing Prof Garlic's second quest.
Introduction
This bug usually occurs when you've used a mod to unlock seeds prior to starting the quest where you acquire the seeds. This breaks the quest and you'll arrive at the Magic Neep to find that Timothy Teasdale has no Fluxweed Seeds for you. Just to add insult to injury, he will still boast about having fully-stocked shelves! This "bug" can be solved using SQL Mod Menu, but that mod can be a little tricky to use. If you don't fancy that, try this mod instead.
Installation
You should be able to install the mod automatically using Vortex (then skip to step 4 below), but Vortex can be a bit unreliable with Hogwarts Legacy mods (it doesn't always delete mods properly) so I would recommend installing it manually as follows:
Download the mod.
Unzip the contents.
Move zMyFluxweedBugFix-1009_P.utoc, zMyFluxweedBugFix-1009_P.ucas, and zMyFluxweedBugFix-1009_P.pak to the Steam\steamapps\common\Hogwarts Legacy\Phoenix\Content\Paks\~mods\ folder.
Type MyFluxweedBugFix in the little window and hit the Enter key on your keyboard.
The word MyFluxweedBugFix should disappear and reappear lower down in that window with an X next to it. If it doesn't - if it stays on the top line - then either a) you put the .utoc, .ucas and .pak files in the wrong folder, or b) one of your existing mods is already using pakchunk 1009. Use my PakChunk Checker to check that. If you have a pakchunk conflict see the Conflicts section below.
If it worked you should see a message on-screen saying that the mod has initialised.
Press F8 again to close the modloader window.
Note that you only need to follow the above process once. From now on the mod will just work.
Usage
Once the mod is installed it will change the first item in Timothy Teasdale's inventory to Fluxweed Seeds. Just go and collect them. Once you've done that you will no longer need this mod, so hit F8 to bring up the Blueprint Apparate Modloader window and hit the X next to MyFluxweedBugFix. That will unload the mod. It's probably wise to do this otherwise you'll never have access to the item that's usually the first one in Timothy Teasdale's inventory. You can also uninstall the mod as described below.
How to Un-Install
Either:
1) If you installed it via Vortex: Disable or Uninstall it via Vortex. BUT also CHECK that it's gone from the ~mods folder afterwards. 2) Delete zMyFluxweedBugFix-1009_P.utoc, zMyFluxweedBugFix-1009_P.ucas, and zMyFluxweedBugFix-1009_P.pak from the ~mods folder.
Conflicts
This mod uses pakchunk 1009. That's the same pakchunk as my Dittany Seed Bug Fix mod. I used the same pakchunk deliberately because these two mods are not compatible with each other - you can't have both installed at the same time or they'll both try to change the same inventory item. Delete the Dittany Seed Bug Fix mod from your ~mods folder before using this mod.
You can check if that conflicts with any of your other mods by running my PakChunk Checker batch script after you've installed the mod. If it does conflict, you can use the Chunk ID Conflict Manager to resolve the conflict.
Spoiler:
Show
Dittany Seed Bug Fix by icouldifiwantedto A bug fix for the Magic Neep Timothy Teasdale Dittany Seed Bug, where you're supposed to collect some Dittany Seeds but the shop doesn't have any, which prevents you from completing the "Welcome to Hogsmeade" quest.
Introduction
This bug usually occurs when you've used a mod to unlock seeds prior to starting the quest where you acquire the seeds. This breaks the quest and you'll arrive at the Magic Neep to find that Timothy Teasdale has no Dittany Seeds for you. Just to add insult to injury, he will still boast about having fully-stocked shelves! This "bug" can be solved using SQL Mod Menu, but that mod can be a little tricky to use. If you don't fancy that, try this mod instead.
Installation
You should be able to install the mod automatically using Vortex (then skip to step 4 below), but Vortex can be a bit unreliable with Hogwarts Legacy mods (it doesn't always delete mods properly) so I would recommend installing it manually as follows:
Download the mod.
Unzip the contents.
Move zMyDittanyBugFix-1009_P.utoc, zMyDittanyBugFix-1009_P.ucas, and zMyDittanyBugFix-1009_P.pak to the Steam\steamapps\common\Hogwarts Legacy\Phoenix\Content\Paks\~mods\ folder.
Type MyDittanyBugFix in the little window and hit the Enter key on your keyboard.
The word MyDittanyBugFix should disappear and reappear lower down in that window with an X next to it. If it doesn't - if it stays on the top line - then either a) you put the .utoc, .ucas and .pak files in the wrong folder, or b) one of your existing mods is already using pakchunk 1009. Use my PakChunk Checker to check that. If you have a pakchunk conflict see the Conflicts section below.
If it worked you should see a message on-screen saying that the mod has initialised.
Press F8 again to close the modloader window.
Note that you only need to follow the above process once. From now on the mod will just work.
Usage
Once the mod is installed it will change the first item in Timothy Teasdale's inventory to Dittany Seeds. Just go and collect them. Once you've done that you will no longer need this mod, so hit F8 to bring up the Blueprint Apparate Modloader window and hit the X next to MyDittanyBugFix. That will unload the mod. It's probably wise to do this otherwise you'll never have access to the item that's usually the first one in Timothy Teasdale's inventory. You can also uninstall the mod as described below.
How to Un-Install
Either:
1) If you installed it via Vortex: Disable or Uninstall it via Vortex. BUT also CHECK that it's gone from the ~mods folder afterwards. 2) Delete zMyDittanyBugFix-1009_P.utoc, zMyDittanyBugFix-1009_P.ucas, and zMyDittanyBugFix-1009_P.pak from the ~mods folder.
Conflicts
This mod uses pakchunk 1009. That's the same pakchunk as my Fluxweed Seed Bug Fix mod. I used the same pakchunk deliberately because these two mods are not compatible with each other - you can't have both installed at the same time or they'll both try to change the same inventory item. Delete the Fluxweed Seed Bug Fix mod from your ~mods folder before using this mod.
You can check if it conflicts with any of your existing mods by running my PakChunk Checker batch script after you've installed the mod. If it does conflict, you can use the Chunk ID Conflict Manager to resolve the conflict.
Spoiler:
Show
Helm of Urtkot Lodgok Bug Fix by icouldifiwantedto A fix for the game-breaking Helm of Urtkot / Lodgok Bug (HL-851) where Lodgok's stuck in the Hog's Head and players can't progress the game.
Public Service Announcement
WB Games and Avalanche issued an update to the game on 06 June 2024. In the Patch Notes it states, "Fixed instance where Lodgok would occasionally remain stuck inside the Hogshead in Hogsmeade instead of traveling to the Witch’s Tomb, preventing player progression." So this problem might now be fixed. But I haven't confirmed that and their track record of fixing bugs isn't great...
Introduction
This is a fix for official bug number HL-851 aka the infamous game-breaking "Helm of Urtkot / Lodgok Bug". This is a BETA TEST version of the mod - it has worked for everyone so far but I can't guarantee that it will work for everyone. Please try it and let me know if it works. Thank you.
I am not affiliated with WB Games.
Awards
I am delighted to report that this humble mod took 4th place in Mod Of The Month for June 2023! Thank you to everyone who voted! 😁
Installation & Use
1a) Remove everything from the Steam\steamapps\common\Hogwarts Legacy\Phoenix\Content\Paks\~mods\ folder. Just put it all in another folder for now, but NOT the Steam\steamapps\common\Hogwarts Legacy\Phoenix\Content\Paks\ folder, NOR any sub-folder of that. A folder on your desktop might be best.
1b) If the ~mods folder doesn't exist, create it.
2) Manually download this mod and extract the PAK file from the ZIP file.
3) Move the PAK file to: Steam\steamapps\common\Hogwarts Legacy\Phoenix\Content\Paks\~mods\
4) Start the Hogwarts Legacy game and load your most recent save file.
5) Bring up your gear screen and check your health. If it ends with an "8" the mod has loaded okay. If it ends in any other number, the mod hasn't loaded. Go back and check steps 1-3 above.
6) Once the mod is correctly installed, IMMEDIATELY go to meet Lodgok on the hill behind Hogsmeade. Do not do anything else first! (It's okay to fast-travel.)
7a) If it works 🙂 please hit the ENDORSE button on this mod page, and feel free to leave a comment in the POSTS section.
7b) If not 😭 please submit a BUG REPORT and I'll try again.
When you're done
Once you've followed Lodgok to the Tomb Entrance and completed your conversation with him, you won't need this mod any more (unless you decide to go back to an earlier point in the game for some reason). So just delete the PAK file from Steam\steamapps\common\Hogwarts Legacy\Phoenix\Content\Paks\~mods\ and put all your existing mod files back again.
Conflicts and Game Versions
This mod alters and replaces the game's PhoenixShipData.sqlite SQL database file. If you have any other SQL mods installed they might prevent this one from working correctly. That's why it's safest to just remove all your mods while you run this one. But if you're positive that you don't have any SQL mods you could leave your existing mods in place and just see if this one works. (If your gear screen in-game shows a health number ending in "8" you should be good to go.) Alternatively, if you do have SQL mods, you could attempt to make this one load after those, by changing the name to "zzzzzHelmofUrtkotLodgokBugFix_P.pak". (Again, if your gear screen in-game shows a health number ending in "8" you should be good to go.) I haven't included these options in the instructions above because I wanted to keep things simple, but if you know what you're doing you could give them a try.
This mod also assumes you're running a fully-patched game (up to and including the 04 May 2023 patch). If you're not, give it a try anyway. It will almost certainly still work. But definitely delete it afterwards.
Spoiler:
Show
Percival Rackham Trial Bug Fix by icouldifiwantedto A fix for the game-breaking Percival Rackham Trial Bug (HL-12745) which prevents players from viewing the pensieve cut-scene and progressing the game. Winner of "Mod of the Month"!
Versions
Version 4.0
Only use this one if version 3.0 doesn't work!
Version 3.0
Combines my original fix and the official fix into a single "brute force" mod.
Version 2.0
The official solution from the 02 June 2023 patch.
Version 1.0
My original version. Only works on games saved before activating the pensieve.
There are several versions of this mod, each of which does slightly different things. That's because the Percival Rackham Trial Bug has more than one cause. For the vast majority of people (maybe 99.9%) the bug will be fixed by Version 3 of this mod. So that is the default version and the version I recommend. But if that doesn't work you can try Version 4, and if that doesn't work try Version 1 (which only works for save-games made before you activate the pensieve). Version 2 is the official bug fix but it's included in Versions 3 & 4 so there's little point in trying version 2. You will find all these versions in the Files tab.
Alternative Method using SQL Mod Menu (for experts only)
If you have SQL Mod Menu installed and you know how to use it (it can be very tricky for beginners) then you can implement Version 3 of this bug fix via SQL Mod Menu if you prefer. The recipe is inside this Article. If not, the installable mod described below is simpler for most people.
Awards
I am delighted to report that this humble mod won Mod Of The Month for May 2023! Thank you to everyone who voted. You're the best. 😁
Introduction
This is a fix for official bug number HL-12745 (and duplicate bug reports like HL-13144, HL-13070, HL-12826, HL-12776, HL-12442 and HL-654) also known as the game-breaking "Percival Rackham Trial Bug" or "First Trial Bug" or "Pensieve Cut-Scene Bug".
I am not affiliated with WB Games.
Installation & Use
The process below should work for everyone. (As of 15 Sep 2023, this mod has over 5000 downloads and a 100% success rate!) This is the procedure that I recommend. Follow it exactly, step by step, and you'll be fine.
But if you use Vortex to install your mods automatically and you absolutely insist on using Vortex to install this one, then click on this link for an article describing how to do it. I have not tested that procedure though, and I don't recommend it unless you really know what you're doing.
Here's the recommended procedure:
1a) Remove everything from the Steam\steamapps\common\Hogwarts Legacy\Phoenix\Content\Paks\~mods\ folder. Just put it all in another folder for now, but NOT the Steam\steamapps\common\Hogwarts Legacy\Phoenix\Content\Paks\ folder, NOR any sub-folder of that. A folder on your desktop might be best.
1b) If the ~mods folder doesn't exist, create it.
1c) OPTIONAL: At this point, if you like, you can try running the game to see if the problem is fixed. For some people the official fix would actually work, but one of their mods is preventing it from doing so. If you're one of those people then removing your mods is all you need to do. So give it a try if you like. If it doesn't work, or if you didn't have any mods installed, or if you want to just fix it for sure, proceed to step 2.
2) Manually download this mod and extract the PAK file from the ZIP file.
3) Move the PAK file to: Steam\steamapps\common\Hogwarts Legacy\Phoenix\Content\Paks\~mods\
4) Start the Hogwarts Legacy game and load your last "Percival Rackham Trial" save file.
5) Bring up your gear screen and check your health. If it ends with a "9" the mod has loaded okay. If it ends in any other number, the mod hasn't loaded. Go back and check steps 1-3 above.
6) Once the mod is correctly installed, the cut-scene will either start immediately or as soon as you activate the pensieve. 🤞
7a) If it works 🙂 please hit the ENDORSE button on this mod page, and feel free to leave a comment in the POSTS section.
7b) If not 😭 please i) try again using Version4 of this mod which you will find on the Files tab and if that doesn't work, ii) try again using Version1 of this mod (with a save file made before you activated the pensieve). If neither of those work, please submit a BUG REPORT telling me what happened, and I'll try to fix it.
When you're done
Once you've got past the pensieve cut-scene you won't need this mod any more (unless you decide to go back to an earlier point in the game for some reason). So just delete the PAK file from Steam\steamapps\common\Hogwarts Legacy\Phoenix\Content\Paks\~mods\ and put all your existing mod files back again.
Crashes
If the game refuses to start after you've installed this mod, there could be two explanations:
You are running an earlier version of the game. The original (07 Feb) version of the game is known to crash with SQL mods designed for the latest (02 Jun) version of the game. If so, let me know and I will create a special version of the mod for you.
You are running a cracked version of the game. For some reason these crash when SQL mods are installed.
Conflicts
This mod alters and replaces the game's PhoenixShipData.sqlite SQL database file. If you have any other SQL mods installed they might prevent this one from working correctly. That's why it's safest to just remove all your mods while you run this one. But if you're positive that you don't have any SQL mods you could leave your existing mods in place and just see if this one works. (If your gear screen in-game shows a health number ending in "9" you should be good to go.) Alternatively, if you do have SQL mods, you could attempt to make this one load after those, by changing the name to "zzzzzPercivalRackhamTrialBugFix_P.pak". (Again, if your gear screen in-game shows a health number ending in "9" you should be good to go.) I haven't included these options in the instructions above because I wanted to keep things simple, but if you know what you're doing you could give them a try.
When you unlock a locked door the padlock flies off and the door can be opened. But when you come back later you'll sometimes find that the door has locked again (i.e. refuses to open) and the padlock hasn't respawned so you have no way to unlock it. The door to the Headmaster's balcony, for example.
This mod will unlock those doors.
Please note that this mod will only open bugged doors. To open locked doors use Skip Alohomora or Open All Locks.
Installation
I would recommend installing the mod manually as described below. You should be able to install the mod automatically using Vortex if you like (then skip to step 4 below), but Vortex can be a bit unreliable with Hogwarts Legacy mods (it doesn't always delete mods properly) so beware!
Download the mod.
Unzip the contents.
Move the .utoc, .ucas, and .pak files to the Steam\steamapps\common\Hogwarts Legacy\Phoenix\Content\Paks\~mods\ folder.
Type OpenBuggedDoors in the little window and hit the Enter key on your keyboard.
The word OpenBuggedDoors should disappear and reappear lower down in that window with an X next to it. If it doesn't - if it stays on the top line - then either a) you put the .utoc, .ucas and .pak files in the wrong folder, or b) one of your existing mods is already using pakchunk 1045. Use my PakChunk Checker to check that. If you have a pakchunk conflict see the Conflicts section below.
Press F8 again to close the modloader window.
Note that you only need to follow the above process once. From now on the mod will just work.
Usage
Hit ALT-o if you encounter a bugged door. You should hear a lock opening sound and the door should swing open.
How to Un-Install EITHER: If you installed it via Vortex: Disable or Uninstall it via Vortex. BUT also CHECK that it's gone from the ~mods folder afterwards.
OR: Delete the .utoc, .ucas, and .pak files from the ~mods folder.
Conflicts
This mod uses pakchunk 1045. You can check if that conflicts with any of your existing mods by running my PakChunk Checker batch script after you've installed this mod. If it does conflict, you can fix it using the Chunk ID Conflict Manager.
Spoiler:
Show
Ultra Plus - Ray Reconstruction - Performance and Hotfixes by sammilucia Better visuals AND performance hotfixes. Fixes stutters, missing LODs (20-40% higher FPS outside), better in-game lighting, fixes noisy RT reflections, fixes low-end PCs! Completely disables Chroma DLL (SLPF).
Support and Supporting
Join The Ultra Place Discord For the fastest support and releases. See you there!
If you'd like to support my efforts please say 'thanks' in Posts or join the community on Patreon 😊
Introducing v10!
Now with Ray Reconstruction, and function keys for Lighting Presets and toggle other features. This does not use ReShade, it modifies the game directly.
Note v10 is currently in beta and seems to be performing well! However there will be some bugs here and there. If you need any help, please join The Ultra Place Discord with 800 members and growing 😊
>>> See Usage Guide in green below <<<
About Ultra+
Fixes all performance problems:
Improving raytracing performance, transfiguration courtyard, etc.
Improves performance in general with no visual quality loss by tuning Unreal
Fixes many hitches/stutters (WIP for v10)
Fixes slow texture loading
Completely disables Chroma SDK plugin in the engine configuration (the replacement SLPF DLL is not necessary)
Forces cut-scene visuals for the whole game with no performance cost
Enables many features not in the vanilla game
F3: Cycle between several Lighting Presets (VanillaTweaked, Realism, Fantasy, Hary's, Fairytale, Darkmoor (replaces Sherlock), Vanilla)
F4: Cycle between SSGI (screen space global illumination), RTGI, RTAO, GTAO, SSAO (ground truth ambient occlusion)
F5: Toggle vignette off/on
F6: Cycle through DLSS presets A, C, E
F7: Toggle fog off/on
F8: Toggle ray traced skylight off/on
F9: Toggle ray traced water off/on
F12: Toggle Ray Reconstruction (if you're using DLSS) off/on
0 (zero number key): Cycle ray traced reflection shininess from "physically-based", "medium", and "full"
(All options are saved automatically and restored next play)
Enables global illumination
Enables raytraced shadows for the whole map—not yet implemented
Improves screen space reflection quality
Fixes raytraced reflection noise
Fixes the black floor
Better light shafts
Fixes blurriness by sharpening textures
Enables higher quality TAA
Improves sky and clouds above cut-scene quality
Enables more particle FX (bugs, butterflies, dust, etc.)
Integrates particles FX with raytracing (spells, rain, butterflies, etc. at High and Epic)
Hand-tunes all in-game graphics to look amazing!
Additional Lighting Mods
These are now included with the main download (v10+ only). Cycle through Lighting Presets with F3. It will be saved automatically and restored next time you play.
How Does it Look?
Alpha build of v10 using VanillaTweaked lighting:
Kind Words
"Just wanted to say, out of all the mods and tweaks I've been doing to get RTX and Ray Tracing features to work with decent performance in this game, this one actually did it." — TheJuggler17
"You are legitimately a godsend, thank you so much. This is the ONLY fix that works for me and solves all of my technical issues with this game, not to mention that it makes the game look so much better without a huge performance hit" — ChristianLangano
"Thank you again for all the effort you're putting into this clearly essential mod for many users." — Korzun
About this Guide
If you're having problems running Hogwarts Legacy with or without Ultra+, this guide will have the answer. Please remember to endorse if it's useful.
It's common to find problems in the game's config files that only show when activating the rest of Unreal Engine 4 (which Ultra+ does). Please see the Sticky Post for easy fixes.
If you're not having problems, you hopefully won't need most of this page — go to Quick Start 😊
Ultra+ can be tuned to your liking, see Extra Options below.
Quick Start
Delete old versions of Ultra+ pak files. Also delete Ultra+ lighting paks (Ultra Fog is okay to keep)
Copy everything in the zip to your Hogwarts Legacy folder
Calibrate your black point: In the game's Graphics Settings > two thirds down > Image Calibration, This makes the mod darker or lighter
Important: Choose the texture quality based on your GPU memory. Go to Graphics Settings > Texture Quality, and choose: - 4GB vram —> Choose Low - 6GB vram —> Choose Medium - 8-10GB vram —> use High - 12GB+ vram —> use Ultra
Note: Texture Quality doesn't make a huge difference to how Ultra+ looks. You can play well with 4GB vram! 😊
If you any need help please see the Troubleshooting sticky Post, or join the Discord. Remember to endorse if you like it 😊
v10 In-game's Graphics Settings
You control Ultra+ two ways: Through function keys and via the existing in-game Graphics menu.
Here is everything the in-game graphics settings in the pak version do:
Function Keys
F3: Cycle between several Lighting Presets (VanillaTweaked, Realism, Fantasy, Hary's, Fairytale, Darkmoor (replaces Sherlock), Vanilla)
F4: Cycle between SSGI, RTGI, RTAO, GTAO (ground truth ambient occlusion), SSAO (screen space ambient occlusion)
F5: Toggle vignette off/on
F6: Cycle through DLSS presets A, C, E
F7: Toggle fog off/on
F8: Toggle ray traced skylight off/on
F9: Toggle ray traced water off/on
F12: Toggle Ray Reconstruction (if you're using DLSS) off/on
0 (zero number key): Cycle ray traced reflection shininess from "physically-based", "medium", and "full"
Graphics Settings > Page 1
Colour fringe is force-disabled
(Recommended) Motion blur can be enabled/disabled as normal, however it's no longer a visual effect — it's altered to smooth the frames (just like a real camera does). When it's enabled you shouldn't notice, except the game looks smoother.
Lens flare is enabled or disabled depending on the Lighting Preset (F3)
Film grain is force-disabled except for Darkmoor, Vanilla, and VanillaTweaked Lighting Presets
Graphics Settings > Page 2 > Raytracing
If RTAO is disabled and ray tracing is enabled, Ultra+ will force RTGI which is not available in the vanilla game
RT Reflections on or off (on is required for raytraced water)
RT Shadows on or off. RT Shadows are badly broken in some areas of the vanilla game, and I haven't yet been able to fix them
All raytracing disabled --> use SSGI
Raytracing: High performance impact
Ultra RT shadows for entire map (not yet implemented in v10) Detailed RT reflections (much improved from vanilla) Highest quality RTAO, RTGI, and RT shadows Ray traced particle FX (spells, etc.) Ray traced water defaults to on
High Exactly the same, but ray traced water defaults to off
Med Performance RT reflections (much improved from vanilla)
Low Performance RT reflections RT shadows around the player (50 metres)
View Distance: High impact Affects vegetation, grass, and building draw distances
Ultra Now same quality as cut-scenes (FPS cost is much more reasonable with v10)
High Boosted view-distance (1.3x to 2x)
Med Vanilla view distance (1.0x)
Low Performance view distance (0.5x)
Effects: Medium Impact Increases or reduces the quality of:
Screen space reflection quality (water and reflective/shiny surfaces)
Particle effects quality (including fire and spells)
Fog resolution is increased or reduced
Foliage: Medium impact Controls density and stop distance of grass and foliage (which is also affected by View Distance)
Ultra Similar to cut-scenes but faster, with a much farther draw distance
High Similar to Vanilla Ultra but with performance improvements
Med Performant fog
Low No fog
Sky: Low impact Affects sky and clouds, but also lighting cast onto ground
Ultra Same as cut-scene, gorgeous clouds and light thrown onto ground (1.0x internal resolution)
High Similar to cut-scene with (0.8x) performance-focused improvements
Med Fast version of Ultra+ sky (0.7x)
Low Performance (0.5x). Interestingly this is about "High" in Vanilla!
Full instructions if you want the best performance possible (it's worth it)...
Install the game on an SSD wherever possible, it needs a fast disk
Run the game at least once
(Required) Copy ~UltraPlus_xxxx.pak to C:\Program Files (x86)\Steam\steamapps\common\Hogwarts Legacy\Phoenix\Content\Paks (not the ~mods folder)
(Required) Set your PoolSize by changing Graphics Settings > Texture Quality
(Recommended) For the smoothest gameplay set a maximum FPS in your GPU's control panel (only use VSync as a last resort)
Make sure not too much is running in the background in Windows
(Required) On the first graphics settings page about 2/3 down, click Image Calibration and follow the instructions. This sets your black point. If the game is too dark for you, come back to this page and nudge it around
(Recommended) in Windows -> Display Settings -> Graphics Settings (at the bottom) -> Enable Hardware-accelerated GPU scheduling. Also enable Variable refresh rate if you have it
(Strongly recommended) Disable Control Flow Guard in Windows. Click Start > type Exploit Protection > Click Program Settings > Click Add program to customize > click Add by program name > type HogwartsLegacy.exe > Scroll down to Control flow guard (CFG) > Click Override > Switch it to Off. Done! You should get even fewer hitches. If the game was running you need to restart it
(Recommended) If you have an Nvidia card, install the latest Ray Reconstruction DLL to Hogwarts Legacy\Engine\Plugins\Runtime\Nvidia\DLSS\Binaries\ThirdParty\Win64
(Required) Raytraced reflections require DLSS or DLAA, or FSR in this game
(FYI Ultra+ disables Razer colour LED syncing with the game. If you own Razer hardware and want the coloured LEDs, please let me know in Posts or the Discord)
(Optional) Enable resizable bar if you can. This game copies a LOT from CPU to GPU. Unreal Engine and most streaming games require PCIe bandwidth
(Recommended) disable PCI Express Link State Power Management in Windows Power Plans (here's how
(Recommended) If you have an AMD CPU, update your AMD chipset drivers
(Recommended) If you have an AMD CPU, try disabling Core Isolation
Read the sticky Posts for fixes to all known problems
About flush-mem I've included a basic tool that flushes unused memory in Windows. A lot of people recommend ISLC, however if ISLC is sitting in the background flushing memory while the game is running, this will cause problems. Either set ISLC to manual mode while the game is running, or just use flush-mem.
I also do not recommend reducing the system time resolution to 0.5 in ISLC.
About clear-shader-caches As the game has been upgraded, or for some unknown reason, some people's games develop problems in the shader cache files. This tool is not intended to be run all the time. But if nothing else has worked, it's super useful to try. The game does not build all shaders (even if you tell it to) so it can make performance *worse* for the first ~1 hour of playing after clearing caches.
Low GPU usage?
Switching to task manager lowers the priority of the game so will show you lower GPU - you need to use MSI Afterburner, MangoHUD, or UUU for accurate GPU readings
GPU usage % is not completely accurate in Unreal Engine
You can add commands to your %LocalAppData%\Hogwarts Legacy\Saved\Config\WindowsNoEditor\Engine.ini.
At the bottom type[SystemSettings] then add these commands under there:
Extra Option 1 - Fix micro-stutters This comes with a performance cost, however if you're sensitive to microstutters it helps (however I would recommend setting a max FPS cap in your GPU control panel before trying this):
r.FinishCurrentFrame=1
Extra Option 2 - Sharper or Softer Image If you want a sharper image, try changing the default r.Tonemapper.Sharpen=0.5. Values of 0.5 to 1.2 work well, e.g:
r.Tonemapper.Sharpen=1.0
Extra Option 6 - User Interface (UI) Scaling To make the UI smaller, add the following to the Engine.ini just above [SystemSettings], where '0.85' is your desired percentage of UI size. 0.70 to 0.95 work well. This affects all HUD and all UI elements.
Stuttering and Low Performance Fix (SLPF) mod — Ultra+ completely disables the Chroma SDK Unreal Engine plugin. However there is no harm in installing this.
Uninstalling
Delete the Hogwarts Legacy\Phoenix\Paks\~UltraPlus*.pak file
I would like to thank the many great people who have and continue to help test Ultra+. This game is huge and far too much for just one person to test, so this mod wouldn't be possible without your invaluable feedback.
I'd like to give special thanks to (I know I'm going to miss some people 😬)
There are many more, in 3000+ Posts I know I've missed some (I'm sorry), but I appreciate everyone one of you! Ultra+ simply wouldn't have gotten to this stage without you taking the time to post! 😊
Changelog
See Changelog near the top of the mod description for the latest changes.
Spoiler:
Show
Spoiler:
Show
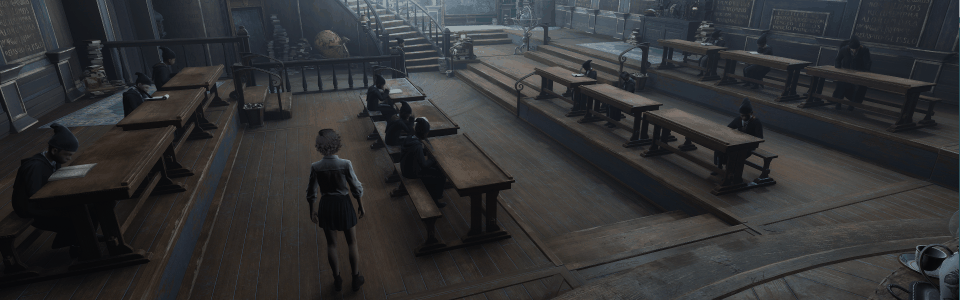
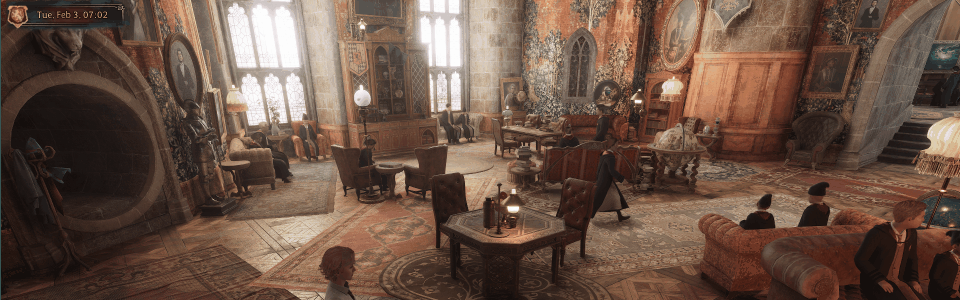
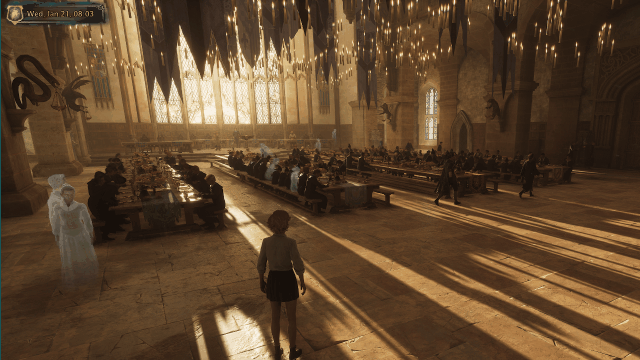
Immersive ModPack by icouldifiwantedto Combines and significantly improves my Immersive Meals, Immersive Classes, Immersive Common Rooms and Immersive Hogsmeade mods.
Versions
See the "Changelogs" dropdown just above.
Description
I've taken things as far as I can with the modular approach to my Immersive series of mods. Sadly it isn't practical to implement further improvements via modules. All future development will take place via this Immersive ModPack, which combines my Immersive Meals, Immersive Classes, Immersive Common Rooms and Immersive Hogsmeade mods into one (and implements lots of improvements). This mod is not compatible with those prior Immersion mods, so they must all be deleted before you install this one. This mod is also not compatible with NPC Schedule Enhanced (Better AI) by Khione. You must also delete the changes that those mods made to your zMergedMods.pak file (by recreating it without those mods) before incorporating the SQL .pak file from this mod.
v1.1.0beta is marked as a beta version because this is a HUGE mod with lots of moving parts. It's impossible for one person (me) to fully test it.
Memory Requirements
Moving all the named-NPC's around can use up a lot of RAM and/or VRAM. If you have a low spec system (less than 32GB RAM or 12GB VRAM) you might run out of memory. If that happens the game should switch to using virtual memory, but it has a habit of simply crashing instead. If you find that this mod crashes your PC it's probably because you don't have enough memory.
Requirements - this is IMPORTANT!
This mod requires the following other mods to be installed:
Emote with any npc - must be installed so beds can be used, but activating it in the modloader is optional.
Time Dilator is required because by default one game-day passes in 48 real-world minutes. In other words time in the game passes 30X faster than time in the real world. This is a problem, because it can easily take 2 real-world minutes for Students or Professors to travel from one part of the castle to another. In game-time that's 2 x 30 = 60 in-game minutes! There is no way to create a realistic daily schedule if it takes an hour to travel from one class to another, or an hour to get to the Great Hall for lunch and an hour to get back. It is therefore essential that you install the Time Dilator mod and use it to set one game-day = 3.2 real-world hours (or more, though 3 will probably do). That way it will take 15 in-game minutes (or less) to walk from one side of the castle to another, which is more workable. This mod will not work correctly unless you install Time Dilator.
New or Improved Features
v1.1.0) New: Named-NPC's now sit down for meals in the Great Hall.
v1.1.0) New: Revamped class timetable to incorporate new classes.
v1.1.0) Added: Nurse Blainey now attends weekday breakfast and dinner in the Great Hall.
v1.1.0) Added: Flying Class (on the Quidditch Pitch).
v1.1.0) Added: Alchemy Class.
v1.1.0) Added: Muggle Studies Class.
v1.1.0) Added: Theory Class (in Fig's Classroom).
v1.1.0) Added: Students to a few bathrooms. (Will improve later.)
v1.1.0) Added: Practical Astronomy Class (in the Observatory from 2130-2215).
v1.1.0) Added: Prefect supervision to all Classes (in case the Prof is on a mission).
v1.1.0) Fixed: Weekend Classes are no longer required, so I scrapped them.
v1.1.0) Fixed: Bug where students would leave if the MC approached the classroom door.
v1.1.0) Fixed: DADA Mission Bug (students sitting in mid-air).
v1.1.0) Fixed: Beasts Class (added places for students to stand).
v1.1.0) Fixed: Herbology Class (added places for students to sit).
v1.1.0) Fixed: Divination Class (added places for students to sit).
v1.1.0) Fixed: DADA Class (two-person desks now seat two).
v1.1.0) Fixed: Charms Class (two-person desks now seat two).
v1.1.0) Fixed: History Class (two-person desks now seat two).
v1.1.0) Fixed: Potions Class (added places for students to sit).
v1.1.0) Fixed: Transfiguration Class (two-person desks now seat two).
v1.1.0) Fixed: Faculty Staff Room (profs can sit and malfunctioning chairs are disabled).
v1.1.0) Fixed: Headmaster now sits in the Headmaster's Chair in the Great Hall.
v1.0.0) New: Young students now attend meals in the Great Hall.
v1.0.0) New: Meal times now match the meal sound FX (students chatting and eating).
v1.0.0) New: Professors now attend breakfast & dinner (not lunch).
v1.0.0) New: Ghosts now attend breakfast & dinner (not lunch). Some pretend to eat. Others just stand chatting.
v1.0.0) New: When mealtime ends, Professors and some students actually get up and leave.
v1.0.0) New: Some students use the Great Hall for "self-study" and socialising between meals (like we see in the HP movies). Food is sometimes provided.
v1.0.0) New: Students and Professors attend up to 8 classes per day on weekdays plus "Remedial Classes" at weekends.
v1.0.0) New: Prefects assist with classes. When the Prof is on a quest the Prefect supervises the class.
v1.0.0) New: When students have a free period they will socialise in a common area somewhere near the next class.
v1.0.0) New: Professors gather in the Faculty Staff Room after dinner (2000-2200).
v1.0.0) New: Professors go to their bedrooms at midnight (or earlier if they have nothing else to do).
v1.0.0) New: Common Rooms are busy at certain times of the day, quiet at others.
v1.0.0) New: Students leave the Common Rooms to attend meals.
v1.0.0) New: Named NPC's actually spend time in the Common Rooms.
v1.0.0) New: Young students are now present in all the Common Rooms.
v1.0.0) New: In the evening some students change into pyjamas.
v1.0.0) New: Students now lie down on beds.
v1.0.0) New: All Professors and all named-NPC students go to Hogsmeade on Saturdays.
v1.0.0) New: They undertake various shopping activities, meet for a chat, or a cup of tea or lunch.
v1.0.0) New: Named-NPC's can now sit down for a haircut at Madam Snelling's salon.
v1.0.0) New: From 1030-1130 on Sat all the female NPC's gather in the Hogsmeade garden to socialise.
v1.0.0) New: The middle and top floors of the Three Broomsticks now have tables for named-NPC's to eat & drink.
v1.0.0) New: From 1500-1600 on Sat all the male NPC's gather in the Hogsmeade garden to socialise.
v1.0.0) New: Added three new NPC's [only previously used in cutscenes]: 1) Constance Dagworth, a 5th year Ravenclaw. Possibly related to the Dagworth-Grangers and hence a distant ancestor of Hermione Granger. 2) Gertrude Wigley, a 1st year Ravenclaw with bows in her hair, and 3) Priscilla Wakefield, a 5th year Slytherin who is very chatty. All 33 of the game's named-NPC students now attend classes (when not on a quest).
Installation
I would recommend installing the mod manually as described below. You should be able to install the mod automatically using Vortex if you like (then skip to step 4 below), but Vortex can be a bit unreliable with Hogwarts Legacy mods (it doesn't always delete mods properly) so beware!
Download the mod.
Unzip the contents.
Move all four mod files files to the Steam\steamapps\common\Hogwarts Legacy\Phoenix\Content\Paks\~mods\ folder. (If the ~mods folder doesn't exist, create it. Also note that the ~ in the name is important! It tells Unreal Engine to give the mods inside that folder a higher priority. Without the ~ they get a lower priority and may not work.)
Type ImmersiveModPack (that's "Pack" not "Pak") in the little window and hit the Enter key on your keyboard.
The word ImmersiveModPack should disappear and reappear lower down in that window with an X next to it. If it doesn't - if it stays on the top line - then either a) you put the mod files in the wrong folder, or b) one of your existing mods is already using pakchunk 2105. Use my PakChunk Checker to check that. If you have a pakchunk conflict see the Conflicts section below.
Type TimeDilator into the modloader and hit Enter. (Unless you've done this already.)
Press F8 again to close the modloader window.
Use the appropriate Time Dilator keybinds to set 1 game day = at least 3 real-world hours.
Note that you only need to follow the above process once. From now on the mod will just work. But see the Conflicts and Mergers section below.
How to Un-Install
If you installed manually, just delete the four ImmersiveModPack files from the "Hogwarts Legacy\Phoenix\Content\Paks\~mods\" folder.
If you installed using Vortex, hit the "Remove" button on the mod inside Vortex... BUT afterwards ALSO check the folder "Hogwarts Legacy\Phoenix\Content\Paks\~mods\" to make sure there are no folders called something like "XXX-ImmersiveModPack_v?_?_?" (where XXX is a three-letter prefix which depends on how many mods you have installed). If such a folder exists, delete it. Vortex should have deleted it but sometimes doesn't. If that folder is still there, the mod is still installed.
Conflicts and Mergers
This mod uses pakchunk 2105. You can check if that conflicts with any of your existing mods by running my PakChunk Checker batch script after you've installed this mod. If it does conflict, you can fix it using the Chunk ID Conflict Manager.
This mod includes an SQL .pak file which alters and replaces the game's PhoenixShipData.sqlite SQL database file. That .pak file will need to be merged with any other SQL .pak files you happen to have using Hogwarts Mod Merger. If you're not sure which .pak files need to be merged, install and run the Mod Merger Checker.
This mod is not compatible with any of the following:
Below is a list of known issues. If you encounter any others please let me know in the POSTS section.
If you skip time (using the Map's "Wait" function or a Time Skip mod) the scheduler can get confused and take a while to correct itself.
Sometimes the named-NPC's spawn in a bunch and do nothing for a while. This is a game bug.
When NPC's sit down at a table, they sometimes walk through the table. This is a game bug.
When NPC's eat the plate of food sometimes fails to spawn. This is a game bug.
When NPC's drink, the contents of their tankard sometimes floats in the air. This is a game bug.
When some NPC's drink they seem to pour the liquid into their eyes instead of their mouth. This is a game bug.
Sometimes the professors literally climb the walls in the Three Broomsticks. This is a game bug.
Sometimes NPC's get stuck when walking around and "treadmill" on the spot. This is a game bug.
Some beds are never used. That's because of they way they're set up in the game. I may try to fix this in future, but it won't be easy.
When younger students lie down on beds they often sink into the bed so only half their body is visible. This is a game bug which I will try to fix in the future. The same happens to some older students in some dorms.
Students sometimes lie down with their feet at the pillow end of the bed, then rotate round to the correct orientation. This is a game bug.
The top bunk Ravenclaw beds are never used. That's because there are no animations for students climbing into the top bunks.
Named-NPC's remain fully clothed when they go to bed. I may fix this in future.
Named-NPC's in some Houses remain awake in the Common Room all night, just like the player character. I guess you all took a No-Sleep Potion. This is because there are no available beds for them to sleep in. I put them in the Common Room (rather than leave them at their default location) to make them easy to locate and to avoid breaching curfew. You can follow them when they leave to find out where they go during the day.
Some features work better in certain House Common Rooms than others. These are game bugs. (For example, when the students leave for Breakfast/Dinner you'll only see a couple leave the Hufflepuff and Slytherin Common Rooms. That's because those Common Rooms are so large that you can only see half of the room. Instead of making NPC's walk all the way from the far end the game just de-spawns them.)
Sometimes the named-NPC's spawn in a bunch and do nothing for a while. This is a game bug.
In the game files Ominis Gaunt is listed as a 1st year. I assume that's a mistake. I've made him a 5th year.
In the game files Sacharissa Tugwood is listed as a 2nd year. She looks older to me so I made her a 4th year.
In the game files Lucan Brattleby is listed as a 2nd year. He looks older to me so I made him a 3rd year.
Some students in the Great Hall (T4's) appear & disappear randomly when you look away from them. This just how the game works.
If the Prof has an active or pending mission (or even just a speech bubble) they won't attend classes. This is a game feature/bug.
If a named-NPC has an active or pending mission (or even just a speech bubble) they won't attend classes. This is a game feature/bug.
Acknowledgements
HUGE thanks to nathdev without whom this mod would not have been possible.
1030-1130: All the female NPC's gather in the Hogsmeade gardens to chill.
1230-1330: Lunch upstairs at the Three Broomsticks (middle and upper floors).
1330-1900: Shopping.
1500-1600: All the male NPC's gather in the Hogsmeade gardens to chill.
1900-2000: Dinner upstairs at the Three Broomsticks (middle and upper floors).
2000-2100: Shopping.
Animated GIFs
Students leaving 1st Year Charms Class.
Students leaving for Breakfast.
Professors, Students and Ghosts leaving breakfast.
Spoiler:
Show
Time Dilator by icouldifiwantedto Speed-up or slow-down the passage of time at the click of a button! A blueprint version of the classic Tempus Imperium mod.
Introduction
By default one "game day" in Hogwarts Legacy will pass in 48 real-world minutes. Sometimes that's too fast and sometimes it's too slow. This mod allows you to change the rate at which time passes to suit your circumstances.
Credit to Rysel / S1yRuleZ for the original LUA/UE4SS mod (called Tempus Imperium), upon which this mod is based.
Installation
You should be able to install the mod automatically using Vortex (then skip to step 4 below), but Vortex can be a bit unreliable with Hogwarts Legacy mods (it doesn't always delete mods properly) so I would recommend installing it manually as follows:
Download the mod.
Unzip the contents.
Move zTimeDilator-1021_P.utoc, zTimeDilator-1021_P.ucas, and zTimeDilator-1021_P.pak to the Steam\steamapps\common\Hogwarts Legacy\Phoenix\Content\Paks\~mods\ folder.
Type TimeDilator in the little window and hit the Enter key on your keyboard.
The word TimeDilator should disappear and reappear lower down in that window with an X next to it. If it doesn't - if it stays on the top line - then either a) you put the .utoc, .ucas and .pak files in the wrong folder, or b) one of your existing mods is already using pakchunk 1021. Use my PakChunk Checker to check that. If you have a pakchunk conflict see the Conflicts section below.
Press F8 again to close the modloader window.
Press CTRL-NUMPAD5 to confirm that the mod is working. You should see the current time factor displayed on-screen. If not, make sure you have NUMLOCK switched ON and try again.
Note that you only need to follow the above process once. From now on the mod will just work.
Default Key Bindings
By default this mod uses the following key bindings:
ALT-NUMPAD8 = Double the current rate at which time passes.
ALT-NUMPAD5 = Reset the rate at which time passes to the default (1 game day = 48 real minutes).
CTRL-NUMPAD5 = Display the current rate at which time passes.
CTRL-ALT-NUMPAD5 = Set 1 game day = 1 real day.
ALT-NUMPAD2 = Half the current rate at which time passes.
Note that you can double or half the rate as many times as you like.
Setting the Config Variables
From v2.2 onwards this mod offers the following configuration variables:
TimeDilationScaleFactor = The amount by which time dilation increases/decreases. Default = 2, so rate doubles/halves.
TimeDilationDefaultMinutes = The default number of real minutes that pass in one game day. Default = 48.
To change the default values add the following to your C:\Users\[username]\AppData\Local\Hogwarts Legacy\Saved\Config\WindowsNoEditor\Engine.ini file and change the numbers as you see fit (though TimeDilationScaleFactor must be > 1.0 and <= 3.0):
Increase/Decrease the rate at which time passes by a factor of 1.5 (when you press ALT-NUMPAD8 / ALT-NUMPAD2).
Set 1 game day = 60 real minutes (next time you press ALT-NUMPAD5).
Custom Key Bindings
You can change the key bindings to anything you like as follows:
Download & install the latest version of this mod, start the game, do the F8 thing (if you haven't already), load a save file, then shut down the game.
In Windows Explorer type %localappdata%\Hogwarts Legacy\Saved\Config\WindowsNoEditor into the address bar at the top and hit Enter.
Left click Input.ini then right click it and select "Edit" (or "Open with" > "Notepad").
Search for TimeDilator. You should find five entries like those below.
Change the items shown in green below to whatever you want. Key names can be found here.
1) If you installed it via Vortex: Disable or Uninstall it via Vortex. BUT also CHECK that it's gone from the ~mods folder afterwards. 2) Delete zTimeDilator-1021_P.utoc, zTimeDilator-1021_P.ucas, and zTimeDilator-1021_P.pak from the ~mods folder.
Conflicts
This mod uses pakchunk 1021. You can check if that conflicts with any of your existing mods by running my PakChunk Checker batch script after you've installed this mod. If it does conflict, you can fix it using the Chunk ID Conflict Manager.
Known Issues
Below is a list of the known issues. If you encounter any others please let me know in the POSTS section.
When you adjust the Time Factor the screen will flash briefly. I've managed to minimize this, but can't get rid of it entirely.
Spoiler:
Show
Night Curfew by nathdev Phineas Black had enough of you and installed a curfew inside the castle. Now prefects will try to catch you between the curfew hour. Adds 16 new prefects to the game. Compatible with 6th June update.
Features
Night curfew will make prefects look for the player in between the curfew hours (0am to 6am) inside Hogwarts. If you are caught, you will be sent back to your common room and will pay a 100 knuts penalty.
Prefect will appear on the minimap.
Messages will be displayed to warn you of the curfew status.
You will not pay 100 knuts if you have less than 1000 knuts.
Adds 16 new prefects across the castle
Sql
The sql file needs to be merged if you are using other sql mods.
If you update this mod and there is a new sql file available, always remerge your mod.
To merge sql mods use this tool (read it's description). Beware that a lot of sql mods do not use SQL in their filename and you could easly miss one in your ~mods folder. An easy way to recognize them is that they are around 8.5 mb in size. If you have multiple sql mods in your ~mods folder then only one will be loaded by the game. Others will be ignored.
Customize your curfew
If you add those lines at the end of your Engine.ini (C:\Users\username\AppData\Local\Hogwarts Legacy\Saved\Config\WindowsNoEditor), you can modify the mod to your liking.
Drop archive files in folder in C:\Program Files (x86)\Steam\steamapps\common\Hogwarts Legacy\Phoenix\Content\Paks\~mods
Press F8 in game and type "NightCurfew" then press enter
Mod incompatibility
Do not disable the minimap
Informations
Special thanks to icouldifiwantedto and mindgam3s for their many contributions and help in making this mod.
This mod use chunk id 1748.
Preview of future updates will be shown on the modding discord.
Spoiler:
Show
Azkaban by nathdev Avada Kedavra, Imperius, and Cruciatus — are known as the Unforgivable Curses. The use of any one of them on any sentient life is enough to earn a life sentence in Azkaban.
Features
Using any of the three unforgivable curses in front of a civilian will make them call the ministry of magic. Local authorities will try to arrest you and send you to Azkaban.
Spoiler:
Show
In Azkaban, you can always load your save before the autorities encounter even if you stay in Azkaban.
Only Ominis and Sebastian will not report you to prevent quest breaking. This mod does not let the player attack students or professors.
Sql
The sql file zAzkaban_SQL_P.pak needs to be merged if you are using other sql mods.
If you update this mod and there is a new sql file available, always remerge your mod.
To merge sql mods use this tool (read it's description). Beware that a lot of sql mods do not use SQL in their filename and you could easly miss one in your ~mods folder. An easy way to recognize them is that they are around 8.5 mb in size. If you have multiple sql mods in your ~mods folder then only one will be loaded by the game. Others will be ignored.
Customize mod
If you add those lines at the end of your Engine.ini (C:\Users\username\AppData\Local\Hogwarts Legacy\Saved\Config\WindowsNoEditor), you can modify the mod to your liking.
Immerse yourself deeper into Hogwarts with 28 unique classes, from Potions to Defense Against the Dark Arts.Attend lessons from 8:30 to 11:30, complete homework in the library, and face the consequences of detention if you miss too many classes.
Class System brings out 28 new quests to the game for 5 classes :
Defense Against the Dark Arts (4 episodes)
Potion (4 episodes)
Herbology (11 episodes)
History of Magic (4 episodes)
Charms (4 episodes)
Every class in Class System has been written by a writer and is therefore unique ! The content of the class is brought via a text novel system inside the classroom. During classes, player can make choices that will impact the story of the episode or future ones.
Starting the new classes
The first class will start shortly after the main quest "Best Class" is finished by the player. Classes are available from 8:30 to 11:30. The player can only do one class each day.
Homework system
After every class, the player unlocks a new homework to do in the library. How much the player study to finish the homework will determine the house points reward for the player house.
Homeworks can be done at any point after you get them. They will become unavailable only after you finish the last quest of the mod.
Detention system
When the player misses a class, an internal counter is started.Missing 3 classes will result in the player having to go to detention before going back to class. Going to detention results in an automatic house point loss.
House points System
Decisions taken during the classes, homeworks and detention counts towards the player's total house points. Other houses make random choices at the same time as the player affecting their total house points.
Final quest
The moment to discover if you've put your house in the winning spot. The last quest triggers after the player has finished the 27 classes and passed the main quest "In the Shadow of Revelation".
Credits
Writer of DADA, Potion, History and Charms : Lam0rak Writer of Herbology : Amberlide
How to install
You can either start from a new save or use an already finished save game. Obviously, for immersion it's much better to start with a new save.
I highly recommend to do a manual save of your character before installing. Keep an do not overwrite this save as it will be useful if you need to go back after a bad installation.
If you are only using this mod (or any non sql mods) :
Extract the archive files in folder C:\Program Files (x86)\Steam\steamapps\common\Hogwarts Legacy\Phoenix\Content\Paks\~mods
If you're using other sql mods :
Extract the archive files in folder C:\Program Files (x86)\Steam\steamapps\common\Hogwarts Legacy\Phoenix\Content\Paks\~mods
Merge the file zClassSystem_SQL_P.pak with your other sql mods THIS STEP IS MANDATORY OR IT WILL NOT WORK
Ps : Blueprint Apparate Mod Loader is not needed as Class System use a fancy new way to load blueprints via sql
This mod use chunk id 1234 and 1235.
Spoiler:
Show
Spoiler:
Show
Animated Game Time HUD by Dekita Adds an animated HUD onto the screen that automatically displays the current day, date, and time of the game world, with coloring based on your chosen house!!
Features:
Animated Display
Shows Automatically
Press Shift + T to Reshow
Window Color Based on House
Integrated in field guide
Configration UI
REQUIREMENTS / HOW TO USE: UICore - ALWAYS REQUIRED - Regardless of chosen modloader. A modloader such as UE4SS or Apparate Modloader is required to use logic mods. DONT LOAD THE SAME MOD IN BOTH MODLOADERS
Install this mods .pak, .utoc, and .ucas files to Hogwarts Legacy\Phoenix\Content\Paks\~mods. Press F8 (when in game) to open the modloader menu, type DekDateTimeHUD. This mod should now be listed within the apparate modloader menu. Note: This is what you type regardless of the version used.
NOTE: If your having trouble getting the mod working with apparate modloader, try renaming the mod files to have a ! in front of their name. This seems to be a priority issue when using a lot of mods.
KNOWN ISSUES: This mod uses pak chunk 1313 and may be incompatible with other mods that do so. Old verisons (without the configurable ui) use pak chunk id 74. Game date is independent to the seasonal weather, which is tied to story progression.
Install this mods .pak, .utoc, and .ucas files to Hogwarts Legacy\Phoenix\Content\Paks\~mods Press F8 (when in game) to open the modloader menu, type DekApparateUI This mod should now be listed within the apparate modloader menu.
NOTE: If your having trouble getting the mod working with apparate modloader, try renaming the mod files to have a ! or z in front of their name. This seems to be a priority issue when using a lot of mods.
KNOWN ISSUES: This mod uses pak chunk 1310 and may be incompatible with other mods that do so.
Spoiler:
Show
Change Season - UI by Dekita Adds a button into the field guide that allows you to control the season!!
Features:
Integrated in game UI
UI color from seasons
Change season at will
Fancy icons n such
NOTE: Teleportation is required after changing season to allow map refresh!! Side Note: this hasnt been tested during quests. i'd recommend backing up your save before you try, or only using after you finish the main story <3
REQUIREMENTS / HOW TO USE: UICore - ALWAYS REQUIRED - Regardless of chosen modloader. A modloader such as UE4SS or Apparate Modloader is required to use logic mods. DONT LOAD THE SAME MOD IN BOTH MODLOADERS
Install this mods .pak, .utoc, and .ucas files to Hogwarts Legacy\Phoenix\Content\Paks\~mods Press F8 (when in game) to open the modloader menu, type DekChangeSeasons This mod should now be listed within the apparate modloader menu.
NOTE: If your having trouble getting the mod working with apparate modloader, try renaming the mod files to have a ! in front of their name. This seems to be a priority issue when using a lot of mods.
KNOWN ISSUES: This mod uses pak chunk 1323 and may be incompatible with other mods that do so.
Spoiler:
Show
Change Weather - UI by Dekita All real wizards can control the weather at will.. Now you can too!! Adds a button into the field guide that opens the UI!!
Features:
Integrated in game UI
Change Weather at will
Does it need a third thing?
REQUIREMENTS / HOW TO USE: UICore - ALWAYS REQUIRED - Regardless of chosen modloader. A modloader such as UE4SS or Apparate Modloader is required to use logic mods. DONT LOAD THE SAME MOD IN BOTH MODLOADERS
Install this mods .pak, .utoc, and .ucas files to Hogwarts Legacy\Phoenix\Content\Paks\~modsPress F8 (when in game) to open the modloader menu, typeDekChangeWeatherThis mod should now be listed within the apparate modloader menu.NOTE: If your having trouble getting the mod working with apparate modloader,try renaming the mod files to have a ! in front of their name. Thisseems to be a priority issue when using a lot of mods.
KNOWN ISSUES: This mod uses pak chunk 1324 and may be incompatible with other mods that do so.
Spoiler:
Show
Change House - UI by Dekita Adds a button into the field guide that lets you switch houses anytime.
Features:
Easily Change House
Integrated in game UI
Updates Player Outfit On Change (if house specific)
REQUIREMENTS / HOW TO USE: UICore - ALWAYS REQUIRED - Regardless of chosen modloader. A modloader such as UE4SS or Apparate Modloader is required to use logic mods. DONT LOAD THE SAME MOD IN BOTH MODLOADERS
Install this mods .pak, .utoc, and .ucas files to Hogwarts Legacy\Phoenix\Content\Paks\~modsPress F8 (when in game) to open the modloader menu, typeDekChangeHouseThis mod should now be listed within the apparate modloader menu.NOTE: If your having trouble getting the mod working with apparate modloader,try renaming the mod files to have a ! in front of their name. Thisseems to be a priority issue when using a lot of mods.
KNOWN ISSUES: This mod uses pak chunk 70 and may be incompatible with other mods that do so. If using my OutfitStudio mod then your temp outfit is reset upon house change. (active outfit customization only, not saved slots) This is to ensure any house specific material parameters are correctly applied :)
GENERAL INFO This mod upscales all the minimap tiles, some in 2x, 4x and 8x (depending on the tile). It also smoothes the edges.
Simple as that, nothing more. If you like it, vote & endorse :)
INSTALL Copy the content of the .zip file into Hogwarts Legacy\Phoenix\Content\Paks
Spoiler:
Show
Guiding Trail Enhancements by RyselZ Provides different guiding trail appearences to customize player experience and increase immersion. Optional: Mute trail sound fx
You can choose between these options:
Trail Only: You only see the trail without the line in between. The book animation is still present.
Line Only: You only see the line without the trail surrounding it. The book animation is still present.
Book animation only: Line and Trail are both disabled. You only see the book flying towards the direction of your POI, but its trail disappears in ~5sec. (RECOMMENDED)
Explosion only: You only see and hear the book explosion. This is useful if you just want to know the direction quickly, without any other distraction.
OPTIONAL FILE: Mute the glowing sound effect. This is recommended if you chose an option that hides the trail+line and you may find odd that the SFX is still present.
INSTALLATION
Copy the content of your selected .zip file into Hogwarts Legacy\Phoenix\Content\Paks
Spoiler:
Show
Toggle HUD Elements by icouldifiwantedto Toggle 12 separate elements of the HUD (or the entire HUD) on/off at the press of a button and optionally auto re-enable 5 of them during combat.
Introduction
There are several mods out there already which toggle the HUD on/off but (as far as I know) only one of them will toggle individual elements of the HUD on/off. That's the predecessor of this mod. But that one used an LUA script (hooked into the game using UE4SS), which some users found to be unreliable and unstable. I have therefore re-written the mod in blueprints (which is what the game is written in). This version should be super-reliable and rock solid.
This mod will allow you to toggle each of the four main elements of the HUD (the map, the tool wheel, the spells and the meters) on/off individually, and toggle floating icons on/off, and of course toggle the entire HUD on/off too. (It will actually toggle whatever you have enabled on/off, so when you toggle it back on you get back what you had showing previously.) It will also toggle another eight transitory elements of the HUD (like the white outlines around enemies).
Your HUD settings will be reflected in the settings menu and will therefore be preserved when you restart the game (except Duel Challenges which is saved separately because it's not in the settings menu).
Installation
You should be able to install the mod automatically using Vortex (then skip to step 4 below), but Vortex can be a bit unreliable with Hogwarts Legacy mods (it doesn't always delete mods properly) so I would recommend installing it manually as follows:
Download the mod.
Unzip the contents.
Move zMyHUDToggler-105_P.utoc, zMyHUDToggler-105_P.ucas, and zMyHUDToggler-105_P.pak to the Steam\steamapps\common\Hogwarts Legacy\Phoenix\Content\Paks\~mods\ folder.
Type MyHUDToggler in the little window and hit the Enter key on your keyboard.
The word MyHUDToggler should disappear and reappear lower down in that window with an X next to it. If it doesn't - if it stays on the top line - then either a) you put the .utoc, .ucas and .pak files in the wrong folder, or b) one of your existing mods is already using pakchunk 105. Use my PakChunk Checker to check that. If you have a pakchunk conflict see the Conflicts section below.
Press F8 again to close the modloader window.
Note that you only need to follow the above process once. From now on the mod will just work.
Default Key Bindings
By default the HUD elements are toggled on/off using the following key bindings:
ALT-DEL = Minimap on/off
ALT-End = Tool Wheel on/off
ALT-Home = Entire HUD on/off (also disables the mod's auto re-enable feature)
ALT-Insert = Floating icons on/off
ALT-PgUp = Spells on/off
ALT-PgDn = Meters on/off
SHIFT-ALT-DEL = Standard Notifications on/off
SHIFT-ALT-End = Quest Notifications on/off
SHIFT-ALT-Home = Special Notifications on/off
SHIFT-ALT-Insert = XP Notifications on/off
SHIFT-ALT-PgUp = Enemy Target Health Bar and Highlight Outline on/off
SHIFT-ALT-PgDn = Special Notifications on/off
SHIFT-CTRL-PgUp = Duelling Challenges on/off
Custom Key Bindings
You can change the key bindings to anything you like as follows:
Download & install the latest version of this mod, start the game, do the F8 thing (if you haven't already), load a save file, then shut down the game.
In Windows Explorer type %localappdata%\Hogwarts Legacy\Saved\Config\WindowsNoEditor into the address bar at the top and hit Enter.
Left click Input.ini then right click it and select "Edit" (or "Open with" > "Notepad").
Search for HUDToggler. You should find entries like those below.
Change the items shown in green below to whatever you want. Key names can be found here.
Five of the HUD elements can be set to auto re-enable when the player enters combat, as listed below. When combat ends these items will return to whatever state (visible or invisible) they were in before combat.
Spell diamond.
Health and Ancient Magic Meters
Tool wheel's currently-selected active item.
Mini-map
Duel Techniques
To select which one(s) are auto re-enabled, add the following lines to your Engine.ini file and change the true/false values to your preferences. You will find this file in your C:\Users\[YourUserName]\AppData\Local\Hogwarts Legacy\Saved\Config\WindowsNoEditor folder.
Avoid manually adjusting your HUD settings during combat or you'll confuse the mod.
Auto re-enabling doesn't work if you've elected to hide the entire HUD using ALT-Home.
How to Un-Install
Either:
If you installed it via Vortex: Disable or Uninstall it via Vortex. BUT also CHECK that it's gone from the ~mods folder afterwards.
Delete zMyHUDToggler-105_P.utoc, zMyHUDToggler-105_P.ucas, and zMyHUDToggler-105_P.pak from the ~mods folder.
Conflicts
This mod uses pakchunk 105. You can check if that conflicts with any of your existing mods by running my PakChunk Checker batch script after you've installed the mod. If it does conflict, you can either fix it using the Chunk ID Conflict Manager or rebuild this mod yourself - see below.
Known Issues
The following are known issues. If you encounter others please let me know in the POSTS section.
If you toggle the entire HUD off, auto re-enabling during combat won't work until you switch the HUD back on.
If you toggle the entire HUD off, certain warning messages will no longer appear. This is a feature (or bug) from the game not my mod.
If you toggle the entire HUD off, all non-combat field animals will vanish (cows, sheep, deer, etc) and they won't return when you toggle the HUD back on. Other types of non-combat animals (chickens, rats, etc) are fine. This is a bug in the game which I don't currently know how to fix. There should be no link between the HUD and animals in the world!
Open Source
This mod forms part of a series of wiki articles I'm writing (this mod is in the 5th article) which aim to help beginners learn how to create blueprint mods for Hogwarts Legacy. The Blueprints for this mod are therefore Open Source - you can download them and play around with them yourself. That's not an entirely easy process though, so you'll need to read the first article in the series to learn how to do it. Nevertheless, once you've got everything set up you can recook this mod with whatever pakchunk and key bindings you like.
To find out more please join the Hogwarts Legacy Modding Discord and head to the wiki section. In there you'll find a link to the first article in the series (called "Blueprint Example 101 - Hello World") which beginners should read first.
Spoiler:
Show
Spoiler:
Show
IMPORTANT NOTE!!: Due to compatibility issues between Spells Enhanced and Fiendfyre, I recommend you ONLY DOWNLOAD ONE, NOT BOTH!!! Unfortunately, until compatibility is fixed between these two mods, you'll have to make a choice between the two.
Spells Enhanced by Khione95 Adds 9 new spells including enemy spells Reducto and Expulso. It has voice lines for the spells.
This mod adds nine new spells. Five of them has cast voice line. Check out the video section to hear the spell cast voices.
Full Spell List:
Reducto: The Reductor Curse (Reducto) is a curse that blasts solid objects to pieces.
Expulso: The Expulso Curse (Expulso) is a curse used to produce immense explosions, blasting the target apart with a burst of blue light; it has enough force to throw people into walls.
Apparation: Apparition is a form of magical transportation, in which the user travelled instantly from one location to another, without traversing the space in-between.
Apparation Maxima: Apparition is a form of magical transportation, in which the user travelled instantly from one location to another, without traversing the space in-between.
Stupefy (The one after protego): The Stunning Spell (Stupefy), also known as the Stupefying Charm, or Stunner for short, is a charm that stuns the target, rendering them unconscious.
Petrificus Totalus (Enemy Version): Powerful enough to bind most enemies permanently, but more dangerous foes will only take some damage and then quickly break free from the effect.
Incendio Incantatem: The Fire-Making Spell, also known as the Fire-Making Charm (Incendio Incantatem) is a charm that conjures a jet of flames that can be used to set things alight.
Obliviate: The Memory Charm (Obliviate), also known as the Forgetfulness Charm, is a charm that can be used to erase specific memories from an individual's mind.
Confundus: The Confundus Charm (Confundo) is a charm which confuses and misdirects the target.
Installation:
Download the mod
Copy and paste the content into: Steam\steamapps\common\Hogwarts Legacy\Phoenix\Content\Paks\~mods
If you use any other mod that modifies SQL use Mod Merger for "zzSpellsEnhanced_SQL.pak". If you don't merge it or don't use SQL you won't see the spells. Do not merge with any other spell mod.
Localization is only in English as of now.
This mod uses chunk number 361.
Spoiler:
Show
IMPORTANT NOTE!!: Due to compatibility issues between Spells Enhanced and Fiendfyre, I recommend you ONLY DOWNLOAD ONE, NOT BOTH!!! Unfortunately, until compatibility is fixed between these two mods, you'll have to make a choice between the two. Fiendfyre by dvcons Enables the Fiendfyre curse as a useable spell.
Enables the Fiendfyre curse as a useable spell for the player. It has the same damage as Incendio, but a higher range. Instead of burning the victim, a curse is placed on them (that's how it's programmed, I can't change it).
How to install:
Donwload one of the main files (can't use both at the same time)
Extract all downloaded files to ...\Hogwarts Legacy\Phoenix\Content\Paks\~mods
If you're using any other SQL mods, you should merge them with HMM (very easy)
Start the game and open the spell menu to select the new spell
How to uninstall:
Remove all downloaded files from ...\Hogwarts Legacy\Phoenix\Content\Paks\~mods
I am aware there are some effects that still have a hint of the default red.
Choose which color you want by modifing the main.lua. Your choices are blue, green, purple, yellow, orange, pink, white, red. For example if you want green modify the chosenColor to show as
Changes the colour of the Protego shield. Colours available are, green, orange, pink, purple, red and yellow.
Has a slight tint of blue still which won't be removed.
To install unpack the zip you downloaded, choose which colour you would like to use, then copy all the three mod files (pak, ucas, utoc) to where your game is installed and your ~mods folder is: "[Path-To-Steam]\steamapps\common\Hogwarts Legacy\Phoenix\Content\Paks\~mods"
To uninstall remove all the three mod files from "[Path-To-Steam]\steamapps\common\Hogwarts Legacy\Phoenix\Content\Paks\~mods"
Spoiler:
Show
IMPORTANT!!!: Only choose between ONE unsupported flight mod!!! YOU CANNOT HAVE BOTH!!!
To install unpack the zip you downloaded, then copy all the three mod files (pak, ucas, utoc) to where your game is installed and your ~mods folder is: "[Path-To-Steam]\steamapps\common\Hogwarts Legacy\Phoenix\Content\Paks\~mods"
Run the game, load a save, press F8 for Apparate window, type DAFlight, press enter. DAFlight should appear in the list. You need to only do it once.
To uninstall remove all the three mod files from "[Path-To-Steam]\steamapps\common\Hogwarts Legacy\Phoenix\Content\Paks\~mods"
IMPORTANT!!!: Only choose between ONE unsupported flight mod!!! YOU CANNOT HAVE BOTH!!!
To install unpack the zip you downloaded, then copy all the three mod files (pak, ucas, utoc) to where your game is installed and your ~mods folder is: "[Path-To-Steam]\steamapps\common\Hogwarts Legacy\Phoenix\Content\Paks\~mods"
Run the game, load a save, press F8 for Apparate window, type AFlight, press enter. AFlight should appear in the list. You need to only do it once.
To uninstall remove all the three mod files from "[Path-To-Steam]\steamapps\common\Hogwarts Legacy\Phoenix\Content\Paks\~mods"
Spoiler:
Show
Invisibroom by alostiar An invisible broom to fly around on. Replaces the Night Dancer.
Replaces the Night Dancer broom with an invisible model, so you can keep looking goofy while flying around Hogwarts.
Completely replaces the mount and dismount broom animations.
Combined with Dark Arts Flight and Invisibroom, it looks like this:
Installation:
Requires Dark Arts Flight, Invisibroom, and UE4SS
Unzip and put into into ".../Steam/steamapps/common/Hogwarts Legacy/"
Change your broom in-game to the Night Dancer (Invisibroom), to prevent it from showing up in any animations
Spoiler:
Show
Spoiler:
Show
Skip Alohomora by icouldifiwantedto Skips the Alohomora mini-game to open locks at your Level (but not higher). An alternative to the Autohomora mod. Does not require UE4SS! To open locks at all levels use the "Open All Locks" mod instead of this one.
A note regarding the wand-cast and incantation
From version 2.0 onwards this mod will play the wand-cast animation and the incantation voice-over... but don't be surprised if they don't happen every time. When the game was first launched and people discovered that they had to spam revelio to find stuff, it drove us all mad that the main character ("MC") would say "Revelio" every time. So the game devs patched it as follows: 1) If you cast the same spell more than once the MC will only speak the incantation the first time, and 2) If you cast the same spell within 30 seconds the MC will only speak the incantation the first time. To make the MC say the incantation every time you must circumvent this "patch" by using Revelio then basic cast after you use Alohomora.
A note regarding the Stand Up Straight mod
If you use the Stand Up Straight mod, please update to version 2.0 of that mod, otherwise it will interrupt the wand-cast animation.
Introduction
There are already four mods (two created by me) to skip the alohomora mini-game and open all locks. But (as far as I know) there isn't one that will only open locks for which you've learned the required Level of Alohomora. Or there wasn't until now... because this mod does exactly that! (To skip the alohomora mini-game and open locks at all levels use the Open All Locks mod instead of this one.)
Installation
You should be able to install the mod automatically using Vortex (then skip to step 4 below), but Vortex can be a bit unreliable with Hogwarts Legacy mods (it doesn't always delete mods properly) so I would recommend installing it manually as follows:
Download the mod.
Unzip the contents.
Move zSkipAlohomora-1011_P.utoc, zSkipAlohomora-1011_P.ucas, and zSkipAlohomora-1011_P.pak to the Steam\steamapps\common\Hogwarts Legacy\Phoenix\Content\Paks\~mods\ folder.
Type SkipAlohomora in the little window and hit the Enter key on your keyboard.
The word SkipAlohomora should disappear and reappear lower down in that window with an X next to it. If it doesn't - if it stays on the top line - then either a) you put the .utoc, .ucas and .pak files in the wrong folder, or b) one of your existing mods is already using pakchunk 1011. Use my PakChunk Checker to check that. If you have a pakchunk conflict see the Conflicts section below.
Press F8 again to close the modloader window.
Note that you only need to follow the above process once. From now on the mod will just work.
Usage
Just install the mod. That's it. When you encounter a padlock, press the interact key as normal and the lock should just spring open.
How to Un-Install
Either:
If you installed it via Vortex: Disable or Uninstall it via Vortex. BUT also CHECK that it's gone from the ~mods folder afterwards.
Delete zSkipAlohomora-1011_P.utoc, zSkipAlohomora-1011_P.ucas, and zSkipAlohomora-1011_P.pak from the ~mods folder.
Conflicts
This mod uses pakchunk 1011. That's the same pakchunk as my Open All Locks mod. I used the same pakchunk deliberately because these two mods are not compatible with each other - you can't have both installed at the same time because they are the same mod, but with different options enabled internally.
You can check if it conflicts with any of your other mods by running my PakChunk Checker batch script after you've installed the mod. If it does conflict, you can use the Chunk ID Conflict Manager to resolve the conflict.
Known Issues
The following are known issues. If you encounter any others please let me know in the POSTS section:
The wand-cast animation and incantation voice-over don't always play. (See the note regarding the wand-cast and incantation above.)
Acknowledgements
Many thanks to Darkstar (aka BenBandu) for their invaluable advice and assistance!
For some reason the player-character in Hogwarts Legacy frequently adopts a weird slouching hunchback pose. This is intended to be the player's "ready for anything" pose, but it just looks awful, especially on female characters. This mod is intended to fix that by forcing the player-character to stand up straight whenever possible.
Awards
I am delighted to report that this humble mod won Mod Of The Month for November 2023! Thank you to everyone who voted. You're the best. 😁
Installation
You should be able to install the mod automatically using Vortex (then skip to step 4 below), but Vortex can be a bit unreliable with Hogwarts Legacy mods (it doesn't always delete mods properly) so I would recommend installing it manually as follows:
Download the mod.
Unzip the contents.
Move zStandUpStraight-1017_P.utoc, zStandUpStraight-1017_P.ucas, and zStandUpStraight-1017_P.pak to the Steam\steamapps\common\Hogwarts Legacy\Phoenix\Content\Paks\~mods\ folder.
Type StandUpStraight in the little window and hit the Enter key on your keyboard.
The word StandUpStraight should disappear and reappear lower down in that window with an X next to it. If it doesn't - if it stays on the top line - then either a) you put the .utoc, .ucas and .pak files in the wrong folder, or b) one of your existing mods is already using pakchunk 1017. Use my PakChunk Checker to check that. If you have a pakchunk conflict see the Conflicts section below.
If it worked you should see a message on-screen saying that the mod has initialised.
Press F8 again to close the modloader window.
Note that you only need to follow the above process once. From now on the mod will just work.
Usage / Key Bindings
There are no key bindings. The mod should just work automatically.
How to Un-Install
Either:
1) If you installed it via Vortex: Disable or Uninstall it via Vortex. BUT also CHECK that it's gone from the ~mods folder afterwards. 2) Delete zStandUpStraight-1017_P.utoc, zStandUpStraight-1017_P.ucas, and zStandUpStraight-1017_P.pak from the ~mods folder.
Conflicts
This mod uses pakchunk 1017. You can check if that conflicts with any of your existing mods by running my PakChunk Checker batch script after you've installed this mod. If it does conflict, you can fix it using the Chunk ID Conflict Manager.
Known Issues
The following are known issues. If you encounter any others please let me know in the POSTS section:
If you eat or drink anything the animation is sometimes truncated, or doesn't play at all. This is a game bug; it's not caused by this mod (though version 1 of the mod did make it worse). To see the animation each time you must alternate eating or drinking with the basic cast. Or go back & forth between eating or drinking two different things. Auto-disables if you're near food or drink, so the mod no longer truncates the animation. Other mods can pause/un-pause this one by adding/deleting the following tag to/from the player: PauseStandUpStraight.
Spoiler:
Show
Character Editor by nathdev Easily edit both your character presets and your wand on the fly !
6th June 2024 update compatible.
Description
Character Editor adds a UI to edit your character at any point in your game. All changes are made live and are saved to your character. It also unlocks options that were not available in the original character creator. Fully compatible with mods that change appearance.
Character editable options :
Firstname and lastname
Social heritage (restored feature)
House
Body type
Dormitory
Voice
Face
Skin color
Hairstyle
Hair color
Eye color
Eyeliner (restored feature)
Eyeshadow (restored feature)
Eyebrow shape
Eyebrow color
Lipstick (restored feature)
Blush (restored feature)
Freckles and moles
Complexion
Scars
Make Up style (restored feature beware that option 1 turn off Eyeliner, Eyeshadow, Lipstick and Blush)
Also make available hidden presets from the original character creator (means more hair style ect...).
Change hotkey : - After mod was loaded in game -> Quit game -> Hotkey can be modified in C:\Users\username\AppData\Local\Hogwarts Legacy\Saved\Config\WindowsNoEditor\Input.ini -> search entry "CharacterLiveEditor" -> change key
Informations
This mod use chunk id 159.
Custom preset/wand thumbnail images (~ 350) have been made by integral89.
Big thanks to integral89 for those wonderful cheat sheet images, testing and design advice :) Thanks to Meatbag101 for testing, feedback and graphic asset rework.
Emote With Any NPC - Social Action Restored by nathdev Emote solo or with a close npc (Hug, Flirt, Slap, Dance, Greet, Mock, etc). Restore all social actions available in game (sit in chair, eat, chat with npc and many more). Recruit companion. 6th June 2024 update compatible.
Available coop/solo emotes
Hello
Gala dance
Slow dance
Move dance
Electric dance
Celebrate kill
Mock
Slap
Hug
Flirt
Intimidate
Thumbs up
Relax (floor)
Study (floor)
Available Station (Social Actions) interactions
All game interactions with station (chair, bed, chat with npc, ect...) are now available. They will be marked with an interact prompt in the game world.
Option to make an npc join you if it's possible
Option to pass game time in bed (8h)
Interaction promt to use a station will dynamically appear if it's available (meaning a chair occupied by an npc will not be usable until he leaves it)
Extract archive files in folder in C:\Program Files (x86)\Steam\steamapps\common\Hogwarts Legacy\Phoenix\Content\Paks\~mods
Press F8 in game and type "EmoteWithAnyNpc" then press enter
How to use
Press P to perform default emote
Long press on P then release to display emote menu and choose a new emote
Navigate the menu using arrow up and down
Validate selection using enter
Cancel current playing emote with jump key
Customize mod
If you add those lines at the end of your Engine.ini (C:\Users\username\AppData\Local\Hogwarts Legacy\Saved\Config\WindowsNoEditor), you can modify the mod to your liking.
Change hotkey (only for solo/dual emote menu) - After mod was loaded in game -> Quit game -> Hotkey can be modified in C:\Users\username\AppData\Local\Hogwarts Legacy\Saved\Config\WindowsNoEditor\Input.ini -> search entry "MKB_EmoteTest" -> change key
Free Fly Plus by icouldifiwantedto Fly your broom or use your mount almost anywhere outdoors... including Hogsmeade and the Ravenclaw roof terrace! An updated version of the classic Free Fly mod.
Introduction
The Free Fly Mod was published within days of Hogwarts Legacy's launch. Unfortunately there were some issues with it which have never been addressed, and the mod has never been updated or even actively supported. The creators have not responded to a single user post. I have therefore created a new version (though this one works somewhat differently to the original). This version also automatically disables the minimap when you're close to landing in Hogsmeade, because it's impossible to take-off again if you land with the minimap on. I also fixed some bugs that occur with the HUD when you use mounts inside Hogsmeade.
This mod will allow you to fly almost but not quite anywhere. For example:
Like the original mod, you still can't fly indoors. That's because the game unloads all the indoor textures when you mount a broom or beast. So if you flew inside a building (as you can in some places) you'd find that half the stuff inside (walls, floor, etc) is missing. This may be something we can change someday, but not yet.
There are lots of places (out of bounds or on roof-tops etc) where you still can't land. That's because the "floor" or "ground" in an Unreal Engine game is not defined by what you can see, but by something called a "Nav Mesh". In the places where you can't land there is no Nav Mesh, so even if you could land there you would just fall through the ground and end up underneath the world.
If you're happy with the original Free Fly Mod then there's no need to install this one. If not, give this one a try.
If you have any problems let me know and I will try to help.
Installation
You should be able to install the mod automatically using Vortex (then skip to step 4 below), but Vortex can be a bit unreliable with Hogwarts Legacy mods (it doesn't always delete mods properly) so I would recommend installing it manually as follows:
Download the mod.
Unzip the contents.
Move zFreeFlyPlus-1010_P.utoc, zFreeFlyPlus-1010_P.ucas, and zFreeFlyPlus-1010_P.pak to the Steam\steamapps\common\Hogwarts Legacy\Phoenix\Content\Paks\~mods\ folder.
Type FreeFlyPlus in the little window and hit the Enter key on your keyboard.
The word FreeFlyPlus should disappear and reappear lower down in that window with an X next to it. If it doesn't - if it stays on the top line - then either a) you put the .utoc, .ucas and .pak files in the wrong folder, or b) one of your existing mods is already using pakchunk 1010. Use my PakChunk Checker to check that. If you have a pakchunk conflict see the Conflicts section below.
Press F8 again to close the modloader window.
Note that you only need to follow the above process once. From now on the mod will just work.
Minimap
By default the mod will turn the minimap off when you enter Hogsmeade and turn it back to what it was when you leave. So if you normally have the map on, it will be turned back on. And if you normally have the map off it will remain off. But if the mod gets it wrong you can press ALT-DEL to toggle the minimap on/off. You can also use this to force the minimap back on while you're in Hogsmeade, but you won't be able to take off again if you do.
At present this key binding can't be changed, but that might be possible with future versions of the mod.
How to Un-Install
Either:
If you installed it via Vortex: Disable or Uninstall it via Vortex. BUT also CHECK that it's gone from the ~mods folder afterwards.
Delete zFreeFlyPlus-1010_P.utoc, zFreeFlyPlus-1010_P.ucas, and zFreeFlyPlus-1010_P.pak from the ~mods folder.
Conflicts
This mod uses pakchunk 1010. You can check if that conflicts with any of your existing mods by running my PakChunk Checker batch script after you've installed the mod. If it does conflict, you can fix it using the Chunk ID Conflict Manager.
Known Issues
The following are known issues. If you encounter others please let me know in the POSTS section.
The minimap will disappear if you fly near Hogsmeade. That's by design, because there's a bug in the game which means that if you land in Hogsmeade with the minimap turned on you can't take off again. If you don't want to lose the minimap just fly quite high over Hogsmeade and the minimap will remain. Not that there's much to see - the map basically goes blank.
Inside Hogsmeade the minimap will remain off even when you're on-foot. That's because if I switched it back on you wouldn't be able to take-off again. If you want the minimap on just press ALT-DEL. Sadly, if you do that you won't be able to take-off again until you leave Hogsmeade.
The "volumes" that define the no-fly zones are "streamed-in" by the game when they're needed, so disabling them isn't a case of just running something once. The mod has to constantly monitor for new volumes streaming in so it can disable them.
You can usually take-off again if you land in Hogsmeade with the minimap disabled, but it still refuses on occasion. I'm not sure if there's a pattern to it, but plunging in like a lunatic and leaping from your broom at the last second might be a trigger. 😂 But it's probably random.
Be careful where you fly inside Hogsmeade. It's quite easy to get stuck. If you do, you might have to use fast-travel to free yourself.
Lore Friendly Apparition This mod adds the ability to apparate to any point on the map, with certain lore friendly restrictions. It uses the guide path as a base, so you will have to place a waymarker or have an active mission for the apparition to be available.
v1.01 Changes:
Changed activation to a double tap after popular demand. This should make the guide path still usable if you want it, and should combat the issue people were having on controller where switching spell sets would accidentally trigger the apparition.
Changed it so the Apparition only works within the open world map, since many reported that sub-levels would just teleport you into the void.
Activation: Apparition is triggerd by doing a quick double tap of the guide path button (By default V on PC, and D-Pad Up on controller) if you have a valid destination, it will trigger the apparition. If you do not have a valid destination, it will show you and error explaining why the apparition isn't valid, and then just show the you guide path instead.
Installation: Install by extracting the Apparition.zip content into "Hogwarts Legacy\Phoenix\Content\Paks\~mods" folder Once in the games character select screen open the Blueprint Apprate Modloader by hitting F8 and type "Apparition"
Restrictions:
You can not apparate in or out of hogwarts. (Whether you are in hogwarts or not is decided by the minimap state, so if you have the Hogwarts minimap, it counts as being inside Hogwarts).
You can not apparate to places you have not explored. (This restriction was added because in the books it is said you need to be able to imagine the location you want to apparate to. And thus it makes sense to me within game reasoning, that you have to explore the area before you can imagine it)
Known Issues:
When apparating on a broom, the player will 'fall' after having disapparated.
Occasionally will not play the Apparate audio when arriving at your destination.
Can occasionally place you out of bounds if you place your waymarker along the map border.
The player will hold the field guide on arrival, as if having sent out the guide path.
The 'area not explored' check can sometimes fail even though it looks like you have explored it on the map. Idk if this is just a discrepancy between how it is displayed and how the data is stored, given that the function used to check this is one that exists in the game already. Either way I haven't found a good fix for it yet.
Huge thanks to the good folks in the Modding discord!
This is a blueprint version of the classic Quick Save mod. It works in exactly the same way, except that this version is written in blueprints so it's faster, more stable, and doesn't require UE4SS. Notes:
By default this mod uses the CTRL key on the RIGHT HAND SIDE of the keyboard as the hotkey, but you can change this.
When you press the hotkey your currently running game will be saved as a MANUAL SAVE, overwriting your oldest manual save.
A message will appear on-screen to confirm that it has worked.
Sadly it is not possible to protect any of your existing manual saves from being over-written.
Installation
You should be able to install the mod automatically using Vortex (then skip to step 4 below), but Vortex can be a bit unreliable with Hogwarts Legacy mods (it doesn't always delete mods properly) so I would recommend installing it manually as follows:
Download the mod.
Unzip the contents.
Move the .utoc, .ucas, and .pak files to the Steam\steamapps\common\Hogwarts Legacy\Phoenix\Content\Paks\~mods\ folder.
Type QuickSave in the little window and hit the Enter key on your keyboard.
The word QuickSave should disappear and reappear lower down in that window with an X next to it. If it doesn't - if it stays on the top line - then either a) you put the .utoc, .ucas and .pak files in the wrong folder, or b) one of your existing mods is already using pakchunk 1031. Use my PakChunk Checker to check that. If you have a pakchunk conflict see the Conflicts section below.
Press F8 again to close the modloader window.
Note that you only need to follow the above process once. From now on the mod will just work.
Default Key Bindings
By default this mod uses the following key bindings:
RIGHT-CTRL = Quick Save
Custom Key Bindings
You can change the key bindings to anything you like as follows:
Download & install the latest version of this mod, start the game, do the F8 thing (if you haven't already), load a save file, then shut down the game.
In Windows Explorer type %localappdata%\Hogwarts Legacy\Saved\Config\WindowsNoEditor into the address bar at the top and hit Enter.
Left click Input.ini then right click it and select "Edit" (or "Open with" > "Notepad").
Search for QuickSave. You should find entries like those below.
Change the items shown in green below to whatever you want. Key names can be found here.
1) If you installed it via Vortex: Disable or Uninstall it via Vortex. BUT also CHECK that it's gone from the ~mods folder afterwards. 2) Delete the .utoc, .ucas, and .pak files from the ~mods folder.
Known Issues
It would be nice to be able to quick-save to a specific slot so that you could protect your other manual saves from being over-written. I tried to do this but the nodes to set the slot were ignored by the game. It seems that over-writing the oldest manual save has been hard-coded into the game.
It would be nice to be able to quick-load your most recent manual save. I tried to do this but the load-last-save node was ignored by the game.
Manual saves are sometime disabled by the game. Over-riding this would be extremely difficult, so I haven't attempted it. Instead, I thought I would take advantage of the fact that auto-saves usually still work. So I wrote some code to trigger a quick auto-save. Sadly the node to do this was ignored by the game.
Conflicts
This mod uses pakchunk 1031. You can check if that conflicts with any of your existing mods by running my PakChunk Checker batch script after you've installed this mod. If it does conflict, you can fix it using the Chunk ID Conflict Manager.
All the FMVs, Talents, Spells and, Tutorial videos have been frame interpolated to 60 FPS for smooth playback. This has been done by using Topaz Video Enhance AI, which I find the frame interpolation AI model to be much accurate and better than RIFE (FlowFrames).
Before they have been frame interpolated, they have been undergone through a "De-Block & De-Noise" pass, which clears up the frames and reduces the TAA appearance within the videos, thus making the videos look slightly sharper and clear. This, by no means, is a remaster or upscaled, as it has been proven from my own tests that upscaling is pointless for this game.
Since this game uses Bink 2 for Pre-Rendered Video playback, there can be little done to improve the frame quality by adjusting the bitrate, as there is a hard-lock on the file size for Bink video.
The paintings has been left untouched as there are issues with exporting them, unless I have selected AVI [Uncompressed] as the export format for the painting videos. They may be frame interpolated in the future.
Short TL:DR:
- Everything has been De-Blocked and De-Noised, resulting in slightly clearer FMVs. - Film Grain has been modified, as De-Block and De-Noise may reduce film grain significantly, so it had to be reimplemented. - Everything has been frame interpolated to 60 FPS. - No Performance Penalties from using this. - Requires slightly more storage - ~10% - 25% more for each video file. - Video Bitrate is slightly higher, but can only do so much. - 30 FPS Paintings may or may not be touched due to current issues with exporting the source to H264.
To keep up to date with all the releases, announcements and get support, join my new Discord Server: Discord Invite Link
Drag and drop Hogwarts Legacy folder to your Steam's Common folder. This is typically found in either:
X: — Substitute the X with the partition drive letter.
Windows should ask you whether you want to replace the existing files with the files you've extracted. At this point, let it replace the files, unless you want to keep a backup of the original video files.
Increase Beast Capacity from 12 to 99 in ALL Vivarium's
Increase Beast Species from 4 to 13 in ALL Vivarium's
Decrease Plant Growth Time to 1 Min
Plant Yield set to 5
Potion Yield set to 3
Beast Yield set to 5
Potion Brew times set to 30 seconds
Added 100 slots to all conjured items
Removed Placement Restrictions
Unlocked all Conjurable Items
Change the size of all Conjurable Items
Change the color of nearly all Conjurable Items
INSTALL Unzip the "zzz_RoR-Update.pak" file into your \Hogwarts Legacy\Phoenix\Content\Paks\~mods folder Default game location: C:\Program Files (x86)\Steam\steamapps\common\Hogwarts Legacy\Phoenix\Content\Paks If you dont have the "~mods" folder, make it! If the mod doesn't load for you try renaming it to "zzz_RoR-Update_P.pak"
NOTES: This will NOT work with mod merger as mod merger itself is outdated, I believe it contains the sqlite database as an internal resource that it compares anything that is loaded into it, I have included an SQL file in the archive that you can apply to any sqlite database of the latest version to apply the same changes. Mod merger has since been updated. It is safe to merge this mod with others.
I updated this of my own accord, original mod by BorisJohnsonLies and if they wish for me to take this down I will.
Spoiler:
Show
RoR Auto Ambience by icouldifiwantedto An open-source blueprint mod to automatically change the Room of Requirement ambience to match the in-game time of day.
Introduction
There are four "ambience" settings you can choose from for the Room of Requirement ("RoR"). Two of them look like day-time and two look like night-time. Once you've chosen an "ambience" it remains fixed until the next time you change it. This can be a little jarring if you go from blazing noon-time sun outside to dark night-time inside. This mod will therefore cycle through the four ambience settings, changing from one to the next every six in-game hours, to keep the ambience inside the ROR aligned with the time-of-day outside the RoR.
Installation
You should be able to install the mod automatically using Vortex (then skip to step 4 below), but Vortex can be a bit unreliable with Hogwarts Legacy mods (it doesn't always delete mods properly) so I would recommend installing it manually as follows:
Download the mod.
Unzip the contents.
Move zMyRoRAutoAmbience-109_P.utoc, zMyRoRAutoAmbience-109_P.ucas, and zMyRoRAutoAmbience-109_P.pak to the Steam\steamapps\common\Hogwarts Legacy\Phoenix\Content\Paks\~mods\ folder.
Type MyRoRAutoAmbience in the little window and hit the Enter key on your keyboard.
The word MyRoRAutoAmbience should disappear and reappear lower down in that window with an X next to it. If it doesn't - if it stays on the top line - then either a) you put the .utoc, .ucas and .pak files in the wrong folder, or b) one of your existing mods is already using pakchunk 109. Use my PakChunk Checker to check that. If you have a pakchunk conflict see the Conflicts section below.
If it worked you should see a message on-screen saying that the mod has initialised.
Press F8 again to close the modloader window.
Note that you only need to follow the above process once. From now on the mod will just work.
Usage
Just install the mod and that's it.
The RoR ambience will automatically change every six hours at approximately (within 15 real-world seconds of) the following in-game times:
Night-time1 = 5pm (it gets dark at about 5pm in the winter in Scotland)
Night-time2 = 11pm
Day-time1 = 5am
Day-time2 = 11am
If you don't know what the in-game time is, I'd recommend installing the excellent Animated Game Time HUD.
How to Un-Install
Either:
1) If you installed the mod via Vortex: Disable or Uninstall it via Vortex. BUT also CHECK that it's gone from the ~mods folder afterwards. 2) Delete zMyRoRAutoAmbience-109_P.utoc, zMyRoRAutoAmbience-109_P.ucas, and zMyRoRAutoAmbience-109_P.pak from the ~mods folder.
Conflicts
This mod uses pakchunk 109. You can check if that conflicts with any of your existing mods by running my PakChunk Checker batch script after you've installed the mod. If it does conflict, you can either fix it using the Chunk ID Conflict Manager or rebuild this mod yourself - see below.
Known Issues
The following are known issues. If you encounter others please let me know in the POSTS section.
If you enter the RoR via fast-travel the ambience should be correct immediately, but if you enter via the door the ambience might take a few seconds to adjust. That's because the function to change ambience doesn't work unless you're either in the RoR or fast-travelling to the RoR.
Open Source
This mod forms part of a series of wiki articles I'm writing which aim to help beginners learn how to create blueprint mods for Hogwarts Legacy. The Blueprints for this mod are therefore Open Source - you can download them and play around with them yourself. That's not an entirely easy process though, so you'll need to read the first article in the series to learn how to do it. Nevertheless, once you've got everything set up you can recook this mod with whatever pakchunk you like.
To find out more please join the Hogwarts Legacy Modding Discord and head to the wiki section. In there you'll find a pinned link to the first article in the series (called "Blueprint Example 101 - Hello World") which beginners should read first.
Spoiler:
Show
Photo Mode Enhanced by nathdev Adds a new hotkey "K" to open a custom PhotoMode menu in game without the need of going to the menu. Adds 191 new poses for female and 206 new poses for male. Also adds 1167 new frames. New sliders to move player on axis X,Y,Z and Rotation Z axis. New slider to change time dilation. New slider to change weather.
PhotoMode Enhanced mod brings :
A custom hotkey to open the PhotoMode in game without using the game menu
191 new poses for female.
206 new poses for male.
1167 new frames.
New sliders to move player on axis X,Y,Z and Rotation Z axis.
Extract archive files in folder in C:\Program Files (x86)\Steam\steamapps\common\Hogwarts Legacy\Phoenix\Content\Paks\~mods
Press F8 in game and type "PhotoModeEnhanced" then press enter
Press the key K in game to open the PhotoMode Menu (Using the photo mode via the game menu will not bring the new sliders)
Press the key K to exit
Change hotkey : - After mod was loaded in game -> Quit game -> Hotkey can be modified in C:\Users\username\AppData\Local\Hogwarts Legacy\Saved\Config\WindowsNoEditor\Input.ini -> search entry "PhotoModeEnhanced_Open" -> change key
This mod use chunk id 199 and 2029.
Preview of future updates will be shown on the modding discord.
Are you sick of flying around the map spamming Revelio and hoping you have found all of the Merlin Trials?
Since the game doesn't have a tracker for the Trials, it can be a royal pain trying to find them all. This mod will locate the nearest uncompleted Merlin Trial and map your path to it. You can now quickly find and complete all the Trials and get your extra loot slots.
I don't know if this ever happens, but if you're led to a Trial which is already completed you can tell the mod to ignore it using Shift-F10. Please be absolutely sure it has been looted because this process cannot currently be reversed.
Installation
You should be able to install the mod automatically using Vortex, but it can be a bit unreliable with Hogwarts Legacy mods:
Download and unzip the contents of zKA-MerlinTrialFinder-11102_P.zip to your Hogwarts Legacy\Phoenix\Content\Paks\~mods folder
If the ~mods folder doesn't exist, you will need to create it
Start Hogwarts Legacy and load your most recent save-file
Press the F8 key, type KA-MerlinTrialFinder and hit Enter
If KA-MerlinTrialFinder stays on the top line, then either:
a) the .utoc, .ucas and .pak files were placed in the wrong folder b) one of your existing mods is already using pakchunk 11102 (use the PakChunk Checker designed by icouldifiwantedto to verify a conflict)
Usage
De-select any active missions
Press the F10 key and follow the path
If you change your mind and don't want to find the Trial press Alt-F10
Default Key Bindings
By default this mod uses the following key bindings:
F10 = Find the nearest uncompleted Merlin Trial
Alt-F10 = Cancel the search
SHIFT-F10 = Mark the current Trial as already completed
Custom Key Bindings
You can change the key bindings to anything you like as follows:
Go to your Hogwarts Legacy\Saved\Config\WindowsNoEditor folder and edit Input.ini
Search for KA-MerlinTrialFinder and change the keybind (shown in green) to whatever you want (key names can be found here)
If you installed manually: Delete the zKA-MerlinTrialFinder-11102_P .utoc, .ucas, and .pak from the ~mods folder.
If you installed it via Vortex: Disable or uninstall it via Vortex BUT also check that it's gone from the ~mods folder afterwards
Conflicts
This mod uses pakchunk 11102 - if there is a conflict, you can fix it using the Chunk ID Conflict Manager
Known Issues
The following are known issues. If you encounter others please let me know in the POSTS section.
If you have a mission selected the path can randomly switch from the Merlin Trial back to your mission. This is a game bug.
If you mount your broom the path will disappear. This is a game "feature" which can't currently be disabled. The work-around is to manually place a purple "waymarker" close to the location of the Trial and follow that.
You can only search for a Merlin Trial while you are in an 'overland' area (i.e. - not in a dungeon, Ancient Magic trial, etc.).
The "finder" mods, which are based on the ones written by icouldifiwantedto, were not originally designed to be installed together. If you are using multiple finder mods, in certain instances they can wrestle for control of the mini-map path and cause it to stop showing in the game. This is being researched and addressed, but in the meantime, just be very careful about switching back and forth between the different mods/abandoning the searches in quick succession.
Are you sick of flying around the map spamming Revelio and hoping you have found all of the treasure vaults?
Since the game doesn't have a tracker for the vaults, it can be a royal pain trying to find them all. This mod will locate the nearest unlooted Treasure Vault and map your path to it. You can quickly find and loot every Vault and not worry if you're leaving unclaimed gear lying around.
I don't know if this ever happens, but if you're led to a vault which is already looted you can tell the mod to ignore it using Shift-F7. Please be absolutely sure it has been looted because this process cannot currently be reversed.
Installation
You should be able to install the mod automatically using Vortex, but it can be a bit unreliable with Hogwarts Legacy mods:
Download and unzip the contents of zKA-TreasureVaultFinder-11101_P.zip to your Hogwarts Legacy\Phoenix\Content\Paks\~mods folder
If the ~mods folder doesn't exist, you will need to create it
Start Hogwarts Legacy and load your most recent save-file
Press the F8 key, type KA-TreasureVaultFinder and hit Enter
If KA-TreasureVaultFinder stays on the top line, then either:
a) the .utoc, .ucas and .pak files were placed in the wrong folder b) one of your existing mods is already using pakchunk 11101 (use the PakChunk Checker designed by icouldifiwantedto to verify a conflict)
Usage
De-select any active missions
Press the F7 key and follow the path
If you change your mind and don't want to find the Vault, press Alt-F7
Default Key Bindings
By default this mod uses the following key bindings:
F7 = Find the nearest unlooted Treasure Vault
Alt-F7 = Cancel the search
SHIFT-F7 = Mark the current Vault as already looted
Custom Key Bindings
You can change the key bindings to anything you like as follows:
Go to your Hogwarts Legacy\Saved\Config\WindowsNoEditor folder and edit Input.ini
Search for KA-TreasureVaultFinder and change the keybind (shown in green) to whatever you want (key names can be found here)
If you installed manually: Delete the zKA-TreasureVaultFinder_P .utoc, .ucas, and .pak from the ~mods folder.
If you installed it via Vortex: Disable or uninstall it via Vortex BUT also check that it's gone from the ~mods folder afterwards
Conflicts
This mod uses pakchunk 11101 - if there is a conflict, you can either fix it using the Chunk ID Conflict Manager
Known Issues
The following are known issues. If you encounter others please let me know in the POSTS section.
The Lore Friendly Apparition mod can cause the mini-map pathing to stop working after you apparate inside a vault. This is a game bug.
If you have a mission selected the path can randomly switch from the Treasure Vault back to your mission. This is a game bug.
If you mount your broom the path will disappear. This is a game "feature" which can't currently be disabled. The work-around is to manually place a purple "waymarker" close to the location of the Vault and follow that.
You can only search for a Treasure Vault while you are in an 'overland' area (i.e. - not in a dungeon, Trial, etc.).
Spoiler:
Show
Field Guide Page Finder by icouldifiwantedto An open-source blueprint mod to help you find all 236 field guide pages (revelio pages, lumos moths, incendio dragons, leviosa statues and accio pages).
Introduction
Can't find those last few field guide pages? It can be a real challenge to find them all. But fear not! This mod will locate the nearest Field Guide Page and map your path to it. Use it repeatedly to find every single page in no time! You can even combine it with the Lore Friendly Apparition mod to apparate straight to them! (Except into / out-of / within Hogwarts.)
This mod will lead you to all 236 field guide pages:
There is a well-known bug in the game (for example see bug reports HL-4185, HL-11449, HL-12259, HL-12782, HL-12917, HL-13416, and others) which means that it sometimes doesn't recognise that you've already collected a Field Guide Page. In which case this mod might keep sending you to collect a Field Guide Page that you already have. If that happens, and you're absolutely positively 100% sure that you've definitely collected it already (and there is definitely not another page very close by) then from version 1.1 of this mod onwards you can hit CTRL-SHIFT-PageUp to mark the current search target as already collected. Please be sure though, because this process cannot currently be reversed.
Installation
You should be able to install the mod automatically using Vortex (then skip to step 4 below), but Vortex can be a bit unreliable with Hogwarts Legacy mods (it doesn't always delete mods properly) so I would recommend installing it manually as follows:
Download the mod.
Unzip the contents.
Move zMyFieldGuidePageFinder-1006_P.utoc, zMyFieldGuidePageFinder-1006_P.ucas, and zMyFieldGuidePageFinder-1006_P.pak to the Steam\steamapps\common\Hogwarts Legacy\Phoenix\Content\Paks\~mods\ folder.
Type MyFieldGuidePageFinder in the little window and hit the Enter key on your keyboard.
The word MyFieldGuidePageFinder should disappear and reappear lower down in that window with an X next to it. If it doesn't - if it stays on the top line - then either a) you put the .utoc, .ucas and .pak files in the wrong folder, or b) one of your existing mods is already using pakchunk 1006. Use my PakChunk Checker to check that. If you have a pakchunk conflict see the Conflicts section below.
Press F8 again to close the modloader window.
Note that you only need to follow the above process once. From now on the mod will just work.
Usage
De-select any active missions.
Press the PageUp button and follow the path.
If you change your mind and don't want to find that Field Guide Page right now, press PageDown.
Default Key Bindings
By default this mod uses the following key bindings:
PageUp = Find the nearest Field Guide Page.
PageDown = Cancel the search.
CTRL-SHIFT-PageUp = Mark the current search target as already collected.
Custom Key Bindings
You can change the key bindings to anything you like as follows:
Download & install the latest version of this mod, start the game, do the F8 thing (if you haven't already), load a save file, then shut down the game.
In Windows Explorer type %localappdata%\Hogwarts Legacy\Saved\Config\WindowsNoEditor into the address bar at the top and hit Enter.
Left click Input.ini then right click it and select "Edit" (or "Open with" > "Notepad").
Search for MyFieldGuidePageFinder. You should find entries like those below.
Change the items shown in green below to whatever you want. Key names can be found here.
1) If you installed it via Vortex: Disable or Uninstall it via Vortex. BUT also CHECK that it's gone from the ~mods folder afterwards. 2) Delete zMyFieldGuidePageFinder-1006_P.utoc, zMyFieldGuidePageFinder-1006_P.ucas, and zMyFieldGuidePageFinder-1006_P.pak from the ~mods folder.
Conflicts
This mod uses pakchunk 1006. You can check if that conflicts with any of your existing mods by running my PakChunk Checker batch script after you've installed the mod. If it does conflict, you can either fix it using the Chunk ID Conflict Manager or rebuild this mod yourself - see below.
Known Issues
The following are known issues. If you encounter others please let me know in the POSTS section.
If you have a mission selected the path can randomly switch from the Field Guide Page back to your mission. This is a game bug.
If you mount your broom the path will disappear. This is a game "feature" which I can't disable. The work-around is to manually place a purple "waymarker" close to the location of the Field Guide Page and follow that. Or use the Lore Friendly Apparition mod to apparate straight to the Field Guide Page.
Sometimes the nearest Field Guide Page will be behind a locked door. Sadly I can't detect that. There are three work-arounds: 1) Travel somewhere far away and do another search. Hopefully you'll find a different Field Guide Page and can come back for the inaccessible one later. 2) Use my Open All Locks (Blueprint Version) mod to open the lock. 3) Use the Lore Friendly Apparition mod (see below).
Sometimes the trail will end but there's no sign of a Field Guide Page. If that happens look for moth frames, statues, and flying pages. If none of those are nearby then look for locked doors on the floor above or below where the trail ends. The Field Guide Page is probably behind that locked door.
The Lore Friendly Apparition mod will not allow you to apparate into / out-of / within Hogwarts. Nor to unexplored territory. But it will let you apparate into rooms behind locked doors. 😉 Once inside you can only leave by apparating or fast-travelling out.
If you search for Field Guide Pages while you're in the Room of Requirement or a Dungeon you may not be able to see the path. Also, the "nearest" Field Guide Page may be in a distant part of the map. That's because places like the Room of Requirement are actually hidden in the uncharted out-of-bounds territory offshore. You need to leave those places for the mod to function correctly.
Inside Hogwarts the "nearest" Field Guide Page might be above or below you, and might therefore require a fairly long journey to get to it. It's possible that there are other Field Guide Pages which would require a shorter journey, but fixing this would be difficult and probably fall foul of bugs in the game.
Open Source
This mod forms part of a series of wiki articles I'm writing (this mod is in the 6th article) which aim to help beginners learn how to create blueprint mods for Hogwarts Legacy. The Blueprints for this mod are therefore Open Source - you can download them and play around with them yourself. That's not an entirely easy process though, so you'll need to read the first article in the series to learn how to do it. Nevertheless, once you've got everything set up you can recook this mod with whatever pakchunk and key bindings you like.
To find out more please join the Hogwarts Legacy Modding Discord and head to the wiki section. In there you'll find a pinned link to the first article in the series (called "Blueprint Example 101 - Hello World") which beginners should read first.
Can't find those last few Collection Items? It can be a real challenge to find them all. But fear not! This mod will locate the nearest Collection Chest and map your path to it. Use it repeatedly to find every single Collection Item in no time! You can even combine it with the Lore Friendly Apparition mod to apparate straight to them! (Except into / out-of / within Hogwarts.)
There are 764 chests in Hogwarts Legacy, of which 168 contain Collection Items, as follows:
22 Conjurations 22 Conjurations in Hamlets 25 Conjurations in Sub-worlds 12 Conjurations in Vivariums 50 Gear Traits in Bandit Camps 37 Wand Skins --- 168 TOTAL ---
However:
The game does not allow path-tracking in Sub-worlds or Vivariums, so this mod can't operate in those locations.
Bandit Camps are readily visible on the map and you might not want to tackle them right now, so I've excluded those.
So:
This mod will help you to find the remaining 81 "overland" Collection Chests.
If you already opened a chest
I don't know if this ever happens, but if you're led to a chest which is already open you can mark it as already opened using the keybind below..
Installation
I would recommend installing the mod manually as described below. You should be able to install the mod automatically using Vortex if you like (then skip to step 4 below), but Vortex can be a bit unreliable with Hogwarts Legacy mods (it doesn't always delete mods properly) so beware!
Download the mod.
Unzip the contents.
Move the .utoc, .ucas, and .pak files to the Steam\steamapps\common\Hogwarts Legacy\Phoenix\Content\Paks\~mods\ folder.
Type MyCollectionChestFinder in the little window and hit the Enter key on your keyboard.
The word MyCollectionChestFinder should disappear and reappear lower down in that window with an X next to it. If it doesn't - if it stays on the top line - then either a) you put the .utoc, .ucas and .pak files in the wrong folder, or b) one of your existing mods is already using pakchunk 1033. Use my PakChunk Checker to check that. If you have a pakchunk conflict see the Conflicts section below.
Press F8 again to close the modloader window.
Note that you only need to follow the above process once. From now on the mod will just work.
Usage
De-select any active missions.
Press the PageUp button and follow the path.
If you change your mind and don't want to find that Collection Chest right now, press PageDown.
Default Key Bindings
By default this mod uses the following key bindings:
PageUp = Find the nearest Collection Chest.
PageDown = Cancel the search.
CTRL-SHIFT-PageUp = Mark the current search target as already opened.
Note that these bindings are the same as my Field Guide Page Finder mod so if you have both mods installed at once you will need to change these default bindings to custom bindings (see below).
Custom Key Bindings
You can change the key bindings to anything you like as follows:
Download & install the latest version of this mod, start the game, do the F8 thing (if you haven't already), load a save file, then shut down the game.
In Windows Explorer type %localappdata%\Hogwarts Legacy\Saved\Config\WindowsNoEditor into the address bar at the top and hit Enter.
Left click Input.ini then right click it and select "Edit" (or "Open with" > "Notepad").
Search for MyTreasureChestFinder (not MyCollectionChestFinder). You should find entries like those below.
Change the items shown in green below to whatever you want. Key names can be found here.
1) If you installed it via Vortex: Disable or Uninstall it via Vortex. BUT also CHECK that it's gone from the ~mods folder afterwards. 2) Delete the zMyCollectionChestFinder-1033_P.utoc, .ucas, and .pak files from the ~mods folder.
Conflicts
This mod uses pakchunk 1033. You can check if that conflicts with any of your existing mods by running my PakChunk Checker batch script after you've installed the mod. If it does conflict, you can either fix it using the Chunk ID Conflict Manager or rebuild this mod yourself - see below.
Known Issues
The following are known issues. If you encounter others please let me know in the POSTS section.
If you have a mission selected the path can randomly switch from the Collection Chest back to your mission. This is a game bug.
If you mount your broom the path will disappear. This is a game "feature" which I can't disable. The work-around is to manually place a purple "waymarker" close to the location of the Collection Chest and follow that. Or use the Lore Friendly Apparition mod to apparate straight to the Collection Chest.
Sometimes the nearest Collection Chest will be behind a locked door. Sadly I can't detect that. There are three work-arounds: 1) Travel somewhere far away and do another search. Hopefully you'll find a different Collection Chest and can come back for the inaccessible one later. 2) Use my Open All Locks mod to open the lock. 3) Use the Lore Friendly Apparition mod (see below).
Sometimes the trail will end but there's no sign of a Collection Chest. If that happens cast Revelio to locate the chest. If you still can't see it look for locked doors on the floor above or below where the trail ends. The Collection Chest is probably behind that locked door.
The Lore Friendly Apparition mod will not allow you to apparate into / out-of / within Hogwarts. Nor to unexplored territory. But it will let you apparate into rooms behind locked doors. 😉 Once inside you can only leave by apparating or fast-travelling out.
This mod can't operate inside the Room of Requirement or a Sub-Level Dungeons because the game won't allow it.
Inside Hogwarts the "nearest" Collection Chest might be above or below you, and might therefore require a fairly long journey to get to it. It's possible that there are other Collection Chest which would require a shorter journey, but fixing this would be difficult and probably fall foul of bugs in the game.
Open Source
This mod forms part of a series of wiki articles I'm writing (this mod is in the 6th article) which aim to help beginners learn how to create blueprint mods for Hogwarts Legacy. The Blueprints for this mod are therefore Open Source - you can download them and play around with them yourself. That's not an entirely easy process though, so you'll need to read the first article in the series to learn how to do it. Nevertheless, once you've got everything set up you can recook this mod with whatever pakchunk and key bindings you like.
To find out more please join the Hogwarts Legacy Modding Discord and head to the wiki section. In there you'll find a pinned link to the first article in the series (called "Blueprint Example 101 - Hello World") which beginners should read first.
Can't find those last few demiguises? This mod will locate the nearest demiguise and map your path to it. Use it repeatedly to find every single demiguise in no time! You can even combine it with the Lore Friendly Apparition mod to apparate straight to them! (Except into / out of / within Hogwarts.)
Installation
You should be able to install the mod automatically using Vortex (then skip to step 4 below), but Vortex can be a bit unreliable with Hogwarts Legacy mods (it doesn't always delete mods properly) so I would recommend installing it manually as follows:
Download the mod.
Unzip the contents.
Move zMyDemiguiseFinder-106_P.utoc, zMyDemiguiseFinder-106_P.ucas, and zMyDemiguiseFinder-106_P.pak to the Steam\steamapps\common\Hogwarts Legacy\Phoenix\Content\Paks\~mods\ folder.
Type MyDemiguiseFinder in the little window and hit the Enter key on your keyboard.
The word MyDemiguiseFinder should disappear and reappear lower down in that window with an X next to it. If it doesn't - if it stays on the top line - then either a) you put the .utoc, .ucas and .pak files in the wrong folder, or b) one of your existing mods is already using pakchunk 106. Use my PakChunk Checker to check that. If you have a pakchunk conflict see the Conflicts section below.
If it worked you should see a message on-screen saying that the mod has initialised.
Press F8 again to close the modloader window.
Note that you only need to follow the above process once. From now on the mod will just work.
Usage
De-select any active missions.
Press the HOME button and follow the path.
If you change your mind and don't want to find that demiguise right now, press SHIFT-HOME .
Default Key Bindings
By default this mod uses the following key bindings:
HOME = Find the nearest demiguise
SHIFT-HOME = Cancel the search.
Custom Key Bindings
You can change the key bindings to anything you like as follows:
Download & install the latest version of this mod, start the game, do the F8 thing (if you haven't already), load a save file, then shut down the game.
In Windows Explorer type %localappdata%\Hogwarts Legacy\Saved\Config\WindowsNoEditor into the address bar at the top and hit Enter.
Left click Input.ini then right click it and select "Edit" (or "Open with" > "Notepad").
Search for MyDemiguiseFinder. You should find entries like those below.
Change the items shown in green below to whatever you want. Key names can be found here.
If you installed it via Vortex: Disable or Uninstall it via Vortex. BUT also CHECK that it's gone from the ~mods folder afterwards.
Delete zMyDemiguiseFinder-106_P.utoc, zMyDemiguiseFinder-106_P.ucas, and zMyDemiguiseFinder-106_P.pak from the ~mods folder.
Conflicts
This mod uses pakchunk 106. You can check if that conflicts with any of your existing mods by running my PakChunk Checker batch script after you've installed the mod. If it does conflict, you can either fix it using the Chunk ID Conflict Manager or rebuild this mod yourself - see below.
Known Issues
The following are known issues. If you encounter others please let me know in the POSTS section.
If you have a mission selected the path can randomly switch from the demiguise back to your mission. This is a game bug.
If you mount your broom the path will disappear. This is a game "feature" which I can't disable. The work-around is to manually place a purple "waymarker" close to the location of the demiguise and follow that. Or use the Lore Friendly Apparition mod to apparate straight to the demiguise.
Sometimes the nearest demiguise will be behind a locked door. Sadly I can't detect that. There are three work-arounds: 1) Travel somewhere far away and do another search. Hopefully you'll find a different demiguise and can come back for the inaccessible one later. 2) Use my Open All Locks (Blueprint Version) mod to open the lock. 3) Use the Lore Friendly Apparition mod (see below).
Sometimes the trail will end but there's no sign of a demiguise. If that happens look for locked doors on the floor above or below where the trail ends. The demiguise is probably behind that locked door.
The Lore Friendly Apparition mod will not allow you to apparate into / out-of / within Hogwarts. Nor to unexplored territory. But it will let you apparate into rooms behind locked doors. 😉 Once inside you can only leave by apparating or fast-travelling out.
If you search for demiguises while you're in the Room of Requirement or a Dungeon you may not be able to see the path. Also, the "nearest" demiguise may be in an distant part of the map. That's because places like the Room of Requirement are actually hidden in the uncharted out-of-bounds territory offshore. You need to leave those places for the mod to function correctly.
Inside Hogwarts the "nearest" demiguise might be above or below you, and might therefore require a fairly long journey to get to it. It's possible that there are other demiguises which would require a shorter journey, but fixing this would be difficult and probably fall foul of bugs in the game.
Open Source
This mod forms part of a series of wiki articles I'm writing (this mod is in the 6th article) which aim to help beginners learn how to create blueprint mods for Hogwarts Legacy. The Blueprints for this mod are therefore Open Source - you can download them and play around with them yourself. That's not an entirely easy process though, so you'll need to read the first article in the series to learn how to do it. Nevertheless, once you've got everything set up you can recook this mod with whatever pakchunk and key bindings you like.
To find out more please join the Hogwarts Legacy Modding Discord and head to the wiki section. In there you'll find a pinned link to the first article in the series (called "Blueprint Example 101 - Hello World") which beginners should read first.
NPC Finder by icouldifiwantedto Helps you find named-NPC's (Hogwarts students and staff) by plotting a path to them.
Introduction
It can be quite frustrating when you want to find a particular named-NPC (e.g. a student or a professor) because the game gives you no clues about where they might be. If this was a real school they'd be in class, or in their Common Room, but by default Hogwarts Legacy has no regular classes and NPC's mysteriously vanish at night. This mod is intended to solve that issue by plotting a path to whichever named-NPC you're looking for.
Installation
I would recommend installing the mod manually as described below. You should be able to install the mod automatically using Vortex if you like (then skip to step 4 below), but Vortex can be a bit unreliable with Hogwarts Legacy mods (it doesn't always delete mods properly) so beware!
Download the mod.
Unzip the contents.
Move the .utoc, .ucas, and .pak files to the Steam\steamapps\common\Hogwarts Legacy\Phoenix\Content\Paks\~mods\ folder.
Type NPCFinder in the little window and hit the Enter key on your keyboard.
The word NPCFinder should disappear and reappear lower down in that window with an X next to it. If it doesn't - if it stays on the top line - then either a) you put the .utoc, .ucas and .pak files in the wrong folder, or b) one of your existing mods is already using pakchunk 1046. Use my PakChunk Checker to check that. If you have a pakchunk conflict see the Conflicts section below.
Press F8 again to close the modloader window.
Note that you only need to follow the above process once. From now on the mod will just work.
Usage
1a) EITHER: Press ALT-N repeatedly to find each student in turn. Stop when you reach the one you're looking for. 1b) OR: Press CTRL-ALT-N repeatedly to find each member of staff in turn. Stop when you reach the one you're looking for. 2a) Follow the trail on the minimap or press V to see it on-screen. 2b) By the time you reach the end of the trail you might find that the NPC is no longer there. If so: 2c) Press ALT-F to find the same NPC again. 2d) Press V to see the path on-screen. If you're close you should see an explosion of golden glitter where the NPC is located. 3) If you change your mind and don't want to find that NPC right now, press CTRL-ALT-F.
Default Key Bindings
By default this mod uses the following key bindings:
ALT-N = Find the next student (alphabetically).
CTRL-ALT-N = Find the next member of staff (alphabetically).
ALT-F = Find the current NPC again.
CTRL-ALT-F = Cancel the search.
Custom Key Bindings
You can change the key bindings to anything you like as follows:
Download & install the latest version of this mod, start the game, do the F8 thing (if you haven't already), load a save file, then shut down the game.
In Windows Explorer type %localappdata%\Hogwarts Legacy\Saved\Config\WindowsNoEditor into the address bar at the top and hit Enter.
Left click Input.ini then right click it and select "Edit" (or "Open with" > "Notepad").
Search for NPCFinder. You should find entries like those below.
Change the items shown in green below to whatever you want. Key names can be found here.
1) If you installed it via Vortex: Disable or Uninstall it via Vortex. BUT also CHECK that it's gone from the ~mods folder afterwards. 2) Delete the .utoc, .ucas, and .pak files from the ~mods folder.
Conflicts
This mod uses pakchunk 1046. You can check if that conflicts with any of your existing mods by running my PakChunk Checker batch script after you've installed the mod. If it does conflict, you can either fix it using the Chunk ID Conflict Manager or rebuild this mod yourself - see below.
Known Issues
The following are known issues. If you encounter others please let me know in the POSTS section.
The trail doesn't update until the player moves.
Some NPC's are listed as "missing". That's because they're not scheduled to do anything at whatever the current day/time is in the game.
When you reach the end of the trail the NPC is sometimes not there. That's because they moved! Press ALT-F and V to find them again.
Sometimes the mod will insist that an NPC is at a certain location, but nobody is there. That's usually because the NPC in question is there on some days of the week, but not there (i.e. invisible) on others. In the default game this applies to Adelaide Oaks, Everett Clopton, Sophronia Franklin and Agnes Scriven (the Librarian) all of whom are only visible Monday to Friday. It also applies to Phineas Black (the Headmaster) most of the time. But it might apply to other NPC's if you have mods installed which alter the NPC schedules.
Overview Ever noticed that sometimes, you'll pick a dialogue option and your character says something completely different than what you were expecting? Didn't mean to be that condescending? DID mean to be condescending, but your character turned out to put it mildly? Well, this mod fixes that!
I've essentially just rephrased the entirety of the dialogue choices in the game to better reflect what your character's about to say.
This mod also fixes one of the biggest issues with the dialogue in this game: the illusion of choice. I won't get into spoilers, but you'll run into a few instances of thinking you HAVE to make a major decision with a dialogue choice, but it turned out to just be... the same. No more of that. You'll now know where your character's head at.
Additionally, I've added a (Lie) suffix to dialogue choices just to add some spice.
Files Accurate Dialogue Choices This file is for my manual re-write of the dialogue choices. You'll generally get an idea of the dialogue choice, but not the full line. Additionally, if you're telling a bold-faced lie, then the game will indicate that! Here's an example:
Full Dialogue Choices Shows the exact line that your character is about to say! Here's an example:
This file also includes the Lie indicator in the options! If you'd like full dialogue choices without the indicators, then check out yakuzadeso's dialogue choices mod!
Optional Files
Accurate Dialogue Choices, but without the (Lie) suffix.
Installation
Download the file you'd like (Only choose one!)
Open the archive and drop the .pak file in your game directory's Phoenix/Content/Paks/~mods folder
Uninstallation
Remove the pak file from your ~mods folder
Other Info Incompatibilities This mod makes changes to the following file found in your game's default pak files:
Phoenix/Content/Localization/WIN64/SUB-enUS.bin
Any mods that edit this file are likely incompatible. Some example mods that are unfortunately incompatible are:
I am unfortunately not multilingual so this is for English only. :( If someone is multilingual and would like to make a translation mod, you have my full permission to upload it as a mod!
To Do
Create "Full Dialogue Choices" for other languages. (There's actually no need for this! yakuzadeso's dialogue choices mod is basically the Full Dialogue Choices file here but without lie indicators for all languages.)
Add a section here to list all my dialogue changes, just for those who are interested.
Put my changes onto Github so people can check out how my changes were made or would like to take a knack at making their own dialogue edits.
Have the modded subtitle file override the other language files, for those who want the modded subtitles but keep their game in another language.
Credits
lordvoldem0rt for his excellent tool Parseltongue! This wouldn't have been possible without it.
Vendor Refresh Button by Dekita Adds a button into the vendor screen that allows you to refresh stock for the measly fee of 50 knuts.
Features:
Button to refresh vendor stock
Immediately refreshes stock
Lore friendly 50 knuts fee (what convenience method is free after all?)
REQUIREMENTS / HOW TO USE: UICore - ALWAYS REQUIRED - Regardless of chosen modloader. A modloader such as UE4SS or Apparate Modloader is required to use logic mods. DONT LOAD THE SAME MOD IN BOTH MODLOADERS
Install this mods .pak, .utoc, and .ucas files to Hogwarts Legacy\Phoenix\Content\Paks\~mods Press F8 (when in game) to open the modloader menu, type DekVendorRefreshButton This mod should now be listed within the apparate modloader menu.
NOTE: If your having trouble getting the mod working with apparate modloader, try renaming the mod files to have a ! in front of their name. This seems to be a priority issue when using a lot of mods.
KNOWN ISSUES: This mod uses pak chunk 1317 and may be incompatible with other mods that do so.
Spoiler:
Show
Sell All Button by Dekita Adds a button to the vendor sell screen to allow you to sell all items in one click <3
Features:
Fancy vendor sell all button <3
REQUIREMENTS / HOW TO USE: VendorRefreshAll - ALWAYS REQUIRED - Regardless of chosen modloader. UICore - ALWAYS REQUIRED - Regardless of chosen modloader. A modloader such as UE4SS or Apparate Modloader is required to use logic mods. DONT LOAD THE SAME MOD IN BOTH MODLOADERS
Install this mods .pak, .utoc, and .ucas files to Hogwarts Legacy\Phoenix\Content\Paks\~mods Press F8 (when in game) to open the modloader menu, type DekVendorSellAll This mod should now be listed within the apparate modloader menu.
NOTE: If your having trouble getting the mod working with apparate modloader, try renaming the mod files to have a ! in front of their name. This seems to be a priority issue when using a lot of mods.
KNOWN ISSUES: This mod uses pak chunk 1319 and may be incompatible with other mods that do so.
Information: When you initially unlock the broom, you will be able to allocate your 'broom stat points' from the broom tab in your gear menu. You will begin with only 3 available points, but for each broom upgrade level, you will gain that level in additional points, so 1 point for level 1, 2, for 2, and 3 points for level 3. This is to keep in line with game progression and makes broom upgrades much more significant and worthwhile.
Default Broom: 3 upgrade points total Level 1 upgrade: 4 upgrade points total Level 2 upgrade: 6 upgrade points total Level 3 upgrade: 9 upgrade points total
It is not possible to max out all stats <3
REQUIREMENTS / HOW TO USE: UICore - ALWAYS REQUIRED - Regardless of chosen modloader. A modloader such as UE4SS or Apparate Modloader is required to use logic mods. DONT LOAD THE SAME MOD IN BOTH MODLOADERS
Install this mods .pak, .utoc, and .ucas files to Hogwarts Legacy\Phoenix\Content\Paks\~mods Press F8 (when in game) to open the modloader menu, type DekBetterBroomUpgrades This mod should now be listed within the apparate modloader menu.
NOTE: If your having trouble getting the mod working with apparate modloader, try renaming the mod files to have a ! in front of their name. This seems to be a priority issue when using a lot of mods.
KNOWN ISSUES: This mod uses pak chunk 1320 and may be incompatible with other mods that do so.
Spoiler:
Show
Broom Speedometer by Dekita Adds a simple animated UI that displays your speed while flying :)
Install this mods .pak, .utoc, and .ucas files to Hogwarts Legacy\Phoenix\Content\Paks\~mods Press F8 (when in game) to open the modloader menu, type DekBroomSpeedometer This mod should now be listed within the apparate modloader menu.
NOTE: If your having trouble getting the mod working with apparate modloader, try renaming the mod files to have a ! in front of their name. This seems to be a priority issue when using a lot of mods.
You should consider using ApparateUI when using the apparate blueprint modloader :)
KNOWN ISSUES: This mod uses pak chunk 1321 and may be incompatible with other mods that do so.
I would recommend installing the mod manually as described below. You should be able to install the mod automatically using Vortex if you like (then skip to step 4 below), but Vortex can be a bit unreliable with Hogwarts Legacy mods (it doesn't always delete mods properly) so beware!
Download the mod.
Unzip the contents.
Move the .utoc, .ucas, and .pak files to the Steam\steamapps\common\Hogwarts Legacy\Phoenix\Content\Paks\~mods\ folder.
Type DisableWindFX in the little window and hit the Enter key on your keyboard.
The word DisableWindFX should disappear and reappear lower down in that window with an X next to it. If it doesn't - if it stays on the top line - then either a) you put the .utoc, .ucas and .pak files in the wrong folder, or b) one of your existing mods is already using pakchunk 1052. Use my PakChunk Checker to check that. If you have a pakchunk conflict see the Conflicts section below.
Press F8 again to close the modloader window.
Note that you only need to follow the above process once. From now on the mod will just work.
Usage
Just use your broom or mounts as usual. You should find that wind FX are automatically disabled.
How to Un-Install
Either:
1) If you installed it via Vortex: Disable or Uninstall it via Vortex. BUT also CHECK that it's gone from the ~mods folder afterwards. 2) Delete the .utoc, .ucas, and .pak files from the ~mods folder.
Conflicts
This mod uses pakchunk 1052. You can check if that conflicts with any of your existing mods by running my PakChunk Checker batch script after you've installed the mod. If it does conflict, you can either fix it using the Chunk ID Conflict Manager or rebuild this mod yourself - see below.
Spoiler:
Show
Skip Merlin Trials by icouldifiwantedto Solve Merlin Trials instantly at the press of a button. No more annoyingly repetitive tasks or time-consuming cinematics!
Introduction
This mod does two things:
It allows you to skip Merlin Trials entirely (by instantly completing them).
Or, if you want to actually do the Trial, it enables the skip feature on the animation at the end.
Installation
I would recommend installing the mod manually as described below. You should be able to install the mod automatically using Vortex if you like (then skip to step 4 below), but Vortex can be a bit unreliable with Hogwarts Legacy mods (it doesn't always delete mods properly) so beware!
Download the mod.
Unzip the contents.
Move the .utoc, .ucas, and .pak files to the Steam\steamapps\common\Hogwarts Legacy\Phoenix\Content\Paks\~mods\ folder.
Type SkipMerlinTrials in the little window and hit the Enter key on your keyboard.
The word SkipMerlinTrials should disappear and reappear lower down in that window with an X next to it. If it doesn't - if it stays on the top line - then either a) you put the .utoc, .ucas and .pak files in the wrong folder, or b) one of your existing mods is already using pakchunk 1049. Use my PakChunk Checker to check that. If you have a pakchunk conflict see the Conflicts section below.
Press F8 again to close the modloader window.
Note that you only need to follow the above process once. From now on the mod will just work.
Default Key Bindings
By default this mod uses the following key bindings:
ALT-M = Instantly complete a nearby Merlin Trial.
Custom Key Bindings
You can change the key bindings to anything you like as follows:
Download & install the latest version of this mod, start the game, do the F8 thing (if you haven't already), load a save file, then shut down the game.
In Windows Explorer type %localappdata%\Hogwarts Legacy\Saved\Config\WindowsNoEditor into the address bar at the top and hit Enter.
Left click Input.ini then right click it and select "Edit" (or "Open with" > "Notepad").
Search for SkipMerlinTrials. You should find entries like those below.
Change the items shown in green below to whatever you want. Key names can be found here.
1) If you installed it via Vortex: Disable or Uninstall it via Vortex. BUT also CHECK that it's gone from the ~mods folder afterwards. 2) Delete the .utoc, .ucas, and .pak files from the ~mods folder.
Conflicts
This mod uses pakchunk 1049. You can check if that conflicts with any of your existing mods by running my PakChunk Checker batch script after you've installed the mod. If it does conflict, you can either fix it using the Chunk ID Conflict Manager or rebuild this mod yourself - see below.
Known Issues
There are currently no known issues. If you encounter any please let me know in the POSTS section.
Instantly skips forward in time by 1h, 3h, 6h, 12h, 24h, 72h (3 days, which is useful for forcing the shops to re-stock) or backwards in time by 24h.
It will also display the date & time on-screen (briefly).
Installation
I would recommend installing the mod manually as described below. You should be able to install the mod automatically using Vortex if you like (then skip to step 4 below), but Vortex can be a bit unreliable with Hogwarts Legacy mods (it doesn't always delete mods properly) so beware!
Download the mod.
Unzip the contents.
Move the .utoc, .ucas, and .pak files to the Steam\steamapps\common\Hogwarts Legacy\Phoenix\Content\Paks\~mods\ folder.
Type MyTimeSkip in the little window and hit the Enter key on your keyboard.
The word MyTimeSkip should disappear and reappear lower down in that window with an X next to it. If it doesn't - if it stays on the top line - then either a) you put the .utoc, .ucas and .pak files in the wrong folder, or b) one of your existing mods is already using pakchunk 108. Use my PakChunk Checker to check that. If you have a pakchunk conflict see the Conflicts section below.
Press F8 again to close the modloader window.
Press F7 to check that the mod is working. You should see the time & date displayed on-screen for a few seconds.
Note that you only need to follow the above process once. From now on the mod will just work.
Default Key Bindings
By default this mod uses the following key bindings:
F7 = Display the date & time on-screen for a few seconds.
SHIFT-F7 = Skip forward in time by 1 hour.
CTRL-F7 = Skip forward in time by 3 hours.
ALT-F7 = Skip forward in time by 6 hours.
SHIFT-CTRL-F7 = Skip forward in time by 12 hours.
SHIFT-ALT-F7 = Skip forward in time by 24 hours.
CTRL-ALT-F7 = Skip forward in time by 72 hours (3 days).
SHIFT-CTRL-ALT-F7 = Skip backward in time by 24 hours.
Custom Key Bindings
You can change the key bindings to anything you like as follows:
Download & install the latest version of this mod, start the game, do the F8 thing (if you haven't already), load a save file, then shut down the game.
In Windows Explorer type %localappdata%\Hogwarts Legacy\Saved\Config\WindowsNoEditor into the address bar at the top and hit Enter.
Left click Input.ini then right click it and select "Edit" (or "Open with" > "Notepad").
Search for MyTimeSkip. You should find entries like those below.
Change the items shown in green below to whatever you want. Key names can be found here.
1) If you installed it via Vortex: Disable or Uninstall it via Vortex. BUT also CHECK that it's gone from the ~mods folder afterwards. 2) Delete the .utoc, .ucas, and .pak files from the ~mods folder.
Conflicts
This mod uses pakchunk 108. You can check if that conflicts with any of your existing mods by running my PakChunk Checker batch script after you've installed the mod. If it does conflict, you can either fix it using the Chunk ID Conflict Manager or rebuild this mod yourself - see below.
Known Issues
There are currently no known issues. If you encounter any please let me know in the POSTS section.
Make sure you have Apparate Modloader Extract mod to: C:\SteamLibrary\steamapps\common\Hogwarts Legacy\Phoenix\Content\Paks\~mods\ Start game, Press F8 and type MRSlots
How to use:
The sets appear next to your Quick Wheel, this has the added benefit of pausing the game while you switch sets.
The mod can snapshot whatever you have slotted in your current selected set
Controls:
Hold Tab/L1/R1 As normal to show the Quick Wheel
Down select a set Works with keyboard arrows, DPad or analogue stick
Left deselect the sets Optional in case you choose not to switch sets
Hold R/RT Save your current equipped spell set to the highlighted set.
Release Tab/L1/R1 When the wheel closes it will automatically equip your selected set
Delete Save:
If you want to reset the save, the mod saves it file to here:
NumPad Version Num . = Disillusionment Num 0 = LumosNum 1 = ReparoNum 2 = Wingardium
Gamepad Controls While holding RB(Xbox) or (R1 PS): D-Pad Down = Disillusionment D-Pad Up = Lumos D-Pad Left = Reparo D-Pad Right = Wingardium
Spoiler:
Show
Auto Loot and Interactions by Dekita Automatically collect chests, loot drops and foragable items such as leaping toadstools, lacewing flies, and ashwinder eggs... Or go even further and enable full automatic interactions!!!
VERSIONS:
AutoLoot:
Collects chests, loot drops and foragable items such as leaping toadstools, lacewing flies, and ashwinder eggs... (doesnt collect leech juice as it seems to be a niagra effect, rather than an actor)
AutoInteract:
Simulates the interaction button frequently. Press Shift+F to toggle AutoInteract if you get stuck petting some random cat :D
KNOWN ISSUES: AutoLoot version doesnt collect leech juice. AutoInteract version might cause unwanted interactions. Doesnt won't work if you changed the interaction key from 'F' to something else in the game settings menu.
This mod uses pak chunk 73 and may be incompatible with other mods that do so.
With Apparate Modloader: Install this mods .pak, .utoc, and .ucas files to Hogwarts Legacy\Phoenix\Content\Paks\~mods Press F8 (when in game) to open the modloader menu, type DekAutoLoot This mod should now be listed within the apparate modloader menu. Note, this is what you type here regardless of mod version used. Only 1 version can be used at a time.
NOTE: If your having trouble getting the mod working with apparate modloader, try renaming the mod files to have a ! in front of their name. This seems to be a priority issue when using a lot of mods
Replaces Title Screen music by Hedwig’s Theme. See video tab to hear the theme.
This mod is divided in 3 folders. The main reason is technical. I won't go and explain everything down below.. But it isn't possible ATM to loop a song entirely. Since the original file is 2 minutes 45 seconds, I'll looped them the best I could, added some fade in and fade outs, and equalized the music (it was really loud). You can only use 1 folder at a time.
Here are the timestamps (use video) :
Hedwig's 1 (Calm and cozy) : 00:00 to 00:33 Hedwig's 2 : 00:43 to 02:27 Hedwig's 3 (Full Orchestra) : 02:27 to 05:00
Replaces the music played by the string quartet in the Defense Against The Dark Arts Tower with Violin/Cello cover of 'Secrets' by OneRepublic.
Example Video:
Credit to the authors of the piece - Violinist Geneviève Salamone and Cellist Kendra Grittani
How to install:
Download and unzip the file
Copy the extracted file to ...\Hogwarts Legacy\Phoenix\Content\Paks\~mods
Install only one song file, as you can't have several songs running at the same time!
How to uninstall:
Remove the downloaded file from ...\Hogwarts Legacy\Phoenix\Content\Paks\~mods
Incompatible with other mods that change the Dark Arts tower music.
Update:
*23.05.2023 Added another piece per request in the comments. Replaces the music in the DADA Tower with Nobody Gets Me - SZA Cover from Netflix's Queen Charlotte Series.
Example Video:
*28.05.2023 Added another piece - Another Love (Tom Odell cover) Credit to the authors of the piece - Feuerbach Quartett: Jamila Musayeva, Max Eisinger, Eugen Hubert, Lukas Kroczek
Example Video:
*03.06.2023 Added 2 versions of a piece as per request in the comments - Paint it Black cover
Example Video:
Credit to the author of the piece - Nicholas Yee
Example Video:
Credit to the authors of the piece - 4Tune quartet: Roxana Barsan, Corina Tofănel, Simona Gurău, Alexandra Enache
*30.06.2023 Added another piece - Shallow (Lady Gaga cover) Credit to the authors of the piece - VitaminString Quartet
AnyTimeCompanion by IMrPez AnyTimeCompanion is a simple mod that allows you to spawn some of your classmates as companions using an In-game menu. The companions work just like they do at any other point of the game.
IMPORTANT Not all of the companions have spells by default, and balancing can be a bit off, so I would DEFINITELY recommend getting the Companion Mod!
Spawnable Companions - I'll be adding more companions soon, but this is currently the few I added. Abraham Ronen Adelaide Oakes Aesop Sharp Amit Kakkar Astoria Crickett Charlotte Morrison Cressida Blume Dinah Hecat Duncan Hobhouse Eleazar Fig Everett Clopton Garreth Weasley Imelda Reyes Leander Prewett Lucan Brattleby Matilda Weasley Mirabel Garlick Mudiwa Onai Natsai Onai Nellie Oggspire Nerida Roberts Ominis Gaunt Phineas Black Poppy Sweeting Smanantha Dale Sebastian Sallow Zenobia Noke Feenky Solomon Sallow Anne Sallow Ruth Singer Peeves Nearly Headless Nick Scrope Fastidio Lodgok Sirona Victor Rookwood Chiyo Kogawa
Installation 1. To install, extra zip into the Hogwarts legacy rootfolder/Phoenix/Content/Paks. 2. Now enter the game and load the mod by openingthe mod loader with ‘F8’, and typing ‘AnyTimeC’ and press enter, the mod should now enter the list of the mod loader. 3. Now you can press Alt+O (Not zero) to open the menu and select your companion. You can also dismiss your companion from this menu. Make sure you exit the menu through the exit button, NOT esc, this will make the cursor go away, to bring it back just hit esc again.
WARNING This is VERY likely to bug quests if you trying to spawn them during the quests, if you’re going to try this, BACKUP YOUR SAVE!
Spoiler:
Show
Companions Mod by Khione95 This mod/guide allows you to take companions with you on your adventures
If you are already using AnyTimeCompanion just download one of the main files and put it in your "~mods" folder.
Hello everybody, I found a way to take companions with us by editing SQL data of our save files. Makig a mod using SQL data does not work because game saves overwrite the values we set. The mod file includes a list with useable companions and a custom mod that changes companions. Professors as well as students work as companions.
Method 1:
There is a new blueprint mod to get companions in game now. Credit goes to Pez
The Blueprint mod: AnyTimeCompanion Don't forget to download my custom mod if you want most of them to have spells. (Also adds new spells to main companions.) If you are using this mod you don't have to use method 2.
How do Companions work
They follow you anywhere in map. If you use broom and if they are stuck behind they tp to you.
They cast lumos when you cast lumos.
They use disillusionment when you use disillusionment.
They fight enemies with you.
They can come to Room of Requirements with you.
They can come to battle arenas.
Some of them will comment on things. (Other characters, side quests, when fighting enemies etc.)
Check the videos to see how they work.
Important Warning: Do not use companions if you are doing their quest.
What does the main file include
Most companions are missing spells in the game so they won't fight. This mod fixes the issue.
Added at least 1 spell to all of the companions. So every companion has 7 spells in total including stupefy. Example Professor Garlic uses chinese chomping cabbages and Sebastian uses petrificus.
Added them to npclevelscaling so their level scales with you. They will deal less damage when you are low level and higher damage when you are higher level.
This mod adds Avada Kedavra and Crucio to companions as useable spells.
Installation: Drop the file in Hogwarts Legacy\Phoenix\Content\Paks\~mods
If you have any other mod that modifies SQL data, use Mod Merger
Update 1.0.1 notes: Fixed students not using unforgiveables issue Removed curses from Crossed Wands Dueling Club (Was not fun getting avada kedavrad from a 13 years old.) Added companions to npcleveledlist
This simple mod replaces the outfits of several NPCs to various school uniform looks.
NPC Uniform Options:
Version 1: Hogwarts Uniforms without Robes (released 2023/04/18)
Version 2: Winter Attire; adds jackets and scarves (released 2023/04/19)
Version 3: Casual Uniforms without Robes (released 2023/05/09) PLEASE VIEW RELEASE NOTES
*SEE IN-GAME IMAGES BELOW*
This mod has two chunk options: 213 or 231. Place the files in your ~mods folder. Removing the mod will revert all NPCs to their default outfits.
You may only have ONE version in your ~mods folder at a given time. To swap between Version 1 or Version 2 or Version 3, you must manually replace the zzNPCalternative files with the zzNPCaltWinter or zzNPCaltCasual files. (I know it's kind of a pain, sorry!) RELEASE NOTES FOR VERSION 3: You may notice that this version of the mod is much larger than the others. This is not only a simple Data Asset modification, but it also changes the Skeletal Meshes of the NPCs that are wearing outfits with rolled-up sleeves. As such, there are some quirks: if you are using AnyTimeCompanion, please use the "Normal" outfit, as the "Alternative" option will NOT work for Sebastian, Natty, or Poppy. They will not have hands. THIS IS EXPECTED. Fixing this issue would make the mod even larger than it already is.
*Please note that Ominis's wand arm is a little wonky. Unfortunately not much can be done to address this.
NOTE: Known conflict with mod "Lily - Edited Female Face 13". If you have this mod, please ensure you download the files labeled with Chunk ID 231. NOTE: Likely conflicts with other mods that change NPC appearances.
Huge thank you to the HL Modding Discord-- Narknon, Tangerie, Hoax, ll500, and the mod testers, Maggie (sometimesfox on Nexus) and Ben (chaddraganddrop on Nexus).
Additional thank you to Sophia (miss__soapy on TikTok) for outfit inspo, and also for promoting this mod! :) Be sure to check out her incredible edits!
This mod changes all the Hogwarts NPC students' uniforms (Prefect's, Student's (the named), T3Student's, T3YoungStudent's & T4Student's). It uses already existing vanilla uniforms, more specifically the ones that are available for MC to wear. This mod is good for making the Hogwarts experience more immersive. There is also a version of this mod that makes the use of hyacinth13's Alternative Uniforms for NPCs (or other mods that edit some of the named students) possible. That way you can have some of the named students look the way you want, while the rest of the Hogwarts students still look more diverse.
I would recommend getting Khione95's mod NPC Schedule Enhanced (Better AI), with that mod installed you will (amongst other things) be able to find your prefects around Hogwarts, who now actually look different from the rest.
!OBS! This mod makes the students' uniforms more detailed compared to the vanilla game files, therefore you might experience some fps drops (depending on your software).
Installation
1. Download the mod 2. Unzip the folder 3. Take the 3 files (diverseNPCuniforms_P.pak, diverseNPCuniforms_P.ucas & diverseNPCuniforms_P.utoc) and add them to your ~mods folder (create the folder if you do not have it already). (Your path probably looks like this C:\Program Files (x86)\Steam\steamapps\common\Hogwarts Legacy\Phoenix\Content\Paks\~mods) 4. Start the game and you should be able to see the Hogwarts students in different uniforms
How to un-install
1. Remove the 3 files (diverseNPCuniforms_P.pak, diverseNPCuniforms_P.ucas & diverseNPCuniforms_P.utoc) from your ~mods folder
Conflicts
This mod uses pakchunk 33, if you are using another mod with this pakchunk this mod will not work. The mod changes almost all of the data assets (DA) that are located in these game folders: Prefect, Student, T3Student, T3YoungStudent & T4Student If you are using another mod, that makes changes to those files, the mod will not work. When using this mod with the AnyTimeCompanion mod, make sure to set the outfits to normal (on the students where there is an alternative outfit option). Also if you are using mods that change MC's clothing there might be conflicts with those too, depending on which files.
Known issues/Help
- The spring version of the mod crashes after a few minutes in game (especially when near the great hall) - I'm looking into it Spring Version - Archived (Don't complain to the mod author about potential problems with the Spring Version, because it's archived for a reason! See Above. Since it's the closest we have to a fully functional Spring version of Diverse NPC Uniforms, and with all other seasons already accounted for, I thought it appropriate to share it with you. I myself haven't tested it so if you're feeling brave then by all means...)
- I can't figure out how to put robes on T4 students, so I can only change their outfits
If you're having any problems with the mod, you're welcome to write about it in POSTS, or make a report in BUGS (providing a screenshot will help me better understand what the problem is). I will help you to the best of my capabilities :D
Future content ideas
- Make versions of the mod for all seasons - Make a version of the mod with the students wearing hats - Make a version of the mod where some students wear robes and some don't - Make a version of the mod where all the students' faces have been redone to look less boring and they can wear short-sleeved outfits
If you have any ideas or wishes for a version of the mod, you can write it in POSTS. Do keep in mind some things aren't doable for me and also that it takes quite some time to make all the changes to so many data assets.
There is already a mod to unlock all gear (called Unlock All Gear) but what if you only want to unlock a few items? Well, that's what this mod does! It unlocks specific gear items (gloves, glasses, hats, scarves, robes, outfits or wand handles) so you can transmogrify what you're wearing into those gear items without having to find them. To specify which items you want to unlock you just type their names into the Engine.ini file (see below). Up to nine items can be unlocked at a time. Those unlocks will be baked into your next save file, so you can unlock nine more after that if you like.
Acknowledgements
Special thanks to nathdev for their invaluable assistance with the Engine.ini config setup.
Installation
I would recommend installing the mod manually as described below. You should be able to install the mod automatically using Vortex if you like (then skip to step 4 below), but Vortex can be a bit unreliable with Hogwarts Legacy mods (it doesn't always delete mods properly) so beware!
Download the mod.
Unzip the contents.
Move the .utoc, .ucas, and .pak files to the Steam\steamapps\common\Hogwarts Legacy\Phoenix\Content\Paks\~mods\ folder.
Type UnlockSpecificGear in the little window and hit the Enter key on your keyboard.
The word UnlockSpecificGear should disappear and reappear lower down in that window with an X next to it. If it doesn't - if it stays on the top line - then either a) you put the .utoc, .ucas and .pak files in the wrong folder, or b) one of your existing mods is already using pakchunk 1037. Use my PakChunk Checker to check that. If you have a pakchunk conflict see the Conflicts section below.
Press F8 again to close the modloader window.
Note that you only need to follow the above process once. From now on the mod will just work.
Key Bindings
There are no key-bindings. The mod will automatically unlock the gear items that you list in the Engine.ini file.
How to Specify which Items to Unlock
Add the following to your C:\Users\[username]\AppData\Local\Hogwarts Legacy\Saved\Config\WindowsNoEditor\Engine.ini file, then edit the GearItems as you see fit. You can specify up to nine gear items in total. I have entered a couple of examples: Head_064 (the Astronomer's Hat) and Back_077 (the Kelpie Robe). See the full list of available gear item names below. If you ever want to disable the mod, change Unlock=True to Unlock=False, but note that if you save your game after unlocking a gear item, that gear item will still be unlocked when you load that save file, even if you've disabled this mod.
1) If you installed it via Vortex: Disable or Uninstall it via Vortex. BUT also CHECK that it's gone from the ~mods folder afterwards. 2) Delete the .utoc, .ucas, and .pak files from the ~mods folder.
Conflicts
This mod uses pakchunk 1037. You can check if that conflicts with any of your existing mods by running my PakChunk Checker batch script after you've installed this mod. If it does conflict, you can fix it using the Chunk ID Conflict Manager.
Available Gear Item Names
The ones with names like H000_M00 are wand handles.
Spoiler:
Show
Dual Dresser by nathdev Getting tired of having to swap outfits manually everytime you leave Hogwarts and come back? This mod is made for you! 6th June 2024 update compatible.
Little mod to automatically swap to student outfit when entering hogwarts map. This mod only update your appearance gear not your equiped gear so you can still loot and upgrade your gear.
How to use : 1) Save school appearance 2) Save outside appearance
Mod only trigger on region change.
Requirements :
- Install Blueprint Apparate Modloader - Drop archive files in folder in C:\Program Files (x86)\Steam\steamapps\common\Hogwarts Legacy\Phoenix\Content\Paks\~mods - Press F8 in game and type "DualDresser" then press enter - Press F6 to display the mod menu.
This mod will replace the "Handcrafted Necklace" with a heart choker. Since any fitting description would be too lewd, I added this abomination of a ballad. L M A O
Why always the Solar Protection Goggles? . . . FINE HERE, HAVE FUN GRINDING FOR THOES THEN! But for real, it's not as easy to replace other glasses and would just take too much time to edit compared to just moving the mod files out of the game files when you don't want to use them anymore. I just want to make it clear that modding is not just simple copying and pasting random files into the games folder.
So, nonetheless, crying my poor heart out, here is the actual mod description:
Mass-produced toy cat ears from Zonko's - their selling price dependent on their colorway. (The mod however is 100% free of charge)
Collect them all and gain the chance to win a ticket to Azkaban! (the last sentence is not true and there is most defenetly no price to win - please do not contact us and ask for the winner - the linked email isn't active lmao - but if you still ... weißt du was, keine Lust weiter auf Englisch zu schreiben lmao. Wenn das hier jemand liest, schreibt mir doch eine lustige Nachricht auf Discord. Nosioce#3070. Aber jetzt mal nur so unter uns - vegane Chicken Nuggets schmecken schon verdammt ähnlich nach toter Tier Fleisch, oder? ... oder?)
Hey hey hey nosioce, why cant you replace a hat with the ears so i can use glasses? Well, you want to be bald or what? - mby swapping them for gloves would work better, but that's for another day.
Please note that the mod uses chunk 142 - so please do not complain that the mod does not work with another mod that uses the same chunk.
DO NOT CHANGE THE FILES NAME OR THE TEXTURES WONT LOAD
(textures may also not load when you are using different mods with high priority)
I'm still open for requests to replace a certain asset but please keep in mind that not every asset is built the same way and may be more complicated to edit than others.
Details • replaces the Bowler Hat • chunk 173 • six variants (see images) • you have to see for yourself which outfits will cause clipping with this; many work, some don't. • looks best from behind; from the side, there can be some weird lighting and it will sometimes look a bit 2-dimensional • doesn't work well with robes • all tails will show the same preview
Installation Choose a color and put all [.pak, .ucas, .utoc] files into your ~mods folder
This mod is pretty straight forward - we thought the dark arts outfit had potential to look nice but felt it was too masculine in shape so I did a quick edit to make it more feminine.
This simply replaces the mesh for the dark arts top in game with my model. It IS rather large in the chest due to the physique of the character I was designing it for but I tried my best to make it look natural (and modest) as possible, so if you like it feel free to use it!
Designed for @pensallow's MC Luna Pendragon <3
Uses chunk 481 - is not compatible with any mod that uses chunk 481 or any mod that also replaces the mesh for the Dark Arts top. You CAN use this with outfits that replace the dark arts attire, but it won't show up that way so there's not really a point lol
install by extracting to the ~mods folder and uninstall by deleting it as usual.
***EDITED TO ADD*** This mod features a rather obviously curvy shape. I would like to add that I myself am a woman and have 0 intention of this mod being made to sexualize the character. As most of us in the Hogwarts Legacy fandom at this point are aware, we all are really in to our characters! We have written their stories thoroughly. We have played their whole lives out clear through adulthood and beyond outside of the game, and as such I know we ALL would like a little content available to age them up in game for the purpose of virtual photography etc. That being said - women of all ages have all different shapes, simply having a bust does not qualify as inappropriate or sexual. I have attempted to retain modesty to the best of my ability and from a pure and innocent place so please do not call it anything else. <3 Thanks again for your support!
Spoiler:
Show
Black Relic Robes by kedavravravra Black versions of the relic robes because why not? Hufflepuff is basically the same, just a bit darker.
Installation: Place the 3 files in: \steamapps\common\Hogwarts Legacy\Phoenix\Content\Paks\~mods
Pansy - Replaces hair #14, chunk 1329 [ALTERNATE CHUNK IN THE OPTIONAL FILES: 1332] Eloise - Replaces hair #50, chunk 3409 No hat versions on either of them. Eloise has some physics.
-INSTALLATION- Unzip files. Copy paste all three files into: Steam\steamapps\common\Hogwarts Legacy\Phoenix\Content\Paks\~mods (If there is no ~mods folder already, create one)
Ruth Hair by deersincere A vintage styled short curly bob hair for female characters. Give your MCs a haircut! (pls)
I'm an obvious big fan of short/medium length hair on my girl characters. This one's been highly requested so here it is!
Replaces hair 27 and uses chunk 1855
-INSTALLATION- Unzip files. Copy paste all three files into: Steam\steamapps\common\Hogwarts Legacy\Phoenix\Content\Paks\~mods (If there is no ~mods folder already, create one)
Delete the files to uninstall.
NOTE: Hat compatible but no physics
-CREDITS & RESOURCES- Modding wiki and ll500's guide. Part of the hair model is by David Glynch on Sketchfab
Since a lot of you liked the Ruth hair, me and deersincere decided to collab to create this hair modpack! You can find the second version of this mod here.
Uses chunk 3019, 3023, 3015, 3020, 3022, and 1519. See what hair it replaces in images.
-INSTALLATION- Unzip files. Copy paste all three files into: Steam\steamapps\common\Hogwarts Legacy\Phoenix\Content\Paks\~mods (If there is no ~mods folder already, create one)
Delete the files to uninstall.
NOTE: There are no hat/hood versions for any of the hairs. The longer hairs have simple physics. Some textures look odd, we tried our best to align the UV.
Uses chunk 3013, 3014, 3016, 3017, 3018, 3021. See what hair it replaces in images.
-INSTALLATION- Unzip files. Copy paste all three files into: Steam\steamapps\common\Hogwarts Legacy\Phoenix\Content\Paks\~mods (If there is no ~mods folder already, create one)
Delete the files to uninstall.
NOTE: There are no hat/hood versions for any of the hairs. The longer hairs have simple physics. Some textures look odd, we tried our best to align the UV.
Santa Hats and Mistletoe by MissSoapy Adds a red or blue Santa hat along with a Mistletoe ROR object replacer! Just in time for the holiday season!
This mod uses chunk 6850, 6851, and 6852
The Mistletoe ROR Object Replacer uses chunk 6850 and replaces the Eclectic Ornamental Stand. The Red Santa Hat uses chunk 6851 and replaces the Sheepskin Winter Hat. The Blue Santa Hat uses chunk 6852 and replaces the Stylish Top Hat.
Please let me know if there are any issues in the comments :) If you want, you can tag me on my tiktok: @miss__soapy or tumblr: @miss--soapy so I can see what kind of things you all use these for!
Important notes:
You can have all these mods installed at the same time!
There might be some hair clipping with the Santa hats.
Will not be compatible with any mod that replaces the same objects/hats or uses the same chunks. If you have a mod that replaces either hats or ROR object, they will need to be removed before installing this one.
How to install the Mistletoe ROR object replacer manually:
Download the Mistletoe zip file.
Unzip the zip file.
Drop the 3 pak files in your mod~ folder.
Start the game.
Summon the "Eclectic Ornamental Stand"
Done!
How to install the Santa Hats manually:
Choose either the red or blue hat, or both!
Unzip the zip file
Grab the 3 pak files out of it and put it in your mod~ folder!
Start the game.
Equip the "Sheepskin Winter Hat" or "Stylish Top Hat"
Done!
How to uninstall both manually:
Delete the 3 pak files.
Done!
The Santa hats are personally remodeled from the in-game "Sheepskin Winter Hat" but the pom is from this Santa Hat model by Schinsly on Sketchfab! The Mistletoe plant model is from P3TroV on Sketchfab and the Ribbon is from Polza also on Sketchfab!
If you are missing any outfits, check out Unlock All Gear by icouldifiwantedto to unlock any clothing you're missing! If you are missing some conjurations, check out Unlock All Transfig (ROR) by Dekita to unlock them all! If you want to summon the mugs outside of the ROR, check out World Conjuration by fatsin to summon conjurations anywhere!
Spoiler:
Show
Hot Chocolate - Object Replacer by MissSoapy A simple mod that replaces all interactable teacups with two festive hot chocolates for the holidays! Plus bonus ROR replacers for posing!
This mod uses chunk 6840, 6841, 6842, 6843!
The Candy Cane Object Replacer ver. uses chunk 6840. The Snowman Object Replacer ver. uses chunk 6841. The Candy Cane ROR Replacer ver. replaces the Eclectic Wizard Mannequin and is chunk 6842. The Snowman ROR Replacer ver. replaces the Gothic Wizard Mannequin and is chunk 6843.
Please let me know if there are any issues in the comments :) If you want, you can tag me on my tiktok: @miss__soapy or tumblr: @miss--soapy so I can see what kind of things you all use these for!
Important notes:
You can only load one object replacer at a time.
You can load both ROR replacers at the same time.
You can load both ROR replacers and one object replacer at a time.
Will not be compatible with any mod that replaces the same objects or uses the same chunks. If you have a mod that replaces either objects or ROR conjurations, they will need to be removed before installing this one.
Any animations that has the mc/npc holding a tea cup, will be replaced with this! Also interactable tea cups that you press F to drink will also be replaced with this.
How to install the object replacers manually:
Choose either the candy cane or snowman. Not both!
Unzip the zip file.
Drop the 3 pak files in your mod~ folder.
Start the game.
Find a mug.
Done!
How to install the ROR replacers manually:
Choose either the candy cane, snowman or both!
Unzip the zip file
Grab the 3 pak files out of it and put it in your mod~ folder!
Start the game.
Summon the "Gothic Wizard Mannequin" or "Eclectic Wizard Mannequin".
Both hot chocolate models is made by David Henson on Sketch Fab! If you are missing some conjurations, check out Unlock All Transfig (ROR) by Dekita to unlock them all! If you want to summon the mugs outside of the ROR, check out World Conjuration by fatsin to summon conjurations anywhere!
Optional Files: Elf Recolor, Gingerbread Recolor, and Snowflake Recolor
Uses chunk numbers 1067, 1068, and 1069 respectively.
These mods are ONLY recolors of the Mrs Claus mod, so you will need to keep the Mrs Claus outfit mods in your game for these to work.
All outfits and accessories are compatible and can be used in the game at the same time.
Credits to Aryksa's Flower Crown mod, which inspired the mistletoe headpiece. Shoutout to TRIPLEC for their gingerbread artwork, which inspired the Gingerbread Recolor.
Happy holidays! 🎄
Additional Notes:
The earrings and headpiece might not be compatible with all heads and hairstyles, as they were designed one-size-fits-all.
If you are missing an outfit item in your inventory, you can use icouldifiwantedto's Unlock All Gear mod to unlock everything.
This mod includes custom icons for reference on which items have been replaced.
How to install (manually):
Unzip each folder, export the .pak, .ucas, and .utoc files into your ~mods folder.
How to uninstall (manually):
Delete the .pak, .ucas, and .utoc files from your ~mods folder.
Spoiler:
Show
Mr Claus Outfit by kedavravravra Christmas outfit for MMC. Comes with a Santa suit, a single earring, antlers (with and without ornaments), and recoloured gloves to match.
A Christmas collaboration with Sebominis! 🎅 Check out her page for the Mrs Claus Outfit.
The earrings work for most but not all face models.
Please see the images for reference on which items they replace.
Spoiler:
Show
If you may not be aware yet, mods that altar and/or replace the game's PhoenixShipData.sqlite need to be merged with other mods which do the same...and we have quite a bit of those in the guide...We'll be going through the steps to merge your mods, ensuring they all work in tandem with one another. We'll be using some of the modding tools which you downloaded and installed in the "Modding Tools" section of the guide: Hogwarts Mod Merger Mod Merger Checker Mod Localization Checker PakChunk Checker Chunk ID Conflict Manager
1. Before we start, make sure you followed the entire "Modding Tools" section of the guide. If you haven't done so yet, go back and do so.
2. Backup your ~mods folder (\steamapps\common\Hogwarts Legacy\Phoenix\Content\Paks) and place it somewhere safe on your PC. Preferably nowhere in the game's files.
3. Navigate to your ~mods folder and find "ModMergerChecker.bat". Double-click on it and you should see a window pop up with all your mods listed.
4. Some mods should be listed in "red". These are the mods we'll be merging using "Hogwarts Mod Merger". Keep "Mod Merger Checker" open as we'll be using this window as reference.
5. Navigate to your ~mods folder and find "ModLocalizationChecker.bat". Double-click on it and you should see a window pop up with all your mods listed.
6. Same as before, some mods should be listed in "red". Also keep this window open so we can use as reference.
7. Unpack "Hogwarts Mod Merger". Place the "Hogwarts Mod Merger.exe" anywhere you want, but not in any game folder and not your ~mods folder! Run "Hogwarts Mod Merger.exe" and a window should pop up. Click the "Add" button and another window should open, the content resembling your ~mods folder.
8. Using both "Mod Merger Checker" and "Mod Localization Checker" as reference, "Add" every mod listed in "red" in both of these windows to "Hogwarts Mod Merger".
9. All of your mods should be listed on the left-hand side of the "Hogwarts Mod Merger". If a window pops up telling you the mod is outdated, click ok, then click on the exclamation mark beside the mod. You will probably have to do this for multiple mods.
10. In "Hogwarts Mod Merger", click on the "Preview Merged Changes" button, then click on "Build Merged Mod". A window should open with a file named "zMergedMods.pak". place this file inside your ~mods folder.
11. Using "Mod Merger Checker" and "Mod Localization Checker" as reference, delete all of the mods listed in "red" from your ~mods folder. Afterwards, you can now close both "Mod Merger Checker" and "Mod Localization Checker".
12. Run "ModMergerChecker.bat" again, and if the only mod listed in "red" is "zMergedMods.pak" then you can close it. Do the same for "ModLocalizationChecker.bat".
13. Navigate to your ~mods folder and find "PakChunkChecker.bat". Double-click on it and you should see a window pop up with lots of numbers listed.
14. Some numbers might be listed in "red". If not, then skip step 14.
15. These numbers listed in "red" are from mods which use the same pakchunk and therefore conflict. We'll be using "Chunk ID Conflict Manager"for the next couple of steps. Make sure to backup your ~mods folder if you haven't done so already before proceeding!!!
16. Run "PakChunkChecker.bat" and make a mental note (or use notepad) of the mods in "red"as well as the ones they conflict with (have the same number, usually above the ones in red).
17. Rename your ~mods folder to anything you want, but don't delete it!!!
18. In the same filepath (steamapps\common\Hogwarts Legacy\Phoenix\Content\Paks\), create a new ~mods folder.
19. Copy all the conflicting mods (the ones in"red" as well as the ones with the same number) into that new ~mods folder.
20. Run "Chunk ID Conflict Manager" on that new ~mods folder. Instructions on how to use it are here ->
Spoiler:
Show
1. Download this mod and Menv's UEcastoc tool(link in requirements) and unpack both files somewhere. 2. Open the UnrealModManager and click off the red box that appears on the first run and go to the settings section in the mod manager. 3. Navigate to the folder where your mods for Hogwarts are stored, drag and drop the ~mods folder (the new one we just created) into the settings section that asks for the folder. 4. Navigate to the location of the main.exe file(\UEcastoc-1.0.1\cpp\main.exe) and drag and drop it into the settings section as well. 5. Exit settings and click the "Scan" button in the mod manager. 6. All of your utoc mods should appear. Click "Fix." 7. All the mods should turn green.
*always scan before clicking fix *always backup first
<-
21. Copy the mods in your new ~mods folder to your main ~mods folder (the one you renamed). overwrite when asked.
22. Delete that new ~mods folder and rename your main ~mods folder back.
23. Run "PakChunkChecker.bat" again to make sure everything is good.
24. If you want to update or remove a mod that altars and/or replace the game's PhoenixShipData.sqlite, you can always use your backup ~mods folder from before you merged your mods to remove or update mods.
25. Congratulations! You are now done Merging your mods and resolving any problems with Chunk ID's. If you have any questions or concerns please let me know in the comments section.
Spoiler:
Show
Included in the files tab is a Reshade preset that I've been working on. The style I was going for was a more colorful experience while also trying to avoid drastically changing the atmosphere or performance of the game too much. As a result, you can expect a 10-15 FPS loss, which isn't as bad as many presets out there. My Reshade preset isn't perfect and there's some areas that I could improve on, but I think it would be a great addition to your experience if you decide to install it. If not, then you're welcome to skip this part.
Installation: 1. Download the "O.W.L.S. Reshade" preset in the files tab.
2. Unpack it anywhere you'd like.
3. Download the latest version of Reshade here: https://reshade.me
4. Launch the Reshade installer and select your Hogwarts Legacy.exe.
5. Click the "Browse" button and navigate to where you unpacked the O.W.L.S. preset. Select the .ini file.
6. When you launch the game, press the "Home" key on your keyboard to open the reshade menu.
7. My preset should be active already.
8. All done!
Spoiler:
Show
Farewell fellow witches and wizards 😭. I hope the guide was to your satisfaction and enhances your experience when you start your new year at Hogwarts! The guide isn't perfect and I'll continue to improve on certain areas with your help of course. If you have any questions and/or concerns please don't hesitate to leave a message in the comments section (Just make sure to keep things civil of course). Special thanks to all the amazing and talented folks on the Hogwarts Legacy Modding Discord. Without them, this wouldn't have been possible. See you next year at Hogwarts...❤❤❤