Only do it for sub_*** paks, because the texture files can only in .sub paks in MHWilds.
You should rename it like "re_chunk_000.pak.sub_000.pak.patch_002.pak". The trailing number (patch_***) should be continuous. If you accidentally use it as a non-sub pak patch, the game will not be launched.
DLC paks are untested, because it's obviously not worth wasting too much storage. If you insist, please give me more feedbacks!
I can't test DLC paks, but my friend did so much tests for this, thanks Amekaji航 and other posters!
DLC pak decompress guide:
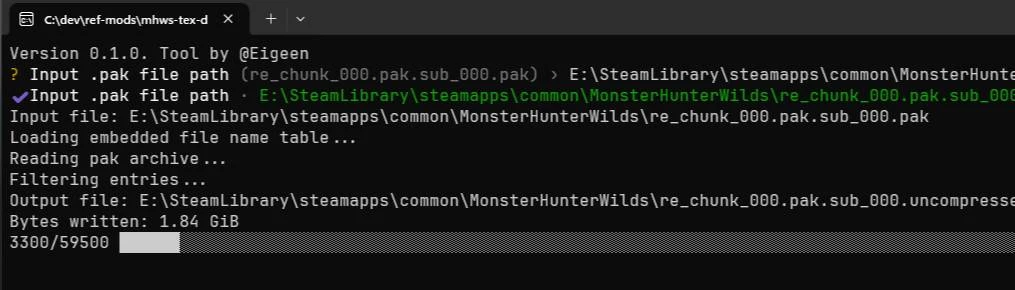
1. You need to create a complete uncompressed copy of the DLC Pak [re_dlc_stm_3308900.pak.sub_000.pak]. In the tool v0.1.2, you need to set both options to True. 2. Replace the original file [re_dlc_stm_3308900.pak.sub_000.pak] by the generated one. If you have enough disk space, you can back it up in advance. 3. It is said that even with DLC, creating an uncompressed version of the game's standard texture pak can still improve performance. So here it is, you can incidentally create an uncompressed version for [re_chunk_000.pak.sub_000.pak]. For tool v0.1.2, select [Full Package: False] + [Feature Clone: True] to create a patch pak. Then rename your generated pak from the above, [re_chunk_000.pak.sub_000.pak.patch_***.pak] (don't delete the original one if you are using patch mode!) 4. If you find that some textures are missing the highest quality after doing this, try other ways of creating hard links in post.
1. Full packaging mode (for those who want to replace the original pak). If disable, the tool only process all .tex files.
2. Clone feature flags from the original pak. The original pak contains a large number of flags of unknown action, cloning them into the same file in the new pak may help fix some issues. However, it is not clear whether these flags will be applicable with changed files, so this will be an experimental feature for the time being and hopefully more people will test it.
After a little feedback, this feature at least does not cause new problems and is recommended for use right now.
For anyone on Linux, I got the tool working in Protontricks. The text will look kind of weird but it works. Just install & open Protontricks, and select Monster Hunter Wilds in the list of prefixes. On the next screen, select "Use the default prefix", and then on the next screen select "run an arbitrary executable". Find the tool, open it, and from there it should pop open.
Even though the text is weird you should be able to follow the steps folks have posted. When you put in the file path and it has you select options, the first one should be True by default, and the second one can be changed to True by hitting Up on your keyboard. It'll work, the uncompressed file will appear, repeat for the patch file, rename the files, good to go. Works on the steam deck too.
So I tried this method on bazzite os and renamed the files to replace the original ones but when I launched the game I would just end up with a black screen (this is with latest ReFramework running and nothing else). Is there something I could be messing up on?
So the tool is actually written in rust, which means you can just take the source code to build a native linux version. Once you've cloned the git repo, you'll have to edit the `Cargo.toml` file so that the entries on line 10 and 11 are uncommented, and the entries on lines 7 and 8 are commented out.
As long as you have the rust toolkit installed along with its dependencies, you should be able to navigate to the cloned repo and run `cargo build`. This should then put the built executable into `./target/release/mhws-tex-decompressor`
I got this info from user Joomsie's comment on this post from 04/17/2025
I noticed a clear improvement in graphics after replacing the Hi-Res file, but when I compared it with the actual Hi-Res version, some objects still appeared to have lower resolution. After applying a hard link and testing again, it seemed that the high resolution was fully applied. However, this raised a question for me.
If you only replace the Hi-Res file without creating a hard link, is it just certain objects that remain low-res? Or is the entire Hi-Res pack not being properly applied at all? In the worst case, I might just be experiencing a placebo effect without realizing it.
Does anyone have more technical insight on this? I’d appreciate hearing your thoughts.
A hard link is like creating an additional name for an existing file. Both the original and the hard link point to the exact same data on the disk, so there's no extra storage used. Even if one is deleted, the data stays as long as at least one link remains.
In this case, the hard link lets the game read the decompressed Hi-Res file as if it were a normal patch file—without actually copying it again.
Whelp, I decompressed the correct paks, renamed them and replaced the originals, but I get just a black screen at startup of game. Have latest ReFramework up and no other mods installed. I am using bazzite os.
After TU2, seem there's no significant improvement from using this decompression, but seem textures loading slower on my RTX 3060 6gb with or without this mod (especially when I used high texture settings in game)
I’ve encountered an icon issue after decompressing some .pak files, including the 4K DLC. Hardlink method is using.Full Package: True + Clone Feature Flags: True. All pak file named correctly. But some monster icons and new feature icons added after updates (e.g. TU2) have become invisible in the game—they don’t display at all. Have any suggestions or plans to update the tool? Thanks.
The tool still works, you'll need to unpack & replace ALL the re_chunk_000.pak.sub_000.pak.patch_00X.pak files (that's not 1kb) as opposed to just the 000. So as of TU2, you'll need to decompress and replace 000, 002, 004, and 006. If you are using Hi-res pack, you'll need to do that as well and create a hardlink as 008.
Hey, I'm not sure if this is happening to you too but since the mini-update from this morning I've been having stuters like crazy again. I decompress the right files 000, 002, 004 and 006 and my decompress files have the following number and size:
Yesterday I decompress the files and today I did it as well as the mini-update removed them. Yesterday I had stutters very ocasionally but today it's unplayable again.
So, you need to actually REPLACE these files and not rename them and place them at the end of the list? Also, why are the decompressed files smaller than the compressed files? Does this happen when you use false/true?
need help, already decompress 000, 002, 004, 006 but text for lagi and seregios eq and item not showing, how can i fix that? my decompress was true true


387 comments
You should rename it like "re_chunk_000.pak.sub_000.pak.patch_002.pak". The trailing number (patch_***) should be continuous. If you accidentally use it as a non-sub pak patch, the game will not be launched.
DLC paks are untested, because it's obviously not worth wasting too much storage. If you insist, please give me more feedbacks!
MonsterHunterWilds
│  MonsterHunterWilds.exe
│  re_chunk_000.pak
│  re_chunk_000.pak.patch_001.pak
│  re_chunk_000.pak.sub_000.pak           <- The input source file
│  re_chunk_000.pak.sub_000.pak.patch_001.pak
│  re_chunk_000.pak.sub_000.pak.patch_002.pak  <- Your generated patch
I can't test DLC paks, but my friend did so much tests for this, thanks Amekaji航 and other posters!
DLC pak decompress guide:
1. You need to create a complete uncompressed copy of the DLC Pak [re_dlc_stm_3308900.pak.sub_000.pak]. In the tool v0.1.2, you need to set both options to True.
2. Replace the original file [re_dlc_stm_3308900.pak.sub_000.pak] by the generated one. If you have enough disk space, you can back it up in advance.
3. It is said that even with DLC, creating an uncompressed version of the game's standard texture pak can still improve performance. So here it is, you can incidentally create an uncompressed version for [re_chunk_000.pak.sub_000.pak]. For tool v0.1.2, select [Full Package: False] + [Feature Clone: True] to create a patch pak. Then rename your generated pak from the above, [re_chunk_000.pak.sub_000.pak.patch_***.pak] (don't delete the original one if you are using patch mode!)
4. If you find that some textures are missing the highest quality after doing this, try other ways of creating hard links in post.
1. Full packaging mode (for those who want to replace the original pak). If disable, the tool only process all .tex files.
2. Clone feature flags from the original pak. The original pak contains a large number of flags of unknown action, cloning them into the same file in the new pak may help fix some issues. However, it is not clear whether these flags will be applicable with changed files, so this will be an experimental feature for the time being and hopefully more people will test it.
After a little feedback, this feature at least does not cause new problems and is recommended for use right now.
Original files:
Renamed files:re_chunk_000.pak.sub_000.pakre_chunk_000.pak.sub_000.pak.patch_002.pakre_chunk_000.pak.sub_000.pak.patch_004.pakre_chunk_000.pak.sub_000.pak.patch_006.pak
However, when I launched the game, it was crushed and wouldn't run.re_chunk_000.pak.sub_000.pak.patch_008.pakre_chunk_000.pak.sub_000.pak.patch_009.pakre_chunk_000.pak.sub_000.pak.patch_010.pakre_chunk_000.pak.sub_000.pak.patch_011.pakHow can I fix this issue?
Even though the text is weird you should be able to follow the steps folks have posted. When you put in the file path and it has you select options, the first one should be True by default, and the second one can be changed to True by hitting Up on your keyboard. It'll work, the uncompressed file will appear, repeat for the patch file, rename the files, good to go. Works on the steam deck too.
As long as you have the rust toolkit installed along with its dependencies, you should be able to navigate to the cloned repo and run `cargo build`. This should then put the built executable into `./target/release/mhws-tex-decompressor`
I got this info from user Joomsie's comment on this post from 04/17/2025
If you only replace the Hi-Res file without creating a hard link, is it just certain objects that remain low-res? Or is the entire Hi-Res pack not being properly applied at all? In the worst case, I might just be experiencing a placebo effect without realizing it.
Does anyone have more technical insight on this? I’d appreciate hearing your thoughts.
Both the original and the hard link point to the exact same data on the disk, so there's no extra storage used.
Even if one is deleted, the data stays as long as at least one link remains.
In this case, the hard link lets the game read the decompressed Hi-Res file as if it were a normal patch file—without actually copying it again.
NVM, figured it out I think.
Hardlink method is using.Full Package: True + Clone Feature Flags: True. All pak file named correctly.
But some monster icons and new feature icons added after updates (e.g. TU2) have become invisible in the game—they don’t display at all.
Have any suggestions or plans to update the tool? Thanks.
So as of TU2, you'll need to decompress and replace 000, 002, 004, and 006. If you are using Hi-res pack, you'll need to do that as well and create a hardlink as 008.
re_chunk_000.pak.sub_000.pak.patch_008 = 36.995.125 KB
re_chunk_000.pak.sub_000.pak.patch_009 = 112.845 KB
re_chunk_000.pak.sub_000.pak.patch_010 = 96.618 KB
re_chunk_000.pak.sub_000.pak.patch_011 = 267.205 KB
Yesterday I decompress the files and today I did it as well as the mini-update removed them. Yesterday I had stutters very ocasionally but today it's unplayable again.
Thank you bro!