This tool still works after 15.23.00; just scroll below for katrau's post about post-iceborn instruction. For me, wireframe is on oo2core_9, so I had to download it from https://www.dll-files.com/oo2core_8_win64.dll.html provided by Panupacs in the post below. You can hmu if you have issues getting it working.
Added to my collection: https://next.nexusmods.com/monsterhunterworld/collections/z4wzg0
I cant seem to get my hands on the oo2core_8_win64.dll file anywhere. I installed Warframe and it was no longer there. Is there any other games that people know that contain this file? Or where else could I get this file?
I want to translate the game into my own language and I need the location of the game font and the files that contain the subtitles, and most importantly, when I have done the translation or tested to see if the text changes work correctly, what should I do, how can I do it? Should I repack the files? Can you help me please, is it even possible to change the game to my own language??
Apparently right now it's oo2core_9_win64.dll, so no idea where to get the correct one Edit: I personaly found it in DOOM Eternal, so if somebody owns it, they can probably get the file there.
It's back! I just finished getting my chunk files processed and extracted, so here's an updated how-to:
Spoiler:
Show
This is a pretty lengthy process, even lengthier than pre-Iceborne due to needing to obtain the .dll to run the program. Fair warning.
1. Go to your game's directory. The directory can be found by right clicking the game in your Steam games list, clicking on the cog icon underneath the game’s banner, on the right side of the window, then hovering over Manage, then clicking on “Browse Local Files”.
2. Once you’ve opened the local files, open the chunk folder in your game directory.
3. Select all the files in your chunk folder (If you’re doing this on the base Iceborne patch, there should only be two files, “chunkG0.bin” and “chunkG60.bin”. There may be more if you’re doing this on a future patch, but no worries. It’ll still work.)
4. Copy those files from your chunk folder and paste them into another folder somewhere else on your PC. This can be anywhere, I put mine on my desktop. It will take a while for them to move, they're large files. If you use an SSD, I would suggest putting the files on an HDD instead, the chunk files are large and unpacking them requires even more space.
5a. Once that's finished comes the slightly annoying part, you need to obtain a “oo2core_8_win64.dll” file. This file is crucial for the program to run. Getting it can be a little tricky. Do NOT download this file from somewhere random on the internet. Unsafe .dll files can do damage to your computer. You may already have the .dll on your computer from a game you’ve already installed. Search your drives for the “oo2core_8_win64.dll” file, and see if you have one in an already installed game directory. If you do have one, you can skip from here straight to step 8. If you don’t have one, go on to step 5b.
5b.The safest way to obtain this .dll file is to download a game off Steam that uses the file. The easiest one that’s been found is Warframe (https://store.steampowered.com/app/230410/Warframe/) as it is free to play. You won’t need to make a Warframe account or log into the game or anything, but this will require you to download all of Warframe which is, as of 1/19/2020, around 37 gb. I assume anyone reading this knows how to download a Steam game and doesn’t need instructions on that.
6. After you’ve downloaded Warframe, start it up so you can update the game fully. If you don’t open Warframe and update it with Warframe’s own launcher, the .dll you need will not appear in the game’s directory. Once the Warframe launcher confirms the game is fully up to date (it should only be like a couple megabytes extra to update, nothing memory or time consuming), go to the Warframe directory. You can find it the same way you found the Monster Hunter World directory in step 1.
7. In the directory, use the windows explorer search bar at the top right of the window to search for the “oo2core_8_win64.dll” file. It should pop up just one result, the .dll file.
8. Copy and paste that "oo2core_8_win64.dll" file into the same folder you pasted the chunk files into.
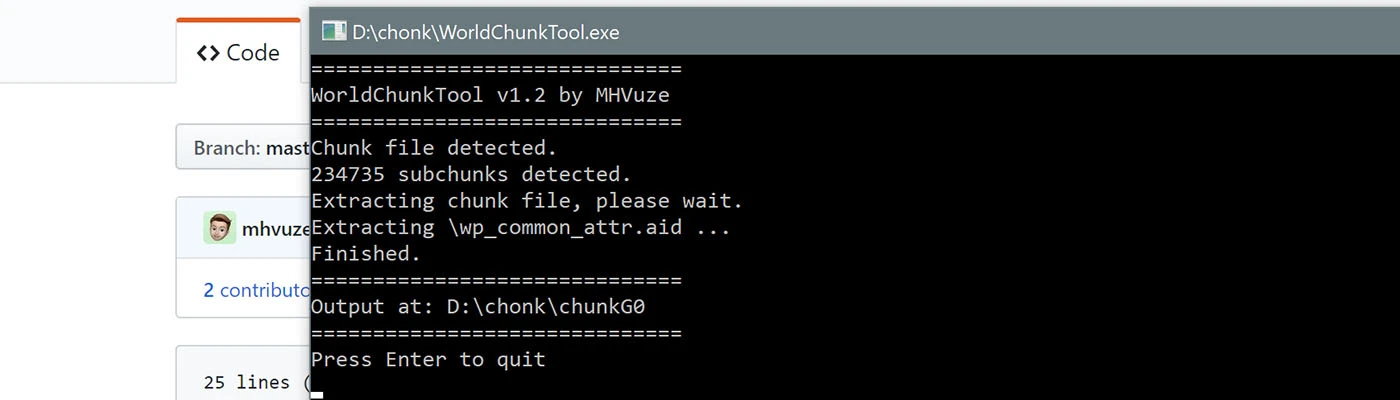
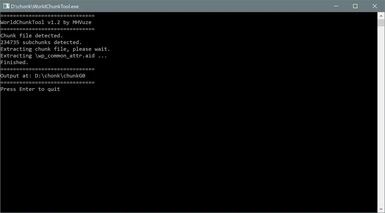
9. Download the WorldChunkTool from the Files page here on Nexusmods. You should use the latest version.
10. Extract the contents of the WorldChunkTool .zip folder to the same folder you pasted your .dll file and your chunk files.
11. Drag and drop each chunk file onto the WorldChunkTool.exe. Doing so will make the WorldChunkTool.exe open, and begin to process the chunk file you dragged and dropped onto it. This will take time, the chunk files hold a huge amount of data, you’ll just have to be patient. If you see it stop on a single file, give it time, it’s likely a large file in particular that takes time to process.
12. Once the tool finishes processing the chunk file, the window will prompt you to hit enter to finish and exit the tool, you can safely do so.
13. Go into the folder you pasted the chunk files into and confirm you have a new folder named after whatever chunk file you processed. If you extracted chunkG0.bin, you'll have a folder named chunkG0, for example.
14. Once you’ve confirmed you have a folder with the processed files in it, you can safely delete that specific chunk file. For example, if you processed chunkG0.bin, and now have a chunkG0 folder filled with subfolders and game files, you can safely delete chunkG0.bin to save space.
15. Repeat from step 11 until you've extracted all your chunk files. If you’re doing this on the base Iceborne patch, it should only be two files, one of which is huge, and the other is very small.
16. You're done! You should have folders named after every chunk file you pasted from your game's directory. Inside them are game files you can edit with various modding tools.
This is the "manual" way of doing it, whereas the "automatic" way is using the -Unpackall option in the actual .exe itself, but it's much, much simpler to do it with the drag and drop method, albeit being a bit more tedious.
----- Here's the old how-to for pre-Iceborne. I don't know if it'll be useful to anyone but I figure I'll leave it up for posterity's sake.
Spoiler:
Show
For anyone still trying to figure this out, you don't need to open the program, or the CMD prompt or anything like that. Here's a detailed explanation on how to do it really simply:
1. Go to your game's directory. The directory can be found by right clicking the game in your Steam games list, clicking on Properties, then on Local Files, then on Browse Local Files.
2. Enter the chunk folder in your game directory.
3. Select all the files in your chunk folder (they should all be named chunk0.bin, chunk1.bin, chunk2.bin, so on and so forth. More get added each time the game is updated. The current highest is chunk14.bin, but you may have more if you're reading this in the future. This method works regardless of how many chunk files there are, it will just take more time to unpack more files, no worries.)
4. Copy all the files from your chunk folder and paste them into another folder somewhere else on your PC. This can be anywhere, I put mine on my desktop. It will take a while for them to move, they're large files. If you use an SSD, I would suggest putting the files on an HDD instead, the chunk files are large and unpacking them requires even more space.
5. Once that's finished, go back to your games directory, where you found the chunk folder.
6. In the directory, there is a file called "oo2core_5_win64.dll". Copy that file.
7. Paste the "oo2core_5_win64.dll" file into the same folder you pasted the chunk files into.
8. Download the WorldChunkTool zip from the Files page here on Nexusmods.
9. Extract the contents of the WorldChunkTool zip folder to the same folder you pasted your .dll file and your chunk files.
10. Drag and drop each chunk file onto the WorldChunkTool.exe. Doing so will make the WorldChunkTool.exe open, and begin to process the chunk file you dragged and dropped onto it. This will take some time, as well.
11. Once WorldChunkTool.exe is finished processing the chunk file, it will need to extract the .pkg file. You will be prompted on the WorldChunkTool.exe window that opened when you dragged and dropped your chunk file, asking you to press Enter to continue. Press Enter. It will begin to extract the .pkg file, which will create a folder (named after whatever chunk file you extracted).
12. Once the tool finishes extracting the .pkg file, the window will prompt you to hit enter to finish and exit the tool. Press Enter.
13. Go into the folder you pasted the chunk files into and confirm you have a new folder named after whatever chunk file you extracted. If you extracted chunk0.bin, you'll have a folder named chunk0, for example.
14. Once you've confirmed the folder is there, you can safely delete the chunk.bin file, the chunk.csv file, and the chunk.pkg file. For example, if you extracted chunk0, you can now delete chunk0.bin, chunk0.csv, and chunk0.pkg.
15. Repeat from step 11 until you've extracted all your chunk files.
16. You're done! You should have folders named after every chunk file you pasted from your game's directory. Inside them are game files you can edit with various modding tools.
This is the "manual" way of doing it, whereas the "automatic" way is using the -Unpackall option in the actual .exe itself, but it's much, much simpler to do it with the drag and drop method, albeit being a bit more tedious. This is also an easy way to work around the issue of the -Unpackall option overwriting newer chunk files with older ones.
cant find any "oo2core_5_win64.dll" on the directory and tried to use the old version of "oo2core_5_win64.dll" but chunk folder are not being generated. Any idea how should i do it ?
i got the oo2core_5_win64.dll and oo2core_8_win64.dll in the same folder as the new chunk folders from mhw iceborn, called chunkG0.bin and chunkG60.bin, aswell as the worldchunktool v. 1.1.4. I tried to run it like back with the normal chunk files for vanilla mhw, but i only got the chunkG0.csv and chunkG0.pkg and NO file with content. After i tried to remove the oo2core_5_win64.dll and only leave the oo2core_8_win64.dll, but worldchunktool didnt want to operate without the oo2core_5_win64.dll, so i tried to rename the 8 to a 5... and it worked but same problem.. only .csv and .pkg and no real file. Any ideas? :c :c many thanks!
They encrypted the .bin files in the chunk folder with the Iceborne release, meaning if you updated to Iceborne, this tool will no longer work with the chunk files. If your chunk folder has the chunkG0/chunkG60 files, that means they're encrypted and you're out of luck until the author updates the mod to work with the Iceborne update.
@Lie134 I've successfully converted, edited, and reconverted .tex files to and from .dds files with Jodo's Tex Converter. It's a similar concept, you just drag the .tex file onto the Tex Converter's .exe and it will convert it into a .dds, which you can then edit. When you're done, drag the .dds onto the Text Converter's .exe to convert it back into a .tex.
Thank you so much for this! I was running into so many issues with using the program, and I was ready to give up on it completely! You rescued my whole experience. Thank you again!
I would like to know this too. My guess is that chunkHiPC is for the high resolution DLC, but the I wonder if I can safely delete the low resolution one if my save is on the high one anyways.
Can somebody please explain in a better way how to do weapon transmog, I've done everything and nothing works. I can give someone my discord and we can call so you can walk me through idc HOW I just need to know how to do it, because every video I have watched on it has terrible quality, no talking, and doesn't actually explain what I'm doing. I don't understand why they had to make the monster hunter world weapon transmog 10x more complicated than the armor one.
Edit: Okay I got some of my weapons to show, but they look really bright and white, and they're supposed to look more dark.
ANOTHER EDIT: I figured out how to do it, and I am so dumb LMAO.


206 comments
-
1
-
2
-
3
- ...
-
10
-
Jumphttps://drive.google.com/drive/folders/1cLc0IKx1YAsGefekTz_NABCqls13i-an?usp=sharing
Virus scans for legitimacy:
oo2core_9 -> https://opentip.kaspersky.com/19452AE1ABAE65E1305D3818354D4FAE7B1200294322F0D9C6D5DDEB7BD9F978/results?tab=upload
oo2core_8 -> https://opentip.kaspersky.com/3E9CE021A2ACC1DA961CE8955C69980BCFD16F6BA3479AFD756A1BF0C30D7BB1/results?tab=upload
Added to my collection:
https://next.nexusmods.com/monsterhunterworld/collections/z4wzg0
Thx.
Edit: I personaly found it in DOOM Eternal, so if somebody owns it, they can probably get the file there.
This is a pretty lengthy process, even lengthier than pre-Iceborne due to needing to obtain the .dll to run the program. Fair warning.
1. Go to your game's directory. The directory can be found by right clicking the game in your Steam games list, clicking on the cog icon underneath the game’s banner, on the right side of the window, then hovering over Manage, then clicking on “Browse Local Files”.
2. Once you’ve opened the local files, open the chunk folder in your game directory.
3. Select all the files in your chunk folder (If you’re doing this on the base Iceborne patch, there should only be two files, “chunkG0.bin” and “chunkG60.bin”. There may be more if you’re doing this on a future patch, but no worries. It’ll still work.)
4. Copy those files from your chunk folder and paste them into another folder somewhere else on your PC. This can be anywhere, I put mine on my desktop. It will take a while for them to move, they're large files. If you use an SSD, I would suggest putting the files on an HDD instead, the chunk files are large and unpacking them requires even more space.
5a. Once that's finished comes the slightly annoying part, you need to obtain a “oo2core_8_win64.dll” file. This file is crucial for the program to run. Getting it can be a little tricky. Do NOT download this file from somewhere random on the internet. Unsafe .dll files can do damage to your computer. You may already have the .dll on your computer from a game you’ve already installed. Search your drives for the “oo2core_8_win64.dll” file, and see if you have one in an already installed game directory. If you do have one, you can skip from here straight to step 8. If you don’t have one, go on to step 5b.
5b.The safest way to obtain this .dll file is to download a game off Steam that uses the file. The easiest one that’s been found is Warframe (https://store.steampowered.com/app/230410/Warframe/) as it is free to play. You won’t need to make a Warframe account or log into the game or anything, but this will require you to download all of Warframe which is, as of 1/19/2020, around 37 gb. I assume anyone reading this knows how to download a Steam game and doesn’t need instructions on that.
6. After you’ve downloaded Warframe, start it up so you can update the game fully. If you don’t open Warframe and update it with Warframe’s own launcher, the .dll you need will not appear in the game’s directory. Once the Warframe launcher confirms the game is fully up to date (it should only be like a couple megabytes extra to update, nothing memory or time consuming), go to the Warframe directory. You can find it the same way you found the Monster Hunter World directory in step 1.
7. In the directory, use the windows explorer search bar at the top right of the window to search for the “oo2core_8_win64.dll” file. It should pop up just one result, the .dll file.
8. Copy and paste that "oo2core_8_win64.dll" file into the same folder you pasted the chunk files into.
9. Download the WorldChunkTool from the Files page here on Nexusmods. You should use the latest version.
10. Extract the contents of the WorldChunkTool .zip folder to the same folder you pasted your .dll file and your chunk files.
11. Drag and drop each chunk file onto the WorldChunkTool.exe. Doing so will make the WorldChunkTool.exe open, and begin to process the chunk file you dragged and dropped onto it. This will take time, the chunk files hold a huge amount of data, you’ll just have to be patient. If you see it stop on a single file, give it time, it’s likely a large file in particular that takes time to process.
12. Once the tool finishes processing the chunk file, the window will prompt you to hit enter to finish and exit the tool, you can safely do so.
13. Go into the folder you pasted the chunk files into and confirm you have a new folder named after whatever chunk file you processed. If you extracted chunkG0.bin, you'll have a folder named chunkG0, for example.
14. Once you’ve confirmed you have a folder with the processed files in it, you can safely delete that specific chunk file. For example, if you processed chunkG0.bin, and now have a chunkG0 folder filled with subfolders and game files, you can safely delete chunkG0.bin to save space.
15. Repeat from step 11 until you've extracted all your chunk files. If you’re doing this on the base Iceborne patch, it should only be two files, one of which is huge, and the other is very small.
16. You're done! You should have folders named after every chunk file you pasted from your game's directory. Inside them are game files you can edit with various modding tools.
This is the "manual" way of doing it, whereas the "automatic" way is using the -Unpackall option in the actual .exe itself, but it's much, much simpler to do it with the drag and drop method, albeit being a bit more tedious.
-----
Here's the old how-to for pre-Iceborne. I don't know if it'll be useful to anyone but I figure I'll leave it up for posterity's sake.
For anyone still trying to figure this out, you don't need to open the program, or the CMD prompt or anything like that. Here's a detailed explanation on how to do it really simply:
1. Go to your game's directory. The directory can be found by right clicking the game in your Steam games list, clicking on Properties, then on Local Files, then on Browse Local Files.
2. Enter the chunk folder in your game directory.
3. Select all the files in your chunk folder (they should all be named chunk0.bin, chunk1.bin, chunk2.bin, so on and so forth. More get added each time the game is updated. The current highest is chunk14.bin, but you may have more if you're reading this in the future. This method works regardless of how many chunk files there are, it will just take more time to unpack more files, no worries.)
4. Copy all the files from your chunk folder and paste them into another folder somewhere else on your PC. This can be anywhere, I put mine on my desktop. It will take a while for them to move, they're large files. If you use an SSD, I would suggest putting the files on an HDD instead, the chunk files are large and unpacking them requires even more space.
5. Once that's finished, go back to your games directory, where you found the chunk folder.
6. In the directory, there is a file called "oo2core_5_win64.dll". Copy that file.
7. Paste the "oo2core_5_win64.dll" file into the same folder you pasted the chunk files into.
8. Download the WorldChunkTool zip from the Files page here on Nexusmods.
9. Extract the contents of the WorldChunkTool zip folder to the same folder you pasted your .dll file and your chunk files.
10. Drag and drop each chunk file onto the WorldChunkTool.exe. Doing so will make the WorldChunkTool.exe open, and begin to process the chunk file you dragged and dropped onto it. This will take some time, as well.
11. Once WorldChunkTool.exe is finished processing the chunk file, it will need to extract the .pkg file. You will be prompted on the WorldChunkTool.exe window that opened when you dragged and dropped your chunk file, asking you to press Enter to continue. Press Enter. It will begin to extract the .pkg file, which will create a folder (named after whatever chunk file you extracted).
12. Once the tool finishes extracting the .pkg file, the window will prompt you to hit enter to finish and exit the tool. Press Enter.
13. Go into the folder you pasted the chunk files into and confirm you have a new folder named after whatever chunk file you extracted. If you extracted chunk0.bin, you'll have a folder named chunk0, for example.
14. Once you've confirmed the folder is there, you can safely delete the chunk.bin file, the chunk.csv file, and the chunk.pkg file. For example, if you extracted chunk0, you can now delete chunk0.bin, chunk0.csv, and chunk0.pkg.
15. Repeat from step 11 until you've extracted all your chunk files.
16. You're done! You should have folders named after every chunk file you pasted from your game's directory. Inside them are game files you can edit with various modding tools.
This is the "manual" way of doing it, whereas the "automatic" way is using the -Unpackall option in the actual .exe itself, but it's much, much simpler to do it with the drag and drop method, albeit being a bit more tedious. This is also an easy way to work around the issue of the -Unpackall option overwriting newer chunk files with older ones.
After i tried to remove the oo2core_5_win64.dll and only leave the oo2core_8_win64.dll, but worldchunktool didnt want to operate without the oo2core_5_win64.dll, so i tried to rename the 8 to a 5... and it worked but same problem.. only .csv and .pkg and no real file.
Any ideas? :c :c
many thanks!
thanks
I couldn't convert well on my PC ...
I wonder if the chunks were not decompressed well ...
I will try various things.
Thank you. : )
My guess is that chunkHiPC is for the high resolution DLC, but the I wonder if I can safely delete the low resolution one if my save is on the high one anyways.
Edit: Okay I got some of my weapons to show, but they look really bright and white, and they're supposed to look more dark.
ANOTHER EDIT: I figured out how to do it, and I am so dumb LMAO.
-
1
-
2
-
3
- ...
-
10
-
Jump