Followed the instructions, which really are simple enough, and no matter what the game would Crash to Desktop before you would see the Bethesda-Zenimax splash screen on bootup. Tried the mod authors instructions, and then tried the Mod Organizer 2 instructions, and both ended up the same.
STEP BY STEP TUTORIAL ON HOW TO MANUALLY INSTALL THIS MOD, FOR THOSE WHO CAN'T GET HOW:
1. Have the mod downloaded (obviously).
2. Open your Fallout: New Vegas root folder(steamapps/ common/ Fallout New Vegas/).
3. Open the downloaded folder of this mod.
4. Drag the folder (yes, the 'data' folder) from this mod's file and drop it onto your New Vegas root folder, it will add the mod's files into your New Vegas' data folder by itself.
5. After that, close both of those folders and go into your New Vegas files in your Documents folder (Documents/ My Games/ FalloutNV).
6. Open both files called Fallout.ini and FalloutPrefs.ini in notepad and scroll down until you find a section of text that has the title [Fonts] above it.
7. Paste this section of text over the existing text below that [Fonts] title:
8. Save both documents once you are finished pasting them, after that you are done and it should now work in your game.
This tutorial goes for any custom fonts that you want to use in your game, it's the same install, with the exception that the mod makers will provide you with their own text to paste into the Fallout.ini files.
THERE IS A SLIGHTLY DIFFERENT INSTALL FOR THOSE USING MO2 (MOD ORGANIZER 2): Only follow this tutorial if your MO2 uses it's own custom INI files built into the mod manager instead of the files in your documents folder.
1. Same beginning steps as above, drag the mod's data file into your New Vegas root folder.
2. Open MO2 and open the .ini editor (this can be done by clicking the small jigsaw icon next to the settings icon at the top left of your screen).
I really like this mod, however, The fonts are a bit misaligned at times, not being in the middle of boxes and stuff. I also wish there was a shadow or outline on the font in the hud, lack of one makes it hard to read in darker areas.
Right click the .ini and go to properties, set it to "read only". This should make it only be edited if you do and only be read by programs and not reset.
You're in luck! I backed up my old fallout.ini and went through testing each font being changed. Now I didn't do massive rigorous testing, I just loaded game, watched the tooltip that said checking for Downloaded Content, checked the Main Menu, continued game, checked the HUD, extra HUD displays, the Pipboy, the interface-text [like "talk to so and so"], and the dialog text.
I can confirm the following:
"sFontFile_1" is extra hud items, like clock and such. "sFontFile_2" is Pipboy fonts. "sFontFile_3" is Dialog. "sFontFile_4" ...no idea, nothing I checked seemed to be changed, probably will see it later on in game at some point. ("sFontFile_5" doesn't change, but I'm assuming that's perhaps the font on terminals possibly?) "sFontFile_6" is Load-screen fonts for the messages that display on top of the full-screen images. "sFontFile_7" is the Menus (like main menu, escape-key) and most of the default HUD (HP, AP, Ammo, etc), but again doesn't effect extra HUD items from mods like the clock. (I think it was also the prompt font for "talk to so and so", don't recall, but pretty certain. Was either this one of the font for the actual dialog [3]) "sFontFile_8" ...no idea, nothing I checked seemed to be changed, probably will see it later on in game at some point. ("sFontFile_9" didn't change either, but by the looks of it, seems to be a dummy place-holder I'm assuming.)
So ultimately, mine ended up looking something like this:
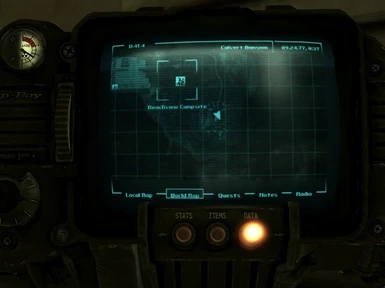
sFontFile_8 Is the large font used for finding locations, and failing/stating quests. It only applies to the location/quest name. The "Quest added/You have discovered" is not included in this.


59 comments
Bummer.
1. Have the mod downloaded (obviously).
2. Open your Fallout: New Vegas root folder (steamapps/ common/ Fallout New Vegas/).
3. Open the downloaded folder of this mod.
4. Drag the folder (yes, the 'data' folder) from this mod's file and drop it onto your New Vegas root folder, it will add the mod's files into your New Vegas' data folder by itself.
5. After that, close both of those folders and go into your New Vegas files in your Documents folder (Documents/ My Games/ FalloutNV).
6. Open both files called Fallout.ini and FalloutPrefs.ini in notepad and scroll down until you find a section of text that has the title [Fonts] above it.
7. Paste this section of text over the existing text below that [Fonts] title:
sFontFile_1=Textures\Fonts\fallout.fnt
sFontFile_2=Textures\Fonts\fallout.fnt
sFontFile_3=Textures\Fonts\fallout.fnt
sFontFile_4=Textures\Fonts\fallout.fnt
sFontFile_5=Textures\Fonts\Fixedsys_Comp_uniform_width.fnt
sFontFile_6=Textures\Fonts\fallout.fnt
sFontFile_7=Textures\Fonts\fallout.fnt
sFontFile_8=Textures\Fonts\fallout.fnt
It should look like this once you are done.
8. Save both documents once you are finished pasting them, after that you are done and it should now work in your game.
This tutorial goes for any custom fonts that you want to use in your game, it's the same install, with the exception that the mod makers will provide you with their own text to paste into the Fallout.ini files.
Only follow this tutorial if your MO2 uses it's own custom INI files built into the mod manager instead of the files in your documents folder.
1. Same beginning steps as above, drag the mod's data file into your New Vegas root folder.
2. Open MO2 and open the .ini editor (this can be done by clicking the small jigsaw icon next to the settings icon at the top left of your screen).
3. Open the custom.ini tab and paste this in it:
[Fonts]
sFontFile_1=Textures\Fonts\fallout.fnt
sFontFile_2=Textures\Fonts\fallout.fnt
sFontFile_3=Textures\Fonts\fallout.fnt
sFontFile_4=Textures\Fonts\fallout.fnt
sFontFile_5=Textures\Fonts\Fixedsys_Comp_uniform_width.fnt
sFontFile_6=Textures\Fonts\fallout.fnt
sFontFile_7=Textures\Fonts\fallout.fnt
sFontFile_8=Textures\Fonts\fallout.fnt
4. Press the save button below the ini editor window, after that it should work in your game.
Edit: Nevermind, i needed to add it to FalloutCustom.ini, not custom.ini
The game itself reverts the lines in Fallout.ini everytime it boots up.
I love this mod, but, if posible, I would like to keep the dialogs -and ONLY the dialogs- in the vanilla font.
I can confirm the following:
"sFontFile_1" is extra hud items, like clock and such.
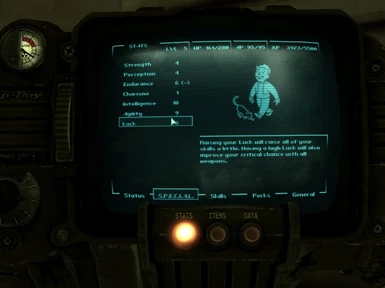
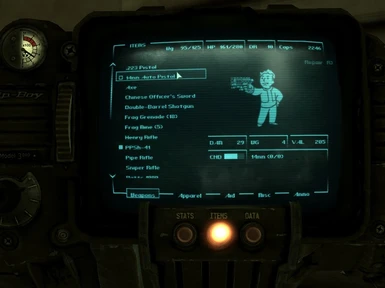
"sFontFile_2" is Pipboy fonts.
"sFontFile_3" is Dialog.
"sFontFile_4" ...no idea, nothing I checked seemed to be changed, probably will see it later on in game at some point.
("sFontFile_5" doesn't change, but I'm assuming that's perhaps the font on terminals possibly?)
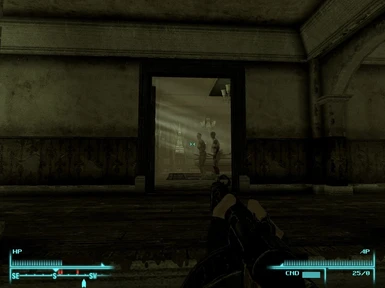
"sFontFile_6" is Load-screen fonts for the messages that display on top of the full-screen images.
"sFontFile_7" is the Menus (like main menu, escape-key) and most of the default HUD (HP, AP, Ammo, etc), but again doesn't effect extra HUD items from mods like the clock. (I think it was also the prompt font for "talk to so and so", don't recall, but pretty certain. Was either this one of the font for the actual dialog [3])
"sFontFile_8" ...no idea, nothing I checked seemed to be changed, probably will see it later on in game at some point.
("sFontFile_9" didn't change either, but by the looks of it, seems to be a dummy place-holder I'm assuming.)
So ultimately, mine ended up looking something like this:
[Fonts]
sFontFile_1=Textures\Fonts\Glow_Monofonto_Large.fnt
sFontFile_2=Textures\Fonts\fallout.fnt
sFontFile_3=Textures\Fonts\Glow_Monofonto_Medium.fnt
sFontFile_4=Textures\Fonts\fallout.fnt
sFontFile_5=Textures\Fonts\Fixedsys_Comp_uniform_width.fnt
sFontFile_6=Textures\Fonts\Glow_Monofonto_VL_dialogs.fnt
sFontFile_7=Textures\Fonts\Baked-in_Monofonto_Large.fnt
sFontFile_8=Textures\Fonts\fallout.fnt
sFontFile_9=Textures\Fonts\NVFont_Test.fnt
PS - Now I'm eager to scour the rest of the interwebs for ".fnt" based font-files to customize the rest of my interface/game fonts!