


0 of 0


About this mod
Simple mod that increases muscle mass of your Nord characters without causing major clipping.
Contains a tutorial on editing character meshes ( first draft )
- Permissions and credits
- Donations
Nordic Muscles
Hey hey, Teslov here.
I spent the last few hours reverse-engineering, testing, importing, exporting, changing settings etc to figure out a way to modify characters in Oblivion Remastered. It's not that hard, if you ever made mods for other Unreal Engine 5 games the only thing you need to know is to import and export vertex colours in linear colorspace as these are used for hiding pieces of a mesh. Anyway, more about the process later.
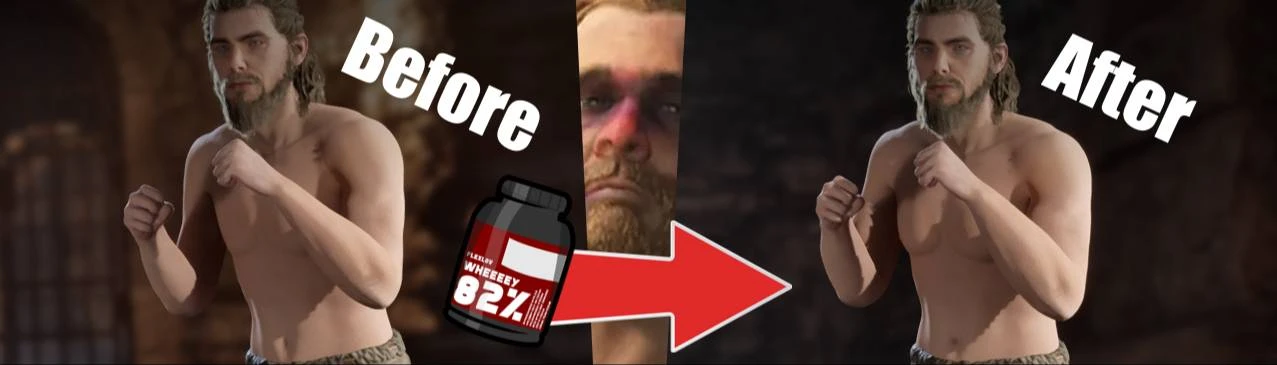
This simple mod increases muscle definition of Nords slightly, makes them bulkier, and pretty much caked up. Why? I just thought it's the best way to showcase the process really, you can apply it to do any changes you want.
How?
Chapter 1 - Preparation and exploration
First, tools. To mod Unreal Engine 5 games, you need Unreal Engine 5. Oblivion uses UE5.3, so grab UE5.3.2 from Epic Games Launcher.
For viewing, importing and exporting I use FModel, which is so good I genuinely thought it's a scam at first. But it's absolutely perfect.
Grab mappings from https://www.nexusmods.com/oblivionremastered/mods/47
Now you can open up FModel, click "Directory" in the top bar, choose "Selector", and "ADD UNDETECTED GAME".
Give it a name, and select base directory. Then press the nice, blue + button.
Now, when you choose it in the list above, switch UE Versions to "GAME_UE5_3".
Archive containing all data you are interested in is the ".utoc" file.
Now, Blender, just grab the newest version available, then download Unreal PSK/PSA extension, you can do that from "Edit->Preferences->Get Extensions".
That's it for the setup.
Chapter 2 - Exporting the files and editing them
Let's try doing the same exact kind of mod as the one posted here, so, character models are located in "Content->Art->Character->[race_name]".
Find "nord" directory, click on it, and switch to "Packages" tab above.
There you'll have a lot of files, based on the prefix, you see:
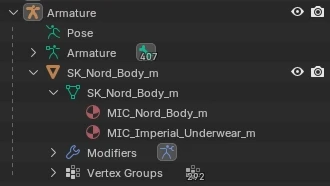
Nords use underwear material from imperial directory btw, you can check that by double-clicking "SK_Nord_Body_m" and checking the "Sections" box.
Or, if you're feeling brave, just reading the file information in main window, you can for example find that PhysicsAsset responsible for this mesh is "PA_Humanoid_Simple". Get ready to learn how to dig through all that, it's gonna be important.
Now, boring stuff aside, you probably want to check your output directory in the Settings, after doing that just right-click on "SK_Nord_Body_m" and click "Save Model".
That'll give you a PSK file that you can finally import :D
Open up Blender, drag n' drop the file ( it'll be in your "[output_directory]/Exports/Game/Game/Character/nord/" ) into Blender's window, and use the import settings from the screenshot.
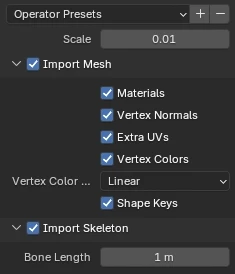
Scale is self-explanatory I guess, but Vertex Color is important. This game uses Vertex Colours for knowing which parts of a mesh to "hide" under amours. You can see that by selecting the mesh and going to the "Vertex Paint" mode. Wrong colorspace will cause your legs and arms to disappear when you equip a shirt and other weirdness like that. Don't ask how much time I wasted on that.
Anyway, now you have a mesh and a skeleton.
First thing to do will be changing the name of your skeleton and it's internal skeletal friend to "Armature" and fixing object name to remove any ".001" that might appear.
Feel free to merge vertices by distance to make editing simpler, turn triangles to quads, and edit whatever. There's a billion Blender tutorials around the internet and the only important thing you really have to keep in my mind here is vertex colours and import/export settings.
Chapter 3 - Blender to Unreal
Sculpted some muscles? Removed the underwear? Whatever, I don't judge. The thing is, you have your mesh, and you want it in game.
Exporting is simple, go through "File->Export->FBX", then use export settings from below:
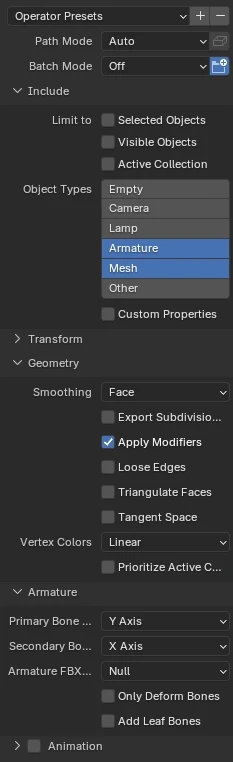
Export only Armature (skeleton) and Mesh, set Geometry->Smoothing to "Face" and "Vertex Colors"to "Linear" like during the import.
Disable "Add Leaf Bones" option in "Armature", tick off "Animation" ( not really needed, but looks better this way, doesn't it? ).
Now you can export with the nice blue button saying "Export FBX", I export to the same directory as the fbx file to keep it clean, keep the same name, just with .fbx extension.
Chapter 4 - Unreal Engine time, setting up, packing it up, loading your mod in game
Now, probably the longest chapter.
First, a quick explanation of how everything here works. Unreal Engine uses .pak files to load game data. It supports loading "patch" files or "chunks" with additional content to avoid dropping 100gb game updates. We are going to use that feature to make Oblivion think we're just supplying it with a patch as our mod.
Open up Unreal Engine 5.3.2 from Epic Games Store, click Games tabs, pick "Blank", set it as BLUEPRINT, disable "Starter Content" and name it exactly "OblivionRemastered".
After engine launched, you'll have to enable few features. "Edit->Editor Preferences->General->Experimental", scroll down and tick "Allow ChunkID Assignments". This will let us choose a pak to put our mod into. Now, to actually output the paks, "Edit->Project Settings->Project->Packaging" and tick the "Generate Chunks" option.
Finally.
Now, let's import the FBX file, first create the correct path, which is "Art/Character/nord". Now, drag n' drop your fbx inside.
You'll get a popup with import settings, you can keep these default and it should import without any errors. If you got errors, let me know, I might have forgotten something.
You'll have all the files in your "nord" directory. As you might remember from earlier, I said underwear belongs to the Imperials, and skeleton and physics are shared among humanoids. You can look up that data up in the nord body uasset in FModel as an exercise, but I'm gonna tell you the correct answers anyway :P
Move your "Skeleton" and "Physics Asset" to "Art/Character/Humanoid" and rename them to "SKEL_HumanoidSkeleton" and "PA_HumanoidSimple" respectively.
Fun fact, this mod is set to "PA_HumanoidFull" which looks like is for female characters. I should probably fix it...
Now, underwear, that's your "MIC_Imperial_Underwear_m" file. As you can probably guess, that goes to "Art/Character/imperial/" directory.
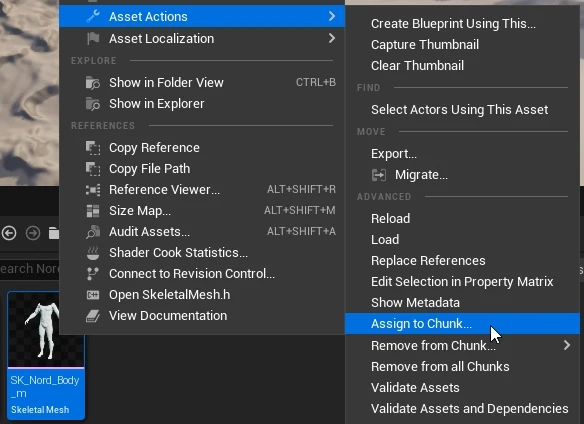
With all that behind us, we can finally test the export. Go back to your "nord" directory, right-click the Skeletal Mesh and "Assign to Chunk...". Pick any number higher than 0, that'll be your mod id. Only important here, for the export, inside your editor, won't change anything for players that download it so don't worry. Remember to save!
Why only the mesh itself? In this situation we want to re-use the assets already in-game. Setting it up like this will make sure your textures, materials, skeleton, physics, animations etc will work. Rule of thumb is, only add to the chunk what you edited to avoid breaking too much.
FINALLY, click the "Platforms" button in the top bar, choose "Windows" and click "Package Project". Select a location and wait.
First one will take way longer, but after it's done, you'll have a full project generator. Open it's dir, go to "[Dir]/OblivionRemastered/Content/Paks" and you'll see your three "pakchunk-Windows.*" files. Rename them to "[ModName]_p.[pak/ucas/utoc]" and throw them into your games Paks directory.
That's it. When you launch the game your mod should be automatically loaded.
This is all obviously just basic basics, doing anything will require fiddling and experimenting, but the overall method is the same. If you want to change textures, just edit your T_ files instead etc.
Please ask any questions you might have in the comments, I'll be happy to reword and explain everything that might cause confusion.
Oh, and consider this a WIP, I'll add screenshots and reformat it later, I just wanted to get all the data out asap.
Installation
Unpack the files to your TES install dir. `*_p.pak` files from the archive should be next to your `OblivionRemastered-Windows.*` files.
Game should load them automatically, like it's an official game patch.
Special Thanks
Folk at Mr Samuel Streamer's Discord for keepin' me motivated and especially Lacero for the legendary "Maybe it's the shader?" question that made me realise it's all vertex colours...

Hey hey, Teslov here.
I spent the last few hours reverse-engineering, testing, importing, exporting, changing settings etc to figure out a way to modify characters in Oblivion Remastered. It's not that hard, if you ever made mods for other Unreal Engine 5 games the only thing you need to know is to import and export vertex colours in linear colorspace as these are used for hiding pieces of a mesh. Anyway, more about the process later.
This simple mod increases muscle definition of Nords slightly, makes them bulkier, and pretty much caked up. Why? I just thought it's the best way to showcase the process really, you can apply it to do any changes you want.
How?
Chapter 1 - Preparation and exploration
First, tools. To mod Unreal Engine 5 games, you need Unreal Engine 5. Oblivion uses UE5.3, so grab UE5.3.2 from Epic Games Launcher.
For viewing, importing and exporting I use FModel, which is so good I genuinely thought it's a scam at first. But it's absolutely perfect.
Grab mappings from https://www.nexusmods.com/oblivionremastered/mods/47
Now you can open up FModel, click "Directory" in the top bar, choose "Selector", and "ADD UNDETECTED GAME".
Give it a name, and select base directory. Then press the nice, blue + button.
Now, when you choose it in the list above, switch UE Versions to "GAME_UE5_3".
Archive containing all data you are interested in is the ".utoc" file.
Now, Blender, just grab the newest version available, then download Unreal PSK/PSA extension, you can do that from "Edit->Preferences->Get Extensions".
That's it for the setup.
Chapter 2 - Exporting the files and editing them
Let's try doing the same exact kind of mod as the one posted here, so, character models are located in "Content->Art->Character->[race_name]".
Find "nord" directory, click on it, and switch to "Packages" tab above.
There you'll have a lot of files, based on the prefix, you see:
- MIC_ - Material Instance Constant
- SK_ - Skeletal Mesh
- T_ - Texture
- PA_ - Physics Asset
- SKEL_ - Skeleton
Nords use underwear material from imperial directory btw, you can check that by double-clicking "SK_Nord_Body_m" and checking the "Sections" box.
Or, if you're feeling brave, just reading the file information in main window, you can for example find that PhysicsAsset responsible for this mesh is "PA_Humanoid_Simple". Get ready to learn how to dig through all that, it's gonna be important.
Now, boring stuff aside, you probably want to check your output directory in the Settings, after doing that just right-click on "SK_Nord_Body_m" and click "Save Model".
That'll give you a PSK file that you can finally import :D
Open up Blender, drag n' drop the file ( it'll be in your "[output_directory]/Exports/Game/Game/Character/nord/" ) into Blender's window, and use the import settings from the screenshot.
Scale is self-explanatory I guess, but Vertex Color is important. This game uses Vertex Colours for knowing which parts of a mesh to "hide" under amours. You can see that by selecting the mesh and going to the "Vertex Paint" mode. Wrong colorspace will cause your legs and arms to disappear when you equip a shirt and other weirdness like that. Don't ask how much time I wasted on that.
Anyway, now you have a mesh and a skeleton.
First thing to do will be changing the name of your skeleton and it's internal skeletal friend to "Armature" and fixing object name to remove any ".001" that might appear.
Feel free to merge vertices by distance to make editing simpler, turn triangles to quads, and edit whatever. There's a billion Blender tutorials around the internet and the only important thing you really have to keep in my mind here is vertex colours and import/export settings.
Chapter 3 - Blender to Unreal
Sculpted some muscles? Removed the underwear? Whatever, I don't judge. The thing is, you have your mesh, and you want it in game.
Exporting is simple, go through "File->Export->FBX", then use export settings from below:
Export only Armature (skeleton) and Mesh, set Geometry->Smoothing to "Face" and "Vertex Colors"to "Linear" like during the import.
Disable "Add Leaf Bones" option in "Armature", tick off "Animation" ( not really needed, but looks better this way, doesn't it? ).
Now you can export with the nice blue button saying "Export FBX", I export to the same directory as the fbx file to keep it clean, keep the same name, just with .fbx extension.
Chapter 4 - Unreal Engine time, setting up, packing it up, loading your mod in game
Now, probably the longest chapter.
First, a quick explanation of how everything here works. Unreal Engine uses .pak files to load game data. It supports loading "patch" files or "chunks" with additional content to avoid dropping 100gb game updates. We are going to use that feature to make Oblivion think we're just supplying it with a patch as our mod.
Open up Unreal Engine 5.3.2 from Epic Games Store, click Games tabs, pick "Blank", set it as BLUEPRINT, disable "Starter Content" and name it exactly "OblivionRemastered".
After engine launched, you'll have to enable few features. "Edit->Editor Preferences->General->Experimental", scroll down and tick "Allow ChunkID Assignments". This will let us choose a pak to put our mod into. Now, to actually output the paks, "Edit->Project Settings->Project->Packaging" and tick the "Generate Chunks" option.
Finally.
Now, let's import the FBX file, first create the correct path, which is "Art/Character/nord". Now, drag n' drop your fbx inside.
You'll get a popup with import settings, you can keep these default and it should import without any errors. If you got errors, let me know, I might have forgotten something.
You'll have all the files in your "nord" directory. As you might remember from earlier, I said underwear belongs to the Imperials, and skeleton and physics are shared among humanoids. You can look up that data up in the nord body uasset in FModel as an exercise, but I'm gonna tell you the correct answers anyway :P
Move your "Skeleton" and "Physics Asset" to "Art/Character/Humanoid" and rename them to "SKEL_HumanoidSkeleton" and "PA_HumanoidSimple" respectively.
Fun fact, this mod is set to "PA_HumanoidFull" which looks like is for female characters. I should probably fix it...
Now, underwear, that's your "MIC_Imperial_Underwear_m" file. As you can probably guess, that goes to "Art/Character/imperial/" directory.
With all that behind us, we can finally test the export. Go back to your "nord" directory, right-click the Skeletal Mesh and "Assign to Chunk...". Pick any number higher than 0, that'll be your mod id. Only important here, for the export, inside your editor, won't change anything for players that download it so don't worry. Remember to save!
Why only the mesh itself? In this situation we want to re-use the assets already in-game. Setting it up like this will make sure your textures, materials, skeleton, physics, animations etc will work. Rule of thumb is, only add to the chunk what you edited to avoid breaking too much.
FINALLY, click the "Platforms" button in the top bar, choose "Windows" and click "Package Project". Select a location and wait.
First one will take way longer, but after it's done, you'll have a full project generator. Open it's dir, go to "[Dir]/OblivionRemastered/Content/Paks" and you'll see your three "pakchunk-Windows.*" files. Rename them to "[ModName]_p.[pak/ucas/utoc]" and throw them into your games Paks directory.
That's it. When you launch the game your mod should be automatically loaded.
This is all obviously just basic basics, doing anything will require fiddling and experimenting, but the overall method is the same. If you want to change textures, just edit your T_ files instead etc.
Please ask any questions you might have in the comments, I'll be happy to reword and explain everything that might cause confusion.
Oh, and consider this a WIP, I'll add screenshots and reformat it later, I just wanted to get all the data out asap.
Installation
Unpack the files to your TES install dir. `*_p.pak` files from the archive should be next to your `OblivionRemastered-Windows.*` files.
Game should load them automatically, like it's an official game patch.
Special Thanks
Folk at Mr Samuel Streamer's Discord for keepin' me motivated and especially Lacero for the legendary "Maybe it's the shader?" question that made me realise it's all vertex colours...