


0 of 0


About this mod
This mod changes many things such as Graphics, Movement Speed, Amount/Length of Batteries, Enemy AI and much more.
- Permissions and credits
Outlast Overhaul/Rebalance Mod by Ratzmoonmopes~
My Outlast 2 Mod Here: https://www.nexusmods.com/outlast2/mods/3?tab=description
UPDATE: I will probably make a Version 1.1 of this mod someday in the future. There's a few things I want to go back to tweak and clean up, plus I learned a lot from modding Outlast 2 that I can apply to the first game. For example, I learned how to extend/get rid of the Night Vision Depth of Field, and I might want to go back and do that for the first game sometime. If I ever do make a version 1.1, it will be whenever I feel like playing and modding Outlast again.
INSTALL INSTRUCTIONS AND DIY MODDING TUTORIAL AT THE BOTTOM OF THE PAGE: If you want to learn how to install/modify this game as well as many other games using this same method, I will be leaving a TUTORIAL AT THE BOTTOM OF THE PAGE.
Introduction/Explanation:
So I am uploading this mod because I felt like it. I saw that surprisingly the Outlast nexus is pretty bare and only 1 other person has uploaded a rebalancing mod like this. I always search for/make my own mods like this whenever I play the PC versions of games, and since nobody else made one I decided to make one myself since it's so easy, and I might as well share it just in case anyone else is like me and wants to enjoy/create a modified version of the game for themselves as well. There are always things in games like walking speed and inventory size that I often disagree on the developers with and feel the desire to change myself.
Keep in mind this is basically my personal version of the game you're downloading; I only changed what I know how to change and only what I personally wanted to change. If there is anything I did not edit it was because either A) I don't know how to do it (battery spawn rate), B) it's not possible (chromatic aberration), C) I didn't feel like messing with it (a LOT of stuff), or D) I feel it was already perfect the way it was and don't feel the need to change it (gravity/jump distance). Also my intention was not to make the game easier OR harder overall, I just wanted it to be more balanced to my personal tastes like how I personally feel it should be. If you disagree with any of these decisions, that's fine because you can easily revert back to default or adjust it yourself to whatever you want.
I AM NOT SAYING MY VERSION OF THE GAME IS PERFECT. I may say it's "improved" or "superior" but I would never say mine is totally perfect for 3 reasons 1) everybody is going to have different opinions on what all of these values should be 2) not all of my values are final, everything still requires more testing because it takes a lot of time and trial and error testing these things over and over again (that's exactly why the game developers often leave this stuff off because they lack the TIME to repeatedly go back and test the same things over and over) and 3) there are plenty of things in the files that I don't know what they do/affect or I don't know how to change it. Please do not think I'm saying my chosen values are the perfect values, this is just what I ended up coming to after my several days of testing. The game is perfectly completable with this mod so don't worry about it breaking the game.
IMPORTANT NOTE: TO ANYONE WHO PLAYS ON VERY LOW/LOW/MID GRAPHICS SETTINGS: I may have messed some things up for you and I apologize for that. If your game gets broken in any way, it's because this mod was designed for and recommended for Very High settings. I did not test it on anything but Very High because that's all I use personally. If you encounter any issues with that on lower-end PCs then you should verify your game files and reinstall the mod WITHOUT the "SystemSettings" files. Sorry about that.
IMPORTANT NOTE: I DID NOT TEST ANY OF THIS WITH A CONTROLLER/GAMEPAD. I will never use a gamepad controller for a first person game on PC, so sorry (not sorry) about that to anyone who chooses to use them.
IMPORTANT NOTE: You might possibly have to make some of the files read-only to work, I'm not sure.
Here is my list of changes (keep in mind that I'm a lil dumb/lazy and failed to backup/write down the vanilla config files/values, so I may not remember what all of the default values were):
- Quick Time Events (not available) - One thing I REALLY want to do is bring back the QTEs that the devs patched out in an early update. I hate that they patched them out. The least they could have done is make it optional in the options menu for people that like them. Personally I love the QTEs, think they make the game better in every way, I see nothing wrong with them and I wish they were still in the game. Unfortunately however I cannot figure out how to do this and cannot find anybody talking about it online. Very disappointing. If anyone knows how to do it please share.
- FOV Increased
(wanted camera to still feel a bit claustrophobic to retain the atmosphere. anything above 100 felt like too much. it didn't feel like the iconic "Outlast" vibe to me anymore. 100 fov feels 100% perfect to me. if you feel differently feel free to adjust it yourself. Also I could not find a way to increase the Cutscene FOV such as the opening scene with Miles driving in the car. I would love to increase that as well but idk how.)
Camera FOV = 83 > 100
Non-Camera FOV = 90 > 110
Sprinting FOV = 100 > 130
- Interact/Pickup Angle Slightly Increased
Increased from 0.98 > 1.0
(very slight negligible change. don't worry about this screwing up any animations or anything, it doesn't. idk why the devs set it to such an odd number, but 1.0 feels just right and satisfies my OCD.)
- Number of Bloody Footsteps Increased 8 > 28
- DecalLifeSpan=9999.0
- MaxDecalCount=9999
(now your bloody footstep trail will be longer and stay forever. HOWEVER this feature is flawed. I tried to increase the total number of decals (footsteps) allowed to exist at the same time but couldn't figure out how to fix this. After about 30 footsteps, your previous ones will start to disappear with every new footstep you create. oh well. and btw in case you never noticed, the bloodiness of the footsteps actually gradually fade more with each step as you walk which is very realistic and immersive.)
Rebalancing Changes:
- Health Regeneration Reduced
(this might sound bad at first, but I absolutely think it's better this way because I wanted it to feel a bit more realistic as well as challenging. the default health regen was honestly WAAAAY too forgiving, easy and unrealistically fast imo. vanilla Normal mode gives you so much health that it feels like easy mode, even the worst players rarely die due to the health regen being so fast. to me the default feels insultingly easy and this change just feels much better balanced and more immersive to me. again it's very easy to edit, so feel free to change it to whatever you would like better if you disagree.)
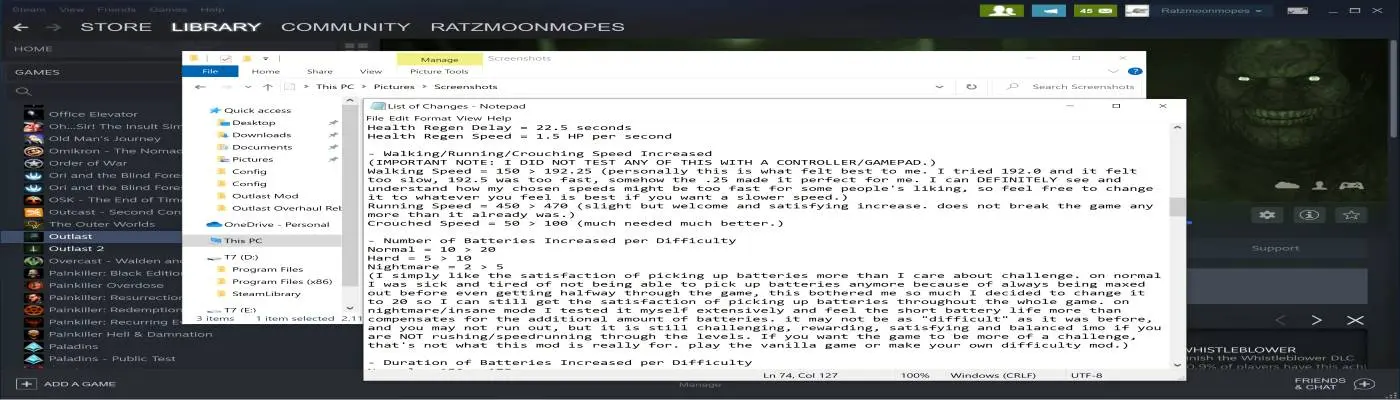
Health Regen Delay = 22.5 seconds
Health Regen Speed = 1.5 HP per second
- Walking/Running/Crouching Speed Increased
(IMPORTANT NOTE: I DID NOT TEST ANY OF THIS WITH A CONTROLLER/GAMEPAD.)
Walking Speed = 150 > 192.25 (personally this is what felt best to me. I tried 192.0 and it felt too slow, 192.5 was too fast, somehow the .25 made it perfect for me. I can DEFINITELY see and understand how my chosen speeds might be too fast for some people's liking, so feel free to change it to whatever you feel is best if you want a slower speed.)
Running Speed = 450 > 470 (slight but welcome and satisfying increase. does not break the game any more than it already was.)
Crouched Speed = 50 > 100 (much needed much better.)
- Number of Batteries Increased per Difficulty
Normal = 10 > 20
Hard = 5 > 10
Nightmare = 2 > 5
(I simply like the satisfaction of picking up batteries more than I care about challenge. on normal I was sick and tired of not being able to pick up batteries anymore because of always being maxed out before even getting halfway through the game, this bothered me so much I decided to change it to 20 so I can still get the satisfaction of picking up batteries throughout the whole game. on nightmare/insane mode I tested it myself extensively and feel the short battery life more than compensates for the additional amount of batteries. it may not be as "difficult" as it was before, and you may not run out, but it is still challenging, rewarding, satisfying and balanced imo if you are NOT rushing/speedrunning through the levels. If you want the game to be more of a challenge, that's not what this mod is really for. play the vanilla game or make your own difficulty mod.)
- Duration of Batteries Increased per Difficulty
Normal = 150 > 175
Hard = 150 > 110
Nightmare = Nothing? > 75
(after extensive testing this is what feels best to me. I have no idea why there were only 2 difficulties lsited here and both were set to 150 by default. nightmare wasn't included for some reason, I had to add that myself. It makes no sense for all difficulties to have the same length. on normal the battery feels more realistic and on nightmare/insane it feels more challenging and properly balanced imo. If you want the original challenge, play the vanilla game.)
Battery Spawn Rate (not available) - I don't know where to find the setting for Battery Spawn Rate, so I can't change that. I would love to increase the spawn rate and make it so they're always guaranteed to appear in every spot. I personally don't like the "random" aspect of the batteries where most of them only spawn if you are low. I wish I could make it so they always spawn in every spot no matter what. Oh well. If anyone figures it out I would love to know.
Adjusted Loudness of Various Actions:
(IMPORTANT NOTE: I honestly am an idiot and forgot to backup/write down the original default values in the config files so I genuinely don't remember what all of the original values were for all of these before I changed them. If you still have the original files you can compare them yourself, but what I wrote here is my best tried guesses for what I remember everything being off the top of my head. sorry about that, I honestly never planned on uploading this until well AFTER I started modding it. it was almost a last minute decision to share this. also once again, if you DISAGREE with any of these changes you can always modify them yourself.)
DoorOpenInstantLoudness=0.6 > 0.5
DoorOpenPartialLoudness=0.3
DoorCloseFastLoudness=0.3
DoorEnterLockerLoudness=0.2
DoorExitLockerLoudness=0.2
DoorRunThroughLoudness=1.0
WalkingLoudness=0.3
CrouchLoudness=0.1
RunningLoudness=1.0 > 0.9
WalkingWaterLoudness=0.7
CrouchWaterLoudness=0.1 > 0.15
FallingHighLoudness=1.0
FallingMedLoudness=0.5
FallingLowLoudness=0.2
LandingBigLoudness=1.0
LandingSmallLoudness=0.5
LandingBigWaterLoudness=1.5
LandingSmallWaterLoudness=0.75
HobblingWalkLoudness=0.4 > 0.3
MovingNoiseStartTime=1.5 > 1.0
MovingNoiseClearTime=1.0
Enemy AI Changes:
(I didn't change much of the Enemy AI, I didn't feel like messing with it too much, all I really did was enable a few things that I saw were disabled and slightly increased the likeliness that they'll check multiple hiding spots because I felt that was lacking. I could have changed the running speed of each enemy to be faster to give more intense chases but I just straight up didn't feel like taking the immensely large amount of time to do that considering how much it could potentially break every part of the game. feel free to mess with it as much as you would like. ALSO nowhere did I see it say anything in the Enemy file about how difficulty affects their stats. I know that damage does, but I don't know if the AI changes at all on higher difficulties.)
EnemyPawn:
InvestigateBedAlternateChance=0.0 > 0.3
InvestigationFindHiddenPlayerProbability=0.0 > 0.3
EnemyGenericPatient:
InvestigateBedAlternateChance=0.0 > 0.3
EnemyNanoCloud:
bInvestigateLockers=true
bInvestigateBeds=true
EnemyGroom:
DoorClosedPathMultiplier=0.0 > 0.3
InvestigationFindHiddenPlayerProbability=0.0 > 0.3
Enemy Cannibal:
DoorClosedPathMultiplier=0.0 > 0.1
Graphics Enhanced/Improved:
IMPORTANT NOTE: TO ANYONE WHO PLAYS ON VERY LOW/LOW/MID GRAPHICS SETTINGS: I may have messed some things up for you and I apologize for that. If your game gets broken in any way, it's because this mod was designed for and recommended for Very High settings. I did not test it on anything but Very High because that's all I use personally. If you encounter any issues with that on lower-end PCs then you should verify your game files and reinstall the mod WITHOUT the "SystemSettings" files. Sorry about that.
- Resolution (LEFT AT DEFAULT) - For some reason in the options menu of the game the resolution caps at 1440p. I have no idea why this is, but I want to point out here that I DID NOT even attempt to increase the screen resolution to 4k. I could have, since I am playing on a 4k screen, but I chose not to for 2 reasons 1) I didn't feel like potentially breaking anything like the UI and 2) the game already looks perfect to me the way it is at 1440p. It already looks so good that I genuinely do not even feel the desire to change it. If you do, more power to you to go ahead and change it yourself if you feel like trying it.
- Film Grain Disabled by pressing F8 at any time
(First of all, SHAME on the developers for putting film grain on Miles' freaking eyeballs when you don't even have the camera up. I cannot stand how much of a huge mistake that is. I can understand having film grain on the CAMERA, but come on it makes NO sense when the camera is down. Unfortunately there is no way to make it exclusively apply to the camera. Once you disable it the only way to get it back is to restart the game. Either way it just makes the game look worse anyway. The game is much better with it off. There are 2 different methods of turning off film grain, the more commonly suggested of them is to turn off ALL post-processing effects, but we DON'T want that so we want to use the 2nd better method. I found this by scouring the internet high and low for it and finally finding a single comment by user superboo07 on the Steam forums who taught me how to do this. I am going to copy/paste exactly what this person typed:
"In DefaultInput.ini
.Bindings=(Name="F8",Command="Set OLUberPostProcessEffect GrainOpacity 0")
" -From @Ритан Кланстер. Using the bind will remove the film grain while keeping all other post processing affects intact")
- Reflections enabled (you can easily tell why they disabled this; because they are static reflections, which means they do not animate. for example when the cafeteria is on fire, if you look at the window's reflection, the fire is not moving. I personally don't mind this because A) I think the flawed reflections are far better than no reflections at all and B) situations where it's noticeable are VERY VERY rare, you will most likely NEVER notice how the flaws outside of the cafeteria I just mentioned. the reflections look great on all of the bathroom mirrors and reflective floor surfaces.)
- MSAA and FXAA Post-Processing Anti-Aliasing enabled
(I disabled Temporal Anti-Aliasing because after a while of testing I finally figured out that this is what was making the game look horrendously terrible. It ruins the whole game, so I disabled it.)
- Texture Quality Increased
(I'm not exactly sure how this one works, but I got this copy/pasted from the PCGamingWiki website:
"Open OLEngine.ini.
Find the lines:
MaxProcBuildingLODColorTextureSize=1024
MaxProcBuildingLODLightingTextureSize=256
Change their values to 2048 and 1024, respectively.")
- Shadow Quality Increased to 4k
- All dynamic lights and shadows enabled
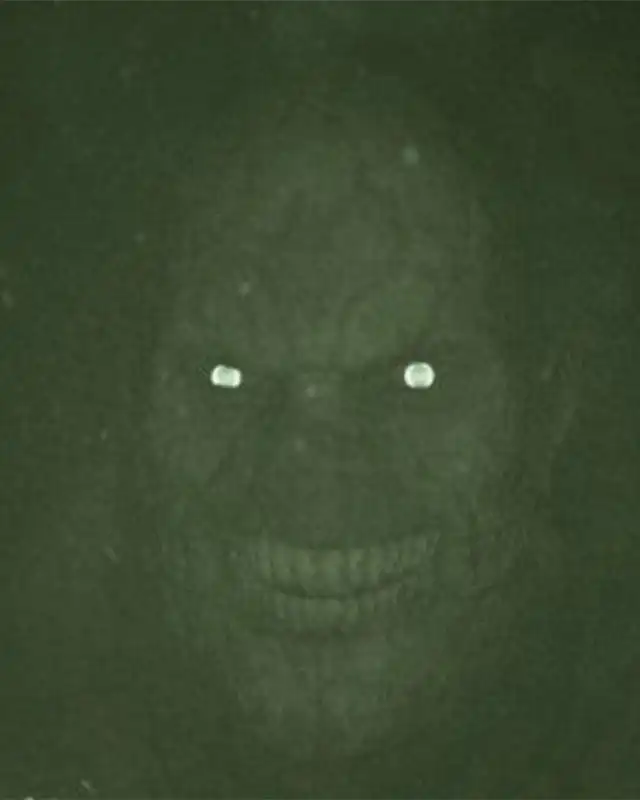
- Explain 2 different types of shadows: There are 2 different kinds of shadows in the game: the ones that DO disappear and the ones that DON'T disappear whenever you turn on Night Vision. All of the shadow resolution settings I adjusted affect the shadows that DON'T disappear. The ones that DO disappear when Night Vision is turned on are extremely pixelated (refer to the screenshots) and I don't know how to fix them. None of the settings I change affect those types of shadows so idk what to do about them. If you are smart enough to figure it out please go ahead. Plus ALL shadows in ALL video games are poorly done on PC ports anyway, there is NEVER a way to fix them completely in any PC game. We should all be used to this by now.
I could not find how to increase shadow draw distance. Nothing I can do about that.
And that's pretty much all I can remember changing. Maybe I changed a couple more little things I don't remember but it's pretty negligible. For the MILLIONTH time, dive in to the files and see for yourself if you're really curious about all the fine details.
INSTALL INSTRUCTIONS:
(I only have the Steam version so I can only provide instructions for the Steam version of the game.)
1. Backup BOTH of your "Config" folders located within Steam Library > steamapps > common > Outlast > BOTH Engine AND OLGame folders
2. Download Mod
3. Open mod with Winrar or 7-Zip
4. Copy and paste BOTH folders into Steam Library > steamapps > common > Outlast
5. Click yes to replace all files of the same name
6. Done, enjoy the mod
DIY MODDING TUTORIAL: Guys this is literally the EASIEST possible method of creating your own mods for pretty much any PC game out there. That's why I'm able to do it; because it's so easy. All it takes is a little time and effort to go out of your way to learn how, and once you do it becomes so simple and easy and opens up a whole new world of gaming for you. So here is how to do it if you don't already know:
1. First you need to find the config file location on your HDD/SSD. Always go to Google first and type in "*insert game here* config file location" and the PCGamingWiki website will usually always tell you where to find it. Every game is a little bit different, the location might be a little bit different for everybody depending on your PC, but 98% most of the time it is located in either the same location your whole game is installed to (such as Steamapps > Common), or in your Documents folder. For some games however you will need to go to %USERPROFILE%, %APPDATA% or %LOCALAPPDATA% and search around those areas. For me Outlast's config files are located in BOTH Steam Library > steamapps > common > Outlast > Engine > Config AND Steam Library > steamapps > common > Outlast > OLGame > Config.
2. In both the "Engine" and "OLGame" folders you will see "Config" and within that is all of the files you can freely edit as much as you want with any basic text editor program like Notepad. Most games have this, it might look a little different but you can usually always find these files and edit them to your heart's content.
3. If you open these files with Notepad and start scrolling through and reading everything you will inevitably realize that about 80% of it is confusing foreign mumbo jumbo language you can't possibly decipher alone, BUT the other 20% scattered around is perfectly understandable english and crystal clear on what it affects. The more you scroll the more stuff you will eventually recognize and say "yeah I know what that means, I can change that".
4. It's pretty easy to just figure it out yourself from here. Experiment as much as you want. Just do what I do and TRY be very careful. Only change the things you are sure you understand, or you might break the game. And try to keep track of the things you change, you don't want to forget what you've done. Keep backups of your modified files so if you ever delete the game, you don't have to redo the config files next time you install it.
That's all I can think of. Hopefully I didn't forget anything important. I've never uploaded a mod before. I hope at least 1 person downloads it and potentially benefits from it someday. Either way I had fun making it.
My Outlast 2 Mod Here: https://www.nexusmods.com/outlast2/mods/3?tab=description
UPDATE: I will probably make a Version 1.1 of this mod someday in the future. There's a few things I want to go back to tweak and clean up, plus I learned a lot from modding Outlast 2 that I can apply to the first game. For example, I learned how to extend/get rid of the Night Vision Depth of Field, and I might want to go back and do that for the first game sometime. If I ever do make a version 1.1, it will be whenever I feel like playing and modding Outlast again.
INSTALL INSTRUCTIONS AND DIY MODDING TUTORIAL AT THE BOTTOM OF THE PAGE: If you want to learn how to install/modify this game as well as many other games using this same method, I will be leaving a TUTORIAL AT THE BOTTOM OF THE PAGE.
Introduction/Explanation:
So I am uploading this mod because I felt like it. I saw that surprisingly the Outlast nexus is pretty bare and only 1 other person has uploaded a rebalancing mod like this. I always search for/make my own mods like this whenever I play the PC versions of games, and since nobody else made one I decided to make one myself since it's so easy, and I might as well share it just in case anyone else is like me and wants to enjoy/create a modified version of the game for themselves as well. There are always things in games like walking speed and inventory size that I often disagree on the developers with and feel the desire to change myself.
Keep in mind this is basically my personal version of the game you're downloading; I only changed what I know how to change and only what I personally wanted to change. If there is anything I did not edit it was because either A) I don't know how to do it (battery spawn rate), B) it's not possible (chromatic aberration), C) I didn't feel like messing with it (a LOT of stuff), or D) I feel it was already perfect the way it was and don't feel the need to change it (gravity/jump distance). Also my intention was not to make the game easier OR harder overall, I just wanted it to be more balanced to my personal tastes like how I personally feel it should be. If you disagree with any of these decisions, that's fine because you can easily revert back to default or adjust it yourself to whatever you want.
I AM NOT SAYING MY VERSION OF THE GAME IS PERFECT. I may say it's "improved" or "superior" but I would never say mine is totally perfect for 3 reasons 1) everybody is going to have different opinions on what all of these values should be 2) not all of my values are final, everything still requires more testing because it takes a lot of time and trial and error testing these things over and over again (that's exactly why the game developers often leave this stuff off because they lack the TIME to repeatedly go back and test the same things over and over) and 3) there are plenty of things in the files that I don't know what they do/affect or I don't know how to change it. Please do not think I'm saying my chosen values are the perfect values, this is just what I ended up coming to after my several days of testing. The game is perfectly completable with this mod so don't worry about it breaking the game.
IMPORTANT NOTE: TO ANYONE WHO PLAYS ON VERY LOW/LOW/MID GRAPHICS SETTINGS: I may have messed some things up for you and I apologize for that. If your game gets broken in any way, it's because this mod was designed for and recommended for Very High settings. I did not test it on anything but Very High because that's all I use personally. If you encounter any issues with that on lower-end PCs then you should verify your game files and reinstall the mod WITHOUT the "SystemSettings" files. Sorry about that.
IMPORTANT NOTE: I DID NOT TEST ANY OF THIS WITH A CONTROLLER/GAMEPAD. I will never use a gamepad controller for a first person game on PC, so sorry (not sorry) about that to anyone who chooses to use them.
IMPORTANT NOTE: You might possibly have to make some of the files read-only to work, I'm not sure.
Here is my list of changes (keep in mind that I'm a lil dumb/lazy and failed to backup/write down the vanilla config files/values, so I may not remember what all of the default values were):
- Quick Time Events (not available) - One thing I REALLY want to do is bring back the QTEs that the devs patched out in an early update. I hate that they patched them out. The least they could have done is make it optional in the options menu for people that like them. Personally I love the QTEs, think they make the game better in every way, I see nothing wrong with them and I wish they were still in the game. Unfortunately however I cannot figure out how to do this and cannot find anybody talking about it online. Very disappointing. If anyone knows how to do it please share.
- FOV Increased
(wanted camera to still feel a bit claustrophobic to retain the atmosphere. anything above 100 felt like too much. it didn't feel like the iconic "Outlast" vibe to me anymore. 100 fov feels 100% perfect to me. if you feel differently feel free to adjust it yourself. Also I could not find a way to increase the Cutscene FOV such as the opening scene with Miles driving in the car. I would love to increase that as well but idk how.)
Camera FOV = 83 > 100
Non-Camera FOV = 90 > 110
Sprinting FOV = 100 > 130
- Interact/Pickup Angle Slightly Increased
Increased from 0.98 > 1.0
(very slight negligible change. don't worry about this screwing up any animations or anything, it doesn't. idk why the devs set it to such an odd number, but 1.0 feels just right and satisfies my OCD.)
- Number of Bloody Footsteps Increased 8 > 28
- DecalLifeSpan=9999.0
- MaxDecalCount=9999
(now your bloody footstep trail will be longer and stay forever. HOWEVER this feature is flawed. I tried to increase the total number of decals (footsteps) allowed to exist at the same time but couldn't figure out how to fix this. After about 30 footsteps, your previous ones will start to disappear with every new footstep you create. oh well. and btw in case you never noticed, the bloodiness of the footsteps actually gradually fade more with each step as you walk which is very realistic and immersive.)
Rebalancing Changes:
- Health Regeneration Reduced
(this might sound bad at first, but I absolutely think it's better this way because I wanted it to feel a bit more realistic as well as challenging. the default health regen was honestly WAAAAY too forgiving, easy and unrealistically fast imo. vanilla Normal mode gives you so much health that it feels like easy mode, even the worst players rarely die due to the health regen being so fast. to me the default feels insultingly easy and this change just feels much better balanced and more immersive to me. again it's very easy to edit, so feel free to change it to whatever you would like better if you disagree.)
Health Regen Delay = 22.5 seconds
Health Regen Speed = 1.5 HP per second
- Walking/Running/Crouching Speed Increased
(IMPORTANT NOTE: I DID NOT TEST ANY OF THIS WITH A CONTROLLER/GAMEPAD.)
Walking Speed = 150 > 192.25 (personally this is what felt best to me. I tried 192.0 and it felt too slow, 192.5 was too fast, somehow the .25 made it perfect for me. I can DEFINITELY see and understand how my chosen speeds might be too fast for some people's liking, so feel free to change it to whatever you feel is best if you want a slower speed.)
Running Speed = 450 > 470 (slight but welcome and satisfying increase. does not break the game any more than it already was.)
Crouched Speed = 50 > 100 (much needed much better.)
- Number of Batteries Increased per Difficulty
Normal = 10 > 20
Hard = 5 > 10
Nightmare = 2 > 5
(I simply like the satisfaction of picking up batteries more than I care about challenge. on normal I was sick and tired of not being able to pick up batteries anymore because of always being maxed out before even getting halfway through the game, this bothered me so much I decided to change it to 20 so I can still get the satisfaction of picking up batteries throughout the whole game. on nightmare/insane mode I tested it myself extensively and feel the short battery life more than compensates for the additional amount of batteries. it may not be as "difficult" as it was before, and you may not run out, but it is still challenging, rewarding, satisfying and balanced imo if you are NOT rushing/speedrunning through the levels. If you want the game to be more of a challenge, that's not what this mod is really for. play the vanilla game or make your own difficulty mod.)
- Duration of Batteries Increased per Difficulty
Normal = 150 > 175
Hard = 150 > 110
Nightmare = Nothing? > 75
(after extensive testing this is what feels best to me. I have no idea why there were only 2 difficulties lsited here and both were set to 150 by default. nightmare wasn't included for some reason, I had to add that myself. It makes no sense for all difficulties to have the same length. on normal the battery feels more realistic and on nightmare/insane it feels more challenging and properly balanced imo. If you want the original challenge, play the vanilla game.)
Battery Spawn Rate (not available) - I don't know where to find the setting for Battery Spawn Rate, so I can't change that. I would love to increase the spawn rate and make it so they're always guaranteed to appear in every spot. I personally don't like the "random" aspect of the batteries where most of them only spawn if you are low. I wish I could make it so they always spawn in every spot no matter what. Oh well. If anyone figures it out I would love to know.
Adjusted Loudness of Various Actions:
(IMPORTANT NOTE: I honestly am an idiot and forgot to backup/write down the original default values in the config files so I genuinely don't remember what all of the original values were for all of these before I changed them. If you still have the original files you can compare them yourself, but what I wrote here is my best tried guesses for what I remember everything being off the top of my head. sorry about that, I honestly never planned on uploading this until well AFTER I started modding it. it was almost a last minute decision to share this. also once again, if you DISAGREE with any of these changes you can always modify them yourself.)
DoorOpenInstantLoudness=0.6 > 0.5
DoorOpenPartialLoudness=0.3
DoorCloseFastLoudness=0.3
DoorEnterLockerLoudness=0.2
DoorExitLockerLoudness=0.2
DoorRunThroughLoudness=1.0
WalkingLoudness=0.3
CrouchLoudness=0.1
RunningLoudness=1.0 > 0.9
WalkingWaterLoudness=0.7
CrouchWaterLoudness=0.1 > 0.15
FallingHighLoudness=1.0
FallingMedLoudness=0.5
FallingLowLoudness=0.2
LandingBigLoudness=1.0
LandingSmallLoudness=0.5
LandingBigWaterLoudness=1.5
LandingSmallWaterLoudness=0.75
HobblingWalkLoudness=0.4 > 0.3
MovingNoiseStartTime=1.5 > 1.0
MovingNoiseClearTime=1.0
Enemy AI Changes:
(I didn't change much of the Enemy AI, I didn't feel like messing with it too much, all I really did was enable a few things that I saw were disabled and slightly increased the likeliness that they'll check multiple hiding spots because I felt that was lacking. I could have changed the running speed of each enemy to be faster to give more intense chases but I just straight up didn't feel like taking the immensely large amount of time to do that considering how much it could potentially break every part of the game. feel free to mess with it as much as you would like. ALSO nowhere did I see it say anything in the Enemy file about how difficulty affects their stats. I know that damage does, but I don't know if the AI changes at all on higher difficulties.)
EnemyPawn:
InvestigateBedAlternateChance=0.0 > 0.3
InvestigationFindHiddenPlayerProbability=0.0 > 0.3
EnemyGenericPatient:
InvestigateBedAlternateChance=0.0 > 0.3
EnemyNanoCloud:
bInvestigateLockers=true
bInvestigateBeds=true
EnemyGroom:
DoorClosedPathMultiplier=0.0 > 0.3
InvestigationFindHiddenPlayerProbability=0.0 > 0.3
Enemy Cannibal:
DoorClosedPathMultiplier=0.0 > 0.1
Graphics Enhanced/Improved:
IMPORTANT NOTE: TO ANYONE WHO PLAYS ON VERY LOW/LOW/MID GRAPHICS SETTINGS: I may have messed some things up for you and I apologize for that. If your game gets broken in any way, it's because this mod was designed for and recommended for Very High settings. I did not test it on anything but Very High because that's all I use personally. If you encounter any issues with that on lower-end PCs then you should verify your game files and reinstall the mod WITHOUT the "SystemSettings" files. Sorry about that.
- Resolution (LEFT AT DEFAULT) - For some reason in the options menu of the game the resolution caps at 1440p. I have no idea why this is, but I want to point out here that I DID NOT even attempt to increase the screen resolution to 4k. I could have, since I am playing on a 4k screen, but I chose not to for 2 reasons 1) I didn't feel like potentially breaking anything like the UI and 2) the game already looks perfect to me the way it is at 1440p. It already looks so good that I genuinely do not even feel the desire to change it. If you do, more power to you to go ahead and change it yourself if you feel like trying it.
- Film Grain Disabled by pressing F8 at any time
(First of all, SHAME on the developers for putting film grain on Miles' freaking eyeballs when you don't even have the camera up. I cannot stand how much of a huge mistake that is. I can understand having film grain on the CAMERA, but come on it makes NO sense when the camera is down. Unfortunately there is no way to make it exclusively apply to the camera. Once you disable it the only way to get it back is to restart the game. Either way it just makes the game look worse anyway. The game is much better with it off. There are 2 different methods of turning off film grain, the more commonly suggested of them is to turn off ALL post-processing effects, but we DON'T want that so we want to use the 2nd better method. I found this by scouring the internet high and low for it and finally finding a single comment by user superboo07 on the Steam forums who taught me how to do this. I am going to copy/paste exactly what this person typed:
"In DefaultInput.ini
.Bindings=(Name="F8",Command="Set OLUberPostProcessEffect GrainOpacity 0")
" -From @Ритан Кланстер. Using the bind will remove the film grain while keeping all other post processing affects intact")
- Reflections enabled (you can easily tell why they disabled this; because they are static reflections, which means they do not animate. for example when the cafeteria is on fire, if you look at the window's reflection, the fire is not moving. I personally don't mind this because A) I think the flawed reflections are far better than no reflections at all and B) situations where it's noticeable are VERY VERY rare, you will most likely NEVER notice how the flaws outside of the cafeteria I just mentioned. the reflections look great on all of the bathroom mirrors and reflective floor surfaces.)
- MSAA and FXAA Post-Processing Anti-Aliasing enabled
(I disabled Temporal Anti-Aliasing because after a while of testing I finally figured out that this is what was making the game look horrendously terrible. It ruins the whole game, so I disabled it.)
- Texture Quality Increased
(I'm not exactly sure how this one works, but I got this copy/pasted from the PCGamingWiki website:
"Open OLEngine.ini.
Find the lines:
MaxProcBuildingLODColorTextureSize=1024
MaxProcBuildingLODLightingTextureSize=256
Change their values to 2048 and 1024, respectively.")
- Shadow Quality Increased to 4k
- All dynamic lights and shadows enabled
- Explain 2 different types of shadows: There are 2 different kinds of shadows in the game: the ones that DO disappear and the ones that DON'T disappear whenever you turn on Night Vision. All of the shadow resolution settings I adjusted affect the shadows that DON'T disappear. The ones that DO disappear when Night Vision is turned on are extremely pixelated (refer to the screenshots) and I don't know how to fix them. None of the settings I change affect those types of shadows so idk what to do about them. If you are smart enough to figure it out please go ahead. Plus ALL shadows in ALL video games are poorly done on PC ports anyway, there is NEVER a way to fix them completely in any PC game. We should all be used to this by now.
I could not find how to increase shadow draw distance. Nothing I can do about that.
And that's pretty much all I can remember changing. Maybe I changed a couple more little things I don't remember but it's pretty negligible. For the MILLIONTH time, dive in to the files and see for yourself if you're really curious about all the fine details.
INSTALL INSTRUCTIONS:
(I only have the Steam version so I can only provide instructions for the Steam version of the game.)
1. Backup BOTH of your "Config" folders located within Steam Library > steamapps > common > Outlast > BOTH Engine AND OLGame folders
2. Download Mod
3. Open mod with Winrar or 7-Zip
4. Copy and paste BOTH folders into Steam Library > steamapps > common > Outlast
5. Click yes to replace all files of the same name
6. Done, enjoy the mod
DIY MODDING TUTORIAL: Guys this is literally the EASIEST possible method of creating your own mods for pretty much any PC game out there. That's why I'm able to do it; because it's so easy. All it takes is a little time and effort to go out of your way to learn how, and once you do it becomes so simple and easy and opens up a whole new world of gaming for you. So here is how to do it if you don't already know:
1. First you need to find the config file location on your HDD/SSD. Always go to Google first and type in "*insert game here* config file location" and the PCGamingWiki website will usually always tell you where to find it. Every game is a little bit different, the location might be a little bit different for everybody depending on your PC, but 98% most of the time it is located in either the same location your whole game is installed to (such as Steamapps > Common), or in your Documents folder. For some games however you will need to go to %USERPROFILE%, %APPDATA% or %LOCALAPPDATA% and search around those areas. For me Outlast's config files are located in BOTH Steam Library > steamapps > common > Outlast > Engine > Config AND Steam Library > steamapps > common > Outlast > OLGame > Config.
2. In both the "Engine" and "OLGame" folders you will see "Config" and within that is all of the files you can freely edit as much as you want with any basic text editor program like Notepad. Most games have this, it might look a little different but you can usually always find these files and edit them to your heart's content.
3. If you open these files with Notepad and start scrolling through and reading everything you will inevitably realize that about 80% of it is confusing foreign mumbo jumbo language you can't possibly decipher alone, BUT the other 20% scattered around is perfectly understandable english and crystal clear on what it affects. The more you scroll the more stuff you will eventually recognize and say "yeah I know what that means, I can change that".
4. It's pretty easy to just figure it out yourself from here. Experiment as much as you want. Just do what I do and TRY be very careful. Only change the things you are sure you understand, or you might break the game. And try to keep track of the things you change, you don't want to forget what you've done. Keep backups of your modified files so if you ever delete the game, you don't have to redo the config files next time you install it.
That's all I can think of. Hopefully I didn't forget anything important. I've never uploaded a mod before. I hope at least 1 person downloads it and potentially benefits from it someday. Either way I had fun making it.