


0 of 0


About this mod
A collection of fixes for control troubles (AZERTY, flashlight, etc) and gameplay issues (like vaulting, climbing camera).
- Permissions and credits
- Changelogs
- Donations
Control fixes
You will need to edit a file named CustomizeControls.cfg
This file is located in
%LOCALAPPDATA%\Stalker2\Saved\
or (which is the same)
C:\Users\[YOUR_WINDOWS_USER_NAME]\AppData\Local\Stalker2\Saved\
(YOUR_WINDOWS_USER_NAME is your actual user name in your system)
Find it and open it with regular windows Notepad (Notepad++ is better, if you have it).
Quit the game, make the edits (see the instructions below), save and close the file, launch the game to test the changes.
AZERTY ladder movement fix
In CustomizeControls.cfg find a line that contains this text:
Delete it, so you've got an empty space in between Sleep = and NoInput = lines.
Open CustomizeControls.cfg.Ladder.part.txt from the mod's package.
Copy the full content of CustomizeControls.cfg.Ladder.part.txt and paste it to that empty space in between Sleep = and NoInput = lines.
If you have changed some of your bindings in-game before, then instead of Ladder = section you might see this:
In this case, paste just the ascend/descent entries themselves and change [0] and [1] indexes accordingly, i.e. if you have entry [0] inside Ladder context already used by something else, then change indexes to [1] and [2].
Key = Z and Key = S can be changed to anything else, if you're no using AZERTY (nor QWERTY) and have issues moving up/down ladders.
AZERTY unarmed fix
Fixes a problem with unarmed action bound to Z in item selector wheel, so when you move, you always end up with no weapon.
In CustomizeControls.cfg find this line:
You will see several entries there, most probably [0] will be for MoveForward, because you were changing it to Z.
Find the last one, for me it has index [2] and is for ItemSelector_Detector.
Copy the text from CustomizeControls.cfg.Unarmed.part.txt and paste it after your last entry. Be careful to respect struct.begin - struct.end pairs!
Make sure to change the new entry index which is [3] in my case to match your file: for example, if your last entry has index [8], then the entry for Unarmed will have index [9].
Flashlight rebind
Note: Flashlight-rebind.zip is not really necessary to download as the instructions below are enough, but you can still do it to increase this mod's visibility for the others and as a thank you to the author.
In CustomizeControls.cfg find these lines:
(note that index [29] might be different for you, but PlayerMappableOption = Flashlight and InputActionSID = IA_Flashlight are important as there are other definitions that are similar, but not the same).
If you can't find this entry, then paste the above text in between these lines:
If instead of Exploration : struct.begin you see Exploration =, then change it to
It's quite simple and you can rebind it to anything else. For a ready to use example download the mod's package, unpack it and open CustomizeControls.cfg.Flashlight.part.txt.
The important part here is to choose a proper trigger condition. Possible conditions are:
EPlayerActionInputTrigger::HoldWithActivationDelay
EPlayerActionInputTrigger::Pressed
EPlayerActionInputTrigger::Tap
EPlayerActionInputTrigger::Hold
EPlayerActionInputTrigger::Down
In the example file I used Key = F and EPlayerActionInputTrigger::HoldWithActivationDelay. I also have F bound to my main interact action. As a result, I can interact with anything by tapping F and also turn my flashlight on and off by holding F (because I used activation with delay).
Melee rebind
Note: Melee-rebind.zip is not really necessary to download as the instructions below are enough, but you can still do it to increase this mod's visibility for the others and as a thank you to the author.
In CustomizeControls.cfg find these lines:
Note that index [9] might be different for you. If the line is missing, find Exploration : struct.begin, go to the end of the entries defined there, and add the entry for MeleeAttack manually. Make sure to adjust the entry index [9] to match the entries in your file, i.e. if your last entry in Exploration section has index [20], then MeleeAttack entry should have index [21].
Replace Key = None with any key you want, for example, MiddleMouseButton.
How to edit your keybindings - general instructions
Note: How-to-edit-your-keybindings.zip is not really necessary to download as the instructions below are enough, but you can still do it to increase this mod's visibility for the others and as a thank you to the author.
In CustomizeControls.cfg and search for a line you need - just read through the file or try to guess the naming and do a search. If it's not in the file, but you saw it in the menu - change it in-game and it will appear.
Important part to understand is the context the binding belongs to, for example, here:
Exploration : struct.begin
is the starting line for Exploration context. Journal, Aiming, etc, have their separate contexts.
Another very important part is Triggers entry: it defines activation conditions. Possible conditions are:
EPlayerActionInputTrigger::HoldWithActivationDelay
EPlayerActionInputTrigger::Pressed
EPlayerActionInputTrigger::Tap
EPlayerActionInputTrigger::Hold
EPlayerActionInputTrigger::Down
It is important to choose a proper condition, so you can have several actions bound to one key.
Here is an example:
I'm using the same key = Up to define two different actions: if I tap Up (entry 29 above), I toggle my weapons, if I long press Up (entry 20 above), I switch the fire type.
It is possible, because I used EPlayerActionInputTrigger::Tap for ToggleHeldItem and EPlayerActionInputTrigger::HoldWithActivationDelay for ChangeFireType.
Hold and Pressed are not good here, as they're not mutually exclusive. Best option is HoldWithActivationDelay.
Gameplay fixes
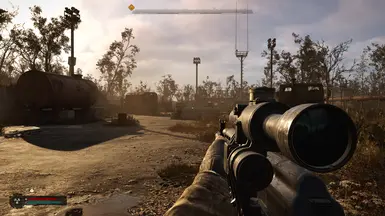
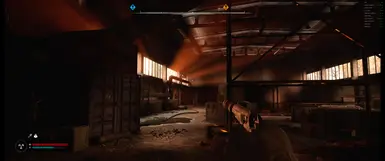
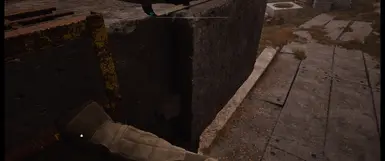
Vaulting height adjustment
Download VaultAdj_P file, unzip it and copy VaultAdj_P.pak to your [Path-To-Stalker2-Install-Folder]\Stalker2\Content\Paks\~mods (if ~mods doesn't exist - create it). The pak increases max vaulting height slightly to fix an issue with being unable to climb places which look like they're supposed to be climbable (see the video). The pak changes ObjPrototypes.cfg, so it's incompatible with anything that changes the same file.
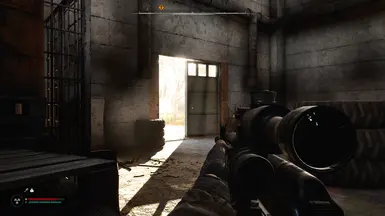
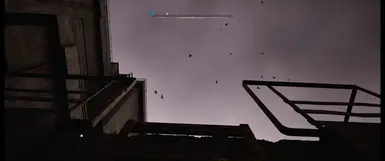
Climbing camera adjustment
Download ClimbCamAdj_P file, unzip it and copy ClimbCamAdj_P.pak to your [Path-To-Stalker2-Install-Folder]\Stalker2\Content\Paks\~mods (if ~mods doesn't exist - create it). The pak increases yaw and pitch limits to 90 deg for better view when climbing ladders (see the video). The pak changes CoreVariables.cfg, so it's incompatible with anything that changes the same file.
Ultrawide fixes
Remove the Engine.ini lines added by this fix and use a new one instead.
You will need to edit a file named CustomizeControls.cfg
This file is located in
%LOCALAPPDATA%\Stalker2\Saved\
or (which is the same)
C:\Users\[YOUR_WINDOWS_USER_NAME]\AppData\Local\Stalker2\Saved\
(YOUR_WINDOWS_USER_NAME is your actual user name in your system)
Find it and open it with regular windows Notepad (Notepad++ is better, if you have it).
Quit the game, make the edits (see the instructions below), save and close the file, launch the game to test the changes.
AZERTY ladder movement fix
In CustomizeControls.cfg find a line that contains this text:
Ladder =Delete it, so you've got an empty space in between Sleep = and NoInput = lines.
Open CustomizeControls.cfg.Ladder.part.txt from the mod's package.
Copy the full content of CustomizeControls.cfg.Ladder.part.txt and paste it to that empty space in between Sleep = and NoInput = lines.
If you have changed some of your bindings in-game before, then instead of Ladder = section you might see this:
Ladder : struct.begin
      here will be definitions of the keys you have customized before with in-game settings
struct.end
In this case, paste just the ascend/descent entries themselves and change [0] and [1] indexes accordingly, i.e. if you have entry [0] inside Ladder context already used by something else, then change indexes to [1] and [2].
Key = Z and Key = S can be changed to anything else, if you're no using AZERTY (nor QWERTY) and have issues moving up/down ladders.
AZERTY unarmed fix
Fixes a problem with unarmed action bound to Z in item selector wheel, so when you move, you always end up with no weapon.
In CustomizeControls.cfg find this line:
ItemSelector : struct.beginYou will see several entries there, most probably [0] will be for MoveForward, because you were changing it to Z.
Find the last one, for me it has index [2] and is for ItemSelector_Detector.
Copy the text from CustomizeControls.cfg.Unarmed.part.txt and paste it after your last entry. Be careful to respect struct.begin - struct.end pairs!
Make sure to change the new entry index which is [3] in my case to match your file: for example, if your last entry has index [8], then the entry for Unarmed will have index [9].
Flashlight rebind
Note: Flashlight-rebind.zip is not really necessary to download as the instructions below are enough, but you can still do it to increase this mod's visibility for the others and as a thank you to the author.
In CustomizeControls.cfg find these lines:
[29] : struct.begin
DefaultID = -1
bIsPlayerMappable = true
PlayerMappableOption = Flashlight
InputActionSID = IA_Flashlight
Key = None
OldKey = MiddleMouseButton
Triggers : struct.begin
[0] = EPlayerActionInputTrigger::Pressed
struct.end
struct.end
(note that index [29] might be different for you, but PlayerMappableOption = Flashlight and InputActionSID = IA_Flashlight are important as there are other definitions that are similar, but not the same).
If you can't find this entry, then paste the above text in between these lines:
PlayerMappings : struct.begin
None =
Exploration : struct.begin
here will be definitions of the keys you have customized before with in-game settings
paste the Flashlight entry at the end of those definitions
adjust the entry number [29] accordingly to the number of entries you have in your file:
for example, if the last one you have is [20], then Flashlight will be [21]
struct.end
Trade =
If instead of Exploration : struct.begin you see Exploration =, then change it to
Exploration : struct.begin
struct.end
It's quite simple and you can rebind it to anything else. For a ready to use example download the mod's package, unpack it and open CustomizeControls.cfg.Flashlight.part.txt.
The important part here is to choose a proper trigger condition. Possible conditions are:
EPlayerActionInputTrigger::HoldWithActivationDelay
EPlayerActionInputTrigger::Pressed
EPlayerActionInputTrigger::Tap
EPlayerActionInputTrigger::Hold
EPlayerActionInputTrigger::Down
In the example file I used Key = F and EPlayerActionInputTrigger::HoldWithActivationDelay. I also have F bound to my main interact action. As a result, I can interact with anything by tapping F and also turn my flashlight on and off by holding F (because I used activation with delay).
Melee rebind
Note: Melee-rebind.zip is not really necessary to download as the instructions below are enough, but you can still do it to increase this mod's visibility for the others and as a thank you to the author.
In CustomizeControls.cfg find these lines:
[9] : struct.begin
DefaultID = -1
bIsPlayerMappable = true
PlayerMappableOption = MeleeAttack
InputActionSID = IA_MeleeAttack
Key = None
OldKey = V
Triggers : struct.begin
[0] = EPlayerActionInputTrigger::Pressed
struct.end
struct.end
Note that index [9] might be different for you. If the line is missing, find Exploration : struct.begin, go to the end of the entries defined there, and add the entry for MeleeAttack manually. Make sure to adjust the entry index [9] to match the entries in your file, i.e. if your last entry in Exploration section has index [20], then MeleeAttack entry should have index [21].
Replace Key = None with any key you want, for example, MiddleMouseButton.
How to edit your keybindings - general instructions
Note: How-to-edit-your-keybindings.zip is not really necessary to download as the instructions below are enough, but you can still do it to increase this mod's visibility for the others and as a thank you to the author.
In CustomizeControls.cfg and search for a line you need - just read through the file or try to guess the naming and do a search. If it's not in the file, but you saw it in the menu - change it in-game and it will appear.
Important part to understand is the context the binding belongs to, for example, here:
Exploration : struct.begin
is the starting line for Exploration context. Journal, Aiming, etc, have their separate contexts.
Another very important part is Triggers entry: it defines activation conditions. Possible conditions are:
EPlayerActionInputTrigger::HoldWithActivationDelay
EPlayerActionInputTrigger::Pressed
EPlayerActionInputTrigger::Tap
EPlayerActionInputTrigger::Hold
EPlayerActionInputTrigger::Down
It is important to choose a proper condition, so you can have several actions bound to one key.
Here is an example:
[20] : struct.begin
DefaultID = -1
bIsPlayerMappable = true
PlayerMappableOption = ChangeFireType
InputActionSID = IA_ChangeFireType
Key = Up
OldKey = B
Triggers : struct.begin
[0] = EPlayerActionInputTrigger::HoldWithActivationDelay
struct.end
struct.end

[29] : struct.begin
DefaultID = -1
bIsPlayerMappable = true
PlayerMappableOption = ToggleHeldItem
InputActionSID = IA_InspectArtifactExit
Key = Up
OldKey = H
Triggers : struct.begin
[0] = EPlayerActionInputTrigger::Tap
struct.end
struct.end
I'm using the same key = Up to define two different actions: if I tap Up (entry 29 above), I toggle my weapons, if I long press Up (entry 20 above), I switch the fire type.
It is possible, because I used EPlayerActionInputTrigger::Tap for ToggleHeldItem and EPlayerActionInputTrigger::HoldWithActivationDelay for ChangeFireType.
Hold and Pressed are not good here, as they're not mutually exclusive. Best option is HoldWithActivationDelay.
Gameplay fixes
Vaulting height adjustment
Download VaultAdj_P file, unzip it and copy VaultAdj_P.pak to your [Path-To-Stalker2-Install-Folder]\Stalker2\Content\Paks\~mods (if ~mods doesn't exist - create it). The pak increases max vaulting height slightly to fix an issue with being unable to climb places which look like they're supposed to be climbable (see the video). The pak changes ObjPrototypes.cfg, so it's incompatible with anything that changes the same file.
Climbing camera adjustment
Download ClimbCamAdj_P file, unzip it and copy ClimbCamAdj_P.pak to your [Path-To-Stalker2-Install-Folder]\Stalker2\Content\Paks\~mods (if ~mods doesn't exist - create it). The pak increases yaw and pitch limits to 90 deg for better view when climbing ladders (see the video). The pak changes CoreVariables.cfg, so it's incompatible with anything that changes the same file.
Ultrawide fixes
Remove the Engine.ini lines added by this fix and use a new one instead.