


0 of 0

About this mod
Enhance and customize your game experience in various ways.
- Requirements
- Permissions and credits
- Changelogs
Read this at least:
- Use F1 to open the mod.
- Many people ask for specific features in YouTube comments or on abandoned mod pages that already exist here.
- Feel free to ask questions, propose new features, suggest reworks for existing ones, request UI changes, or even suggest improvements to the mod description for better readability and navigation if the information isn’t presented optimally.
For players who've beaten the game, need a bit of help, or want quality of life improvements.
Page Guide:
- Mod Features: Overview of all mod functionalities
- Installation: Detailed guide for installing the mod
- Mod Guide: Instructions for using most of the mod features
- Important: Tips for optimal mod usage
- Inner Workings: Insights on mod features from a coding perspective and my thoughts
- Q&A: Answers to frequently asked questions
- Bug Report: How to properly report bugs
- Community: Info for peoples and content creators
- TODO: Future Plans
- Support: For those who want to support my work
- Weapons and Accessories: Edit parameters (area, amount, etc.), level-ups, limit breaks
- PowerUps Editing
- Kills per Second Counter
- Caps: Set limits for weapon stats
- Eggs: Buy or remove
- Items: Add/remove and adjust count limits
- Trigger various game effects, spawn chests, gain XP and coins
- Adjust game speed, camera distance, effect transparency, and color
- Set priority for Auto Limit Breaks
- Quality of life options
- Item Wiki
- Bind actions to keys
- Microsoft Visual C++ 2015-2019 Redistributable 64 Bit
- .NET Desktop Runtime
2. Locate the Game's Installation Folder:
- Launch Steam and click on the "Library" tab at the top.
- Right-click on Vampire Survivors on the left side.
- Under "Manage," select "Browse local files."
3. Install MelonLoader:
- github - Releases - MelonLoader.Installer.exe
- Run MelonLoader.Installer.exe.
- Click the SELECT button.
- Select and Open the VampireSurvivors.exe in your Game's Installation Folder.
- Select which Version of MelonLoader to install using the Drop-Down List. (Select Latest Version)
- Click the INSTALL or RE-INSTALL button.
4. Run the Game:
- Launch the game. Note that the initial startup may take some time.
- Allow the game to load fully.
5. Install the Mod:
- Locate the "Mods" folder within the Game's Installation Folder.
- Place your mod file (the one you want to install) into this folder.
6. Play and Access the Mod:
- Start the game.
- To access your mod features, press F1 to open the ModMenu.
Vortex: If I understand correctly, Vortex now has VS support, but it requires an additional script download when you select the game in mod loader. There is also a Vortex download button on the mod page. However, steps 1-5 need to be completed regardless. I don't use this feature, so any Vortex-related questions should be directed to the script creator.
- The ModMenu(F1) appears differently in the main menu compared to during gameplay.
- The ModMenu has several pages. You can switch between them by pressing the icons located in the special zone to the left of the mod menu.
- To interact with any number fields, simply click on them and type an integer/decimal number or string, then press Enter.
- The mod saves most of its parameters, so you don't need to reapply them every time.
- Close the ModMenu(F1) to apply changes.
Main Menu:
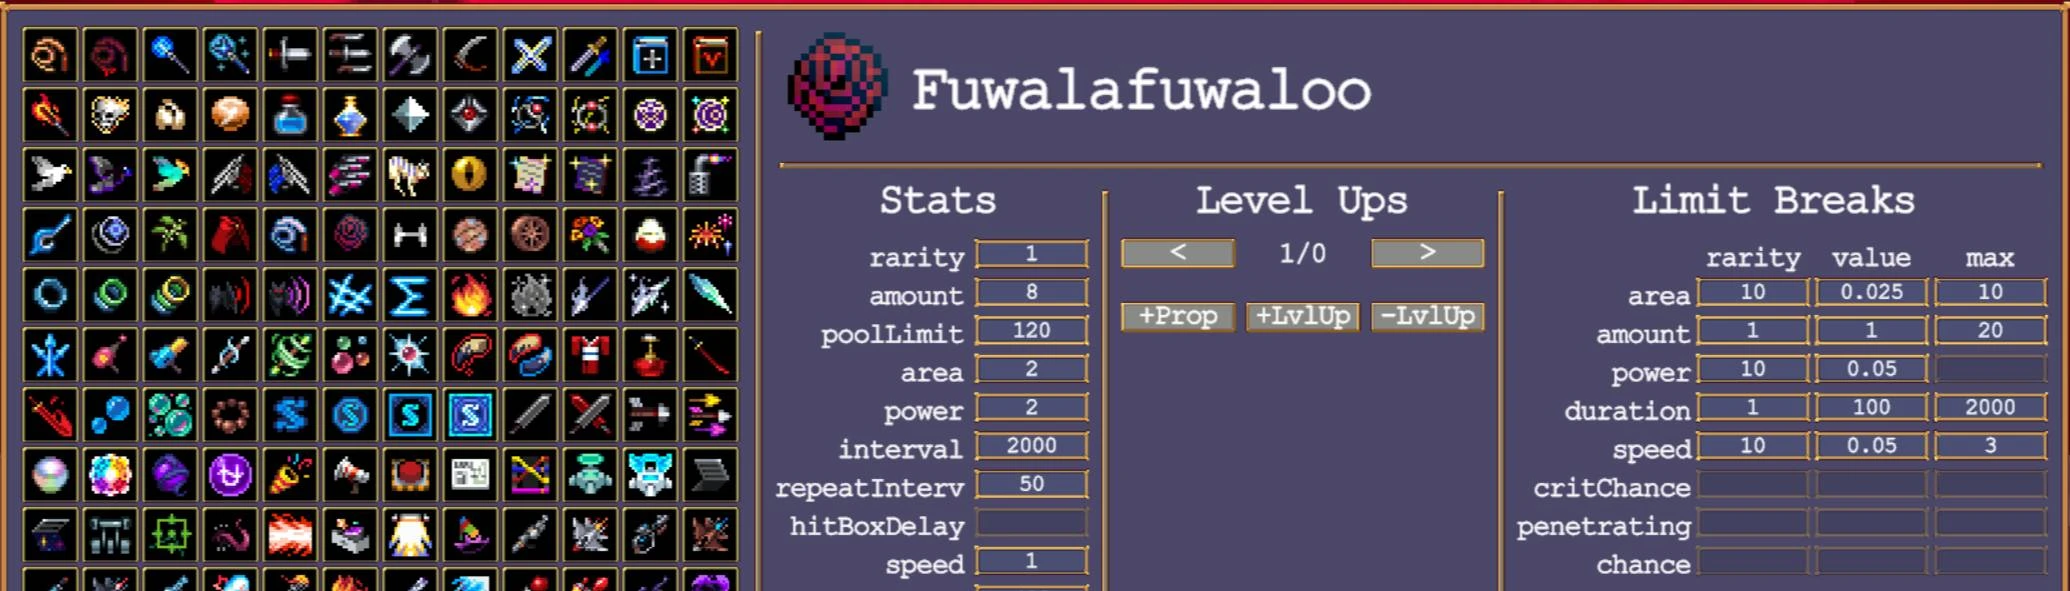
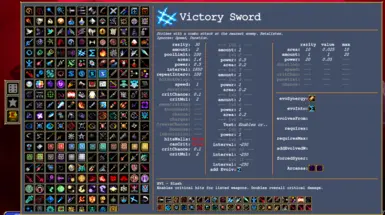
Page 1: Stats editing
To select a weapon, click on its icon. Some of the parameters:
- Rarity: determines the probability of the weapon appearing in level-up choices.
- Interval: refers to the cooldown time between shots when the weapon fires.
- Repeat Interval: Indicates the time between shooting projectiles during weapon fire
Use "Reset" to reverse changes in selected item. All data automatically saves to file when you quit the game. However, if you want to ensure that your changes is saved to a file, you can press "Seve To File".
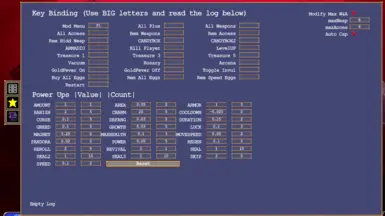
Page 2: Options
- Bind specific functions to keys. The success of these bindings can be tracked in the bottom log section. Google "Unity Scripting API: KeyCode".
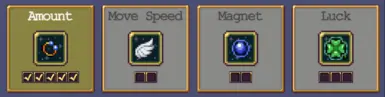
- Power Ups Editing. Applies to the Power Up game menu. Close the ModMenu to save changes, then open/reopen the Power Up menu to see them. Count is clamped to a 1-100 range.
- Add To Stat. Use this to add values to the listed stats. It’s an alternative to PowerUps, which don’t work with these stats. The "Charm" works after the first minute.
- To the right, you can set the count for Weapons and Accessories. These values only work if "Modify Max W&A" is enabled, but changes made in the ModMenu during gameplay will still apply. "Auto Cap" automatically adjusts stats caps; otherwise, use the "Do Caps" button to apply manually.
Page 3: Wiki
This page provides information about the game items.
Gameplay:
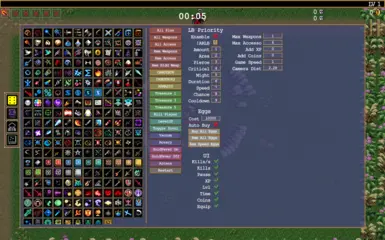
Page 1:
This page contains a bunch of different options and effects to trigger, as well as options to get or remove accessories.
To get a weapon or accessory, simply click on its icon. If the item already exists, clicking on it will remove it. It's important to note that removing an accessory does not undo any stats that were previously added by it.
Each button performs the action described on it. For example:
- All_Plus: grants all items (in-game debug option)
- ToggleInvul: toggles invulnerability.
- Hidden Weapon: refers to a hidden weapon that certain characters have from the start.
LB Priority: Lets you set priorities for automatic Limit Break selections based on the values below. This option doesn't affect the choices offered, only what is chosen when random Limit Break selection is enabled — a lower number means higher priority. "Cooldown" is included for completeness but isn't used by any weapons yet. !ARLB - inverts the current Auto (Random) Limit Break Selection game option.
Eggs: "Cost" - if the mod buy an egg its uses this price. All "Eggs" buttons works per currently playing character and applies changes immediately (you don't need reenter a stage). "Auto Eggs" automatically triggers "Buy All Eggs" every half second.
UI: Disable parts of UI. Not applied automatically if you don't selecting initial arcana.
Below the original kill counter, you now have an additional counter that tracks kills per second. You can hide it if you want.
Page 2: Wiki
This page provides information about the game items.
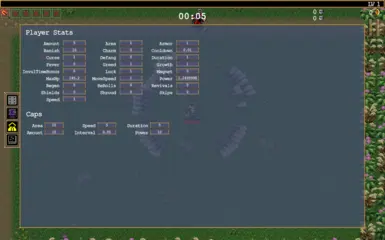
Page 3: Stats and Caps
You can edit player passive stats.
You can change limits for weapon stats, but you need to press the "Do Caps" button once per game launch to activate these fields. This action patches and replaces the weapon stats calculation function with a custom one. If you don't see the button, it's either already applied by pressing it, or "Auto Cap" is enabled, meaning the option is already applied. You can also check the console for the "-- Do Caps --" message.
During my tests, I didn't find any difference between the custom calculations and the original ones. However, if you don't need this feature, avoid using it.
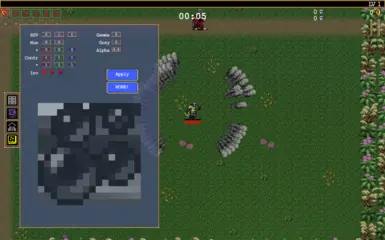
Page 4: Color Correction
You can adjust the transparency and correct the appearance of weapon effects. Some weapons work, but not all. In this case, try the "MORE!" button.
In short, you can view each image as a combination of three color channels: red, green, and blue. All options on this page allow you to edit the image or its channels separately. You may need to 'Google' for more information based on the details provided below.
- HSV: Hue, Saturation, Value
- Hue: Two another Hue shifts. Ranges from 0 to 360.
- + (Addition): Modifies color values by adding a specified amount.
- Contr: contrast.
- * (Multiply): Adjusts the gain of color values.
- Gamma: gamma.
- Grey: set 0 for Unity-style greyscale.
- inv (Inverse): Inverts color values.
- Alpha: transparency.
Changes take effect only after closing the Mod Menu window or pressing "Apply" button, but the preview image updates immediately after adjusting the fields.
Effects order: description order above.
Values with R,G,B colors allows editing per color channel, color represented in the range from 0 to 1.
The "MORE!" button allows you to pick up additional weapon sprites (even not intended). If you need this effect again, just press the button once more.
- Be Reasonable with Field Values: I don't clamp their range, so use sensible values.
- Avoid testing any strange edge cases: For example, pressing the 'START' button while the Mod Menu is open (in this case, changes won't be saved).
- Do not spam key-bound features: You will hardlock the game if you press a button for a menu that is already active but not yet resolved. For example, summoning the Arcana selection menu when you haven't chosen an Arcana in the current menu.
- In-Gameplay Usage of Mod Menu: It's recommended to use the ModMenu when no other menus are on the screen (e.g., level-up options). Simply close the ModMenu (F1) and reopen it when no other menus are visible.
- Item Removal: While most items remove correctly, be aware that some removals (like Sole Solution) may not behave as expected.
- Players cannot obtain items from DLCs they have not purchased.
- The mod dynamically creates an items list, and after game updates, there is a possibility of new weapons or accessories appearing that are not supposed to be in this list (its not about DLC items). For example, it could be a new power-up (like "Karoma's Mana"), a placeholder for a future weapon, or something akin to a "Candybox". To maintain accuracy, I manually add these new items to the mod filter. But their existence do no harm.
- Creating this mod took significant time and effort, and my courage has its limits. As a result, some decisions may appear unconventional or less polished.
Alpha and Color Correction: This has been quite a challenge. Initially, it was simpler, but shortly after the mod release, the VS developers set textures to not readable. Currently, I duplicate textures and use general methods to find and replace all sprites during gameplay (since you can’t replace the texture in a sprite, only create a new sprite with the desired texture). However, many weapons require individual adjustments.
Projectiles have different internal logics and field names (e.g., "trail," "Trail," "_trail," "_Trail1"). They might be created (pooled) and initialized when you get the weapon, after shooting, or be destroyed after a hit — even when pooled. Some create additional objects, consist of multiple parts, or are created in the character. Some can reinitialize after each shot, and certain sprites change every frame. Sprite and material colors can also be animated, constantly overwriting my changes. Then there are particle systems, trails, and other components with their own behaviors and issues. It’s not always clear where to even find a sprite.
Solution? I don’t know. Honestly, adding an alpha slider doesn’t seem hard for the developer (based on my UE5 knowledge and some Unity modding experience), but I could be wrong. On the other hand, game updates keep introducing more complex weapons, making it feel like it’s intentionally difficult (though I know it’s not). I could modify almost all weapons manually and apply changes every time a projectile fires, but that’s time-consuming. I’m aiming for a more elegant solution, even though "applying changes every time" might not be that performance-heavy. I’ve tried several approaches already, but they haven’t worked.
It’s funny to see comments in some videos using my mod saying things like "it’s sad that no one has made a mod for weapon transparency" (except for the kill counter). Yeah... funny.
Item Data: You might notice some new weapons have "-" for their name and description. For these weapons, the developer sets the name/description/tips to "-", pulling the data from the localization system instead. But why? Anyway, it’s not a problem, and I now use this localized data for partial mod localization, even if it’s not entirely straightforward.
Kills per Second: Updates every half second and shows the sum of the last two values.
Stats Cap: This is based purely on guesswork and testing. For example, all I have for damage calculation is the method’s name and its result. My formula is: WeaponPower * (CharacterPower * sine + SilentMight) + BloodlineDamage
It produces the same result as the original, but it’s all reverse-engineered.
Q: What about performance impact?
A: The performance impact is close to zero. Most of the mod's functions are called only when necessary, not every frame.
Q: After the game update, mod not working anymore.
A: Repeat installation steps 2-3
Q: Some weapon effects are not affected by color correction.
A: The mod doesn’t fully support this feature for all weapons.
Q: Problems with MelonLoader.Installer.exe.
A: Download MelonLoader.x64.zip, extract the zip file you just downloaded to the Game's Installation Folder.
1. Describe the Bug: Please provide a brief summary of the issue you're encountering. What seems to be going wrong?
2. Steps to Recreate the Bug: To help diagnose the problem, I'll need the exact steps you take to encounter the bug. Describe the clicks, key presses, and selections you make that lead to the issue.
3. Console Logs(Optional): When you run the game, the console will appear. You don't need to provide all the logs. Instead, look for a big red chunk of text or any other red indicators after the message indicating that the mod is loaded.
- I could create a helper mod for other modders that includes a ModMenu and allows adding pages to it. It could also help with creating UI elements, saving/loading data, or accessing certain game data. This would allow combining multiple mods into one menu and simplify parts of the modding process. But I’m not sure if it’s even something people would be interested in.
- Not sure if a Discord channel is necessary, but maybe later.
- You’re welcome to use my mod in your videos; just mention it in the description if you’d like to.
- If you have any questions or feature suggestions, feel free to leave a comment.
- Rewrite the code
- Look at Localizations
- Look at "not work in adventure mode"
- Change font
- Add more safety features
- coop slots
- "description text of weapons, upgrades etc"
- Look " if the game character's passives are editable or replicable", "characters"
- Transparency for all weapons
- "just a checkbox to make any weapons I spawn in be Unsealed"
My Patreon
- Use F1 to open the mod.
- Many people ask for specific features in YouTube comments or on abandoned mod pages that already exist here.
- Feel free to ask questions, propose new features, suggest reworks for existing ones, request UI changes, or even suggest improvements to the mod description for better readability and navigation if the information isn’t presented optimally.
For players who've beaten the game, need a bit of help, or want quality of life improvements.
Page Guide:
- Mod Features: Overview of all mod functionalities
- Installation: Detailed guide for installing the mod
- Mod Guide: Instructions for using most of the mod features
- Important: Tips for optimal mod usage
- Inner Workings: Insights on mod features from a coding perspective and my thoughts
- Q&A: Answers to frequently asked questions
- Bug Report: How to properly report bugs
- Community: Info for peoples and content creators
- TODO: Future Plans
- Support: For those who want to support my work
---------------------------------- Mod Features ----------------------------------
- Weapons and Accessories: Edit parameters (area, amount, etc.), level-ups, limit breaks
- PowerUps Editing
- Kills per Second Counter
- Caps: Set limits for weapon stats
- Eggs: Buy or remove
- Items: Add/remove and adjust count limits
- Trigger various game effects, spawn chests, gain XP and coins
- Adjust game speed, camera distance, effect transparency, and color
- Set priority for Auto Limit Breaks
- Quality of life options
- Item Wiki
- Bind actions to keys
---------------------------------- Installation ----------------------------------
1. If you don't have them already, please install the following libraries:- Microsoft Visual C++ 2015-2019 Redistributable 64 Bit
- .NET Desktop Runtime
2. Locate the Game's Installation Folder:
- Launch Steam and click on the "Library" tab at the top.
- Right-click on Vampire Survivors on the left side.
- Under "Manage," select "Browse local files."
3. Install MelonLoader:
- github - Releases - MelonLoader.Installer.exe
- Run MelonLoader.Installer.exe.
- Click the SELECT button.
- Select and Open the VampireSurvivors.exe in your Game's Installation Folder.
- Select which Version of MelonLoader to install using the Drop-Down List. (Select Latest Version)
- Click the INSTALL or RE-INSTALL button.
4. Run the Game:
- Launch the game. Note that the initial startup may take some time.
- Allow the game to load fully.
5. Install the Mod:
- Locate the "Mods" folder within the Game's Installation Folder.
- Place your mod file (the one you want to install) into this folder.
6. Play and Access the Mod:
- Start the game.
- To access your mod features, press F1 to open the ModMenu.
Vortex: If I understand correctly, Vortex now has VS support, but it requires an additional script download when you select the game in mod loader. There is also a Vortex download button on the mod page. However, steps 1-5 need to be completed regardless. I don't use this feature, so any Vortex-related questions should be directed to the script creator.
---------------------------------- Mod Guide ----------------------------------
- The ModMenu(F1) appears differently in the main menu compared to during gameplay.
- The ModMenu has several pages. You can switch between them by pressing the icons located in the special zone to the left of the mod menu.
- To interact with any number fields, simply click on them and type an integer/decimal number or string, then press Enter.
- The mod saves most of its parameters, so you don't need to reapply them every time.
- Close the ModMenu(F1) to apply changes.
Main Menu:
Page 1: Stats editing
To select a weapon, click on its icon. Some of the parameters:
- Rarity: determines the probability of the weapon appearing in level-up choices.
- Interval: refers to the cooldown time between shots when the weapon fires.
- Repeat Interval: Indicates the time between shooting projectiles during weapon fire
Use "Reset" to reverse changes in selected item. All data automatically saves to file when you quit the game. However, if you want to ensure that your changes is saved to a file, you can press "Seve To File".
Page 2: Options
- Bind specific functions to keys. The success of these bindings can be tracked in the bottom log section. Google "Unity Scripting API: KeyCode".
- Power Ups Editing. Applies to the Power Up game menu. Close the ModMenu to save changes, then open/reopen the Power Up menu to see them. Count is clamped to a 1-100 range.
- Add To Stat. Use this to add values to the listed stats. It’s an alternative to PowerUps, which don’t work with these stats. The "Charm" works after the first minute.
- To the right, you can set the count for Weapons and Accessories. These values only work if "Modify Max W&A" is enabled, but changes made in the ModMenu during gameplay will still apply. "Auto Cap" automatically adjusts stats caps; otherwise, use the "Do Caps" button to apply manually.
Page 3: Wiki
This page provides information about the game items.
Gameplay:
Page 1:
This page contains a bunch of different options and effects to trigger, as well as options to get or remove accessories.
To get a weapon or accessory, simply click on its icon. If the item already exists, clicking on it will remove it. It's important to note that removing an accessory does not undo any stats that were previously added by it.
Each button performs the action described on it. For example:
- All_Plus: grants all items (in-game debug option)
- ToggleInvul: toggles invulnerability.
- Hidden Weapon: refers to a hidden weapon that certain characters have from the start.
LB Priority: Lets you set priorities for automatic Limit Break selections based on the values below. This option doesn't affect the choices offered, only what is chosen when random Limit Break selection is enabled — a lower number means higher priority. "Cooldown" is included for completeness but isn't used by any weapons yet. !ARLB - inverts the current Auto (Random) Limit Break Selection game option.
Eggs: "Cost" - if the mod buy an egg its uses this price. All "Eggs" buttons works per currently playing character and applies changes immediately (you don't need reenter a stage). "Auto Eggs" automatically triggers "Buy All Eggs" every half second.
UI: Disable parts of UI. Not applied automatically if you don't selecting initial arcana.
Below the original kill counter, you now have an additional counter that tracks kills per second. You can hide it if you want.
Page 2: Wiki
This page provides information about the game items.
Page 3: Stats and Caps
You can edit player passive stats.
You can change limits for weapon stats, but you need to press the "Do Caps" button once per game launch to activate these fields. This action patches and replaces the weapon stats calculation function with a custom one. If you don't see the button, it's either already applied by pressing it, or "Auto Cap" is enabled, meaning the option is already applied. You can also check the console for the "-- Do Caps --" message.
During my tests, I didn't find any difference between the custom calculations and the original ones. However, if you don't need this feature, avoid using it.
Page 4: Color Correction
You can adjust the transparency and correct the appearance of weapon effects. Some weapons work, but not all. In this case, try the "MORE!" button.
In short, you can view each image as a combination of three color channels: red, green, and blue. All options on this page allow you to edit the image or its channels separately. You may need to 'Google' for more information based on the details provided below.
- HSV: Hue, Saturation, Value
- Hue: Two another Hue shifts. Ranges from 0 to 360.
- + (Addition): Modifies color values by adding a specified amount.
- Contr: contrast.
- * (Multiply): Adjusts the gain of color values.
- Gamma: gamma.
- Grey: set 0 for Unity-style greyscale.
- inv (Inverse): Inverts color values.
- Alpha: transparency.
Changes take effect only after closing the Mod Menu window or pressing "Apply" button, but the preview image updates immediately after adjusting the fields.
Effects order: description order above.
Values with R,G,B colors allows editing per color channel, color represented in the range from 0 to 1.
The "MORE!" button allows you to pick up additional weapon sprites (even not intended). If you need this effect again, just press the button once more.
---------------------------------- Important ----------------------------------
- Be Reasonable with Field Values: I don't clamp their range, so use sensible values.
- Avoid testing any strange edge cases: For example, pressing the 'START' button while the Mod Menu is open (in this case, changes won't be saved).
- Do not spam key-bound features: You will hardlock the game if you press a button for a menu that is already active but not yet resolved. For example, summoning the Arcana selection menu when you haven't chosen an Arcana in the current menu.
- In-Gameplay Usage of Mod Menu: It's recommended to use the ModMenu when no other menus are on the screen (e.g., level-up options). Simply close the ModMenu (F1) and reopen it when no other menus are visible.
- Item Removal: While most items remove correctly, be aware that some removals (like Sole Solution) may not behave as expected.
- Players cannot obtain items from DLCs they have not purchased.
- The mod dynamically creates an items list, and after game updates, there is a possibility of new weapons or accessories appearing that are not supposed to be in this list (its not about DLC items). For example, it could be a new power-up (like "Karoma's Mana"), a placeholder for a future weapon, or something akin to a "Candybox". To maintain accuracy, I manually add these new items to the mod filter. But their existence do no harm.
- Creating this mod took significant time and effort, and my courage has its limits. As a result, some decisions may appear unconventional or less polished.
---------------------------------- Inner Workings ----------------------------------
Alpha and Color Correction: This has been quite a challenge. Initially, it was simpler, but shortly after the mod release, the VS developers set textures to not readable. Currently, I duplicate textures and use general methods to find and replace all sprites during gameplay (since you can’t replace the texture in a sprite, only create a new sprite with the desired texture). However, many weapons require individual adjustments.
Projectiles have different internal logics and field names (e.g., "trail," "Trail," "_trail," "_Trail1"). They might be created (pooled) and initialized when you get the weapon, after shooting, or be destroyed after a hit — even when pooled. Some create additional objects, consist of multiple parts, or are created in the character. Some can reinitialize after each shot, and certain sprites change every frame. Sprite and material colors can also be animated, constantly overwriting my changes. Then there are particle systems, trails, and other components with their own behaviors and issues. It’s not always clear where to even find a sprite.
Solution? I don’t know. Honestly, adding an alpha slider doesn’t seem hard for the developer (based on my UE5 knowledge and some Unity modding experience), but I could be wrong. On the other hand, game updates keep introducing more complex weapons, making it feel like it’s intentionally difficult (though I know it’s not). I could modify almost all weapons manually and apply changes every time a projectile fires, but that’s time-consuming. I’m aiming for a more elegant solution, even though "applying changes every time" might not be that performance-heavy. I’ve tried several approaches already, but they haven’t worked.
It’s funny to see comments in some videos using my mod saying things like "it’s sad that no one has made a mod for weapon transparency" (except for the kill counter). Yeah... funny.
Item Data: You might notice some new weapons have "-" for their name and description. For these weapons, the developer sets the name/description/tips to "-", pulling the data from the localization system instead. But why? Anyway, it’s not a problem, and I now use this localized data for partial mod localization, even if it’s not entirely straightforward.
Kills per Second: Updates every half second and shows the sum of the last two values.
Stats Cap: This is based purely on guesswork and testing. For example, all I have for damage calculation is the method’s name and its result. My formula is: WeaponPower * (CharacterPower * sine + SilentMight) + BloodlineDamage
It produces the same result as the original, but it’s all reverse-engineered.
---------------------------------- Q&A ----------------------------------
Q: What about performance impact?
A: The performance impact is close to zero. Most of the mod's functions are called only when necessary, not every frame.
Q: After the game update, mod not working anymore.
A: Repeat installation steps 2-3
Q: Some weapon effects are not affected by color correction.
A: The mod doesn’t fully support this feature for all weapons.
Q: Problems with MelonLoader.Installer.exe.
A: Download MelonLoader.x64.zip, extract the zip file you just downloaded to the Game's Installation Folder.
---------------------------------- Bug report ----------------------------------
1. Describe the Bug: Please provide a brief summary of the issue you're encountering. What seems to be going wrong?
2. Steps to Recreate the Bug: To help diagnose the problem, I'll need the exact steps you take to encounter the bug. Describe the clicks, key presses, and selections you make that lead to the issue.
3. Console Logs(Optional): When you run the game, the console will appear. You don't need to provide all the logs. Instead, look for a big red chunk of text or any other red indicators after the message indicating that the mod is loaded.
---------------------------------- Community ----------------------------------
- The main problem with the mod is that people don’t read the 'Brief Overview' or 'Mod Features' sections and then get disappointed (e.g., on YouTube) because the mod doesn’t include features like camera distance adjustment, game speed control, or sprite transparency editing. My goal is not to split the mod into several pieces, where instead of 'VSTweaks,' you would have 'Transparency Edit' and so on. However, it's a really weird situation right now.- I could create a helper mod for other modders that includes a ModMenu and allows adding pages to it. It could also help with creating UI elements, saving/loading data, or accessing certain game data. This would allow combining multiple mods into one menu and simplify parts of the modding process. But I’m not sure if it’s even something people would be interested in.
- Not sure if a Discord channel is necessary, but maybe later.
- You’re welcome to use my mod in your videos; just mention it in the description if you’d like to.
- If you have any questions or feature suggestions, feel free to leave a comment.
---------------------------------- TODO ----------------------------------
- Rewrite the code
- Look at Localizations
- Look at "not work in adventure mode"
- Change font
- Add more safety features
- coop slots
- "description text of weapons, upgrades etc"
- Look " if the game character's passives are editable or replicable", "characters"
- Transparency for all weapons
- "just a checkbox to make any weapons I spawn in be Unsealed"
---------------------------------- SUPPORT ----------------------------------
My Patreon