


0 of 0
")

")

About this mod
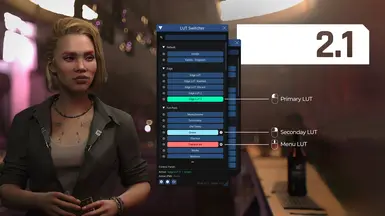
Realtime LUT switching! Features LUT blind comparison mode, custom packs, categories, favorites, and hotkeys to toggle active LUTs!
- Requirements
- Permissions and credits
-
Translations
- Russian
- Changelogs
- Donations

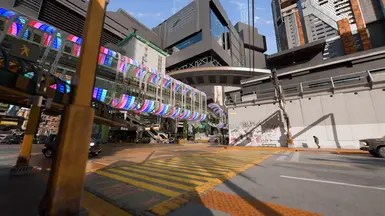
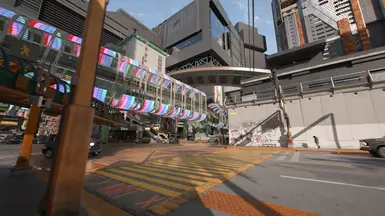
Switch LUTs in realtime with this CET mod. Features LUT pack support, collapsible categories, favorite lists, and CET hotkey to toggle active LUTs. Supports both SDR and HDR LUTs (only if included).
Active LUTs are saved and reapplied upon reloading.
This mod was originally created to help users compare LUTs for downloading to use in their games and soon advanced to saving active previews and replacing the need for LUT downloads altogether. No longer will you need to relaunch the game in order to switch things up; click away anytime!

FAQs:
- Do I need to uninstall my LUT mods first? No.
- Why don't I see any LUTs listed in the GUI? You need to download the LUT packs from the optional files tab.
- Why do some quests and events disable LUTs? Because the effect is being overridden by something in game. Report it to me with a game save.
- Where do I find ___ LUT from mod author ____? If you don't see a LUT Switcher pack listed on this page or another LUT page, you must request LUT Switcher support from the mod author use use the WolvenKit tutorial to add it to your own pack.
- How do I access LUT Switcher? Install CET and read how to use it. You access LUT Switcher using the CET key bind.
- I still don't see the menu! You failed to install all the files in the correct location or are missing required files.
- Why is my screen flickering when I apply a LUT? Some locations override LUTs and some mods apply their own effects which cause z-fighting.

Installation:
Use Vortex (recommended) or manually install by just dragging and dropping the contents of the zip to the Cyberpunk 2077 root folder.
- For GOG it should be something like "C:\Games\Cyberpunk 2077\[it goes here]
- For Steam it should be something like "C:\Games\Steam\steamapps\common\Cyberpunk 2077\[it goes here]
Making a LUT Pack:
Download the WolvenKit project template in the misc file section. Extract the folder to your PC and open the WolvenKit project file.
You will see three main groups of files, the name_of_lut.effect files in the custom folder, name_of_lut.xbm files in the rename_this folder, and the rename_this.json. Here is an image of the project template.
Start by renaming the name_of_lut.effect files to the name of the LUT. Then rename the rename_this folder containing the name_of_lut.xbm files. Then rename the rename_this.json file found under the resources folder.
Replace name_of_lut.xbm (and the HDR variant) with your own custom LUTs (make sure to name them). Open the .effect file in your project explorer panel found in base/fx/lutswitcher/custom, expand events, expand 0, and then expand both lutParams and lutParamsHdr. Right click your custom LUT .xbm file in your project explorer panel and 'Copy relative path to game file' then paste that into the .effect file under the lutParam > LUT path. Do the same for the HDR version. Save the effect file.
Open the .json file in the resources folder and read the commented lines. If you only have one pack, delete the "CustomPack2" entry. If you only have one LUT, remove the second LUT from the first pack. Rename your pack, LUT Name, and replace name_of_lut.effect with the name of your LUT effect found in the base/fx/lutswitcher/custom folder.
Open the _template.json file to see an example of the new 2.0 pack format. Delete all comments and save the json file with your own pack name. Make sure the location path uses double backslashes (\\).
New 2.0 pack format template:
{
    "CustomPack1": {
        "packTooltip": "Optional tooltip for CustomPack1",
        "effects": [
            {
                "name": "LUTName",
                "location": "base\\fx\\lutswitcher\\custom\\name_of_lut.effect",
                "tooltip": "Optional tooltip for LUTName"
            },
            {
                "name": "LUTName2",
                "location": "base\\fx\\lutswitcher\\custom\\name_of_lut.effect"
                // "tooltip": "Optional tooltip for LUTName2" //optional tooltip for the LUT
            }
            //add more custom effects here
        ]
    },
    "CustomPack2": {
        "packTooltip": "Optional tooltip for CustomPack2", //optional tooltip for the pack
        "effects": [
            {
                "name": "LUTName",
                "location": "base\\fx\\lutswitcher\\custom\\name_of_lut.effect",
                "tooltip": "Optional tooltip for LUTName"
            },
            {
                "name": "LUTName2",
                "location": "base\\fx\\lutswitcher\\custom\\name_of_lut.effect"
                // "tooltip": "Optional tooltip for LUTName2"
            }
            //add more custom effects here
        ]
    }
    //add more custom effects here
}
When you're done, your project should look something like this:

Click Build > Pack Project to get a .zip of your mod to share or simply click install mod to install it to your game.

LUT Switcher 2 - Comparison Mode (2.3)
Overview
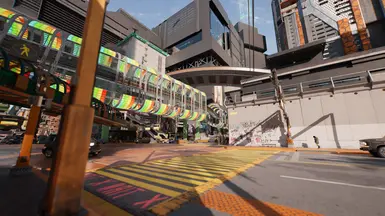
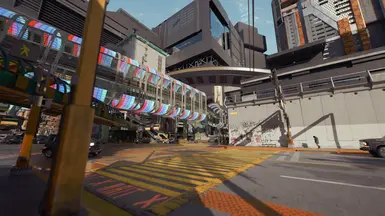
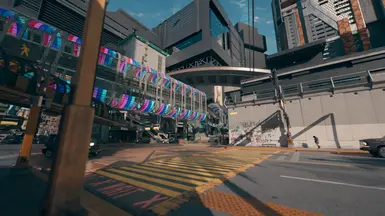
The Comparison Mode in LUT Switcher 2 allows you to blindly compare two LUTs side by side and select your favorite. This mode helps you to determine the best LUTs for your game by rating them through a series of comparisons.
The Importance of Blind Comparisons
Blind comparisons are crucial for ensuring unbiased and accurate evaluations of LUTs. By comparing LUTs without knowing which one you are currently viewing, you can focus solely on the visual impact and quality rather than being influenced by preconceived notions or preferences. This approach allows you to make more objective decisions, leading to a more accurate ranking of LUTs based on their true performance. Additionally, blind comparisons help to eliminate any potential bias that might arise from familiarity with certain LUTs, ensuring that all LUTs are judged fairly.
Recommendations for Rating LUTs in Various Locations, Time of Day, and Weather States
To achieve the most accurate and comprehensive results when rating LUTs, it is important to consider various environmental factors. Here are some recommendations for effective rating:
- Different Locations: Test LUTs in a variety of locations to ensure they perform well in different settings. This includes urban areas, natural landscapes, indoor environments, and more. By evaluating LUTs in diverse locations, you can determine their versatility and adaptability.
- Time of Day: Rate LUTs at different times of the day, such as morning, afternoon, evening, and night. Lighting conditions change throughout the day, and evaluating LUTs under different lighting scenarios helps you to identify those that consistently deliver high-quality visuals.
- Weather States: Consider the impact of various weather conditions, such as sunny, cloudy, rainy, and snowy environments. Different weather states can affect the appearance of your game, and testing LUTs under these conditions ensures that they maintain their effectiveness regardless of the weather.
By following these recommendations and incorporating blind comparisons, you can ensure that your ratings of LUTs are thorough, unbiased, and reflective of their true performance in a wide range of environments... but, most importantly, which LUTs you prefer for the look of your game.
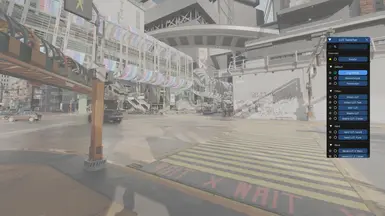
How to Use Comparison Mode
Enabling Comparison Mode
1. Select LUT Packs for Comparison:
- Open the LUT Switcher GUI.
- Navigate to the "Packs" section.
- Enable the packs you wish to include in the comparison mode by checking the corresponding checkboxes.
2. Start Comparison Mode:
- Use the hotkey assigned to "Start/Stop Comparison" (set in CET bindings) to start the comparison mode.
- The comparison mode window will appear at the bottom of the screen, displaying the current status and progress.
Comparing LUTs
1. Toggle Between LUTs:
- Use the hotkey assigned to "Toggle Comparison Effect" to switch between the two randomly selected LUTs (LUT A and LUT B).
- The active LUT will be indicated by an on-screen label (A or B).
2. Select Your Favorite LUT:
- Use the hotkey assigned to "Select Favorite Effect A" to select LUT A as your favorite.
- Use the hotkey assigned to "Select Favorite Effect B" to select LUT B as your favorite.
- The next two randomly selected LUTs will be displayed automatically for comparison.
Exiting Comparison Mode
- Use the hotkey assigned to "Start/Stop Comparison" again to exit the comparison mode.
- The previously active LUT will be restored, and your ratings will be saved.
Settings and Customization
Comparison Mode Settings
- Selected Packs: Choose which LUT packs to include in the comparison mode.
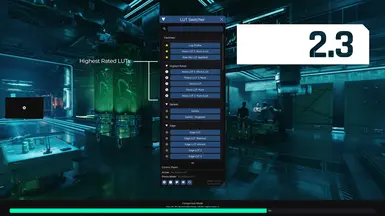
- Highest Rated LUTs Count: Set the number of highest-rated LUTs to be displayed (between 3 and 10).
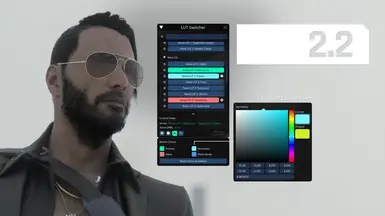
- Comparison Window Colors: Customize the colors of the comparison window, text, and progress bar.
Backup Settings
- Enable Backups: Enable or disable user score backups from comparison mode.
- Max User Backups: Set the number of user backups to save (between 1 and 20).
Tips for Effective Comparisons
- Select Relevant Packs: Exclude packs like the Utility or Fun Pack to focus on the LUTs you want to compare.
- Complete Recommended Ratings: The recommended number of ratings is based on the total LUTs being compared. Completing the minimum recommended ratings ensures accurate rankings.
- Check Highest Rated LUTs: Once you have rated enough LUTs, the "Highest Rated" category will be populated and ranked from 1-10 based on total score.
Example Workflow
- Preparation:
- Enable the desired LUT packs for comparison.
- Ensure you have set the hotkeys for starting/stopping comparison mode and toggling/selecting LUTs.
- Enable the desired LUT packs for comparison.
- Comparison Session:
- Start the comparison mode using the hotkey.
- Toggle between LUT A and LUT B using the hotkey.
- Select your favorite LUT using the hotkey.
- Repeat the process until you have completed the recommended number of ratings.
- Start the comparison mode using the hotkey.
- Review Results:
- Check the "Highest Rated" category in the LUT Switcher GUI to see the top-rated LUTs based on your comparisons.
- Check the "Highest Rated" category in the LUT Switcher GUI to see the top-rated LUTs based on your comparisons.
Conclusion
The Comparison Mode in LUT Switcher 2 is a powerful tool for finding the best LUTs for your gaming experience by removing indecision and extracting your inner preference. By following the steps outlined in this documentation, you can effectively compare and rate LUTs to enhance your gaming experience.
-----------------
Other Packs:
Compatibility:
This mod has no known compatibility issues.
Known Issues:
- Some effects in game may override the active LUT (ie. falling from a high place). I will add fixes as they're discovered and can be downloaded in the update files section.
Thanks:
Big shoutout to Val for leading me down this path and inspiring LUT Switcher! Thank you to null, sosuine, and Val for testing and another thank you to TheManualEnhancer for adding CET hotkey functionality. Thank you to Sevenence and Stormie for beta testing version 2.0! And last, by certainly not least, thank you to Freakaz for helping me with the GUI layout and addition of glyph icons!
Future Plans:
2.0:
Add a secondary LUT select to be used when player enters menus.(DONE)Remove the check mark glyph in place of an active button appearance.(DONE)LUT switching in photo mode.(DONE)Shadow boost, color boost, and other tweaks to modify base LUTs instead of overriding altogether.(DONE)- Allow more than two LUTs to be selected in queue and cycle between them all with hotkey.
- Automatically apply specific LUTs during specific weather states and times of day.
- Link LUTs to game events (ie. reduced highlights effect when driving in first person).
3.0: