


0 of 0
Documentation
Readme
View as plain text
# Cyberpunk 2077 Input Loader
This plugin looks for all `r6/input/*.xml` files and merges them with the appropriate input config file from `r6/config/` and saves results to `r6/cache/`. A configuration file is written to `engine/config/platform/pc/input_loader.ini`, which tells the game to load the merged .xml files.
## Usage
1. Install [RED4ext](https://github.com/WopsS/RED4ext)
2. Install Input Loader using the [latest release](https://github.com/jackhumbert/cyberpunk2077-input-loader/releases/latest), at `red4ext/plugins/`
3. Place a mod's custom .xml file in `r6/input/`
4. Start the game
A log file will be written to `red4ext/logs/input_loader.log` every start-up, if you're having problems.
## Node type
Only children of `<bindings>` are supported currently, but they can all be in the same .xml file (to encourage a mod to have a single .xml file). Depending on the node type, the block will be added to the new `inputContexts.xml` or `inputUserMappings.xml` automatically:
inputUserMappings.xml:
* mapping
* buttonGroup
* pairedAxes
* preset
inputContexts.xml:
* blend
* context
* hold
* multitap
* repeat
* toggle
* acceptedEvents
## Node attributes
You can add `append="true"` to a node to avoid overwriting. This is the recommeneded method for adding functionality, as multiple mods will be able to do this without conflicts. See below for an example.
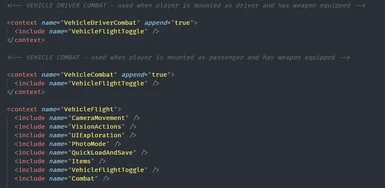
## Example .xml file
```xml
<?xml version="1.0"?>
<bindings>
<!-- Defines a custom context with a custom Action, mapped to UseConsumable_Button -->
<context name="MyCustomContext" >
<action name="ShakeAroundABit" map="UseConsumable_Button" />
</context>
<!-- Adds the custom context to VehicleDrive without overwriting existing definitions -->
<context name="VehicleDrive" append="true">
<include name="MyCustomContext" />
</context>
</bindings>
```